Ruby on Rails step by step. # 2 Workplace and first application
This time we will deploy the “polygon” of the RoR developer, talk about the
Installing a working kit for
Download
However, when loading the kit, you most likely noticed that its latest version dates back to the end of the year before last, so we need to update the components. First of all, the RoR framework is outdated - we will undertake to update it. How to do it?
All add-ons, libraries and programs for Ruby are in the global Ruby Application Archive (RAA) repository, which already contains more than 1,700 projects. For installation (both remotely and locally) and control of these add-ons, the
I think that everything is intuitive and explain what, how and why, it is not necessary. Then we wait until all components are downloaded and installed (documentation is created for a long time, but we have no hurry).
')
If you like to take everything under control or you already have MySQL installed, then you can use the manual deployment of the environment. It's not hard, let's start with Ruby 's offsite and download the
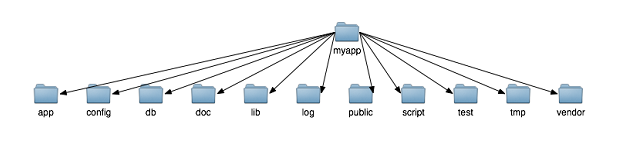
As we have said, RoR must follow certain agreements. One of them - the application on RoR always has a strict folder structure. Here is its first level:
But do not rush to create folders - as usual, RoR does the routine work for us.
When installing RoR, the

As you can see, the server settled on port
That's the first "demo" we already have. Then again we will return and delve into the theory - I will talk about the features of RoR, like the Ruby framework, the YAP with the possibility of meta-programming, learn about the REST principles and begin to design our multiplayer blog. I would also like to know your opinion about the issues of the lessons in the form of screencasts or presentations. Waiting for comments!
gem , generate and launch the first application.Instant rails
Installing a working kit for
Windows as simple as possible, and all because one generous programmer named Kurt Hibs has already assembled everything we need to develop RoR applications in one package called Instant Rails . Packages collected:- Ruby interpreter
SQLiteandMySQLdatabase enginesApacheweb server (which, in fact, we do not need ...)- and Rails themselves
Download
Instant Rails (IR) from the official site , unpack the contents of the archive into any folder (better if located closer to the root of the disk, and there should be no spaces in the way, I recommend C:\ruby ). There are about 18,000 files in the archive, so you have to wait a bit. After we run InstantRails.exe and click SQLite as the database. Thank you, Kurt, for your efforts, but we stop the Apache and muscle and close all this stuff.However, when loading the kit, you most likely noticed that its latest version dates back to the end of the year before last, so we need to update the components. First of all, the RoR framework is outdated - we will undertake to update it. How to do it?
gem comes to the rescue.gem
All add-ons, libraries and programs for Ruby are in the global Ruby Application Archive (RAA) repository, which already contains more than 1,700 projects. For installation (both remotely and locally) and control of these add-ons, the
gem program is used. Welcome to the console (Start-> All Programs-> Run-> enter cmd > OK). In it, go to the folder with IR ( cd c:/ruby ) and run use_ruby ( use_ruby.bat ) - this bat file will assign us the necessary paths in the PATH, which will make working with RoR even more convenient, which will make working with RoR even more convenient. We will always work only through use_ruby.bat , so do not forget to run it. Command: gem list and see a list of all installed "jams". The gem update command should gem update us all, but this will not happen because the update system is already outdated, leaving no backward compatibility. Therefore, the order of the commands is this (in order not to be confused, we will immediately remove the old versions of the jam):gem install rubygems-updateupdate_rubygemsgem uninstall rails activerecord activeresource activesupport actionpack actionmailergem install rails --include-dependencies
I think that everything is intuitive and explain what, how and why, it is not necessary. Then we wait until all components are downloaded and installed (documentation is created for a long time, but we have no hurry).
')
Installation from scratch
If you like to take everything under control or you already have MySQL installed, then you can use the manual deployment of the environment. It's not hard, let's start with Ruby 's offsite and download the
Ruby 1.8.6 One-Click Installer package - it contains additional libraries under Windows, install everything by default. Then go to Start - Ruby-186-xx - Ruby Gems - Ruby Gems package manager and here, as described above, we install the necessary jams (rails - include-dependencies, mysql, mongrel).Application structure
As we have said, RoR must follow certain agreements. One of them - the application on RoR always has a strict folder structure. Here is its first level:
But do not rush to create folders - as usual, RoR does the routine work for us.
Test application
When installing RoR, the
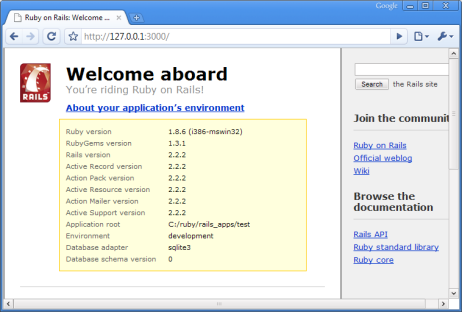
rails application was also installed, which will generate a folder structure for the application and create basic code files. We still have to have the “rail console” open, with an invitation in the rails_apps folder (there will be applications in it). We will create a test application, command: rails test . We are waiting for the end of the generation. As you can see, a separate folder was created in which the above structure was placed. Next time we will find out what each folder is for, but for now just run the Mongrel web server to see the result. In the console, go to the folder with the application ( cd test ) and specify: ruby script/server . As a result, Mongrel will be launched:As you can see, the server settled on port
3000 . Well, open the browser and go tohttp://127.0.0.1天000/- and here we are waiting for a test page with a greeting. Yes, you already ride on the tracks with Ruby;) By clicking on
“About your application's environment” , you will know the parameters of your environment:Epilogue
That's the first "demo" we already have. Then again we will return and delve into the theory - I will talk about the features of RoR, like the Ruby framework, the YAP with the possibility of meta-programming, learn about the REST principles and begin to design our multiplayer blog. I would also like to know your opinion about the issues of the lessons in the form of screencasts or presentations. Waiting for comments!
Source: https://habr.com/ru/post/50085/
All Articles