"Iron tuning" Asus WL-520GC
I decided to share my esteemed upgrade experience for ASUS WL-520gc router with a respected habrosocompany.
I will not write a long introduction, about what the USB port in the router is for, why it is not in the ASUS WL-520gc, but there is in the ASUS WL-520gu, and immediately get down to the heart of the matter :)
First you need to unplug all the connected cables and the antenna, then proceed to disassemble the router case, with this I had a little trouble first, namely, I could not find the screw that prevented the case from opening, after unscrewing the 2 visible, immediately I will tell you not to tear off all the stickers in a row - the missing screws are arranged symmetrically under the rubber stickers :)
after disassembling, we see next to the power connector our goal — not to plug the USB port ;-)
Here, as they say, a matter of taste and habit. I experienced two versions of firmware: DD-WRT and firmware from Oleg.
Briefly explain the meaning:
After completing the firmware, the router will boot with mega firmware ...
Installing the package is porobno painted here all the necessary images of the firmware to take here
This option is more difficult, in terms of what will have to manually assemble the firmware for this model of the router. We will do it easier, take the finished one ;-)
After the reboot, the router will please us with a “full” version of the firmware from Oleg with the option of installing packages.
I myself personally now use the second option, since the difference in speed is quite noticeable, and not in favor of DD-WRT.
As a result, we have a functional like Asus WL-520GU for less money (I got this device for about 1500 rubles during the promotion)
')
Funny pictures:
Thank you very much for the invaluable help of the distinguished lightix from the forum dd-wrt.com , in fact, he is the author of this method, I just gathered everything in a heap and streamlined.
I will not write a long introduction, about what the USB port in the router is for, why it is not in the ASUS WL-520gc, but there is in the ASUS WL-520gu, and immediately get down to the heart of the matter :)
What we need:
- 1. IC chip voltage regulator KREN5A, KREN5B (not tested) or analogues
- 2. USB Extender
- 3. Soldering iron with a thin sting
Let's start ....
First you need to unplug all the connected cables and the antenna, then proceed to disassemble the router case, with this I had a little trouble first, namely, I could not find the screw that prevented the case from opening, after unscrewing the 2 visible, immediately I will tell you not to tear off all the stickers in a row - the missing screws are arranged symmetrically under the rubber stickers :)
after disassembling, we see next to the power connector our goal — not to plug the USB port ;-)
"Iron" part
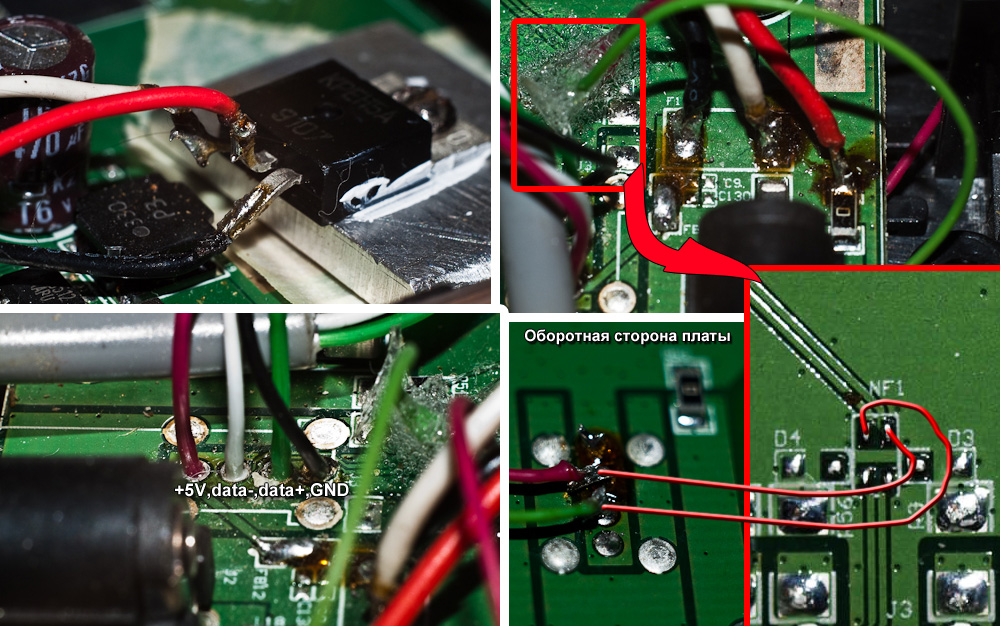
- 1. We close the gap on the data line, on the board is designated as NF1 (you can make jumpers, but my soldering iron did not allow it, so I brought the wires to the back side of the board)
- 2. Put the jumper instead of the element FB12
- 3. Solder the KREN chip in accordance with Image 1
- 4. We make a hole on the back of the router case (between the Ethernet ports and the power supply socket) with a diameter equal to the thickness of the USB extension cable.
- 5. We cut off from the USB extender the part on which the port is located, 15-20 cm long (a matter of taste, for whom it is more convenient)
- 6. Expose the wires, push the cable through the hole, solder to the board, in accordance with the USB pinout (see Picture 1 )
Software part
Here, as they say, a matter of taste and habit. I experienced two versions of firmware: DD-WRT and firmware from Oleg.
DD-WRT
Briefly explain the meaning:
- 1. The DD-WRT firmware for Asus WL-520GC (micro-plus_ssh) is taken, the packages that are not needed to boot the router are removed from it (to make room for the USB driver) and the drivers for the USB and ext2 file system are added.
- 2. From the resulting rootfs / sbin folder after unpacking, the init file is moved to the rootfs / usr / sbin folder, a new init file is created, which is a script:
#!/bin/sh
if [ $1 == "noinitrd" ] ; then
insmod /lib/modules/`uname -r`/usbcore.o
insmod /lib/modules/`uname -r`/usb-uhci.o
insmod /lib/modules/`uname -r`/usb-ohci.o
insmod /lib/modules/`uname -r`/ehci-hcd.o
insmod /lib/modules/`uname -r`/scsi_mod.o
insmod /lib/modules/`uname -r`/sd_mod.o
insmod /lib/modules/`uname -r`/usb-storage.o
insmod /lib/modules/`uname -r`/ext2.o
sleep 8s
mount -t proc none /proc
mount -t ext2 -o noatime,nodiratime /dev/scsi/host0/bus0/target0/lun0/part1 /mnt
if [ -x /mnt/sbin/init ] ; then
mount -o move /proc /mnt/proc && \
pivot_root /mnt /mnt/mnt && {
mount -o move /mnt/dev /dev
mount -o move /mnt/tmp /tmp
mount -o move /mnt/jffs /jffs
exec /sbin/init $*
}

else
exec /usr/sbin/init $*
fi
else
exec /usr/sbin/init $*
fi- 3. Making the script executable, with the help of a modkit, the firmware is back packaged in a * .bin file.
- 4. The contents of the rootfs mega folder of the firmware, obtained after unpacking it with the help of a modkit, is poured onto the prefiltered ext2 formatted USB stick .
- 5. Connect the flash drive to the router, sew the image obtained in the 3rd paragraph
After completing the firmware, the router will boot with mega firmware ...
Installing the package is porobno painted here all the necessary images of the firmware to take here
Firmware from Oleg
This option is more difficult, in terms of what will have to manually assemble the firmware for this model of the router. We will do it easier, take the finished one ;-)
- 1. Download the firmware
- 2. Download file system for flash drive
- 3. On the formatted in ext3 partition of the flash drive, unpack the archive with the file system
- 4. Connect the USB flash drive, flash the router.
- 5. After flashing and rebooting the router, connect to it via telnet (user / password is admin / admin) and give the command
nvram set boot_dev="/dev/scsi/host0/bus0/target0/lun0/part1"
nvram commit- 6. Reboot
After the reboot, the router will please us with a “full” version of the firmware from Oleg with the option of installing packages.
I myself personally now use the second option, since the difference in speed is quite noticeable, and not in favor of DD-WRT.
As a result, we have a functional like Asus WL-520GU for less money (I got this device for about 1500 rubles during the promotion)
')
Funny pictures:
Thank you very much for the invaluable help of the distinguished lightix from the forum dd-wrt.com , in fact, he is the author of this method, I just gathered everything in a heap and streamlined.
Source: https://habr.com/ru/post/49331/
All Articles