All the "secrets" of Windows 7
By popular demand - translation of the article "The Bumper List of Windows 7 Secrets".
Here, the introduction is missed on how great it is that Windows 7 has come out, which all the same will miss and will read the “secrets” themselves.
You probably already know that Windows 7 makes working with windows much easier. The window can be “attached” to the left or right half of the screen simply by sliding it to the corresponding edge, and also the window can be maximized / restored vertically by double clicking on the lower border of the window. But what you probably do not know is that all these actions are available through hotkeys.
Are you already tired of the torment with a specific driver in order to get your laptop to display the desktop on the projector? In this case, you will be happy to know that working with the projector is much easier in Win 7. The combination Win + P draws the following window to light:
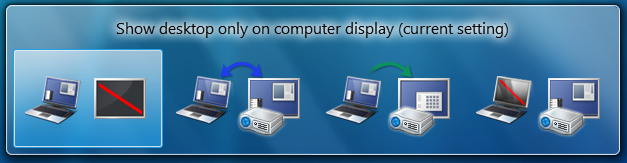
By pressing the arrows or repeating the combination Win + P, you can switch to the “clone”, “expand desktop” [external device] or “external device only” modes. This can also be done through the displayswitch.exe application.
')
If you want wider control, you can get it through the Mobility Center (Win + X), which allows you to turn on presentation mode, during which clients of messages switch to “do not disturb” mode, screen savers are turned off, neutral wallpapers are installed, etc. d. (ps Mobility Center is also in Windows Vista)
In the original article, it is written as “a fashionable option to eliminate rear noise,” in fact, is a combination of keys Win + Home , which minimizes / restores all windows except the active one.
Previous tours have shown that you can attach windows to the display. In addition to this, we can say that there are hot keys for this. Win + Shift + Left and Win + Shift + Right will move the window between the displays while keeping it at the same distance from the upper left corner.
One of the most popular utilities in the Windows XP Power Toys set was the context menu item of the explorer “Open Command Prompt Here”. In Windows 7 (and in Windows Vista too, although many do not know) this item is in the context menu, but when you call the menu, you must hold down the Shift key. If the current directory is a network directory, Windows will automatically attach the network drive.
It is told that the set of standard wallpapers depends on the language selected during installation. However, each distribution kit carries all the wallpapers. They lie in C: \ Windows \ Globalization \ MCT .
Each developer thinks that the end user can quickly and easily demonstrate what and how it does not work on his (user) machine. Windows 7 to the rescue!
One of the built-in diagnostic tools that we use to send error reports is the Problem Steps Recorder, which is a simple tool for recording a sequence of actions ( not in the form of video! - note trans. ) Occurring on the screen. When you click "Record", it tracks keyboard and mouse actions and takes screenshots to which you can add comments. After the end of the recording, the utility saves all snapshots to a ZIP archive containing an HTML presentation from all snapshots. The program is called psr.exe and you can find it in the control panel in the section “Record steps to reproduce a problem”.

Added the Install button to the font viewing applet
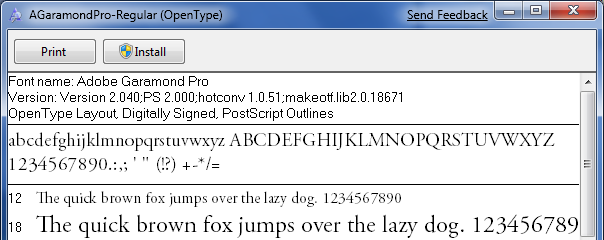
And in the standard font selection dialog, the font name is now displayed with this font.
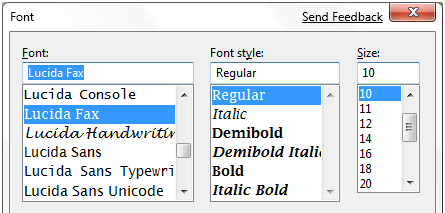
There are also many improvements related to typography: grouping by boldness, hiding / displaying fonts depending on regional settings, a new text rendering engine built into the DirectWrite API, as well as more font decoration settings, unlike the standard four.
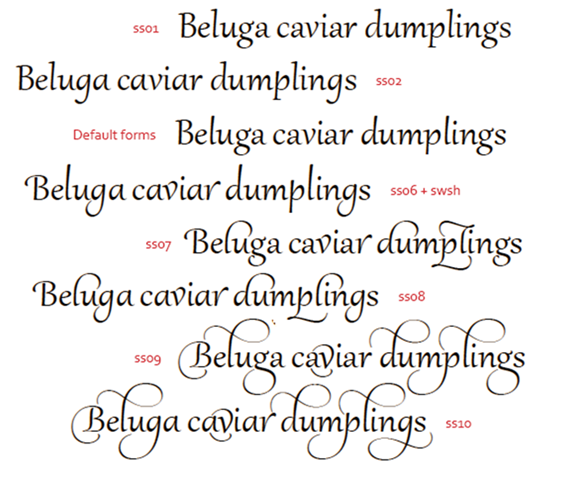
Along with other typography enhancements, Gabriola is included in Windows 7 - an improved selection font developed by Tiro Typeworks , with which OpenType Layout can be used to display a variety of styles and styles.
If it seems to you that Internet Explorer is slowly loading pages, then it makes sense to look at the installed add-ons (add-ons) because One of the convenient improvements in IE8 is the toolkit to work with them. Go to the Tools / Manage Add-ons dialog box and then review the list for the time the add -ons were loaded. On my machine, I noticed that the Research add-on that installs Office 2007 slows down a bit and I don’t use it at all, so I turned it off.
Unless someone shows you, you may not notice that the icons on the taskbar are fixed (apparently, it means that the same application always creates an icon in the same place - note) . You can move them as you wish. What else is cool - you can start any of the first five applications (icons on the taskbar) with the key combination Win + 1, Win + 2, Win + 3 .... For example, I really like that I can launch a new Notepad2 window at any time simply by clicking Win + 5, for example.
However, even fewer people know that the icons in the system tray (tray) can also be moved as you wish.
My wife has a Samsung NC10 netbook and we wanted to install Windows 7 there in order to replace the pre-installed Windows XP. As in most machines of this class, he did not have a DVD-drive, and I also did not have an external DVD-USB drive. The problem was solved this way: I took a 4 GB USB flash drive formatted in FAT32 and simply copied the contents of the Windows 7 Beta ISO image onto this flash drive with the xcopy e: \ f: \ e / f (e: - this is my DVD, and f: - the flash drive itself).
Installation from a flash drive is not only simple, but also fast - faster than from a DVD on my stationary workstation.
I can not fail to note that Windows 7 is much better suited for netbooks, it uses less disk space and memory than Vista, while being more prepared to work with SSD (for example, turns off defragmentation, because it is irrelevant for such devices and it works in a special way with the deletion of files (to which - it is not indicated - note. Trans ), in order to reduce the wear of the SSD).
13. Give our
You probably noticed that the good old Quick Launch bar is not only disabled by default in Windows 7 - it is not at all in the list of available panels. How, I think, is clear to everyone, replaced by the concept of “fixed applications”, which is supported by the new taskbar.
Based on early testing, we can say that the overwhelming majority of users (meaning not those who read this blog, except for my mom), this model is quite suitable. But if you are a fan of the old approach, you will be glad to know that the old labels are still in place. To enable them, do the following:
If this is not entirely obvious from the tedious process described above, then it is worth noting that we do not really support the idea that users include this panel. But, if you really need it - it is.
But in any case, we would very much like you to try a new model and write to us if, for some reason, it did not satisfy your needs.
Note trans: drag - puns, and drug - drug. The phrase It's a drug - translated as "This is just a drug," "I can not tear myself away."
In Windows 7, much is tied to the “quick action list” (jump list), which allows applications like Windows Live Messenger to provide convenient management tools right from the taskbar. "Quick Actions" replace the standard context menu on the taskbar. In addition to the standard one, there is one more way to call them - “pull” the panel button up a little and release. This behavior was made for touch-based devices.
Another place where you can repeat the last trick is the address bar in IE8, where the “pull down” gesture literally pulls out an extended list consisting of history, bookmarks, and other similar elements. The slower you pull, the cooler the animation!
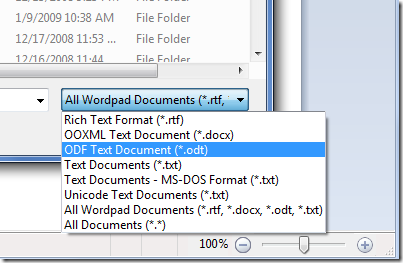
Every review of Windows 7, which I saw, from the main innovations of WordPad and Paint, highlighted the menu in the style of Office2007. However, few people paid attention to one small, but I think, the expected thing: WordPad can now view and save not only Office Open XML documents (compatible with Word 2007), but also documents like OpenDocument (ODF).
I didn’t immediately like the Windows 7 taskbar, but closer to the beta it was finalized, and now I actively use it. For those who prefer the classic look, the good news is that the taskbar can be customized so that it most closely resembles it from previous versions of Windows.

To get this view, call the context menu on the taskbar, and open the Properties dialog (Properties). Check “Small icons” and in the group tab “Taskbar buttons” (taskbar buttons) select “Combine when space is small” (combine when taskbar is full). The panel will not be "exactly" the same, but in terms of functionality it is very close.
While we are on the taskbar, we will note another little thing. You probably noticed a small rectangle in the right corner: this is the functionality that we call “Aero Peak”. It allows you to see gadgets or icons on your desktop. It is worth noting that for this there is a hot key - Win + Spacebar
Do you want to quickly launch an application attached to the taskbar with administrator rights? Easy: hold down Ctrl + Shift and click on the application icon (your account, of course, must have corresponding rights).
I have seen people who were bewildered by the following. Suppose you have already opened some application (for example, the command line) and you want to open a second copy of the same application. You do not need to go into the Start menu again. Just hold down Shift and click on the icon on the taskbar, and instead of switching to the existing window, a new copy of this application will open. The same effect can be achieved by clicking on this button with the middle mouse button .
Another innovation that will appeal to experienced users allows you to switch between the windows of a single application. For example, if you have 5 messages open in Outlook, you can quickly switch between them by holding Ctrl and pressing the button on the taskbar. This is much more convenient than searching for these windows in the Alt + Tab dialog.
The combination of Win + T will transfer the focus to the taskbar, after which you can use the cursor to move between applications. Enter activates the selected application / group. Esc removes focus from the taskbar.

Almost every display sold today is widescreen. This is convenient for watching movies, but in the work you can feel a certain vertical stiffness.
Therefore, the first thing I do during installation is to move the taskbar to the left. We do not put it there by default, because there are still a lot of old monitors, and we would receive a huge amount of complaints.
Previously, Windows had little support for alternative panel placement. Yes, you could move the panel to the left, but it looked unnatural, the gradients could be wrong, the start menu became uncomfortable and in general, you felt like a citizen of the “second grade”. the taskbar in Windows 7 looks like it was designed for a position to the left. Moving around the panel after pressing Win + T (mentioned above) immediately switches from right-left to up and down, and the new convenience is that you increase your working space vertically.
I say seriously: if you have a wide screen, and especially on a netbook, try this placement. At first it may seem a bit unusual, but then you will appreciate and do not want to return!
If you often work with some 4 or 5 folders, you can quickly attach them to the explorer button on the taskbar. Hold down the right mouse button, drag the folder to the taskbar, and it will automatically be placed in the "Jump List" button of the explorer.
If you spend more time outside the My Documents folder, then you will probably find it convenient to change the default Explorer directory to open my Computer.
To do this, open the Start menu, find the Explorer there — it is in the Accessories folder — and change the program to run to
% SystemRoot% \ explorer.exe / root, :: {20D04FE0-3AEA-1069-A2D8-08002B30309D}
If you also want to change the behavior of the taskbar button, then you will need to detach it and fix it again. But this is all nonsense, because Win + E will still open My documents. I have not found a way to change this.
Now, if you want to adjust the color rendition or font smoothing, there are standard utilities for this. Surprisingly, a slight darkening of the colors along with pulling the gamut up a bit - and now the fonts on my laptop look much clearer. You are setting up a color for the 42-inch tele, which you bought yesterday? Why not do the same for a monitor that you watch all day?

You can run it through the utilities cttune.exe and dccw.exe , or through the control panel.
Easy to miss if not looking. Double-clicking on the ISO image file opens a useful small applet that allows you to write this image to a blank disc. And no more searching for paid utilities of dubious origin!

Currently, video editing utilities are not included in Windows 7. That's because Movie Maker is now included in the Windows Live Essentials package and is now being processed. For the "early birds" while the council will use Windows Movie Maker 2.6. It does not have all the effects that exist in Windows Vista and it does not support editing HD video, but the rest of the functionality works.
Download Windows Movie Maker 2.6 at this link.
I hope that the first thing you did after installing Windows 7 beta was to download the Windows Live Essentials toolkit (if not, many Windows 7 innovations bypass you). If you spend a lot of time on instant messaging clients, you will like that the Windows Live Messenger icon is clearly visible and always in the center of the taskbar. From there you can easily change the status or send a message to someone.

On the other hand, you may want to keep it only in the system tray (tray), as in previous versions. To do this, you can very easily deceive the application, simply edit the launch shortcut and set it to “Run in Windows Vista compatibility mode”.
I am surprised that few people understood the joke with the Siamese fighting fish on standard wallpaper. So I will not reveal the secret. For those who are interested - wikipedia to help. (The answer is really easy to find - approx. Transl.)
Sometimes it happens grief - the system is not loaded. And what you really want at this moment is something to gain access to the disk and to the command console. Windows 7 now includes the ability to create a rescue disk, which, of course, is a bootable version of Windows, including a console and a set of system utilities. Just write "system repair disc" in the Start menu search bar and you will find a utility to create it.
Here, the introduction is missed on how great it is that Windows 7 has come out, which all the same will miss and will read the “secrets” themselves.
1. Window management
You probably already know that Windows 7 makes working with windows much easier. The window can be “attached” to the left or right half of the screen simply by sliding it to the corresponding edge, and also the window can be maximized / restored vertically by double clicking on the lower border of the window. But what you probably do not know is that all these actions are available through hotkeys.
- Win + Left and Win + Right - attach a window
- Win + Up and Win + Down - maximize and restore / minimize the window
- Win + Shift + Up and Win + Shift + Down - maximize and restore the window vertically
2. Projectors.
Are you already tired of the torment with a specific driver in order to get your laptop to display the desktop on the projector? In this case, you will be happy to know that working with the projector is much easier in Win 7. The combination Win + P draws the following window to light:
By pressing the arrows or repeating the combination Win + P, you can switch to the “clone”, “expand desktop” [external device] or “external device only” modes. This can also be done through the displayswitch.exe application.
')
If you want wider control, you can get it through the Mobility Center (Win + X), which allows you to turn on presentation mode, during which clients of messages switch to “do not disturb” mode, screen savers are turned off, neutral wallpapers are installed, etc. d. (ps Mobility Center is also in Windows Vista)
3. Elimination of noise
In the original article, it is written as “a fashionable option to eliminate rear noise,” in fact, is a combination of keys Win + Home , which minimizes / restores all windows except the active one.
4. Manage multiple displays
Previous tours have shown that you can attach windows to the display. In addition to this, we can say that there are hot keys for this. Win + Shift + Left and Win + Shift + Right will move the window between the displays while keeping it at the same distance from the upper left corner.
5. Only for command line maniacs
One of the most popular utilities in the Windows XP Power Toys set was the context menu item of the explorer “Open Command Prompt Here”. In Windows 7 (and in Windows Vista too, although many do not know) this item is in the context menu, but when you call the menu, you must hold down the Shift key. If the current directory is a network directory, Windows will automatically attach the network drive.
6. Big Village
It is told that the set of standard wallpapers depends on the language selected during installation. However, each distribution kit carries all the wallpapers. They lie in C: \ Windows \ Globalization \ MCT .
7. Black box
Each developer thinks that the end user can quickly and easily demonstrate what and how it does not work on his (user) machine. Windows 7 to the rescue!
One of the built-in diagnostic tools that we use to send error reports is the Problem Steps Recorder, which is a simple tool for recording a sequence of actions ( not in the form of video! - note trans. ) Occurring on the screen. When you click "Record", it tracks keyboard and mouse actions and takes screenshots to which you can add comments. After the end of the recording, the utility saves all snapshots to a ZIP archive containing an HTML presentation from all snapshots. The program is called psr.exe and you can find it in the control panel in the section “Record steps to reproduce a problem”.
8. Fonts
Added the Install button to the font viewing applet
And in the standard font selection dialog, the font name is now displayed with this font.
There are also many improvements related to typography: grouping by boldness, hiding / displaying fonts depending on regional settings, a new text rendering engine built into the DirectWrite API, as well as more font decoration settings, unlike the standard four.
9. Gabriola
Along with other typography enhancements, Gabriola is included in Windows 7 - an improved selection font developed by Tiro Typeworks , with which OpenType Layout can be used to display a variety of styles and styles.
10. Who stole my browser?
If it seems to you that Internet Explorer is slowly loading pages, then it makes sense to look at the installed add-ons (add-ons) because One of the convenient improvements in IE8 is the toolkit to work with them. Go to the Tools / Manage Add-ons dialog box and then review the list for the time the add -ons were loaded. On my machine, I noticed that the Research add-on that installs Office 2007 slows down a bit and I don’t use it at all, so I turned it off.
11. Furniture rearrangement
Unless someone shows you, you may not notice that the icons on the taskbar are fixed (apparently, it means that the same application always creates an icon in the same place - note) . You can move them as you wish. What else is cool - you can start any of the first five applications (icons on the taskbar) with the key combination Win + 1, Win + 2, Win + 3 .... For example, I really like that I can launch a new Notepad2 window at any time simply by clicking Win + 5, for example.
However, even fewer people know that the icons in the system tray (tray) can also be moved as you wish.
12. Installation from a USB flash drive
My wife has a Samsung NC10 netbook and we wanted to install Windows 7 there in order to replace the pre-installed Windows XP. As in most machines of this class, he did not have a DVD-drive, and I also did not have an external DVD-USB drive. The problem was solved this way: I took a 4 GB USB flash drive formatted in FAT32 and simply copied the contents of the Windows 7 Beta ISO image onto this flash drive with the xcopy e: \ f: \ e / f (e: - this is my DVD, and f: - the flash drive itself).
Installation from a flash drive is not only simple, but also fast - faster than from a DVD on my stationary workstation.
I can not fail to note that Windows 7 is much better suited for netbooks, it uses less disk space and memory than Vista, while being more prepared to work with SSD (for example, turns off defragmentation, because it is irrelevant for such devices and it works in a special way with the deletion of files (to which - it is not indicated - note. Trans ), in order to reduce the wear of the SSD).
13. Give our parcel now to the Quick Launch!
You probably noticed that the good old Quick Launch bar is not only disabled by default in Windows 7 - it is not at all in the list of available panels. How, I think, is clear to everyone, replaced by the concept of “fixed applications”, which is supported by the new taskbar.
Based on early testing, we can say that the overwhelming majority of users (meaning not those who read this blog, except for my mom), this model is quite suitable. But if you are a fan of the old approach, you will be glad to know that the old labels are still in place. To enable them, do the following:
- Right click on the taskbar, Toolbars / New Toolbar
- In the folder selection dialog, enter the following line and click OK:
% userprofile% \ AppData \ Roaming \ Microsoft \ Internet Explorer \ Quick Launch - Turn off the “lock the taskbar” setting and right-click on the separator (obviously, in the newly created panel, note the translator ). Make sure that the Show text and Show title items are disabled, and the “small icons” are selected as the view.
- Use the dividers to move the panel where it is comfortable, and then reattach the taskbar.
If this is not entirely obvious from the tedious process described above, then it is worth noting that we do not really support the idea that users include this panel. But, if you really need it - it is.
But in any case, we would very much like you to try a new model and write to us if, for some reason, it did not satisfy your needs.
14. It's a Drag
Note trans: drag - puns, and drug - drug. The phrase It's a drug - translated as "This is just a drug," "I can not tear myself away."
In Windows 7, much is tied to the “quick action list” (jump list), which allows applications like Windows Live Messenger to provide convenient management tools right from the taskbar. "Quick Actions" replace the standard context menu on the taskbar. In addition to the standard one, there is one more way to call them - “pull” the panel button up a little and release. This behavior was made for touch-based devices.
Another place where you can repeat the last trick is the address bar in IE8, where the “pull down” gesture literally pulls out an extended list consisting of history, bookmarks, and other similar elements. The slower you pull, the cooler the animation!
15. Standards support
Every review of Windows 7, which I saw, from the main innovations of WordPad and Paint, highlighted the menu in the style of Office2007. However, few people paid attention to one small, but I think, the expected thing: WordPad can now view and save not only Office Open XML documents (compatible with Word 2007), but also documents like OpenDocument (ODF).
16. Taskbar in Windows-Vista style
I didn’t immediately like the Windows 7 taskbar, but closer to the beta it was finalized, and now I actively use it. For those who prefer the classic look, the good news is that the taskbar can be customized so that it most closely resembles it from previous versions of Windows.
To get this view, call the context menu on the taskbar, and open the Properties dialog (Properties). Check “Small icons” and in the group tab “Taskbar buttons” (taskbar buttons) select “Combine when space is small” (combine when taskbar is full). The panel will not be "exactly" the same, but in terms of functionality it is very close.
17. On the desktop with one peephole
While we are on the taskbar, we will note another little thing. You probably noticed a small rectangle in the right corner: this is the functionality that we call “Aero Peak”. It allows you to see gadgets or icons on your desktop. It is worth noting that for this there is a hot key - Win + Spacebar
18. Run with elevated privileges
Do you want to quickly launch an application attached to the taskbar with administrator rights? Easy: hold down Ctrl + Shift and click on the application icon (your account, of course, must have corresponding rights).
19. Repeat, please!
I have seen people who were bewildered by the following. Suppose you have already opened some application (for example, the command line) and you want to open a second copy of the same application. You do not need to go into the Start menu again. Just hold down Shift and click on the icon on the taskbar, and instead of switching to the existing window, a new copy of this application will open. The same effect can be achieved by clicking on this button with the middle mouse button .
20. Switch to specific windows
Another innovation that will appeal to experienced users allows you to switch between the windows of a single application. For example, if you have 5 messages open in Outlook, you can quickly switch between them by holding Ctrl and pressing the button on the taskbar. This is much more convenient than searching for these windows in the Alt + Tab dialog.
21. Walk through the taskbar
The combination of Win + T will transfer the focus to the taskbar, after which you can use the cursor to move between applications. Enter activates the selected application / group. Esc removes focus from the taskbar.
22. Tricks for wide screens
Almost every display sold today is widescreen. This is convenient for watching movies, but in the work you can feel a certain vertical stiffness.
Therefore, the first thing I do during installation is to move the taskbar to the left. We do not put it there by default, because there are still a lot of old monitors, and we would receive a huge amount of complaints.
Previously, Windows had little support for alternative panel placement. Yes, you could move the panel to the left, but it looked unnatural, the gradients could be wrong, the start menu became uncomfortable and in general, you felt like a citizen of the “second grade”. the taskbar in Windows 7 looks like it was designed for a position to the left. Moving around the panel after pressing Win + T (mentioned above) immediately switches from right-left to up and down, and the new convenience is that you increase your working space vertically.
I say seriously: if you have a wide screen, and especially on a netbook, try this placement. At first it may seem a bit unusual, but then you will appreciate and do not want to return!
23. Attach frequent folders
If you often work with some 4 or 5 folders, you can quickly attach them to the explorer button on the taskbar. Hold down the right mouse button, drag the folder to the taskbar, and it will automatically be placed in the "Jump List" button of the explorer.
24. Opening Explorer from My Computer
If you spend more time outside the My Documents folder, then you will probably find it convenient to change the default Explorer directory to open my Computer.
To do this, open the Start menu, find the Explorer there — it is in the Accessories folder — and change the program to run to
% SystemRoot% \ explorer.exe / root, :: {20D04FE0-3AEA-1069-A2D8-08002B30309D}
If you also want to change the behavior of the taskbar button, then you will need to detach it and fix it again. But this is all nonsense, because Win + E will still open My documents. I have not found a way to change this.
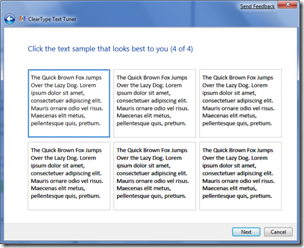
25. ClearType Setup and Monitor Calibration
Now, if you want to adjust the color rendition or font smoothing, there are standard utilities for this. Surprisingly, a slight darkening of the colors along with pulling the gamut up a bit - and now the fonts on my laptop look much clearer. You are setting up a color for the 42-inch tele, which you bought yesterday? Why not do the same for a monitor that you watch all day?
You can run it through the utilities cttune.exe and dccw.exe , or through the control panel.
26. ISO Recording
Easy to miss if not looking. Double-clicking on the ISO image file opens a useful small applet that allows you to write this image to a blank disc. And no more searching for paid utilities of dubious origin!
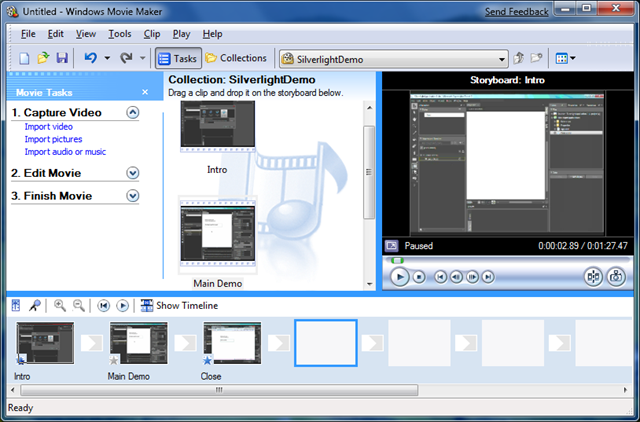
27. Windows Movie Maker
Currently, video editing utilities are not included in Windows 7. That's because Movie Maker is now included in the Windows Live Essentials package and is now being processed. For the "early birds" while the council will use Windows Movie Maker 2.6. It does not have all the effects that exist in Windows Vista and it does not support editing HD video, but the rest of the functionality works.
Download Windows Movie Maker 2.6 at this link.
28. Hiding the Windows Live Messenger icon
I hope that the first thing you did after installing Windows 7 beta was to download the Windows Live Essentials toolkit (if not, many Windows 7 innovations bypass you). If you spend a lot of time on instant messaging clients, you will like that the Windows Live Messenger icon is clearly visible and always in the center of the taskbar. From there you can easily change the status or send a message to someone.
On the other hand, you may want to keep it only in the system tray (tray), as in previous versions. To do this, you can very easily deceive the application, simply edit the launch shortcut and set it to “Run in Windows Vista compatibility mode”.
29. Enjoy the fish
I am surprised that few people understood the joke with the Siamese fighting fish on standard wallpaper. So I will not reveal the secret. For those who are interested - wikipedia to help. (The answer is really easy to find - approx. Transl.)
30. When nothing works ...
Sometimes it happens grief - the system is not loaded. And what you really want at this moment is something to gain access to the disk and to the command console. Windows 7 now includes the ability to create a rescue disk, which, of course, is a bootable version of Windows, including a console and a set of system utilities. Just write "system repair disc" in the Start menu search bar and you will find a utility to create it.
Source: https://habr.com/ru/post/49203/
All Articles