Skinpack LikePS for MirandaIM
Today I completed work on the final skin in the LikePS series. Now I am satisfied with the work done and I want to submit it to your judgment.
LikePS series has come a certain way. Before taking shape in what is now, skins have undergone several reincarnations.
I want to say a few words about the entire series as a whole.
All skins are made in 2 versions: with a thick and thin frame. I tried to make them in such a way that, with any settings, they looked nice on the surface. In the default font in skins, I used Candara from Windows Vista, but you can change the font in the settings.

reference
')
In this skin, I decided to use the built-in toolbar, since It allows you to customize the buttons. For the toolbar, I took sets of free icons and redrawn them a bit, I drew some icons myself. They are in the archive with the skin.
Skin comes with 4 configuration files:

reference
This skin made me suffer a lot. Due to the limitations in the tabSRMM skins engine, the conceived design could not be fully implemented. Skin survived 2 versions, at first it was without a title, and there was a version for those who like to place the bookmarks below and those who have them at the top.
The lack of a title in the first version of the skin was my mistake, because A window without a title is not very convenient to drag.
Because of this, I decided to make a second version, which in my opinion fits more into the overall design and is more convenient to use. I returned the heading to it and found a solution that made it possible not to divide the skin into parts (tabs below, tabs above). In the archive at the link you will find a skin with a thick frame, with a thin frame and settings for fonts and colors for the message box, you can import them, or you can use your own.
I tested the skin with different window settings, everything seems to be harmonious and simpotichno, but of course you will judge this.

reference
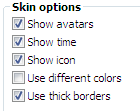
In this skin, I also added support for a thick and thin border,
support of different colors, depending on the status and your settings,
ability to hide popup elements.
You can see the skin options in the image on the left.
Well, in the appendage are very simple skins for tipper. Just save one of the images below and use it as a background for your tooltips.

Based on my skins comrade Amatory was created assembly . I am grateful to him for his confidence and for the use of my work in his assembly.
I also want to express my gratitude to all the participants of the Miranda planet forum who helped me with their tips and ideas. Thank you =)
PS
I hope you enjoy my work. Also, I am absolutely not against criticism, because she will contribute to my development.
UPDATE
I updated the skin for CL, now there are settings for XP. I just replaced the font Candara on Tahoma, t.ch. If you like Tahoma more, you can use XP skin in Vista.
To apply the skin with the settings, go to Options-> Customize-> Contact list, select the LikePS branch and select the skin in it with the + settings in the name. Next, click Apply under the list of skins.
In theory, this is all, if I have not forgotten to put some settings into the skin)
Everything will be a little different. To apply the settings you need the dbeditor ++ plugin .
This plugin must be downloaded and put the dll in the Plugins folder in Miranda.
And this archiver with settings.
The archive has settings with the font Candara and Tahoma. In XP, I recommend using Tahoma, because Candara is terrible there.
After that, go to the main menu of Miranda, select the Database Editor ++ item. In the window that opens, go to the menu Import-> From a file and select the settings file we need.
Rebooting Miranda.
Now we need to configure the message window interface.
Open the message window, right-click on the window title, select the Container options item, then go to the Windows layout and set the settings as in the screenshot below.

Click OK. Setup complete.
LikePS series has come a certain way. Before taking shape in what is now, skins have undergone several reincarnations.
I want to say a few words about the entire series as a whole.
All skins are made in 2 versions: with a thick and thin frame. I tried to make them in such a way that, with any settings, they looked nice on the surface. In the default font in skins, I used Candara from Windows Vista, but you can change the font in the settings.
LikePS for Modern Contact List
reference
')
In this skin, I decided to use the built-in toolbar, since It allows you to customize the buttons. For the toolbar, I took sets of free icons and redrawn them a bit, I drew some icons myself. They are in the archive with the skin.
Skin comes with 4 configuration files:
- LikePs - with a thick frame
- LikePs + settings - with thick frame and settings (fonts, location of icons, etc.)
- LikePs thin - with a thin frame
- LikePs thin + settings - with a thin frame and settings
LikePS for TabSRMM
reference
This skin made me suffer a lot. Due to the limitations in the tabSRMM skins engine, the conceived design could not be fully implemented. Skin survived 2 versions, at first it was without a title, and there was a version for those who like to place the bookmarks below and those who have them at the top.
The lack of a title in the first version of the skin was my mistake, because A window without a title is not very convenient to drag.
Because of this, I decided to make a second version, which in my opinion fits more into the overall design and is more convenient to use. I returned the heading to it and found a solution that made it possible not to divide the skin into parts (tabs below, tabs above). In the archive at the link you will find a skin with a thick frame, with a thin frame and settings for fonts and colors for the message box, you can import them, or you can use your own.
I tested the skin with different window settings, everything seems to be harmonious and simpotichno, but of course you will judge this.
LikePs for PopUp +
reference
In this skin, I also added support for a thick and thin border,
support of different colors, depending on the status and your settings,
ability to hide popup elements.
You can see the skin options in the image on the left.
LikePS for Tipper
Well, in the appendage are very simple skins for tipper. Just save one of the images below and use it as a background for your tooltips.
With a thick stroke
With fine
Based on my skins comrade Amatory was created assembly . I am grateful to him for his confidence and for the use of my work in his assembly.
I also want to express my gratitude to all the participants of the Miranda planet forum who helped me with their tips and ideas. Thank you =)
PS
I hope you enjoy my work. Also, I am absolutely not against criticism, because she will contribute to my development.
UPDATE
How to set up Miranda to make it look like in my screenshot?
Contact sheet
I updated the skin for CL, now there are settings for XP. I just replaced the font Candara on Tahoma, t.ch. If you like Tahoma more, you can use XP skin in Vista.
To apply the skin with the settings, go to Options-> Customize-> Contact list, select the LikePS branch and select the skin in it with the + settings in the name. Next, click Apply under the list of skins.
In theory, this is all, if I have not forgotten to put some settings into the skin)
Message window + PopUp + + Tipper
Everything will be a little different. To apply the settings you need the dbeditor ++ plugin .
This plugin must be downloaded and put the dll in the Plugins folder in Miranda.
And this archiver with settings.
The archive has settings with the font Candara and Tahoma. In XP, I recommend using Tahoma, because Candara is terrible there.
After that, go to the main menu of Miranda, select the Database Editor ++ item. In the window that opens, go to the menu Import-> From a file and select the settings file we need.
Rebooting Miranda.
Now we need to configure the message window interface.
Open the message window, right-click on the window title, select the Container options item, then go to the Windows layout and set the settings as in the screenshot below.
Click OK. Setup complete.
Source: https://habr.com/ru/post/47897/
All Articles