Drupal 6. Primitive gallery CCK + ImageField + ImageCache + Lightbox2
This is a small article (or a manual, if you will) about creating a primitive gallery through additional modules. He himself took up the study of drupal three days ago. I have to say that after WordPress, this is a bit difficult, but you can understand and understand. Go.
First of all, thanks to all the habra people who helped write not to your blog. Thank you very much!
')
If you do not have Drupal (drupal-6.8) installed, download the system from drupal.org and simultaneously download the following modules:
CKK, FileField, Lightbox2 dev (a developer version is required!), ImageAPI, ImageField, ImageCache. I hope there is no need to explain that these modules need to be copied to / sites / all / modules / and included (dependencies can be viewed on the page with modules).
Go to Administer / Site Building / Modules, turn on
In the CCK block:
Content, Content Permissions, FileField, ImageField, Text
In the Core Optional block:
PHP Filter
In the ImageCache block:
ImageAPI, ImageAPI, GD2, ImageCache, ImageCache UI
In the Other block:
Lightbox2
After switching on the modules, go to Administer / Site Building / ImageCache and click on Add new preset.
In the text box of the Preset namespace form, enter img_120x120, then save: Create New Preset. Select on the page that opens the action for processing photos. I chose Add Scale (this is scaling with proportions), after selecting the action on the page, select our size - width: 120, height 120. Click Add Action, the preset is ready.
how it should be:


Go to Administer / Site configuration / Lightbox2.
General tab:
Put the birds on the Force visibility of the navigation links and on the Continuous galeries
HTML Content Tab:
Put your size large photos or leave the default (600x400)
Automatic image handling tab
Image node settings:
Automatic handler for image nodes change to Lightbox grouped
Inline images
Automatic handler for inline images change to Lightbox grouped
Save configuration
Go to Administer / Content types and select from the manage field operations next to the Story item. Add a new field:
Label: imgsrc
Field name imgsrc
Select a field type: image
We were transferred to the field page. We leave everything by default. Besides:
File path: this is the path inside the files directory where the downloaded images will be copied, you can put imgsrc. Number of values - the number of fields for uploading photos - set Unlimited. Save (save filed settings).
how it should be:

Go to Display fields.
In Teaser, change the value of Generic Files to Lightbox2: img_120x120-> original
In Full node, change the value of Generic Files to Lightbox2: img_120x120-> original
how it should be:
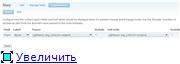
Now create a Story material.
Create content-> Story
Title: Test gallery 01
Body: can not fill
Imgsrc block
New upload, select files (by default there are two fields to upload, but you can click add another item and make them as many as you like). Select a photo, click Upload (on each photo). Settings below can not touch. Next button Save. Actually that's all. It remains to make a small change in the display of thumbnails.
Go to Administer / Site building / Blocks and create a new block.
Block Description: Gallery CSS
Block title: Block body:
Input format: PHP code
Save (Save block). Region for the created block choose Header
how it should be:

Now we will make a css-file with the following data:
That's all, tinkering in the settings: you can do anything. Good luck
UPD Thank you very much ivlis for the live preview .
First of all, thanks to all the habra people who helped write not to your blog. Thank you very much!
')
If you do not have Drupal (drupal-6.8) installed, download the system from drupal.org and simultaneously download the following modules:
CKK, FileField, Lightbox2 dev (a developer version is required!), ImageAPI, ImageField, ImageCache. I hope there is no need to explain that these modules need to be copied to / sites / all / modules / and included (dependencies can be viewed on the page with modules).
Go to Administer / Site Building / Modules, turn on
In the CCK block:
Content, Content Permissions, FileField, ImageField, Text
In the Core Optional block:
PHP Filter
In the ImageCache block:
ImageAPI, ImageAPI, GD2, ImageCache, ImageCache UI
In the Other block:
Lightbox2
After switching on the modules, go to Administer / Site Building / ImageCache and click on Add new preset.
In the text box of the Preset namespace form, enter img_120x120, then save: Create New Preset. Select on the page that opens the action for processing photos. I chose Add Scale (this is scaling with proportions), after selecting the action on the page, select our size - width: 120, height 120. Click Add Action, the preset is ready.
how it should be:


Go to Administer / Site configuration / Lightbox2.
General tab:
Put the birds on the Force visibility of the navigation links and on the Continuous galeries
HTML Content Tab:
Put your size large photos or leave the default (600x400)
Automatic image handling tab
Image node settings:
Automatic handler for image nodes change to Lightbox grouped
Inline images
Automatic handler for inline images change to Lightbox grouped
Save configuration
Go to Administer / Content types and select from the manage field operations next to the Story item. Add a new field:
Label: imgsrc
Field name imgsrc
Select a field type: image
We were transferred to the field page. We leave everything by default. Besides:
File path: this is the path inside the files directory where the downloaded images will be copied, you can put imgsrc. Number of values - the number of fields for uploading photos - set Unlimited. Save (save filed settings).
how it should be:

Go to Display fields.
In Teaser, change the value of Generic Files to Lightbox2: img_120x120-> original
In Full node, change the value of Generic Files to Lightbox2: img_120x120-> original
how it should be:

Now create a Story material.
Create content-> Story
Title: Test gallery 01
Body: can not fill
Imgsrc block
New upload, select files (by default there are two fields to upload, but you can click add another item and make them as many as you like). Select a photo, click Upload (on each photo). Settings below can not touch. Next button Save. Actually that's all. It remains to make a small change in the display of thumbnails.
Go to Administer / Site building / Blocks and create a new block.
Block Description: Gallery CSS
Block title: Block body:
<?php
drupal_add_css('sites/all/themes/image-style.css','theme');
?>
Input format: PHP code
Save (Save block). Region for the created block choose Header
how it should be:

Now we will make a css-file with the following data:
div.odd, div.even {float: left; margin-right: 5px; }
div.field-label {display: none; }
That's all, tinkering in the settings: you can do anything. Good luck
UPD Thank you very much ivlis for the live preview .
Source: https://habr.com/ru/post/47205/
All Articles