Lens for DSLR for 1 dollar. Stenop.
Last time I went to the fashion on the topics of the authors karmoneuschih, zaposhennyh other users. I post this post on behalf of leoneed , and I call for an active fight against this tendency to increase the karma of people deserving of it.
I met the article , and remembered that I had long ago promised mygirlfriend amateur photographer to make a lens, more precisely, its absence.
This topic will be devoted to this post. It is designed for a wide range of readers, so we will try to do without abstruse words and cunning formulas.
And so, STENOP is a photographic device without a lens, which plays the role of a small hole ( wiki ).
Once upon a time, one person made a very small hole in an opaque curtain, and an opposite image of the street appeared on the opposite wall from this hole.
So a camera obscura appeared (lat. amera obscūra “dark room”), and a photo was born.
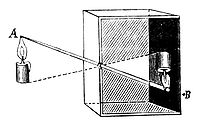
All the rays entering the room had to go through this hole, which means that one point on the plane with the image corresponded to one point on the object, the image of which appeared on the wall. The image was not clear, so they began to use lenses. Then progress went forward, achieved small sizes, etc. ... The camera has evolved to our time. But the main principles remained unchanged, this is still the same point through which the rays pass, and still the same plane on which they draw the image. That's why I decided to return to the past, and turn the reflex digital camera into a camera obscura with a matrix, or WALL.
On the Internet you can find several detailed articles on the process of such a transformation. If in a nutshell, they are invited to spoil the lid that covers the bayonet,i.e. the hole where the lens is attached. It is necessary to make a hole in it with a half centimeter in it, close it with a piece of foil or thin aluminum with a hole already in 0.2–0.3 mm and can be removed.

It is also advised to achieve maximum removal of this hole from the matrix to avoid vignetting. This is when the photo is light in the middle and dark in the corners.
I decided to go a little different way and bring this hole to the matrix. The idea was that the luminosity of such a design is very small, compared with a conventional lens. Lenses significantly increased the amount of light entering the camera. But when you just have a peephole without lenses, you have to shoot at long exposures - there is very little light. The smaller the distance between the matrix and the hole, the more light it hits. The second reason: the smaller this distance (in the future we will call it the focal length), the clearer the image will be,because Rays do not have time to scatter into vague spots. The lack of sharpness is the second problem of this design.
The base, as in common recipes, was taken as a stub for baoinet. Here I was waiting for disappointment. She was made of soft plastic, white and let the light through, which was completely unsuitable for my plan. During the day of wandering around the city to find the same, but the black failed. It was necessary to work with what is, but leave at least a plug from the plug — only what is attached to the camera body; the rest should be replaced with a light-proof material. With a lid in my pocket, I explored the nearest supermarket and the most suitable for the experiment seemed to me a jar of Bern. Its bottom perfectly lay on the lid and allowed to place it as deep as possible in the camera. So if we have a KAF baoynet, then it is best to use Byrne. It was for him that I had to put one dollar promised in the title.

The bottom is successfully cut, the queue glue.

An hour later, there was a question about the complete light insulation of what was left of the lid. It was decided to paint it with something black. Under the arm caught black nail polish. Since the design will be used by the girl, he was donated without any special scandals.

Further, a long and painstaking process of painting. I will say that the varnish is not ideal, as it is better to have a matte surface, especially the part that will be inside the camera. But it was too late to look for a more suitable solution was lazy. Further very accurately we pierce a hole with a needle.

It should be as round as possible, without torn edges and other things. 0.3–0.2 mm in diameter. If more, then we lose in sharpness, if less, then the variance will attack and there will bemany, many distortions.

We put on the camera:

And remove:

The same photo taken with a 35 mm whale lens:

Sorry for not taking anything more beautiful - the weather was not suitable and time was short.
As you have noticed, the image is very blurry and dark towards the edges. Nothing can be done about it.
But! Firstly, these effects may be useful in artistic photography. Now, many soften photos with photoshop and add a similar blackout, trying to achieve the effect "semi-antique". Secondly, this design has undeniable advantages that are inaccessible to ordinary objectives:
The advantage of the wall is the full orthoscopicity of the image given to them, and the very large depth of the sharply depicted space.
What in human language means that all the straight lines in the photo will remain straight. If they are parallel, then they will remain parallel. Objectives sin with a cushion or barrel, or both. And the focus, albeit very soft, but will be the same at all distances, from the camera to infinity.
These properties provide great opportunities for filming urban landscape and country landscape. Also suitable for still lifes.
Here are these natural effects, do it yourself.
I met the article , and remembered that I had long ago promised my
This topic will be devoted to this post. It is designed for a wide range of readers, so we will try to do without abstruse words and cunning formulas.
And so, STENOP is a photographic device without a lens, which plays the role of a small hole ( wiki ).
So a camera obscura appeared (lat. amera obscūra “dark room”), and a photo was born.
All the rays entering the room had to go through this hole, which means that one point on the plane with the image corresponded to one point on the object, the image of which appeared on the wall. The image was not clear, so they began to use lenses. Then progress went forward, achieved small sizes
On the Internet you can find several detailed articles on the process of such a transformation. If in a nutshell, they are invited to spoil the lid that covers the bayonet,
It is also advised to achieve maximum removal of this hole from the matrix to avoid vignetting. This is when the photo is light in the middle and dark in the corners.
I decided to go a little different way and bring this hole to the matrix. The idea was that the luminosity of such a design is very small, compared with a conventional lens. Lenses significantly increased the amount of light entering the camera. But when you just have a peephole without lenses, you have to shoot at long exposures - there is very little light. The smaller the distance between the matrix and the hole, the more light it hits. The second reason: the smaller this distance (in the future we will call it the focal length), the clearer the image will be,
The base, as in common recipes, was taken as a stub for baoinet. Here I was waiting for disappointment. She was made of soft plastic, white and let the light through, which was completely unsuitable for my plan. During the day of wandering around the city to find the same, but the black failed. It was necessary to work with what is, but leave at least a plug from the plug — only what is attached to the camera body; the rest should be replaced with a light-proof material. With a lid in my pocket, I explored the nearest supermarket and the most suitable for the experiment seemed to me a jar of Bern. Its bottom perfectly lay on the lid and allowed to place it as deep as possible in the camera. So if we have a KAF baoynet, then it is best to use Byrne. It was for him that I had to put one dollar promised in the title.
The bottom is successfully cut, the queue glue.
An hour later, there was a question about the complete light insulation of what was left of the lid. It was decided to paint it with something black. Under the arm caught black nail polish. Since the design will be used by the girl, he was donated without any special scandals.
Further, a long and painstaking process of painting. I will say that the varnish is not ideal, as it is better to have a matte surface, especially the part that will be inside the camera. But it was too late to look for a more suitable solution was lazy. Further very accurately we pierce a hole with a needle.
It should be as round as possible, without torn edges and other things. 0.3–0.2 mm in diameter. If more, then we lose in sharpness, if less, then the variance will attack and there will be
We put on the camera:
And remove:
The same photo taken with a 35 mm whale lens:
Sorry for not taking anything more beautiful - the weather was not suitable and time was short.
As you have noticed, the image is very blurry and dark towards the edges. Nothing can be done about it.
But! Firstly, these effects may be useful in artistic photography. Now, many soften photos with photoshop and add a similar blackout, trying to achieve the effect "semi-antique". Secondly, this design has undeniable advantages that are inaccessible to ordinary objectives:
The advantage of the wall is the full orthoscopicity of the image given to them, and the very large depth of the sharply depicted space.
What in human language means that all the straight lines in the photo will remain straight. If they are parallel, then they will remain parallel. Objectives sin with a cushion or barrel, or both. And the focus, albeit very soft, but will be the same at all distances, from the camera to infinity.
These properties provide great opportunities for filming urban landscape and country landscape. Also suitable for still lifes.
Here are these natural effects, do it yourself.
')
Source: https://habr.com/ru/post/46486/
All Articles