Entering Aeronet Episode 2: Homing Drone
In the previous article, we examined the procedure for launching an autonomous virtual drone into the air. Under the guidance of a teacher, even schoolchildren manage to launch a drone according to this instruction. The question arises: what next? Well, drone, well soared. Moreover, virtual - in toys and simulators and more beautifully painted.
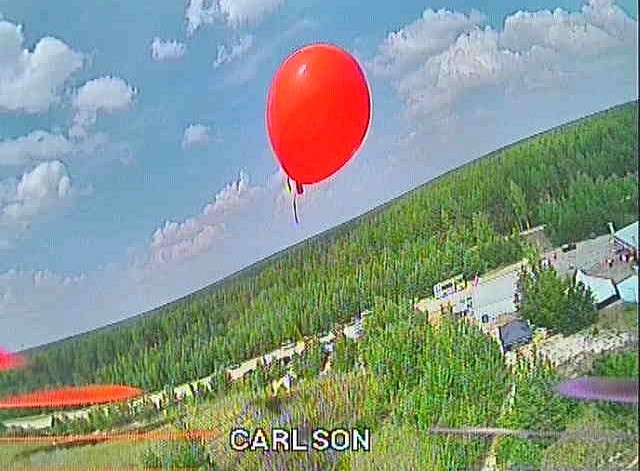
As a next step, we propose creating a homing drone capable of seeing its goal and successfully achieving it. It’s easiest to use a colored balloon as the target.
Such a task (to burst a ball with an autonomous drone) was recently carried out by teams at the Aeronet section of the All-Russian Robocross-2019 . We were inspired by the song “Seek and destroy” from the debut album of an American group that was very popular during my turbulent youth.
In the next series of articles, we will look at how to teach an autonomous drone to follow simple instructions from the refrain of the aforementioned song.
So, we need the following:
- A flying drone that we can control from the program
- Target recognition and guidance system
- Combine the previous two points together - and, voila, you can compete, whose drone will fly faster and more balls.
Next, first things first.
jMAVSim keyboard-controlled
Imagine a drone seeing a ball, like in the picture above. The drone's camera is looking straight ahead.
To fly on a ball, our drone must be able to: move forward / backward, turn left and right, fly higher and lower. The ball will move in the camera lens not only from gusts of wind, but also from the tilt of the drone along the roll and pitch, but we neglect these tilts so far.
We will control the speed of the drone by sending messages through mavros to the topic /mavros/setpoint_velocity/cmd_vel_unstamped .
To manipulate the drone from the keyboard, we use the curses module ( description in Russian , in English ).
The algorithm is simple: the current values of the desired speeds are stored in a setvel variable of type geometry_msgs.msg.Twist . By pressing a button on the keyboard, we increase / decrease the desired speed component. By the timer 20 times per second we publish the speed in the specified topic.
For forward speed (relative to the drone), clarification is required. The fact is that flight speeds must be set in the local coordinate system of the "world" in which our drone flies. Therefore, you need to track the current position (pose) of the drone in this coordinate system. The X axis of the drone is rotated relative to the X axis of the “world” by a certain angle yaw. Mavros publishes the current position of the drone in the coordinates of the "world" in the topic /mavros/local_position/pose . Having obtained the angle yaw from the position in order to obtain and publish the desired drone speed in world coordinates, we multiply the desired forward speed setvel_forward by cos (yaw) for the X axis and sin (yaw) for the Y axis of the world, respectively.

#!/usr/bin/env python # coding=UTF-8 import rospy import mavros import mavros.command as mc from mavros_msgs.msg import State from geometry_msgs.msg import PoseStamped, Twist, Quaternion from mavros_msgs.srv import CommandBool from mavros_msgs.srv import SetMode import tf.transformations as t import math current_state=State() current_pose = PoseStamped() current_vel = Twist() def localpose_callback(data): global current_pose current_pose = data def publish_setvel(event): global current_pose, setvel_pub, setvel, setvel_forward q=current_pose.pose.orientation.x, current_pose.pose.orientation.y,current_pose.pose.orientation.z,current_pose.pose.orientation.w roll, pitch, yaw = t.euler_from_quaternion(q) setvel.linear.x = setvel_forward * math.cos(yaw) setvel.linear.y = setvel_forward * math.sin(yaw) setvel_pub.publish(setvel) def main(): global current_pose, setvel, setvel_pub, setvel_forward rospy.init_node("offbrd",anonymous=True) rate=rospy.Rate(10) pose_sub=rospy.Subscriber("/mavros/local_position/pose",PoseStamped,localpose_callback) setvel_pub=rospy.Publisher("/mavros/setpoint_velocity/cmd_vel_unstamped",Twist,queue_size=1) arming_s=rospy.ServiceProxy("/mavros/cmd/arming",CommandBool) set_mode=rospy.ServiceProxy("/mavros/set_mode",SetMode) setvel=Twist() setvel_forward = 0 arming_s(True) set_mode(0,"AUTO.TAKEOFF") print 'Taking off.....\r' rospy.sleep(5) # keyboard manipulation import curses stdscr = curses.initscr() curses.noecho() stdscr.nodelay(1) stdscr.keypad(1) for i in range (0,10): setvel_pub.publish(setvel) rate.sleep() set_mode(0,"OFFBOARD") setvel_timer = rospy.Timer(rospy.Duration(0.05), publish_setvel) while (rospy.is_shutdown()==False): rate.sleep() # keyboard hcommands handling c = stdscr.getch() if c == ord('q'): break # Exit the while() elif c == ord('u'): setvel.linear.z += 0.25 elif c == ord('d'): setvel.linear.z -= 0.25 elif c == curses.KEY_LEFT: setvel.angular.z += 0.25 elif c == curses.KEY_RIGHT: setvel.angular.z -= 0.25 elif c == curses.KEY_UP: setvel_forward += 0.25 elif c == curses.KEY_DOWN: setvel_forward -= 0.25 elif c == ord('s'): setvel_forward=setvel.linear.z=setvel.angular.z=0 if c!=curses.ERR: print setvel,'\r' curses.endwin() set_mode(0,"AUTO.LAND") print 'Landing.......\r' if __name__=="__main__": main() To run the program for execution, we need to run jMAVSim, and connect mavros to it using the roslaunch mavros command (after running roscore if it was not started automatically):
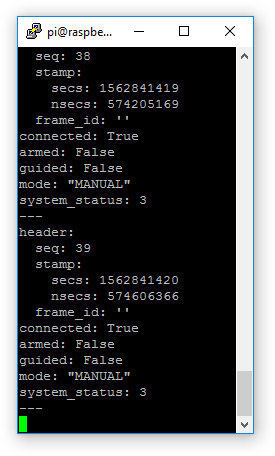
roslaunch mavros mavros_sitl.launch fcu_url:="udp://@192.168.7.14:14580" Make sure we are connected using rostopic echo / mavros / state. The connected field must be = True.
After that, save the program code to a file and run it with the python fly_mavsim.py . The virtual quadrocopter should rise to a height of about 2 meters (takeoff height is set in the MIS_TAKEOFF_ALT parameter in QGroundControl) and freeze. Using the buttons on the keyboard, it can be controlled: right-left arrows - turn, up-down arrows - forward / backward movement, u - fly up (UP), d - fly down (DOWN), s - hang in place (STOP, all speeds = 0), q - exit the program (QUIT) and land the quadrocopter.
You can fly around the virtual world, check how an ideal virtual drone behaves in flight.

Changes in speeds from keystrokes are summed up, you can make the drone fly in a circle, in a spiral, around a certain point, simulating a targeting system.
Then the fun begins: from a spherical drone in a vacuum, we move into the real world.
Keyboard controlled real drone
There are many instructions on the network for assembling and configuring copters on the PX4 stack. A fairly detailed process is described in the documentation of the developers .
Since I used a ready-made drone, this saved me from numerous squats during assembly and preliminary configuration of the system.
As an on-board computer, we use the Raspberry PI 3 Model B +, with Raspbian + ROS Kinetic installed. Raspberry is connected to the Pixracer flight controller via uart, according to the scheme:

The GPS module is connected to the GPS port of the flight controller. I use the TS100 module from Radiolink, the quality is good, the cost is not high.
ROS Kinetic can be installed independently using the instructions . On Raspberry, you should configure access via Wifi and ssh ( here is an instruction, for example ).
You can also use a ready-made image for Raspberry from the company "Copter Express". In this case, you should disable the default clever package, which we do not need:
sudo systemctl stop clever sudo systemctl disable clever Another Raspberry image with ROS and OpenCV is described here , I have not tried it in my work, but the tools used are similar.
After turning on the drone and connecting to Raspberry via ssh, we launch mavros and check the connection with the flight controller:
roslaunch mavros px4.launch fcu_url:='/dev/ttyAMA0:921600' gcs_url:='tcp-l://0.0.0.0:5760' rostopic echo /mavros/state If everything works correctly, once a second we receive messages about the status of the flight controller with the field Connected = True.
The gcs_url parameter in the gcs_url call is needed so that we can connect the QGroundControl to the flight controller of the drone via WiFi via TCP-bridge. Connection parameters are set in QGroundControl:

To prepare the drone for autonomous flight, I follow a few simple steps:
1. Make sure that the drone flies well in manual mode. To do this, the correct parameter settings must be selected and all sensors calibrated. Using a commercially available drone saved me from the trouble at this point. I used the LPE estimator with GPS enabled and a barometer:

2. If the system starts in a new place or for the first time, you should wait for the GPS module to “warm up”. With regular work on the street, GPS usually catches from 16 to 22 satellites.

3. Before flying to a new place, and if the drone does not hold a point, you should recalibrate the compass:

You should use an external compass, and make sure that the correct orientation is set in the settings:

If all the settings are made correctly, the drone should confidently keep the point in HOLD mode and fly stably in Position mode.
After successful test flights in manual mode, we can check how our program fly_jmavsim.py works on a real drone: video .
A real drone does not fly as perfect as a virtual one - but it also needs to obey commands from the keyboard - fly in the right direction and stop at the command.
If this happens, instead of keyboard control, we can use computer vision, which we will discuss about setting up in the next article. The first ball-hunting tests looked something like this .
The settings of our flight controller + program code are posted on the github .
')
Source: https://habr.com/ru/post/461887/
All Articles