Data Version Control (DVC): data versioning and experiment reproducibility
This article is a kind of master class “DVC for automating ML experiments and data versioning”, which took place on June 18 at the ML REPA (Machine Learning REPA:
Reproducibility, Experiments and Pipelines Automation) at our bank site.
Here I will talk about the features of the internal work of DVC and how to use it in projects.
The code examples used in the article are available here . The code was tested on MacOS and Linux (Ubuntu).
')

Part 1
Part 2
Data Version Control is a tool that is designed to manage model and data versions in ML projects. It is useful both at the experimental stage and for deploying your models into operation.
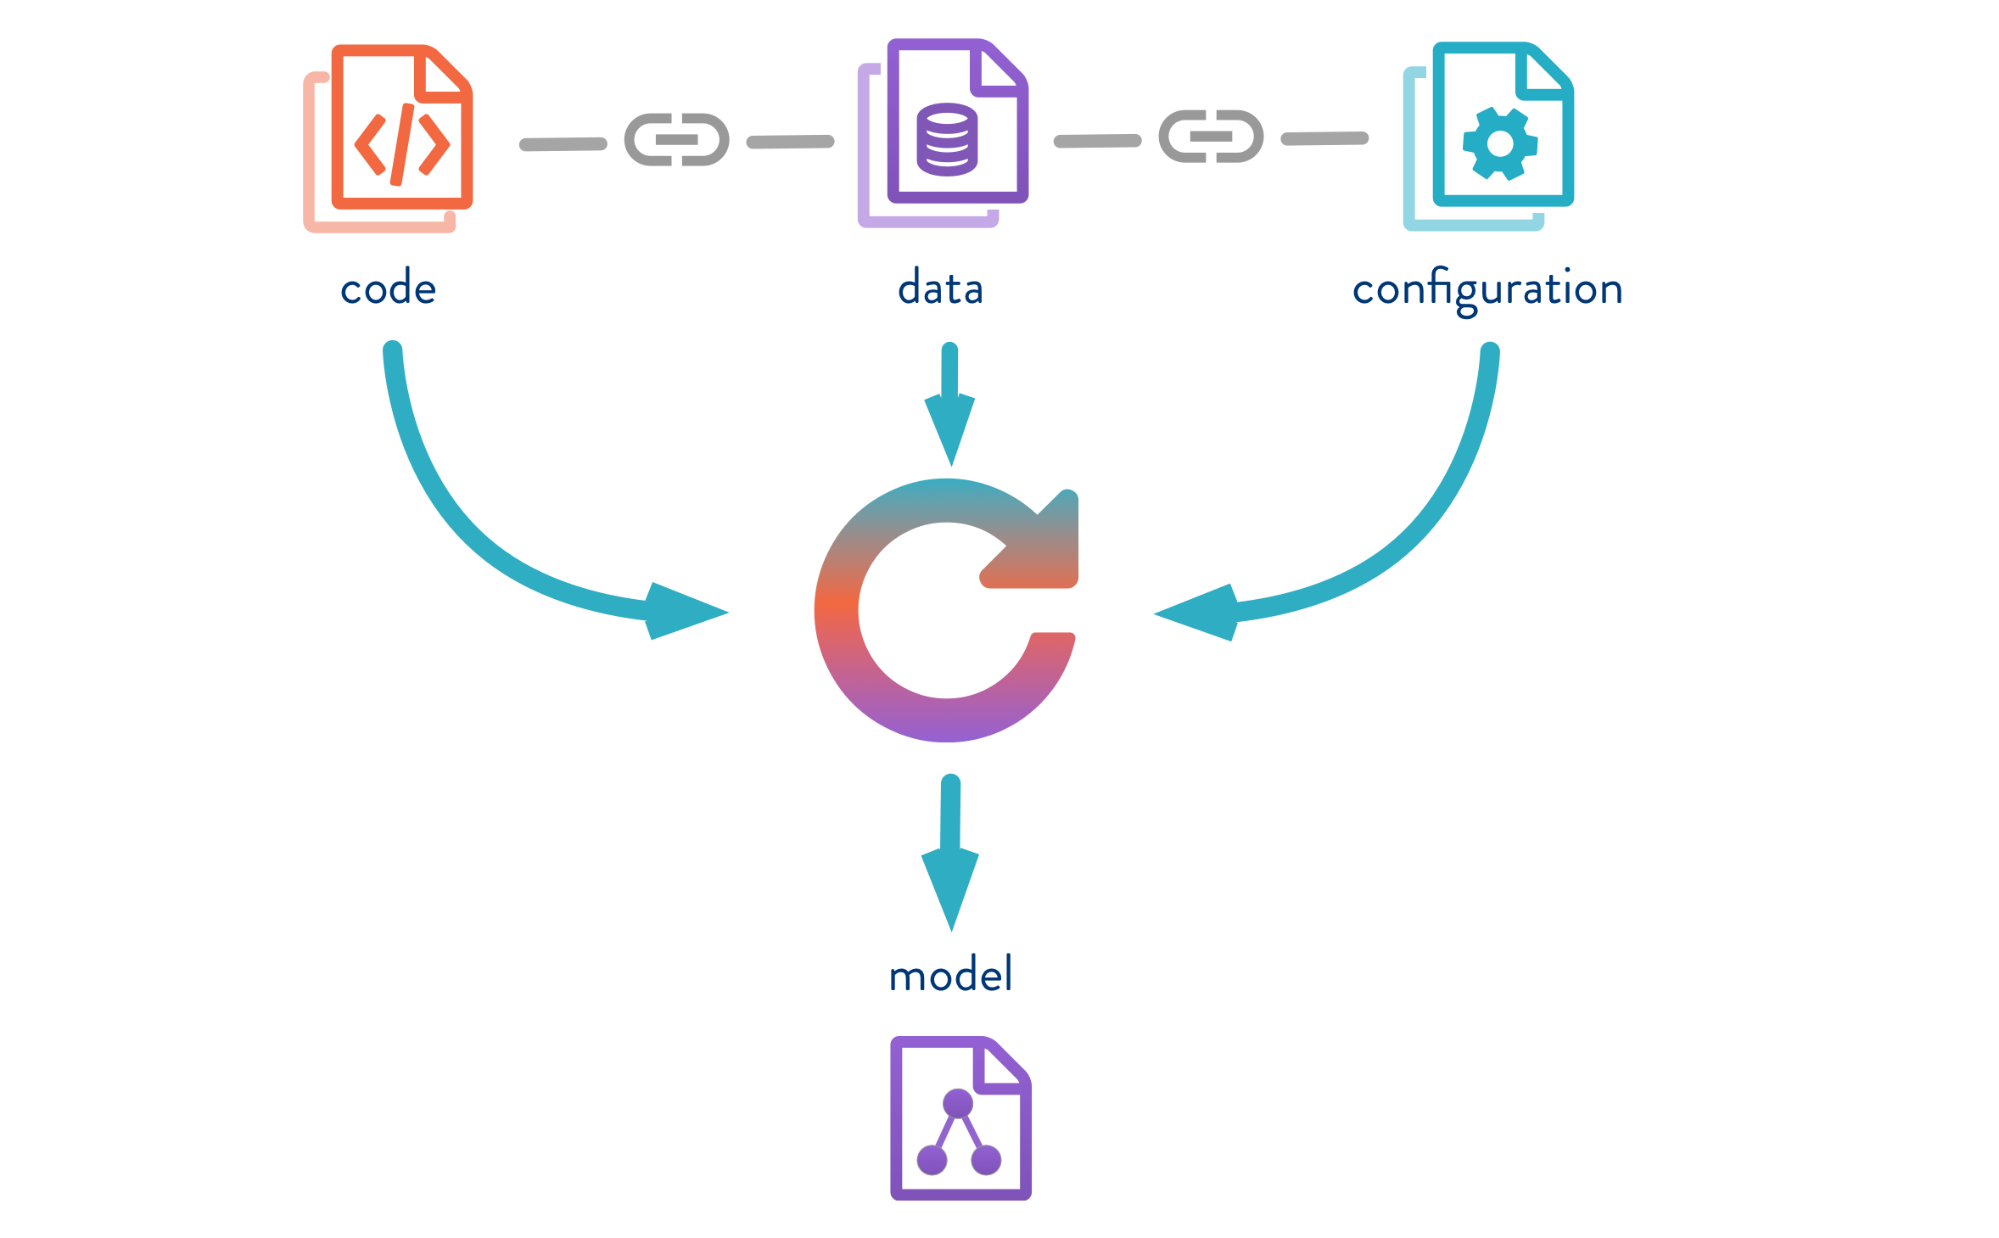
DVC allows you to version models, data and pipelines in DS projects.
The source is here .
Let's look at the DVC operation using the example of the iris color classification problem. To do this, I will use the well-known dataset Iris Data Set . Other examples of working with DVC are shown by Jupyter Notebook.
What should be done:
So, we clone the repository, create a virtual environment and install the necessary packages. Installation and launch instructions are in the README repository.
To install DVC, use the
DVC runs on top of Git, uses its infrastructure, and has similar syntax.
In the process, DVC creates meta files to describe pipelines and versioned files that need to be saved in Git the history of your project. Therefore, after executing
The
The contents of
Config is the DVC configuration, and cache is the system folder into which DVC will store all the data and models that you will version.
DVC will also create a
Now you need to install all the dependencies, and then make a
Versioning Models and Data

The source is here .
Let me remind you that if you transfer some data under the control of DVC, then it will begin to track all changes. And we can work with this data in the same way as with Git: save the version, send it to the remote repository, get the right version of the data, change and switch between versions. The interface at DVC is very simple.
Enter the
Inside the generated dvc file, its hash with standard parameters is stored.
Automation of ML Pipelines
In addition to data version control, we can create pipelines (pipelines) - chains of calculations between which dependencies are defined. Here is the standard pipeline for classifier training and assessment:
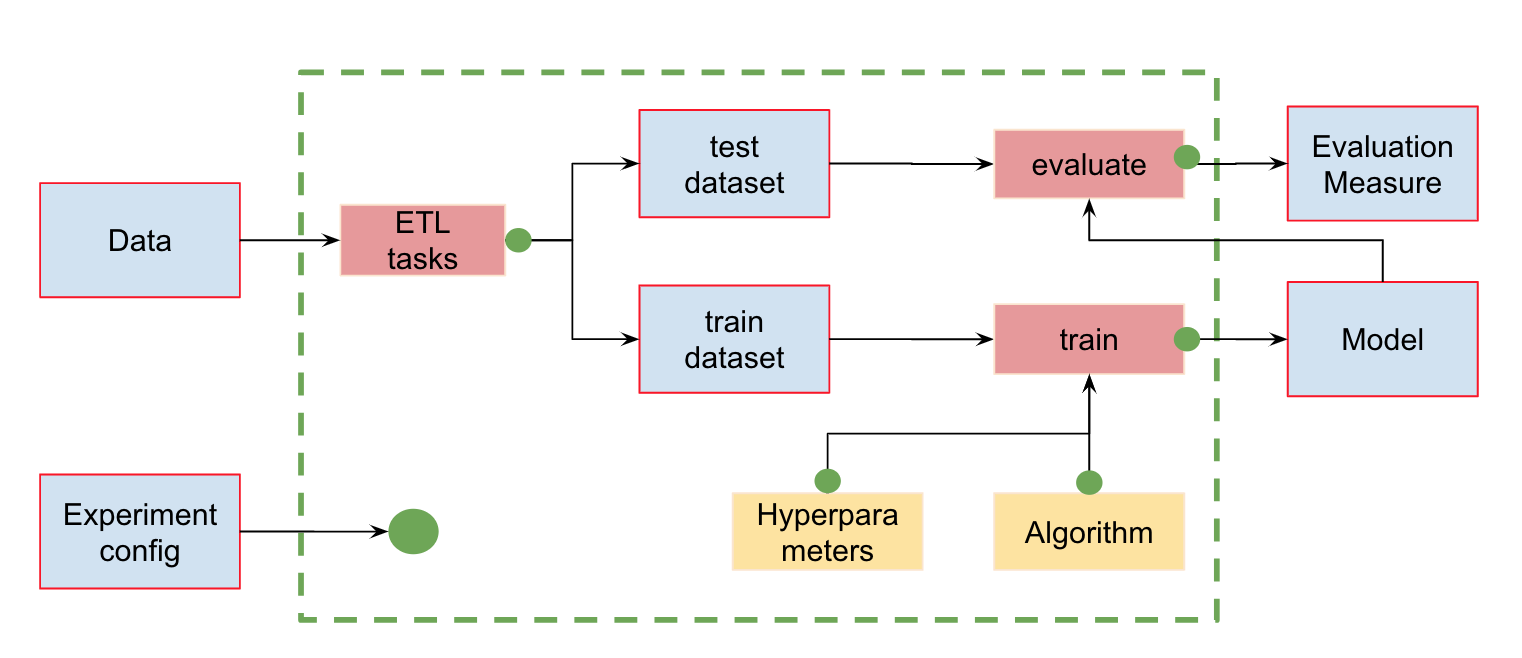
At the input, we have data that must be pre-processed, divided into train and test, calculate the characteristics and only then train the model and evaluate it. This pipeline can be broken into separate pieces. For example, to distinguish the stage of loading and preprocessing data, splitting data, evaluating, etc., and connecting these chains together.
To do this, the DVC has a wonderful
Now - for example, the launch phase of the calculation of signs. First, let's look at the contents of the featureization.py module:
This code takes the dataset, calculates the characteristics and saves them in iris_featurized.csv. We left the calculation of additional signs to the next stage.
To create a pipeline, it is necessary to execute the command for each stage of calculations
First, in the
DVC will create a metafile and will track changes in the Python module and the iris.csv file.
If changes occur in them, the DVC will restart this calculation step in the pipeline.
The resulting stage_feature_extraction.dvc file will contain its hash, start command, dependencies and output (there are additional parameters for them that can be found in the metadata).
Now you need to save this file in the history of Git commits. Thus, we can create a new branch and push it into the Git repository. You can commit to a Git story either by creating each stage individually, or all stages at once.
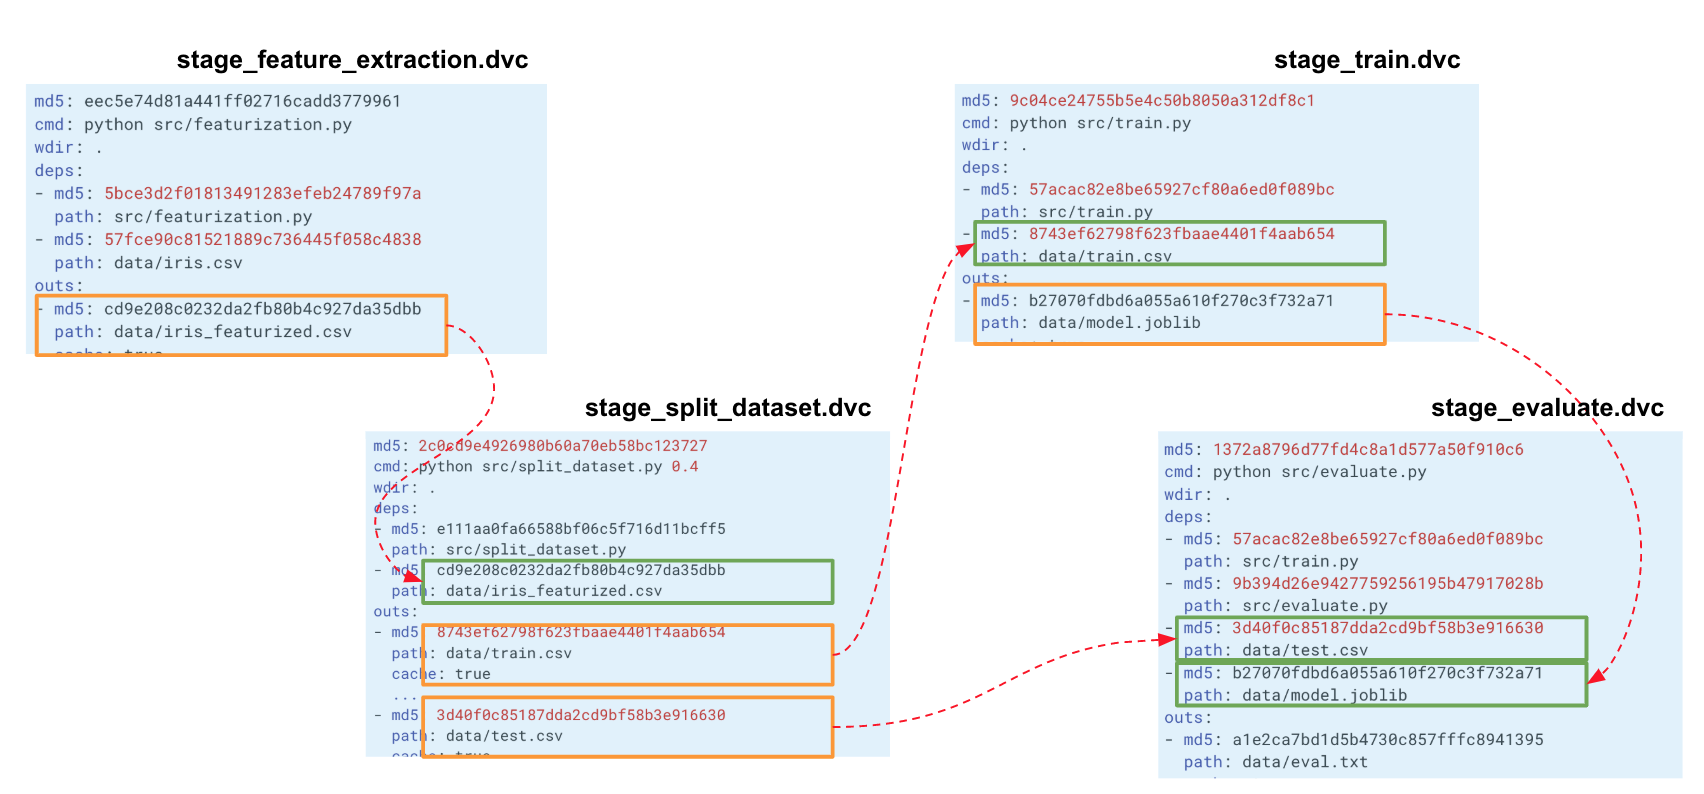
When we build such a chain for our entire experiment, DVC builds a computation graph (DAG), by which it can start either recalculation of the entire pipeline or some part. The hashes of the output from one stage go to the inputs of another. According to them, DVC tracks dependencies and builds a graph of calculations. If you changed the code somewhere in split_dataset.py, the DVC will not load the data and possibly recalculate the signs, but will restart this stage and the subsequent training and evaluation stages.
Metrics tracking
Using the
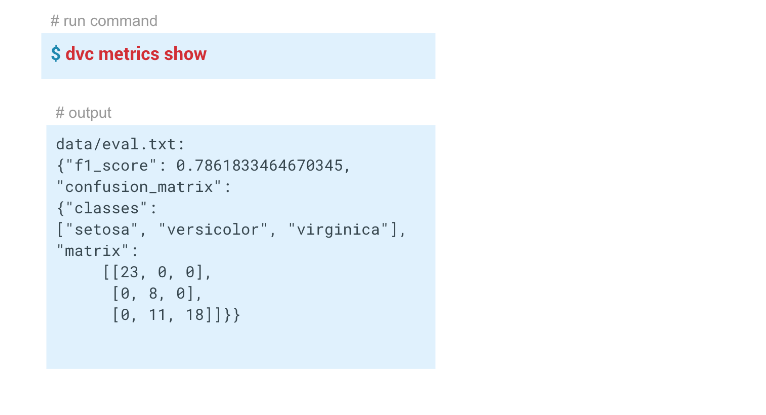
In this example, we got these results:
Pipeline reproducibility
Those who have worked with this dataset know that it is very difficult to build a good model on it.
Now we have a pipeline created using DVC. The system tracks the history of data and the model, can restart itself in whole or in part, and can display metrics. We have completed all the necessary automation.
We had a model with f1 = 0.78. We want to improve it by changing some parameters. To do this, restart the entire pipeline, ideally, with just one command. In addition, if you are working in a team, you may want to pass on the model and code to colleagues so that they can continue to work on them.
The
In this case, the DVC did not see any changes in the stage_evaluate stage dependencies and refused to restart. And if we specify the
The ability to restart pipelines and track the dependencies of each stage allows you to experiment with models faster.
For example, you can change the characteristics ('uncomment' the lines for calculating the characteristics in
Saving data to a remote repository
DVC can work not only with local version storage. If you execute the
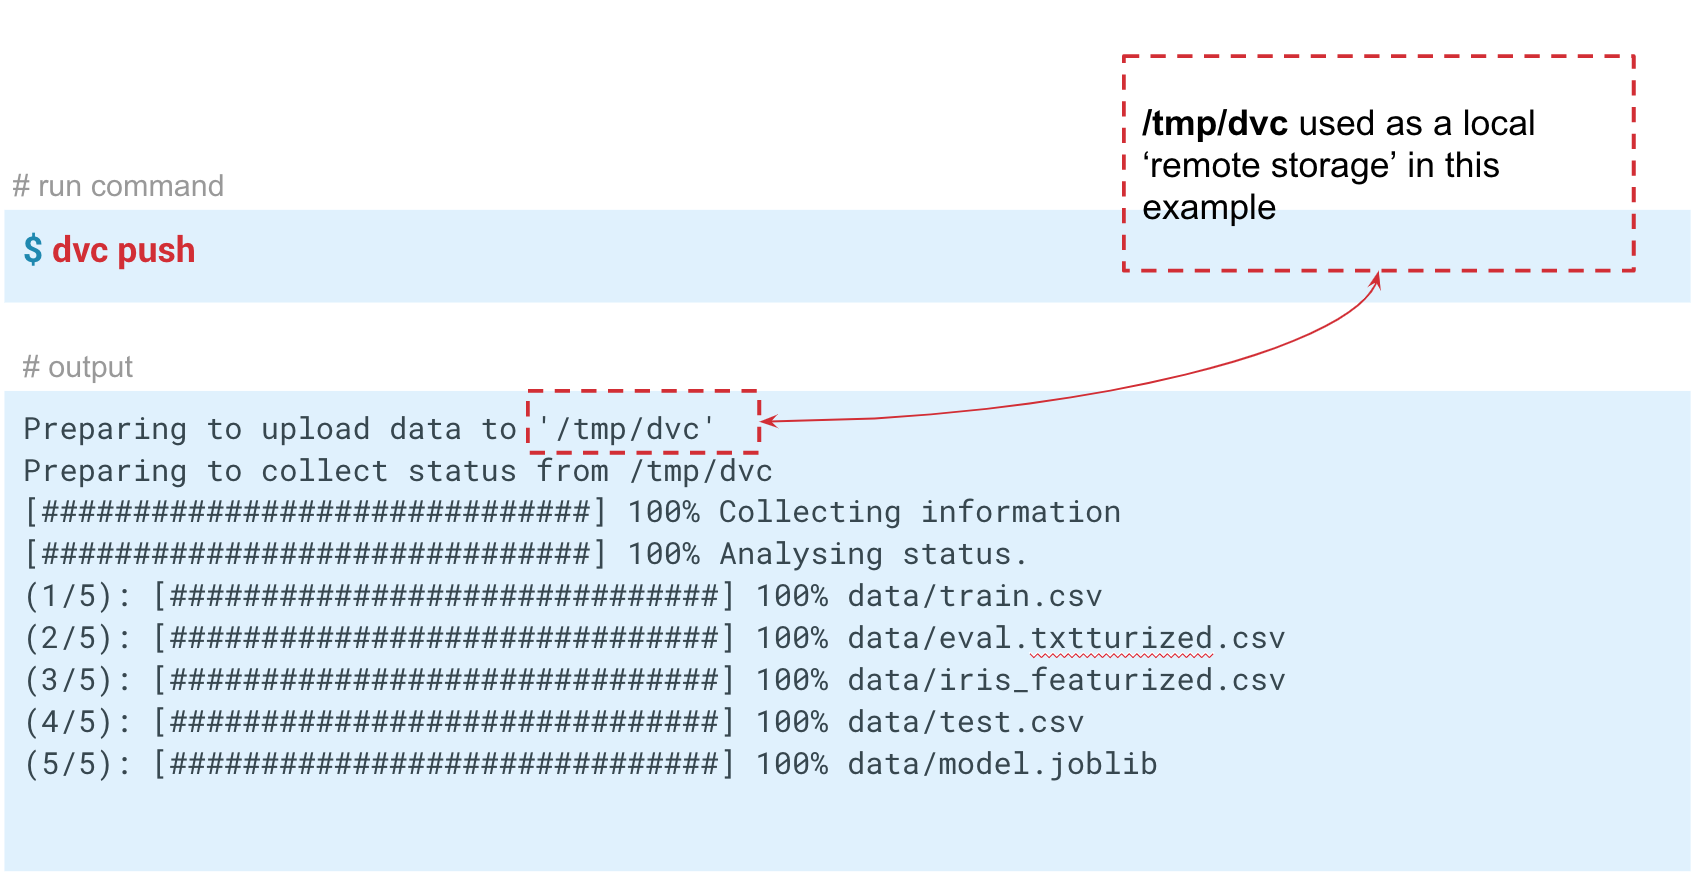
In this case, we simulate the “remote” storage in the temp / dvc folder. In approximately the same way, remote storage is created in the cloud. Commit this change so that it remains in the Git story. Now we can perform
So , we examined three situations in which DVC and basic functionality are useful:
How to implement DVC in your projects?
To ensure reproducibility of the project, certain requirements must be observed.
Here are the main ones:
If all this is done, then the project is more likely to be reproducible. DVC allows you to fulfill the 3 first requirements in this list.
When trying to implement DVC in your company, you may encounter reluctance: “Why do we need this? We have a Jupyter Notebook. ” Perhaps some of your colleagues only work with Jupyter Notebook, and it is much more difficult for them to write such pipelines and code in the IDE. In this case, you can go through a step-by-step implementation.
If you have a new project and a couple of enthusiasts in a team, then it is better to use DVC right away. So, for example, it turned out in our team! When starting a new project, my colleagues supported me, and we started using DVC on our own. Then they began to share with other colleagues and teams. Someone picked up our undertaking. Today, DVC is not yet a generally accepted tool in our bank, but it is used in several projects.
Reproducibility, Experiments and Pipelines Automation) at our bank site.
Here I will talk about the features of the internal work of DVC and how to use it in projects.
The code examples used in the article are available here . The code was tested on MacOS and Linux (Ubuntu).
')
Content
Part 1
Part 2
DVC setup
Data Version Control is a tool that is designed to manage model and data versions in ML projects. It is useful both at the experimental stage and for deploying your models into operation.
DVC allows you to version models, data and pipelines in DS projects.
The source is here .
Let's look at the DVC operation using the example of the iris color classification problem. To do this, I will use the well-known dataset Iris Data Set . Other examples of working with DVC are shown by Jupyter Notebook.
What should be done:
- clone the repository;
- create a virtual environment;
- install the necessary python packages;
- initialize DVC.
So, we clone the repository, create a virtual environment and install the necessary packages. Installation and launch instructions are in the README repository.
1. Clone this repositorygit clone https://gitlab.com/7labs.ru/tutorials-dvc/dvc-1-get-started.git cd dvc-1-get-started
2. Create and activate virtual environmentpip install virtualenv virtualenv venv source venv/bin/activate
3. Install python libraries (including dvc)pip install -r requirements.txt
To install DVC, use the
pip install dvc command. After installation, it is necessary to initialize the DVC in the dvc init project folder, which will generate a set of folders for further work of the DVC.4. checkout new branch in demo repository (to not wipe content of master branch)git checkout -b dvc-tutorial
5. Initialize DVCdvc init commit dvc init git commit -m "Initialize DVC"
DVC runs on top of Git, uses its infrastructure, and has similar syntax.
In the process, DVC creates meta files to describe pipelines and versioned files that need to be saved in Git the history of your project. Therefore, after executing
dvc init you need to run git commit to commit all the settings made.The
.dvc folder will appear in your repository, in which cache and config will lie.The contents of
.dvc will look like this: ./ ../ .gitignore cache/ config Config is the DVC configuration, and cache is the system folder into which DVC will store all the data and models that you will version.
DVC will also create a
.gitignore file, in which it will write those files and folders that do not need to be committed to the repository. When you transfer a file to DVC for versioning in Git, versions and metadata will be saved, and the file itself will be stored in cache.Now you need to install all the dependencies, and then make a
checkout in the new dvc-tutorial branch, in which we will work. And download the Iris dataset.Get datawget -P data/ https://raw.githubusercontent.com/uiuc-cse/data-fa14/gh-pages/data/iris.csv
DVC Features
Versioning Models and Data
The source is here .
Let me remind you that if you transfer some data under the control of DVC, then it will begin to track all changes. And we can work with this data in the same way as with Git: save the version, send it to the remote repository, get the right version of the data, change and switch between versions. The interface at DVC is very simple.
Enter the
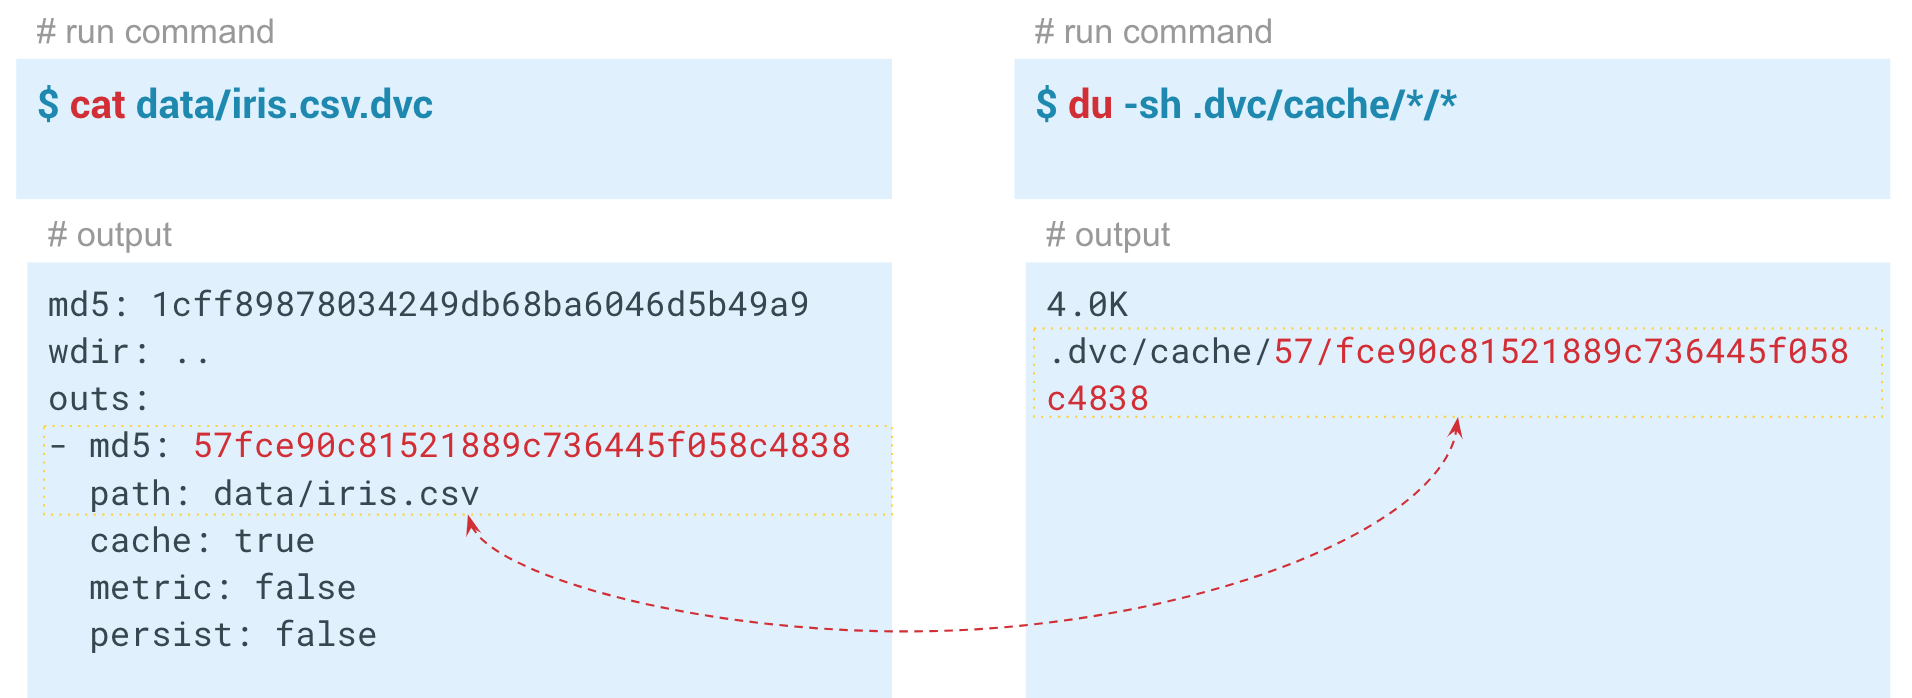
dvc add command and specify the path to the file that we need to version. DVC will create the iris.csv metafile with the extension .dvc, and write information about it to the cache folder. Let's commit these changes so that information about the beginning of versioning appears in the Git history. dvc add data/iris.csv Inside the generated dvc file, its hash with standard parameters is stored.
Output - the path to the file in the dvc folder, which we added under the control of DVC. The system takes the data, puts it in the cache and creates a link to the cache in the working directory. This file can be added to the Git history and thus versioned. DVC takes over the management of the data itself. The first two characters of the hash are used as the folder inside the cache, and the remaining characters are used as the name of the created file.Automation of ML Pipelines
In addition to data version control, we can create pipelines (pipelines) - chains of calculations between which dependencies are defined. Here is the standard pipeline for classifier training and assessment:
At the input, we have data that must be pre-processed, divided into train and test, calculate the characteristics and only then train the model and evaluate it. This pipeline can be broken into separate pieces. For example, to distinguish the stage of loading and preprocessing data, splitting data, evaluating, etc., and connecting these chains together.
To do this, the DVC has a wonderful
dvc run command, in which we pass certain parameters and specify the Python module that we need to run.Now - for example, the launch phase of the calculation of signs. First, let's look at the contents of the featureization.py module:
import pandas as pd def get_features(dataset): features = dataset.copy() # uncomment for step 5.2 Add features # features['sepal_length_to_sepal_width'] = features['sepal_length'] / features['sepal_width'] # features['petal_length_to_petal_width'] = features['petal_length'] / features['petal_width'] return features if __name__ == '__main__': dataset = pd.read_csv('data/iris.csv') features = get_features(dataset) features.to_csv('data/iris_featurized.csv', index=False) This code takes the dataset, calculates the characteristics and saves them in iris_featurized.csv. We left the calculation of additional signs to the next stage.
To create a pipeline, it is necessary to execute the command for each stage of calculations
dvc run .First, in the
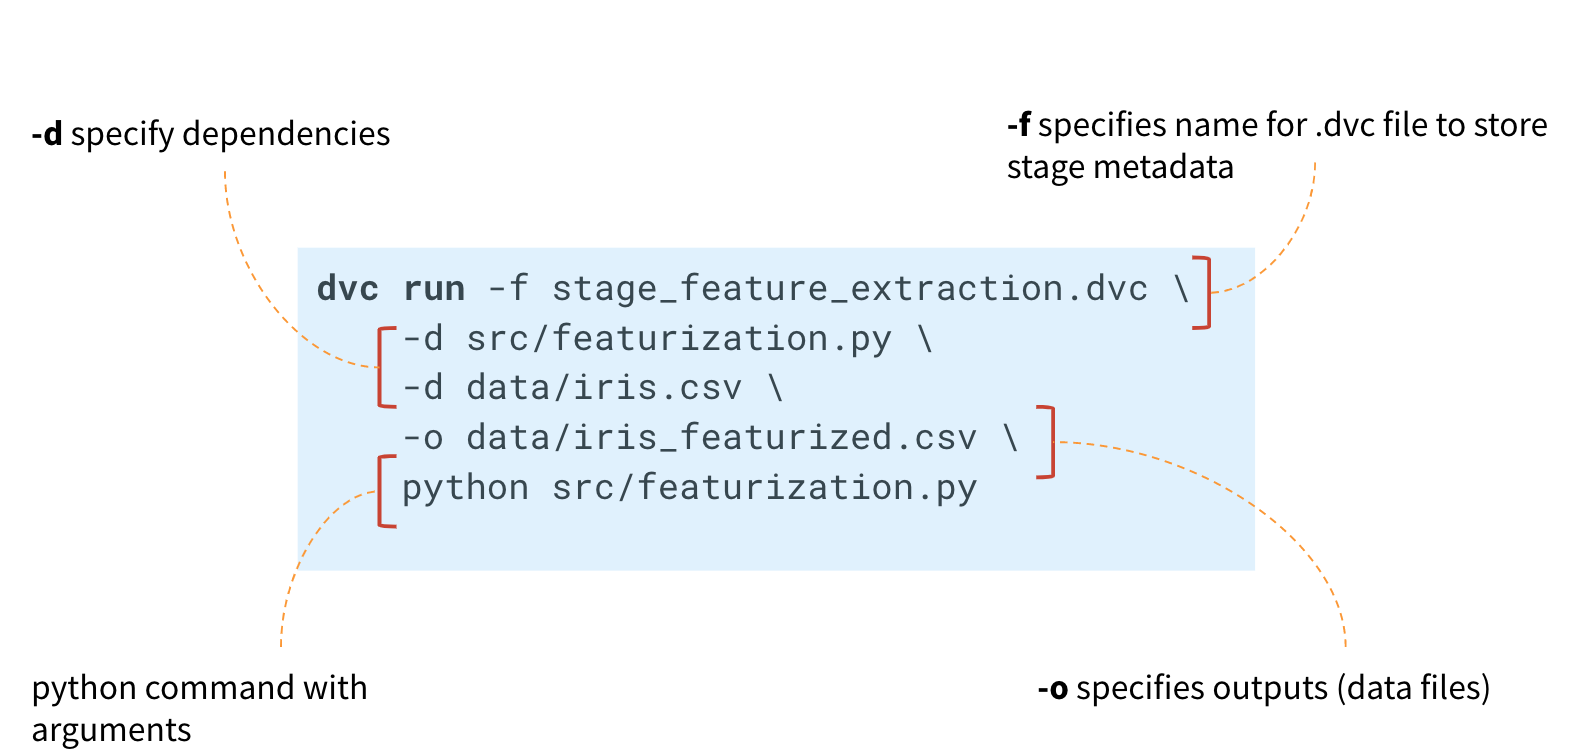
dvc run command, specify the name of the stage_feature_extraction.dvc metafile, in which the DVC will write the necessary metadata about the calculation stage. Through the -d argument, we specify the necessary dependencies: the featureization.py module and the iris.csv data file. We also specify the iris_featurized.csv file, in which the signs are saved, and the python src / featurization.py launch command itself. dvc run -f stage_feature_extraction.dvc \ -d src/featurization.py \ -d data/iris.csv \ -o data/iris_featurized.csv \ python src/featurization.py DVC will create a metafile and will track changes in the Python module and the iris.csv file.
If changes occur in them, the DVC will restart this calculation step in the pipeline.
The resulting stage_feature_extraction.dvc file will contain its hash, start command, dependencies and output (there are additional parameters for them that can be found in the metadata).
Now you need to save this file in the history of Git commits. Thus, we can create a new branch and push it into the Git repository. You can commit to a Git story either by creating each stage individually, or all stages at once.
When we build such a chain for our entire experiment, DVC builds a computation graph (DAG), by which it can start either recalculation of the entire pipeline or some part. The hashes of the output from one stage go to the inputs of another. According to them, DVC tracks dependencies and builds a graph of calculations. If you changed the code somewhere in split_dataset.py, the DVC will not load the data and possibly recalculate the signs, but will restart this stage and the subsequent training and evaluation stages.
Metrics tracking
Using the
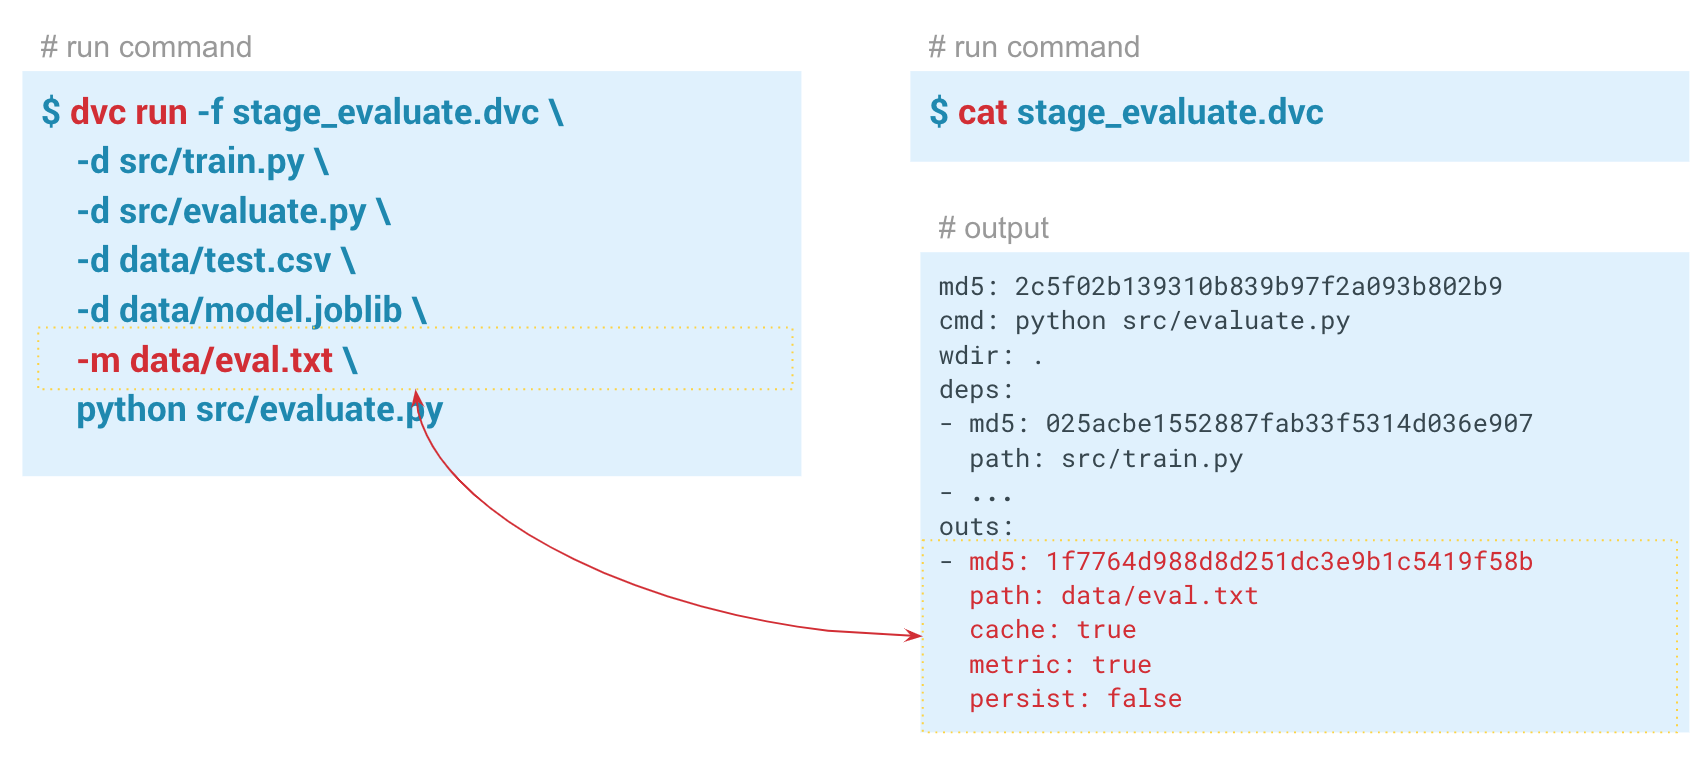
dvc metrics show command, you can display the metrics of the current launch, the branch in which we are located. And if we pass the -a option, the DVC will show all the metrics that are in the Git history. In order for DVC to start tracking metrics, when creating the evaluate step, we pass the -m parameter through data / eval.txt. The evaluate.py module writes metrics to this file, in this case f1 and confusion metrics . In the output folder in the dvc file of this step, cache and metrics set to true. That is, the dvc metrics show command will output the contents of the eval.txt file to the console. Also, with the arguments of this command, you can show only f1_score or only confusion_matrix .In this example, we got these results:
Pipeline reproducibility
Those who have worked with this dataset know that it is very difficult to build a good model on it.
Now we have a pipeline created using DVC. The system tracks the history of data and the model, can restart itself in whole or in part, and can display metrics. We have completed all the necessary automation.
We had a model with f1 = 0.78. We want to improve it by changing some parameters. To do this, restart the entire pipeline, ideally, with just one command. In addition, if you are working in a team, you may want to pass on the model and code to colleagues so that they can continue to work on them.
The
dvc repro allows dvc repro to restart pipelines or individual stages (in this case, you need to specify the reproduced stage after the command).dvc repro stage_evaluate , the stage will try to restart the entire pipeline. But if we do this in the current state, the DVC will not see any changes and will not restart. And if we change something, he will find the change and restart the pipeline from this point on. $ dvc repro stage_evaluate.dvc Stage 'data/iris.csv.dvc' didn't change. Stage 'stage_feature_extraction.dvc' didn't change. Stage 'stage_split_dataset.dvc' didn't change. Stage 'stage_train.dvc' didn't change. Stage 'stage_evaluate.dvc' didn't change. Pipeline is up to date. Nothing to reproduce. In this case, the DVC did not see any changes in the stage_evaluate stage dependencies and refused to restart. And if we specify the
-f option, then it will restart all the preliminary steps and show a warning that it deletes previous versions of the data that it was tracking. Each time the DVC restarts the stage, it deletes the previous cache, actually overwrites it so as not to duplicate data. At the moment the DVC file is launched, its hash will be checked, and if it has changed, the pipeline will restart and overwrite all the output that this pipeline has. If you want to avoid this, you must first run a specific version of the data in some remote repository.The ability to restart pipelines and track the dependencies of each stage allows you to experiment with models faster.
For example, you can change the characteristics ('uncomment' the lines for calculating the characteristics in
featurization.py ). DVC will see these changes and restart the entire pipeline.Saving data to a remote repository
DVC can work not only with local version storage. If you execute the
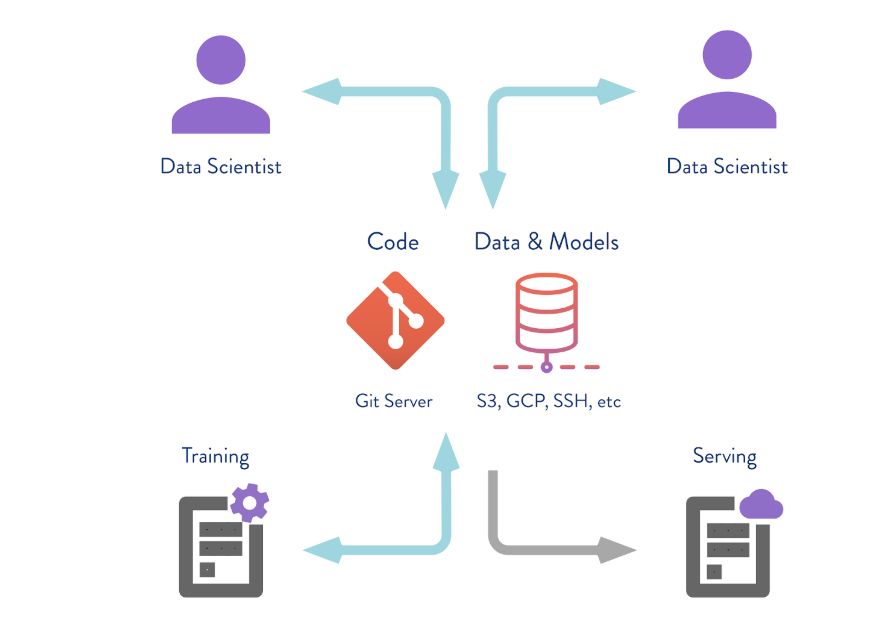
dvc push command, the DVC will send the current version of the model and data to a pre-configured remote repository repository. If then your colleague makes the git clone your repository and performs dvc pull , he will receive the version of the data and models that is intended for this branch. The main thing is that everyone has access to this repository.In this case, we simulate the “remote” storage in the temp / dvc folder. In approximately the same way, remote storage is created in the cloud. Commit this change so that it remains in the Git story. Now we can perform
dvc push to send data to this storage, and your colleague simply dvc pull to receive them.So , we examined three situations in which DVC and basic functionality are useful:
- Versioning data and models . If you do not need pipes and remote repositories, you can version the data for a specific project, working on the local machine. DVC allows you to quickly work with data in tens of gigabytes.
- Exchange of data and models between teams . You can use cloud solutions to store data. This is a convenient option if you have a distributed team or there are restrictions on the size of files sent by mail. Also, this technique can be used in situations when you send each other a Notebook, but they do not start.
- Organization of team work inside a large server . The team can work with the local version of big data, for example, several tens or hundreds of gigabytes, so that you do not copy them back and forth, but use one remote storage that will send and save only critical versions of models or data.
Part 2
How to implement DVC in your projects?
To ensure reproducibility of the project, certain requirements must be observed.
Here are the main ones:
- all pipelines are automated;
- control of launch parameters of each stage of calculations;
- version control of code, data and models;
- environmental control;
- documentation.
If all this is done, then the project is more likely to be reproducible. DVC allows you to fulfill the 3 first requirements in this list.
When trying to implement DVC in your company, you may encounter reluctance: “Why do we need this? We have a Jupyter Notebook. ” Perhaps some of your colleagues only work with Jupyter Notebook, and it is much more difficult for them to write such pipelines and code in the IDE. In this case, you can go through a step-by-step implementation.
- The easiest way to start is by versioning the code and models.
And then move on to automating the pipelines. - First automate the steps that often restart and change,
and then the whole pipeline.
If you have a new project and a couple of enthusiasts in a team, then it is better to use DVC right away. So, for example, it turned out in our team! When starting a new project, my colleagues supported me, and we started using DVC on our own. Then they began to share with other colleagues and teams. Someone picked up our undertaking. Today, DVC is not yet a generally accepted tool in our bank, but it is used in several projects.
Source: https://habr.com/ru/post/461803/
All Articles