Android text display

Displaying textual information is probably the most basic and important part of many Android applications. This article will talk about TextView. Every developer, starting with “Hello World,” is constantly confronted with this user interface element. From time to time, when working with text, you have to think about implementing various design solutions or improving performance when rendering a screen.
I will talk about the TextView device and some subtleties of working with it. Key tips were taken from reports of past Google I / O.
TextView under the hood
For rendering text in Android, a whole stack of various libraries is used under the hood. They can be divided into two main parts - java code and native code:

Java code is essentially part of the Android SDK available to application developers, and new features from it can be ported to the support library.
The TextView core itself is written in C ++, which limits the porting to the support library of new features implemented there from new versions of the operating system. The core is the following libraries:
- Minikin is used to measure the length of text, line breaks and words by syllables.
- ICU provides Unicode support.
- HarfBuzz finds for Unicode characters the corresponding graphic elements (glyphs) in fonts.
- FreeType makes bitmaps of glyphs.
- Skia is an engine for drawing 2D graphics.
Measuring text length and line breaks
If you pass the string to the Minikin library, which is used inside the TextView, then the first thing it determines is which glyphs the string consists of:
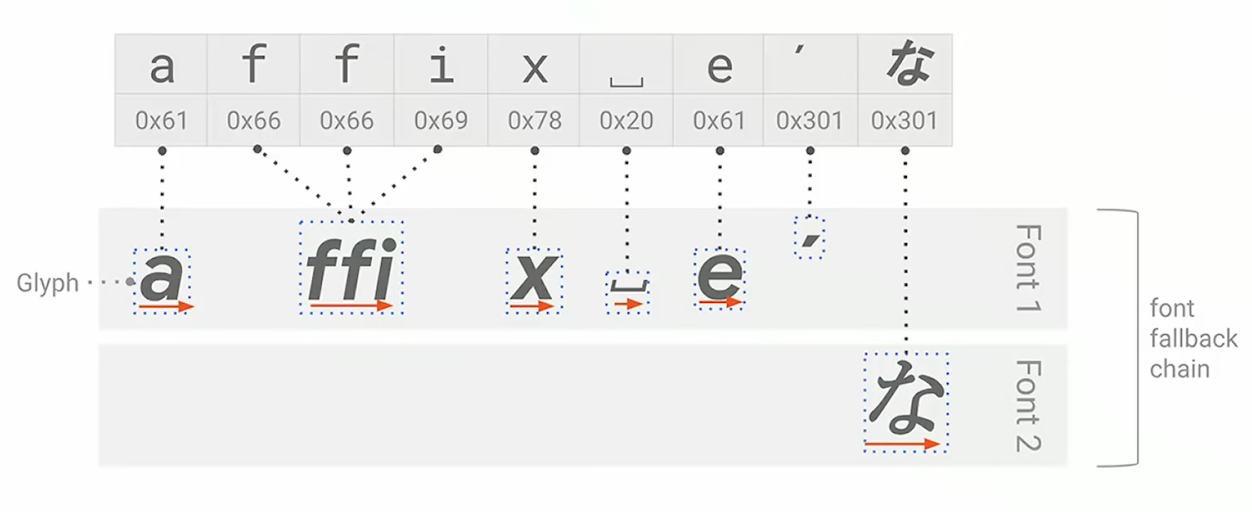
As you can see from this example, matching Unicode characters with glyphs will not always be one to one: here 3 characters at once will correspond to one glyph ffi. In addition, it is worth paying attention that the necessary glyphs can be found in various system fonts.
Finding glyphs only in system fonts can lead to difficulties, especially if icons or emojis are displayed through the characters, and it is supposed to combine characters from different fonts in one line. Therefore, starting with Android Q (29) , it became possible to create your own list of fonts that come with the application. This list will be used to search for glyphs:
textView.typeface = TypeFace.CustomFallbackBuilder( FontFamily.Builder( Font.Builder(assets, “lato.ttf”).build() ).build() ).addCustomFallback( FontFamily.Builder( Font.Builder(assets, “kosugi.ttf”).build() ).build() ).build() Now, using CustomFallbackBuilder when matching characters with glyphs, the SDK will sort through the specified font family in order, and if it cannot be found, the search will continue in system fonts (and through the setSystemFallback() method you can specify the preferred system font family). CustomFallbackBuilder has a limit on the number of font family - you can add no more than 64 fonts.
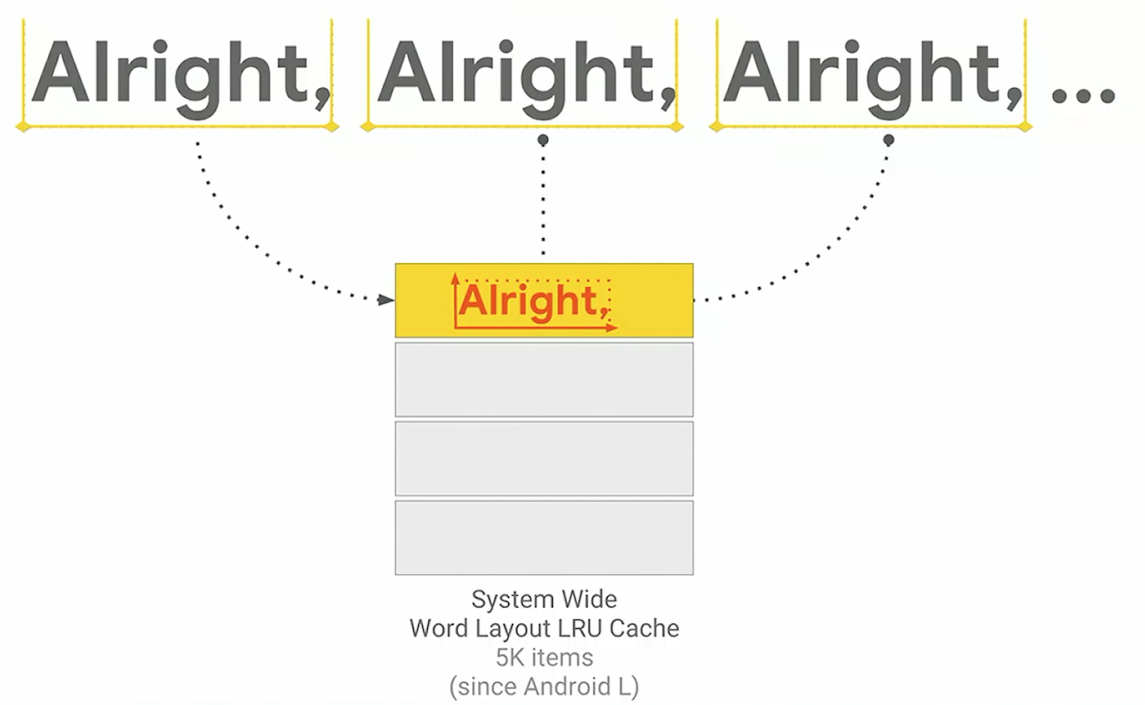
The Minikin library splits strings into words and measures individual words. To speed up work, starting with Lollipop (21) , a system LRU cache of words is used. Such a cache gives a huge performance gain: a call to Paint.measureText() for a cached word will take an average of 3% of the time it first calculates its size.
If the text does not fit the specified width, Minikin arranges line breaks and words in the text. Starting with Marshmallow (23), you can control its behavior by specifying the breakStrategy and hyphenationFrequency special attributes for TextView.
With the value breakStrategy=simple library will simply arrange hyphens sequentially, passing through the text: as soon as the line ceases to fit, the hyphenation is put before the last word.
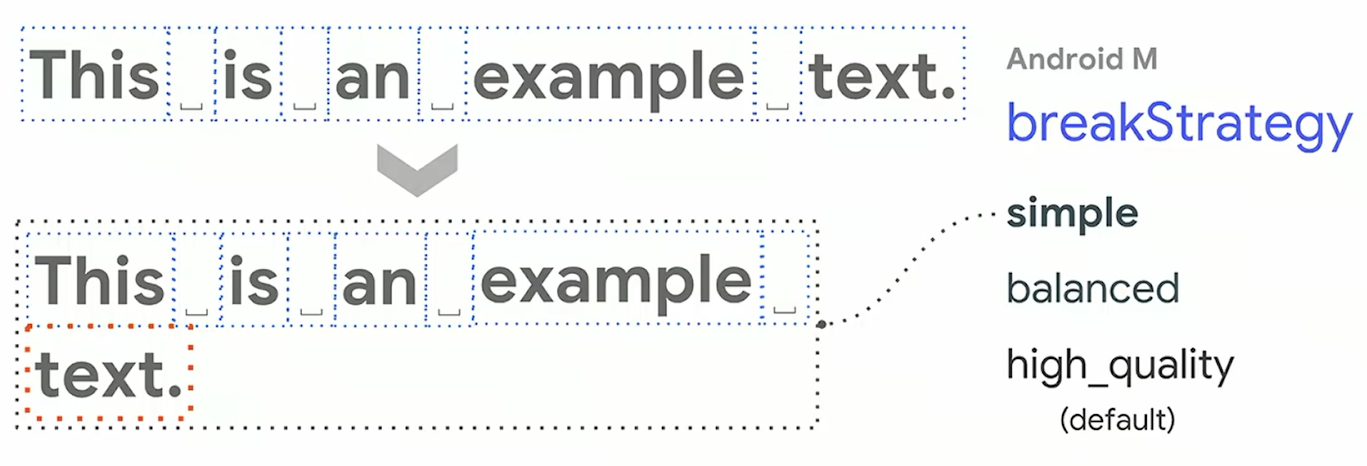
In the value balanced library will try to make line breaks so that the lines are aligned in width.

high_quality has almost the same behavior as balanced , with the exception of some differences (one of them: on the penultimate line, hyphenation can be not only separate words, but also words by syllables).
The hyphenationFrequency attribute allows hyphenationFrequency to control the strategy for word wrapping by syllables. A value of none will not do automatic hyphenation, normal will make a small frequency of hyphenation, and full , accordingly, will use the maximum number of words.

Text rendering performance depending on the selected flags (measured on Android P (28) ):
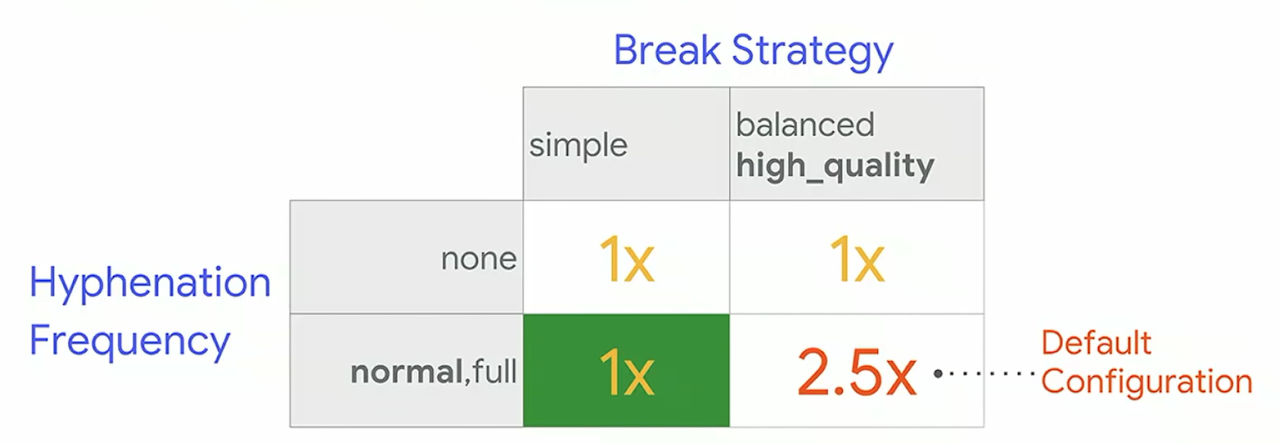
Given a fairly strong performance hit, Google developers, starting with version Q (29) and AppCompat 1.1.0 , decided to turn off hyphenation by default. If word wrapping is important in the application, now you need to enable it explicitly.
When using word wrap, one must take into account that the current selected language in the operating system will affect the operation of the library. Depending on the language, the system will select special dictionaries with transfer rules.
Text styles
There are several ways to style text in Android:
- A single style that applies to the entire TextView element.
- Multi-style (multi style) - several styles at once, which can be applied to the text, at the level of paragraph or individual characters. There are several ways to do this:
- drawing text on canvas
- html tags
- special markup elements - spans
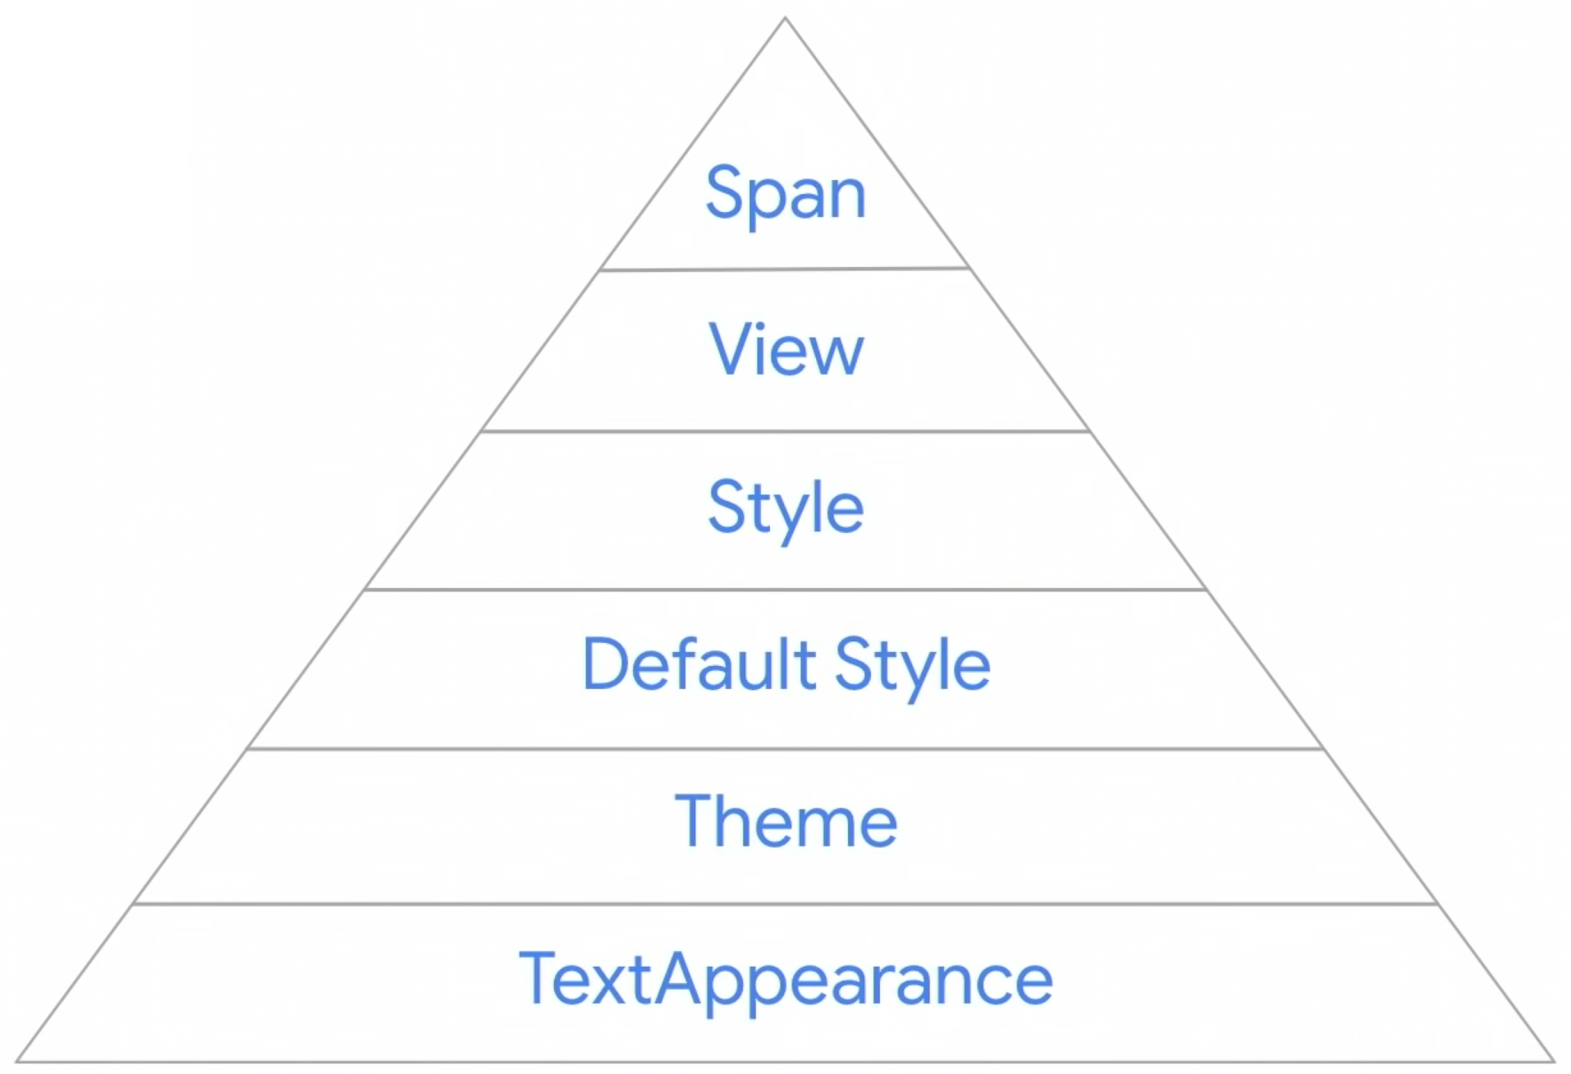
A single style implies the use of XML styles or XML attributes in TextView markup. In this case, the system will apply the values from the resources in the following order: TextAppearance, theme (Theme), default style (Default style), style from the application, and the highest priority is the values of the View attributes.
Using resources is a fairly simple solution, but, unfortunately, it does not allow you to apply style to parts of the text.
Html tags are another simple solution that provides features such as making individual words bold, italic, or even highlighting lists with dots in the text. All that a developer needs is to make a call to the Html.fromHtml() method, which will turn the tagged text into text marked up by spans. But this solution has limited capabilities, as it recognizes only part of the html tags and does not support CSS styles.
val text = "My text <ul><li>bullet one</li><li>bullet two</li></ul>" myTextView.text = Html.fromHtml(text) Various methods of styling TextView can be combined, but it is worth remembering the priority of a particular method, which will affect the final result:
Another way - drawing text on the canvas - gives the developer complete control over the text output: for example, you can draw text along a curved line. But such a solution, depending on the requirements, can be quite difficult to implement and is beyond the scope of this article.
Spans
TextView uses spans to fine-tune the styles. Using spans you can change the color of a range of characters, make part of the text as links, change the size of the text, draw a dot in front of a paragraph, etc.
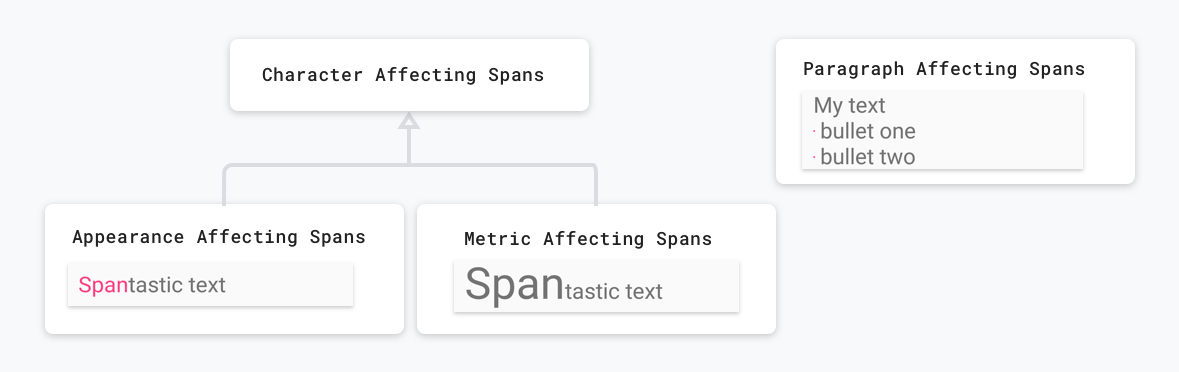
The following categories of spans can be distinguished:
- Character spans - applied at the character level of the string.
- Appearance affecting - do not change the text size.
- Metric affecting - resize text.
- Paragraph spans - applied at the paragraph level.
The Android framework has interfaces and abstract classes with methods that are called during onMeasure() and TextView rendering, these methods give spans access to lower-level objects like TextPaint and Canvas . Using the span, the Android framework checks which interfaces this object implements to invoke the necessary methods.
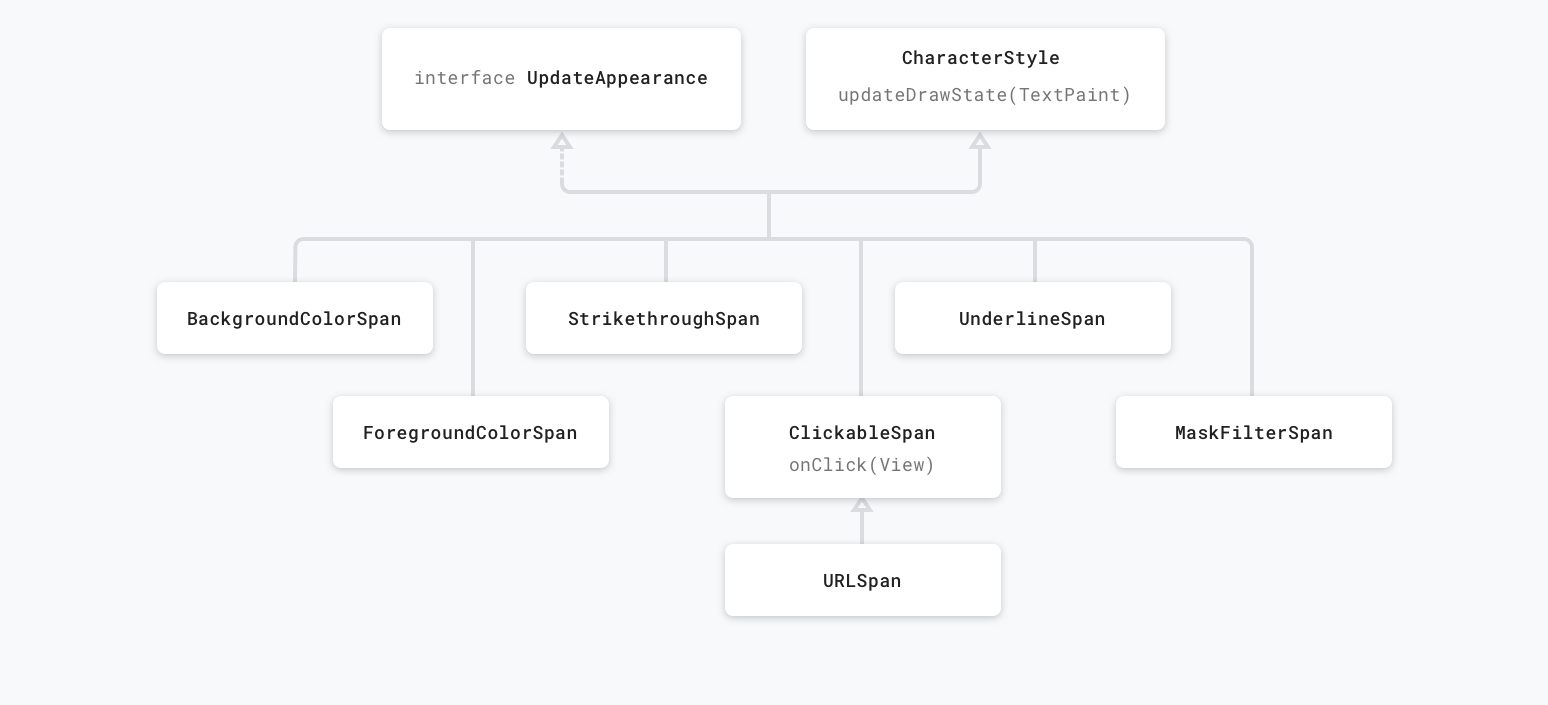
The android framework defines about 20+ spans, so before you make your own, it is better to check if the SDK is suitable.
Appearance vs metric affecting spans
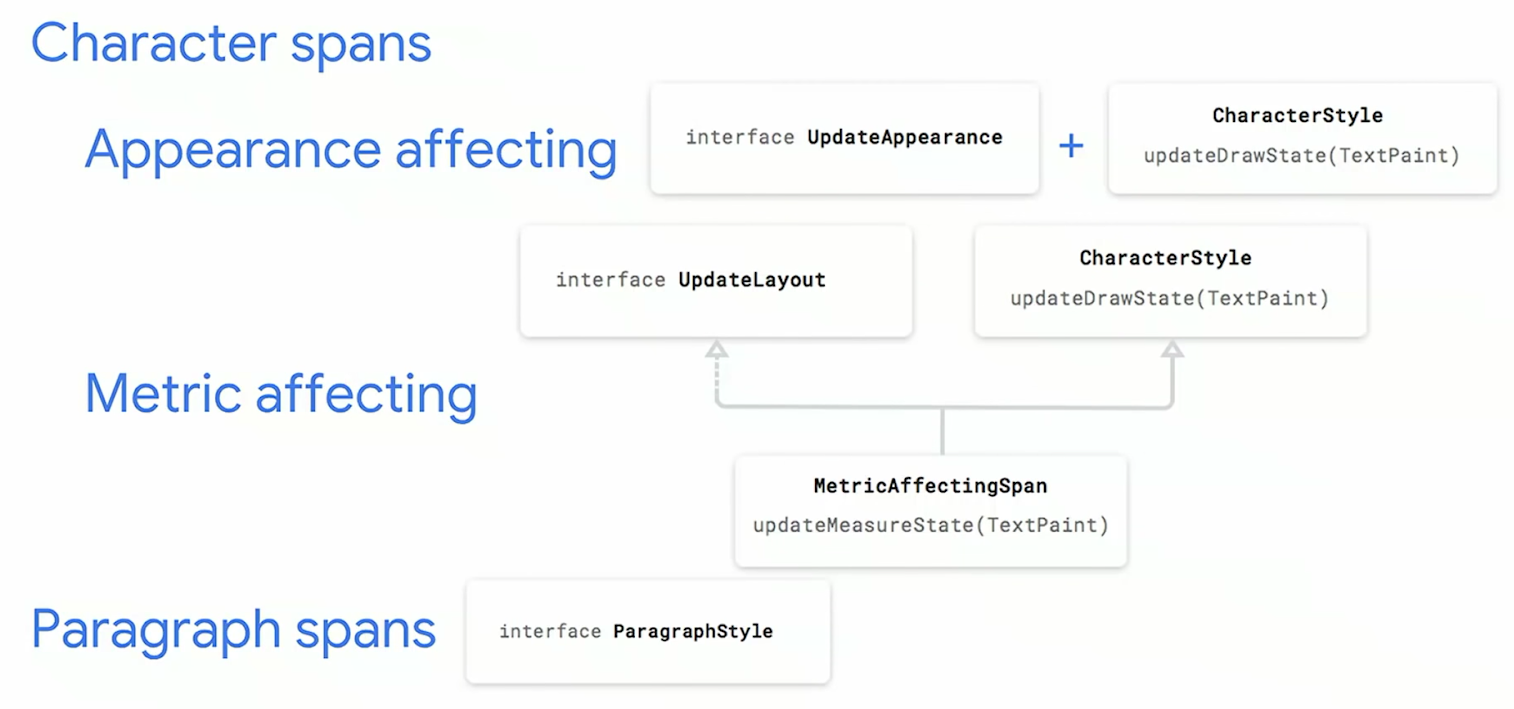
The first category of spans affects how the characters in the string will look: character color, background color, underlined or strikethrough characters, etc. These spans implement the UpdateAppearance interface and inherit from the CharacterStyle class, which provides access to the TextPaint object.
Metric affecting span affects the size of the text and layout, therefore, the use of such a span requires not only redrawing the TextView, but also the call onMeasure() / onLayout() . These spans are usually inherited from the MetricAffectingSpan class, which inherits from the CharacterStyle mentioned above.

Character vs paragraph affecting spans
Paragraph span affects the whole block of text: it can change the alignment, indentation or even insert a point at the beginning of the paragraph. Such spans should be inherited from the ParagraphStyle class and inserted into the text exactly from the beginning of the paragraph to its end. If the range is incorrect, then the span will not work.

On Android, paragraphs are considered to be the part of the text separated by newlines ( \n ).

Writing Your Spans
When writing your own spans, you need to decide what the span will affect in order to choose which class to inherit from:
- Affects text at character level →
CharacterStyle - Affects text at paragraph level ->
ParagraphStyle - Affects text view →
UpdateAppearance - Affects text size -
UpdateLayout
Here is an example of a span for changing the font:
class CustomTypefaceSpan(private val font: Typeface?) : MetricAffectingSpan() { override fun updateMeasureState(textPaint: TextPaint) = update(textPaint) override fun updateDrawState(textPaint: TextPaint) = update(textPaint) fun update(textPaint: TextPaint) { textPaint.apply { val old = typeface val oldStyle = old?.style ?: 0 val font = Typeface.create(font, oldStyle) typeface = font // } } } Imagine that we want to create our own span for highlighting blocks of code, for this we will edit our previous span - we will add, after installing the font, also changing the background color of the text:
class CodeBlockSpan(private val font: Typeface?) : MetricAffectingSpan() { … fun update(textPaint: TextPaint) { textPaint.apply { // … bgColor = lightGray // } } } Apply span to the text:
// span spannable.setSpan(CodeBlockSpan(typeface), ...) But you can get exactly the same result by combining two spans: take our previous CustomTypefaceSpan and BackgroundColorSpan from the Android framework:
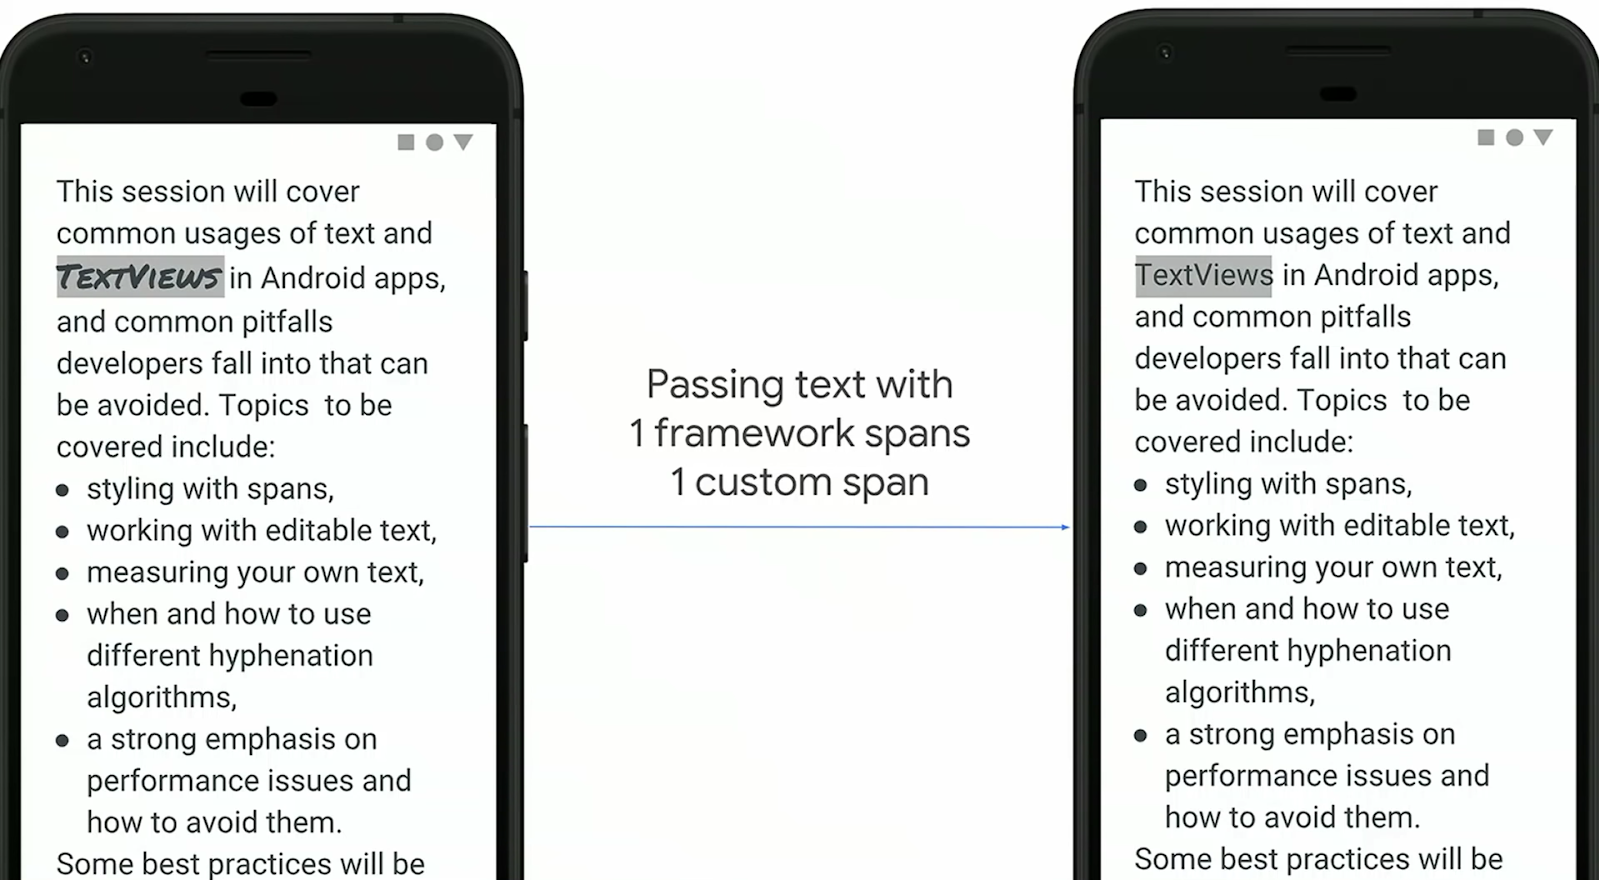
// spannable.setSpan(BackgroundColorSpan(lightGray), ...) // spannable.setSpan(CustomTypefaceSpan(typeface), ...) These two solutions will have a difference. The fact is that self-written spans cannot implement the Parcelable interface, unlike system ones.
When transmitting a stylized line through Intent or the clipboard in case of a span of self-written markup will not be saved. When using spans from the framework, the markup will remain.
Using spans in text
There are two interfaces for stylized text in the framework: Spanned and Spannable (with unchanged and mutable markup, respectively) and three implementations: SpannedString (unchanged text), SpannableString (unchanged text) and SpannableStringBuilder (mutable text).
| Mutable text | Variable markup | |
|---|---|---|
| Spanned string | not | not |
| Spannable string | not | Yes |
| Spannablestring builder | Yes | Yes |
SpannableStringBuilder , for example, is used inside an EditText that needs to change text.
You can add a new span to a line using the method:
setSpan(Object what, int start, int end, int flags)
The span is passed through the first parameter, then the range of indices in the text is indicated. And the last parameter can be controlled, what will be the behavior of the span when inserting new text: whether the span will spread to the text inserted at the start or end point (if you insert new text in the middle, the span will automatically apply to it, regardless of the flag values) .
The classes listed above differ not only semantically, but also in how they are arranged internally: SpannedString and SpannableString use arrays to store spans, and SpannableStringBuilder uses an interval tree .
If you conduct tests for the speed of rendering text depending on the number of spans, you will get the following results: when using up to ~ 250 spans in a row, SpannableString and SpannableStringBuilder work at about the same speed, but if the markup elements become more than 250, then SpannableString starts lose. Thus, if the task is to apply a style to some text, then when choosing a class, one should be guided by semantic requirements: whether the line and styles will be mutable. But if markup requires more than 250 spans, then you should always give SpannableStringBuilder to SpannableStringBuilder .
Check for span in the text
The task periodically arises to check whether there is a certain span in the spanned line. And on Stackoverflow you can find this code:
fun <T> hasSpan(spanned: Spanned, clazz: Class<T>): Boolean { val spans: Array<out T> = spanned.getSpans(0, spanned.length, clazz) return spans.isNotEmpty() } Such a solution will work, but it is inefficient: you have to go through all the spans, check whether each of them belongs to the passed type, collect the result into an array, and in the end just check that the array is not empty.
A more efficient solution would be to use the nextSpanTransition() method:
fun <T> hasSpan(spanned: Spanned, clazz: Class<T>): Boolean { val limit = spanned.length return spanned.nextSpanTransition(0, limit, clazz) < limit } Text markup in various language resources
Such a problem may arise when you want to highlight a specific word using markup in various string resources. For example, we need to highlight the word “text” in the English version and “texto” in the Spanish:
<!-- values-en/strings.xml --> <string name="title">Best practices for text in Android</string> <!-- values-es/strings.xml --> <string name=”title”>Texto en Android: mejores prácticas</string> If you need something simple, for example, to highlight the word in bold, then you can use the usual html tags ( <b> ). In the UI, you just need to set the string resource in the TextView:
textView.setText(R.string.title) But if you need something more complex, for example, changing the font, then html can no longer be used. The solution is to use the special <annotation> . This tag allows you to define any key-value pair in an xml file. When we pull a string from resources, these tags are automatically converted to Annotation spans, arranged in the text with the corresponding keys and values. After that, you can parse the list of annotations in the text and apply the necessary spans.
Suppose we need to change the font using CustomTypefaceSpan .
Add a tag and define a “font” key and a value for it — the type of font that we want to use is “title_emphasis” :
<!-- values-en/strings.xml --> <string name="title">Best practices for <annotation font=”title_emphasis”>text</annotation> in Android</string> <!-- values-es/strings.xml --> <string name=”title”><annotation font=”title_emphasis”>Texto</annotation> en Android: mejores prácticas</string> Pull the string from the resources, find the annotations with the “font” key and arrange the spans:
// SpannedString, span' val titleText = getText(R.string.title) as SpannedString // val annotations = titleText.getSpans(0, titleText.length, Annotation::class.java) // SpannableString // val spannableString = SpannableString(titleText) // for (annotation in annotations) { // "font" if (annotation.key == "font") { val fontName = annotation.value // , if (fontName == "title_emphasis") { val typeface = getFontCompat(R.font.permanent_marker) // span , spannableString.setSpan( CustomTypefaceSpan(typeface), titleText.getSpanStart(annotation), titleText.getSpanEnd(annotation), Spannable.SPAN_EXCLUSIVE_EXCLUSIVE ) } } } styledText.text = spannableString 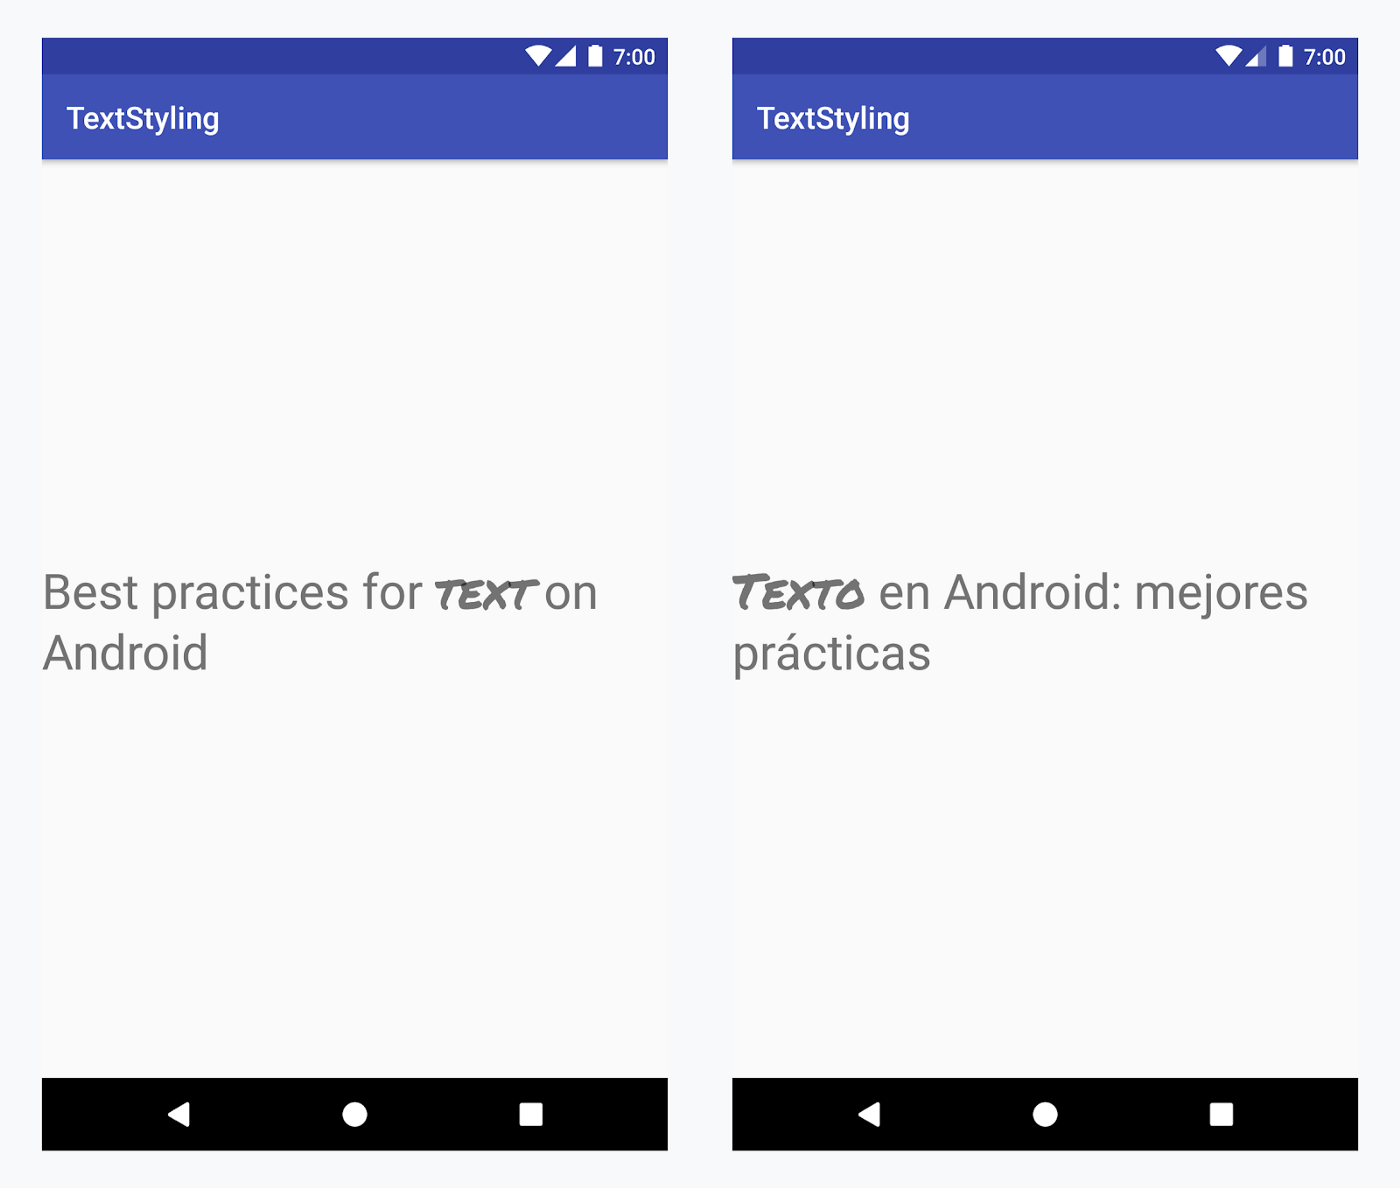
It was mentioned above that spans from outside the Android framework cannot implement Parcelable and are transmitted via Intent. But this does not apply to annotations that implement Parcelable . So you can pass the annotated string through Intent and parse in exactly the same way by arranging your spans.
How text is placed in a TextView
TextView can display not only text, but also pictures. You can also set various indents in front of the text. Under the hood, this works so that TextView creates a child class, Layout, which is responsible directly for displaying text. This is an abstract class that has three implementations; usually you don’t have to work directly with them unless you write your own control:
- BoringLayout is used for simple texts, does not support line breaks , RTL and other things, but it is the most lightweight. TextView uses it if the text meets all restrictions.
- StaticLayout is used in TextView for other cases.
- DynamicLayout is used for mutable text in an EditText.
Layout has many methods that let you know the various parameters of the displayed text: the coordinates of the lines, baseline, the coordinates of the beginning and end of the text in the line, etc. (more details can be found in the documentation )
Such methods can be very helpful. For example, some developers are faced with the task of extracting part of the text into rounded rectangles, and are trying to find its solution through spans that are not applicable in solving this problem.
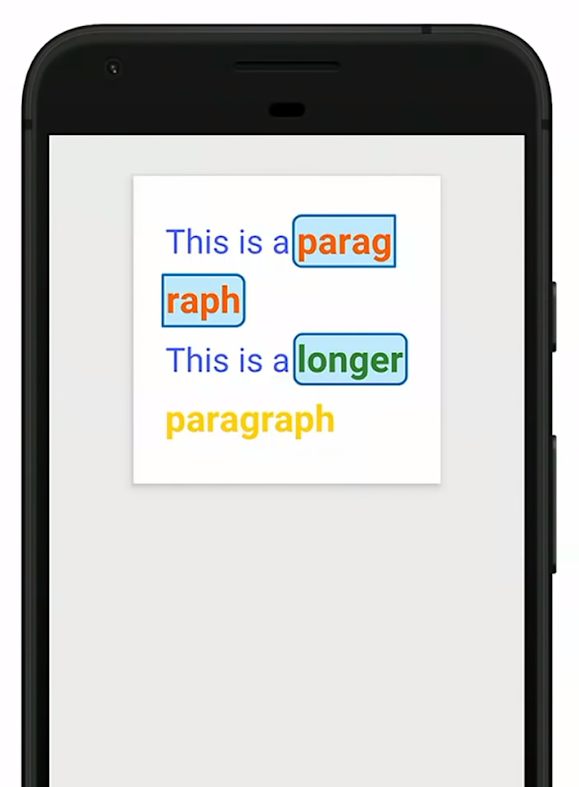
But methods of the Layout class can come to the rescue. Here is a sample solution:
Using annotations, we select the words that should be circled in rectangles.
Then create 4 drawable resources for all cases of text wrapping, which should be enclosed in rectangles:

Next, we find the annotations we need in the text, as described above. Now we have the indexes of the beginning and end of such an annotation. Through the Layout methods, you can find out the line number on which the annotated text begins and on which it ends:
val startLine = layout.getLineForOffset(spanStartIndex) val endLine = layout.getLineForOffset(spanEndIndex) Next, you have to draw one or more rectangles. Let's consider a simple case when the annotated part of the text appeared on one line, then we need only one rectangle with four rounded corners. Define its coordinates and draw:
... if (startLine == endLine) { val lineTop = layout.getLineTop(startLine) // val lineBottom = layout.getLineBottom(startLine) // val startCoor = layout.getPrimaryHorizontal(spanStartIndex).toInt() // val endCoor = layout.getPrimaryHorizontal(spanEndIndex).toInt() // // drawable.setBounds(startCoor, lineTop, endCoor, lineBottom) drawable.draw(canvas) ... As you can see from this example, Layout stores a lot of useful information on the displayed text, which can help in the implementation of various non-standard tasks.
TextView Performance
A TextView, like any View, passes through three phases when displayed: onMeasure() , onLayout() and onDraw() . At the same time, onMeasure() takes the most time, unlike the other two methods: at this moment, the Layout class is recreated and the text size is calculated. So changing the size of the text (for example, changing the font) entails a lot of work. Changing the color of the text will be more lightweight because it only requires calling onDraw() . As mentioned above, the system has a global word cache with calculated sizes. If the word is already in the cache, then calling onMeasure() for it will take 11-16% of the time that would have been required for a complete calculation.
Speeding up text
In 2015, Instagram developers accelerated the display of comments on photos using the global cache. The idea was to virtually draw the text before showing it on the screen, thus “warming up” the system cache. When it was time to show the text, the user saw it much faster, since the text was already measured and was in the cache.
Starting with Android P (28) , Google developers have added to the API the ability to perform the phase of measuring text size in advance in the background thread - PrecomputedText (and the backport for the API starting with Android I (14) - PrecomputedTextCompat ). Using the new API, 90% of the work will be done in the background thread.
Example:
// UI thread val params: PrecomputedText.Params = textView.getTextMetricsParams() val ref = WeakReference(textView) executor.execute { // background thread val text = PrecomputedText.create("Hello", params) val textView = ref.get() textView?.post { // UI thread val textView = ref.get() textView?.text = text } } Show large text
If you need to show large text, then do not immediately transfer it to a TextView. Otherwise, the application may stop working smoothly or completely freeze, as it will do a lot of work on the main thread to show huge text that the user may not even scroll to the end. The solution is to split the text into parts (e.g. paragraphs) and display the individual parts in the RecyclerView. For even greater speedup, you can pre-calculate the size of text blocks using PrecomputedText.
To facilitate the embedding of PrecomputedText in RecyclerView, Google developers made special methods PrecomputedTextCompat.getTextFuture() and AppCompatTextView.setTextFuture() :
fun onBindViewHolder(vh: ViewHolder, position: Int) { val data = getData(position) vh.textView.setTextSize(...) vh.textView.setFontVariationSettings(...) // val future = PrecomputedTextCompat.getTextFuture( data.text, vh.textView.getTextMetricsParamsCompat(), myExecutor ) // future TextView, onMeasure() vh.textView.setTextFuture(future) } Since RecyclerView creates new elements during scrolling that are not yet visible to the user, such a solution will have enough time to do the work in the background before the element is shown to the user.
It should be remembered that after calling the method getTextFuture()you cannot change the style of the text (for example, put a new font), otherwise an exception will occur, since the values with which it was called getTextFuture()will not coincide with those that appear in the TextView.
What you need to know when setting text in a TextView
When the method is called TextView.setText(), a copy of the line is actually created inside:
if (type == SPANNABLE || movementMethod != null) { text = spannableFactory.newSpannable(spannable) // } else { text = new SpannedString(spannable) // } span' TextView, setText() , .
, . TextView , -, . , . , , TextView spannableFactory :
class MySpannableFactory : Spannable.Factory() { override fun newSpannable(source: CharSequence): Spannable { return source as? Spannable ?: super.newSpannable(source) } } textView.spannableFactory = MySpannableFactory() textView.setText(spannable, BufferType.SPANNABLE) , .
Google span' RecyclerView, .
TextView, span, setText() . TextView span. TextView spannable- span', :
val spannable = textView.getText() as Spannable val span = CustomTypefaceSpan(span) spannable.setSpan(span, ...) span, TextView, TextView . , invalidate() , – requestLayout() :
val spannable = textView.getText() as Spannable val span = CustomTypefaceSpan(span) spannable.setSpan(span, ...) span.setTypeface(anotherTypeface) textView.requestLayout() // re-measure and re-draw // or textView.invalidate() // re-draw autoLink
TextView . autoLink . autoLink=”web” TextView URL URLSpan . , SDK setText() :
spannable = new SpannableString(string); Matcher m = pattern.matcher(text); while (...) { // String utl = … URLSpan span = new URLSpan(url); spannable.setSpan(span, ...); } UI , autoLink=”web” RecyclerView. . LinkifyCompat :
// , background thread val spannable = SpannableString(string) LinkifyCompat.addLinks(spannable, Linkify.WEB_URLS) // RecyclerView override fun onBindViewHolder(holder: ViewHolder, position: Int) { holder.textView.setText(spannable, BufferType.SPANNABLE) // ... } autoLink map – ( all ). . , WebView, ! SDK Linkify.gatherMapLinks() , :
while ((address = WebView.findAddress(string)) != null) { ... } WebView TODO SDK:
public static String findAddress(String addr) { // TODO: Rewrite this in Java so it is not needed to start up chromium // Could also be deprecated return getFactory().getStatics().findAddress(addr); } ? Smart Linkify, Android P (28) , , . :
// UI thread val text: Spannable = … val request = TextLinks.Request.Builder(text) val ref = WeakReference(textView) executor.execute { // background thread TextClassifier.generateLinks(request).apply(text) val textView = ref.get() textView?.post { // UI thread val textView = ref.get() textView?.text = text } } Linkify, . toolbar , Google .
Smart Linkify : , .
Magnifier
Android P (28) , – Magnifier, . .

TextView, EditText WebView, : API .
Conclusion
Android , , :
- , TextView (, EditText)
- , Google I/O'19 “Best Practices for Using Text in Android” .
useful links
Articles
- Florina Muntenescu. "Spantastic text styling with Spans"
- Florina Muntenescu. "Underspanding spans"
- Florina Muntenescu. "Styling internationalized text in Android"
- Instagram Engineering. "Improving Comment Rendering on Android"
- Daniel Lee. "Text rendering on Android"
- Mariusz Dąbrowski. "What is new in Android P — PrecomputedText"
- Chet Haase. "RecyclerView Prefetch"
- Chris Craik. "Prefetch Text Layout in RecyclerView"
Reports
')
Source: https://habr.com/ru/post/461787/
All Articles