FFmpeg DXVA2 Hardware Decoding Practice
Hello! This article is a continuation of my FFmpeg article getting started with Visual Studio. Here we get down to hardware decoding of the FULL HD RTSP stream. I will say in advance that even the Intel ATOM Z8350 can easily cope with this task.
Objective: hardware decoding and recording up to 4 frames in RAM for subsequent parallel processing (four processor cores) from an RTSP h.264 IP camera. I display the processed frames using the WinAPI functions. As a result, we get a high-speed system for computer processing of the RTSP stream in parallel mode. Next, you can connect the computer vision algorithms for processing Real Time frames.
Why do I need hardware decoding? Do you want to decode real-time video with a weak and cheap processor or you want to unload the processor as much as possible, then it's time to get acquainted with hardware decoding.
')
DirectX Video Acceleration (DXVA) is an API for using hardware acceleration to accelerate video processing with GPUs. DXVA 2.0 allows you to redirect more operations to the GPU, including video capture and video processing operations.
After writing the previous article, I was asked quite a few questions: “why is it used FFmpeg?” I'll start with the problems. The main difficulty of hardware decoding is to write the decoded frame to RAM. For Full HD, this is 1920 x 1080 x 3 = 6,220,800 bytes. Even taking into account the fact that the frame is stored in the NV12 format, this is also a lot of 1920 x 1080 x 1.5 = 3 110 400 bytes. Overwriting 75 MB per second is a serious task for any processor. To solve this problem, Intel has added SSE 4 commands, which allow you to rewrite data without a processor. Unfortunately, not all libraries have this implemented. I have tested the following libraries:
VLC - works with IP cameras through hardware decoding (very low processor load), a primitive RTSP stream player can be built in just 10 lines of code, but receiving decoded frames in RAM takes too much processor time.
OpenCV - RTSP uses FFmpeg to work with the stream, so it was decided to work without intermediaries, i.e. use the FFmpeg library. In addition, FFmpeg, which is installed by default, is built in OpenCV without hardware decoding.
FFmpeg - showed good, in my opinion, results, it works stably. The only drawback is not implemented working with WEB-cameras for version X86 (X64 seems to allow you to work) in Windows.
In fact, hardware decoding using the FFmpeg library is no more complicated than software. The project settings are the same as for the software implementation, the block diagram remained unchanged.
You can display a list of hardware decoding methods supported by FFmpeg.
The first thing we need to do is tell FFmpeg with which hardware decoder you want to decode the video. In my case, Windows10 + Intel Atom Z8350 leaves only DXVA2:
You can choose CUDA, D3D11VA, QSV or VAAPI (Linux only) as a hardware decoder. Accordingly, you should have this hardware solution and FFmpeg should be built with its support.
Open the video stream:
We get information about the video stream:
Allocate memory:
This function overwrites the decoded file in RAM:
So, we got a frame in the sw_frame structure. The received frame is stored in NV12 format. This format was invented by Microsoft. It allows you to store pixel information in 12 bits. Where 8 bits are the intensity, and 4 bits describe the color (or rather, the color is immediately described for 4 adjacent 2x2 pixels). Moreover, sw_frame.data [0] - the intensity is stored, and sw_frame.data [1] - the color is stored. To convert from NV-12 to RGB, you can use the following function:
Although working with NV12 allows you to speed up the implementation of procedures such as blurring, Retinex and obtaining images in grayscale (just by discarding the color). In my tasks, I do not translate the NV12 format to RGB, as this takes extra time.
And so we learned how to decode video files in hardware and display them in a window. We met in NV12 format and how to convert it to familiar RGB.
FFmpeg issues frames after 40 ms (at 25 frames per second). As a rule, processing a Full HD frame takes significantly longer. This requires multithreading to maximize the load of all 4 processor cores. In practice, I start 6 threads once and do not remove them anymore, which greatly simplifies the work and increases the reliability of the program. The operation scheme is shown in Fig. one
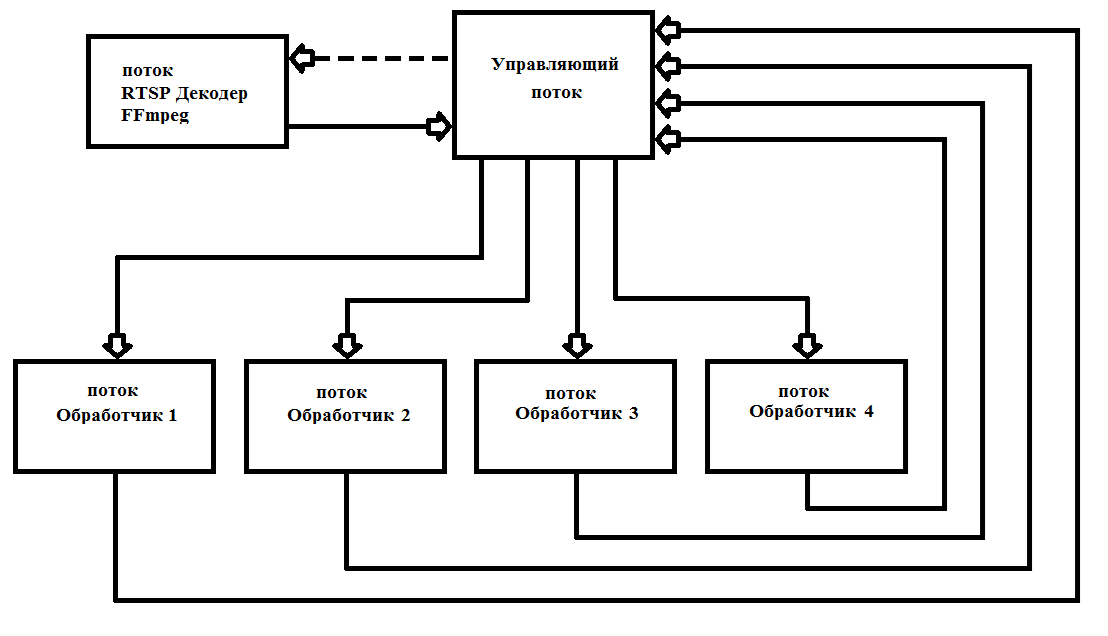
Fig. 1 Scheme of building a multithreaded program with FFmpeg
I wrote my decoder as * .dll (FFmpegD.DLL) for inclusion in my projects. This allows you to reduce the code of the project, which increases the understanding of the code and include it in any programming language, up to Assembler (verified :)). Using it, we will write our RTSP stream player from the IP camera.
To start working with a DLL, you need to pass a pointer to an int [13] array, a HANDLE of a new frame arrival event, a HANDLE to start processing a new data packet from the camera, and a char array of the camera address.
The array structure is given in table 1.
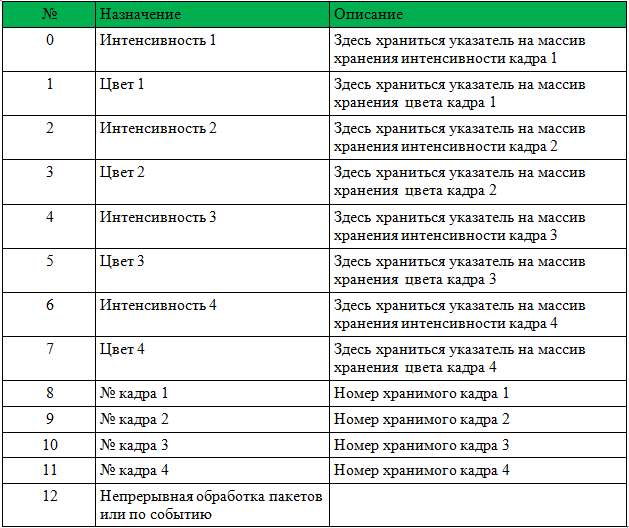
Before calling, you must reset the frame numbers 1-4.
The DLL will take all necessary steps to initialize FFmpeg and will record pointers and frame numbers. After it sets the event “New frame arrival”. It is only necessary to process the incoming frames and write 0 instead of the frame number (this means the frame has been processed and is no longer used).
Below you will find an example player with source code. The example is ShowDib3 Charles Petzold.
→ Archive with the project
→ FFmpegD.dll archive
RESULTS: FFmpeg hardware motion detector even on Intel Atom Z8350 decodes h264 Full HD in real time with processor loading up to 20% with a connected motion detector.
Motion Detector Operation Example on Intel ATOM Z8350. The first 30 seconds is the calculation of the background. After that, the motion detector works by the method of subtracting the background.
PS You can also decode video files (compressed h.264) !!!
References:
Objective: hardware decoding and recording up to 4 frames in RAM for subsequent parallel processing (four processor cores) from an RTSP h.264 IP camera. I display the processed frames using the WinAPI functions. As a result, we get a high-speed system for computer processing of the RTSP stream in parallel mode. Next, you can connect the computer vision algorithms for processing Real Time frames.
Introduction
Why do I need hardware decoding? Do you want to decode real-time video with a weak and cheap processor or you want to unload the processor as much as possible, then it's time to get acquainted with hardware decoding.
')
DirectX Video Acceleration (DXVA) is an API for using hardware acceleration to accelerate video processing with GPUs. DXVA 2.0 allows you to redirect more operations to the GPU, including video capture and video processing operations.
After writing the previous article, I was asked quite a few questions: “why is it used FFmpeg?” I'll start with the problems. The main difficulty of hardware decoding is to write the decoded frame to RAM. For Full HD, this is 1920 x 1080 x 3 = 6,220,800 bytes. Even taking into account the fact that the frame is stored in the NV12 format, this is also a lot of 1920 x 1080 x 1.5 = 3 110 400 bytes. Overwriting 75 MB per second is a serious task for any processor. To solve this problem, Intel has added SSE 4 commands, which allow you to rewrite data without a processor. Unfortunately, not all libraries have this implemented. I have tested the following libraries:
- Ffmpeg
- VLC
- Opencv
VLC - works with IP cameras through hardware decoding (very low processor load), a primitive RTSP stream player can be built in just 10 lines of code, but receiving decoded frames in RAM takes too much processor time.
OpenCV - RTSP uses FFmpeg to work with the stream, so it was decided to work without intermediaries, i.e. use the FFmpeg library. In addition, FFmpeg, which is installed by default, is built in OpenCV without hardware decoding.
FFmpeg - showed good, in my opinion, results, it works stably. The only drawback is not implemented working with WEB-cameras for version X86 (X64 seems to allow you to work) in Windows.
Hardware video decoding is easy
In fact, hardware decoding using the FFmpeg library is no more complicated than software. The project settings are the same as for the software implementation, the block diagram remained unchanged.
You can display a list of hardware decoding methods supported by FFmpeg.
fprintf(stderr, " %s", av_hwdevice_get_type_name(type)); The first thing we need to do is tell FFmpeg with which hardware decoder you want to decode the video. In my case, Windows10 + Intel Atom Z8350 leaves only DXVA2:
type = av_hwdevice_find_type_by_name("dxva2"); You can choose CUDA, D3D11VA, QSV or VAAPI (Linux only) as a hardware decoder. Accordingly, you should have this hardware solution and FFmpeg should be built with its support.
Open the video stream:
avformat_open_input(&input_ctx, filename, NULL, NULL; We get information about the video stream:
av_find_best_stream(input_ctx, AVMEDIA_TYPE_VIDEO, -1, -1, &decoder, 0); Allocate memory:
frame = av_frame_alloc(); // sw_frame = av_frame_alloc(); // This function overwrites the decoded file in RAM:
av_hwframe_transfer_data(sw_frame, frame, 0); A bit about the NV12 format
So, we got a frame in the sw_frame structure. The received frame is stored in NV12 format. This format was invented by Microsoft. It allows you to store pixel information in 12 bits. Where 8 bits are the intensity, and 4 bits describe the color (or rather, the color is immediately described for 4 adjacent 2x2 pixels). Moreover, sw_frame.data [0] - the intensity is stored, and sw_frame.data [1] - the color is stored. To convert from NV-12 to RGB, you can use the following function:
C ++ translation from NV12 to RGB
void SaveFrame(uint8_t * f1, uint8_t * f2, int iFrame) { FILE *pFile; char szFilename[32]; int x, i, j; // char buff[1920 * 1080 * 3]; uint8_t *buff = new uint8_t(1920*3*2); int u=0, v=0, y=0; // Open file sprintf(szFilename, "frame%d.ppm", iFrame); pFile = fopen(szFilename, "wb"); if (pFile == NULL) return; // fprintf(pFile, "P6\n%d %d\n255\n", 1920, 1080); for (j = 0; j < 1080 / 2; j++) { for (i = 0; i < 1920; i +=2) { // 1 rgb y = *(f1 + j * 1920 * 2 + i); v = *(f2 + j * 1920 + i) - 128; u = *(f2 + j * 1920 + i + 1) - 128; x = round(y + 1.370705 * v); if (x < 0) x = 0; if (x > 255) x = 255; // if (j > 34) printf("%i, ",(j * 1920 * 2 + i) * 3); buff[i * 3 + 2] = x; x = round(y - 0.698001 * v - 0.337633 * u); if (x < 0) x = 0; if (x > 255) x = 255; buff[i * 3 + 1] = x; x = round(y + 1.732446 * u); if (x < 0) x = 0; if (x > 255) x = 255; buff[i * 3] = x; // 2 rgb y = *(f1 + j * 1920 * 2 + i + 1); x = y + 1.370705 * v; if (x < 0) x = 0; if (x > 255) x = 255; buff[i * 3 + 5] = x; x = y - 0.698001 * v - 0.337633 * u; if (x < 0) x = 0; if (x > 255) x = 255; buff[i * 3 + 4] = x; x = y + 1.732446 * u; if (x < 0) x = 0; if (x > 255) x = 255; buff[i * 3 + 3] = x; // 3 rgb y = *(f1 + j * 1920 * 2 + 1920 + i); x = y + 1.370705 * v; if (x < 0) x = 0; if (x > 255) x = 255; buff[(1920 + i) * 3 + 2] = x; x = y - 0.698001 * v - 0.337633 * u; if (x < 0) x = 0; if (x > 255) x = 255; buff[(1920 + i) * 3 + 1] = x; x = y + 1.732446 * u; if (x < 0) x = 0; if (x > 255) x = 255; buff[(1920 + i) * 3 + 0] = x; // 4 rgb y = *(f1 + j * 1920 * 2 + 1920 + i + 1); x = y + 1.370705 * v; if (x < 0) x = 0; if (x > 255) x = 255; buff[(1920 + i) * 3 + 5] = x; x = y - 0.698001 * v - 0.337633 * u; if (x < 0) x = 0; if (x > 255) x = 255; buff[(1920 + i) * 3 + 4] = x; x = y + 1.732446 * u; if (x < 0) x = 0; if (x > 255) x = 255; buff[(1920 + i) * 3 + 3] = x; // printf("%i, ", i); } // for i fwrite(buff, 1, 1920 * 3 * 2, pFile); printf("\n %i\n", j); } // for j // printf("Save4\n"); // Write pixel data // fwrite(buff, 1, 1920*1080*3, pFile); // Close file printf("close\n"); fclose(pFile); printf("exit\n"); delete buff; // return; } Although working with NV12 allows you to speed up the implementation of procedures such as blurring, Retinex and obtaining images in grayscale (just by discarding the color). In my tasks, I do not translate the NV12 format to RGB, as this takes extra time.
And so we learned how to decode video files in hardware and display them in a window. We met in NV12 format and how to convert it to familiar RGB.
Dll hardware decoding
FFmpeg issues frames after 40 ms (at 25 frames per second). As a rule, processing a Full HD frame takes significantly longer. This requires multithreading to maximize the load of all 4 processor cores. In practice, I start 6 threads once and do not remove them anymore, which greatly simplifies the work and increases the reliability of the program. The operation scheme is shown in Fig. one
Fig. 1 Scheme of building a multithreaded program with FFmpeg
I wrote my decoder as * .dll (FFmpegD.DLL) for inclusion in my projects. This allows you to reduce the code of the project, which increases the understanding of the code and include it in any programming language, up to Assembler (verified :)). Using it, we will write our RTSP stream player from the IP camera.
To start working with a DLL, you need to pass a pointer to an int [13] array, a HANDLE of a new frame arrival event, a HANDLE to start processing a new data packet from the camera, and a char array of the camera address.
The array structure is given in table 1.
Before calling, you must reset the frame numbers 1-4.
The DLL will take all necessary steps to initialize FFmpeg and will record pointers and frame numbers. After it sets the event “New frame arrival”. It is only necessary to process the incoming frames and write 0 instead of the frame number (this means the frame has been processed and is no longer used).
Below you will find an example player with source code. The example is ShowDib3 Charles Petzold.
→ Archive with the project
→ FFmpegD.dll archive
RESULTS: FFmpeg hardware motion detector even on Intel Atom Z8350 decodes h264 Full HD in real time with processor loading up to 20% with a connected motion detector.
Motion Detector Operation Example on Intel ATOM Z8350. The first 30 seconds is the calculation of the background. After that, the motion detector works by the method of subtracting the background.
PS You can also decode video files (compressed h.264) !!!
References:
Source: https://habr.com/ru/post/461735/
All Articles