Introducing SwiftUI: Creating a Simple Application Using TableView
During WWDC 2019, one of the biggest and most exciting moments was the SwiftUI release announcement. SwiftUI is a completely new framework that allows you to design and develop user interfaces with writing less code in a declarative way.
Unlike UIKit, which was commonly used in conjunction with storyboards , SwiftUI is completely software-based. However, the syntax is very easy to understand and the project can be quickly viewed using Automatic Preview.
Because SwiftUI uses the Swift language, it allows you to create applications of the same complexity with much less code. Moreover, using SwiftUI automatically allows an application to use features such as Dynamic Type , Dark Mode , Localization, and Accessibility . In addition, it is available on all platforms, including macOS , iOS , iPadOS , watchOS, and tvOS . So, now your user interface code can be synchronized across all platforms, giving you more time to focus on a secondary platform-specific code.
It is important that developers learn how to use SwiftUI at an earlier stage, as Apple will ultimately focus most of its attention on this framework. In this article, we will look at the basics of SwiftUI and learn how to create minimal navigation, display images, text and lists by creating a simple contact list that will display all the members of our team. When choosing a team member, the application displays detailed information that contains the user's image with his brief biography. Let's start!
')
Launch Xcode 11 . At the time of this writing, Xcode 11 is still in beta, so some features may not work as expected. In this article we will use Swift 5 . Although advanced knowledge of Swift is not required for this article, an understanding of the basics of the language is still recommended.
Editor's Note: To preview and interact with images from Canvas in Xcode, make sure Mac OS 10.15 beta is installed.
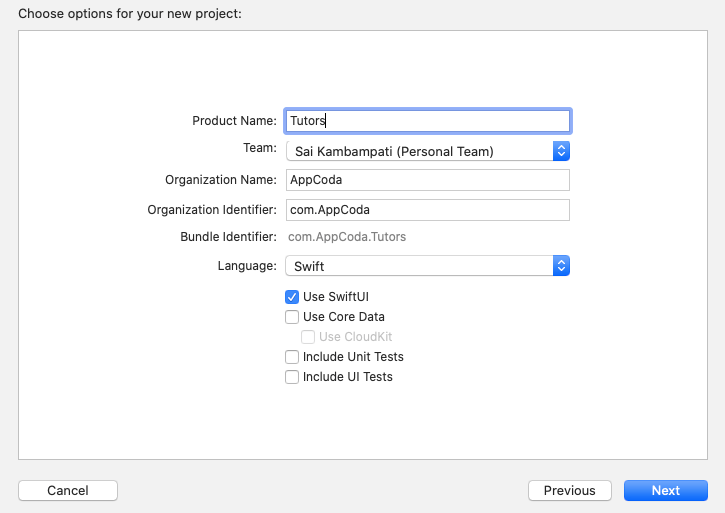
Let's start all over again so you can immediately see how to launch the SwiftUI application. First open Xcode and select “Create new Xcode project”. For the iOS platform, select the Single View App. Enter a name for the application and fill in the text fields. However, make sure that Use SwiftUI is checked at the bottom. If you do not select this option, Xcode will create a storyboard file for you.
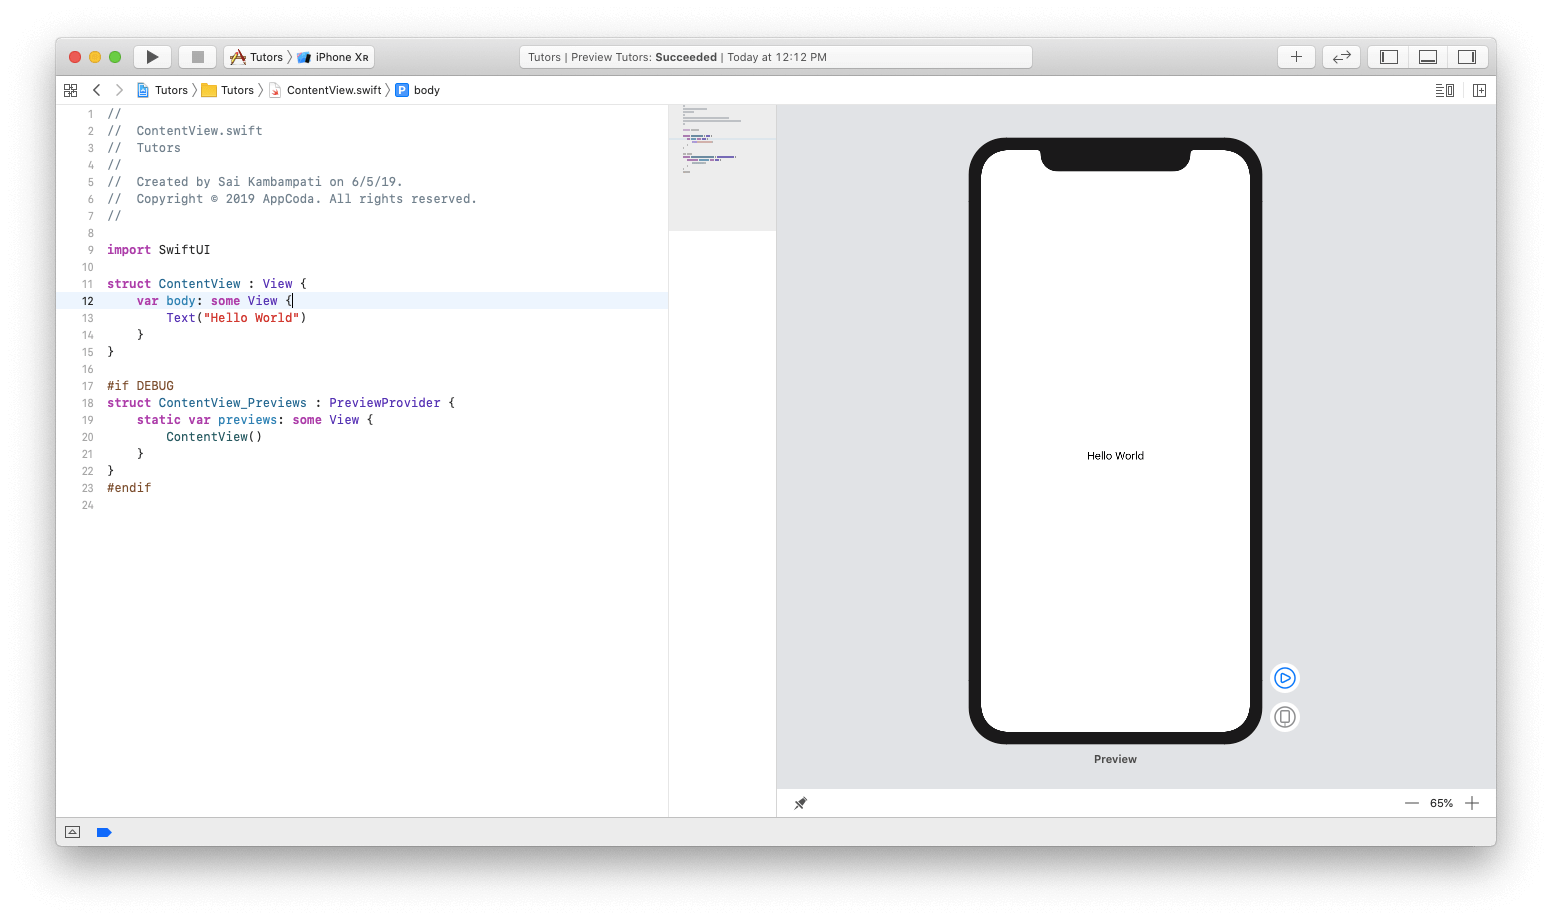
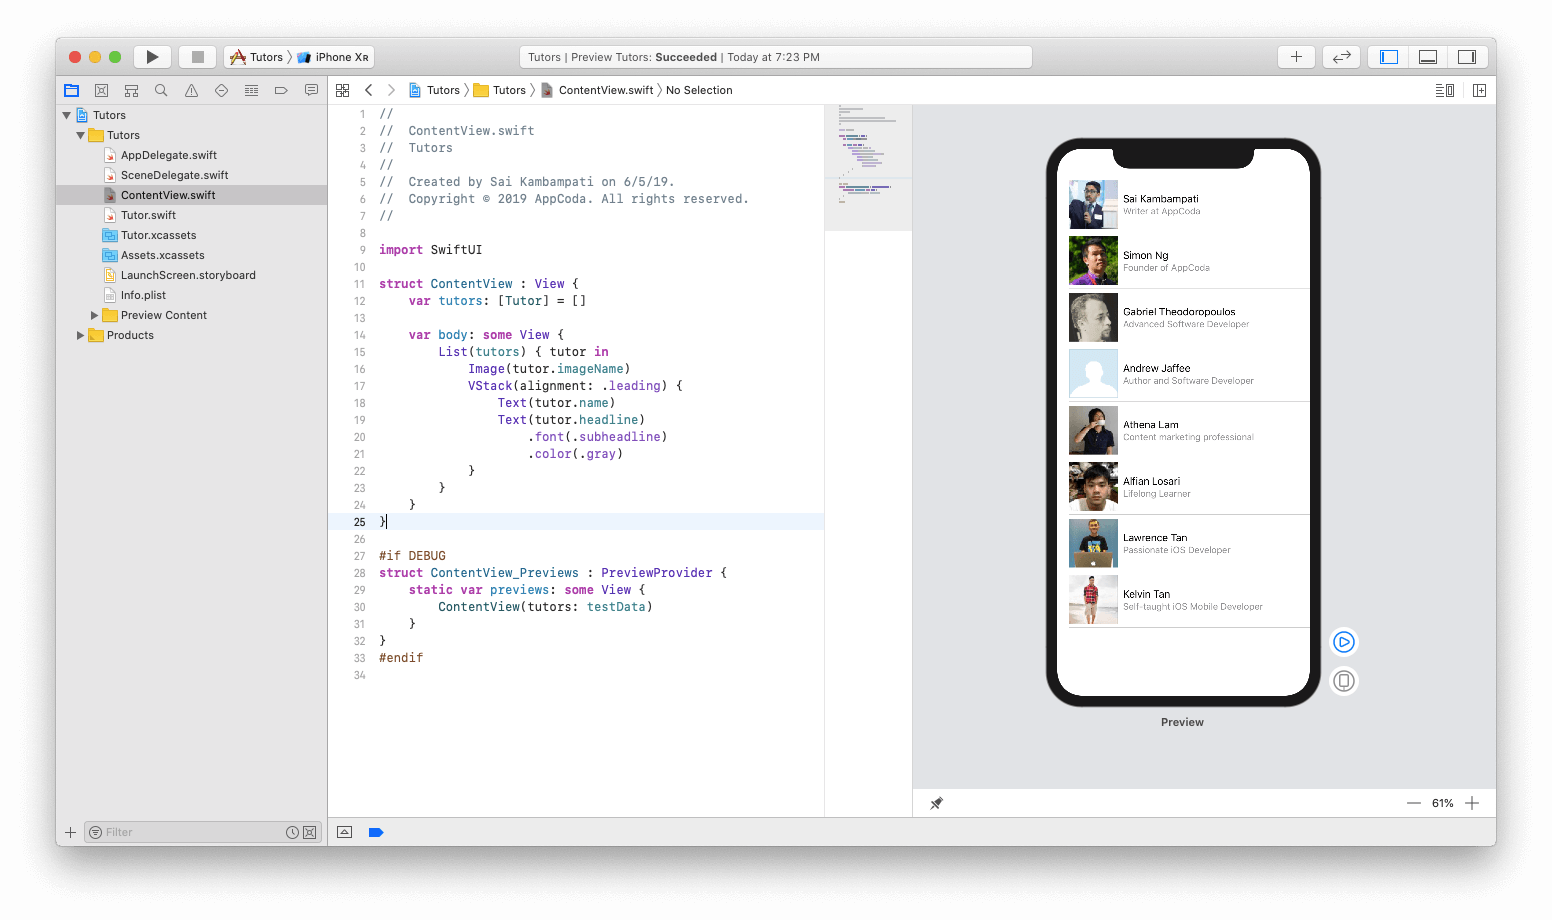
Xcode will automatically create a file for you called ContentView.swift, and it will be amazing that a preview of your code will be displayed on the right side, as shown below.
If you do not see the preview, you must click the Resume button in the preview area. Compilation of the project will take some time. Be patient and wait for the compilation to complete.
Now let's see how you can modify these files to create an application.
Creating a list view is carried out in three stages. The first one is creating lines in a list. Perhaps the design is similar to a UITableView. To do this, create a ContactRow. The second stage is the transfer of the necessary data to the list. I have data that is already encoded, and it only takes a few changes to associate the list with the data. The final step is simply to add the Navigation Bar and embed the list in the Navigation View. It is pretty simple. Now let's see how all this was implemented in SwiftUI.
First, you need to create a view to display a list of all team members, including photos of their profile and their description. Let's see how this can be done.
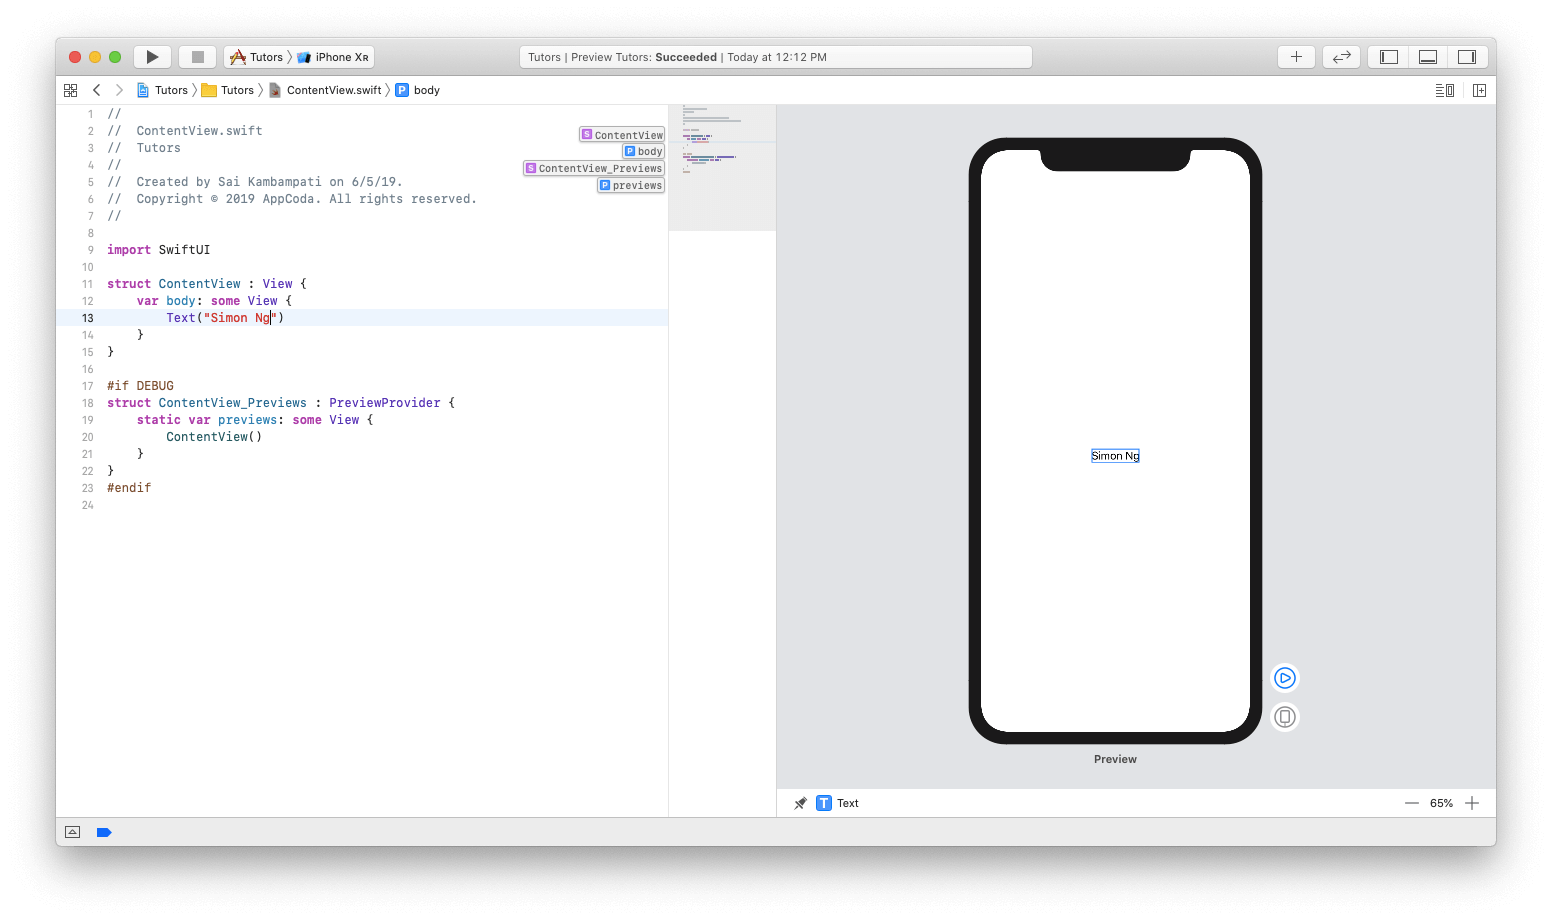
As we can see, the generated code has a Text component with the value “Hello World”. In the code editor, change the value of the code to "Simon Ng".
If everything works correctly, on the right you should see an automatic update. This is the effect of instant viewing, as we expected.
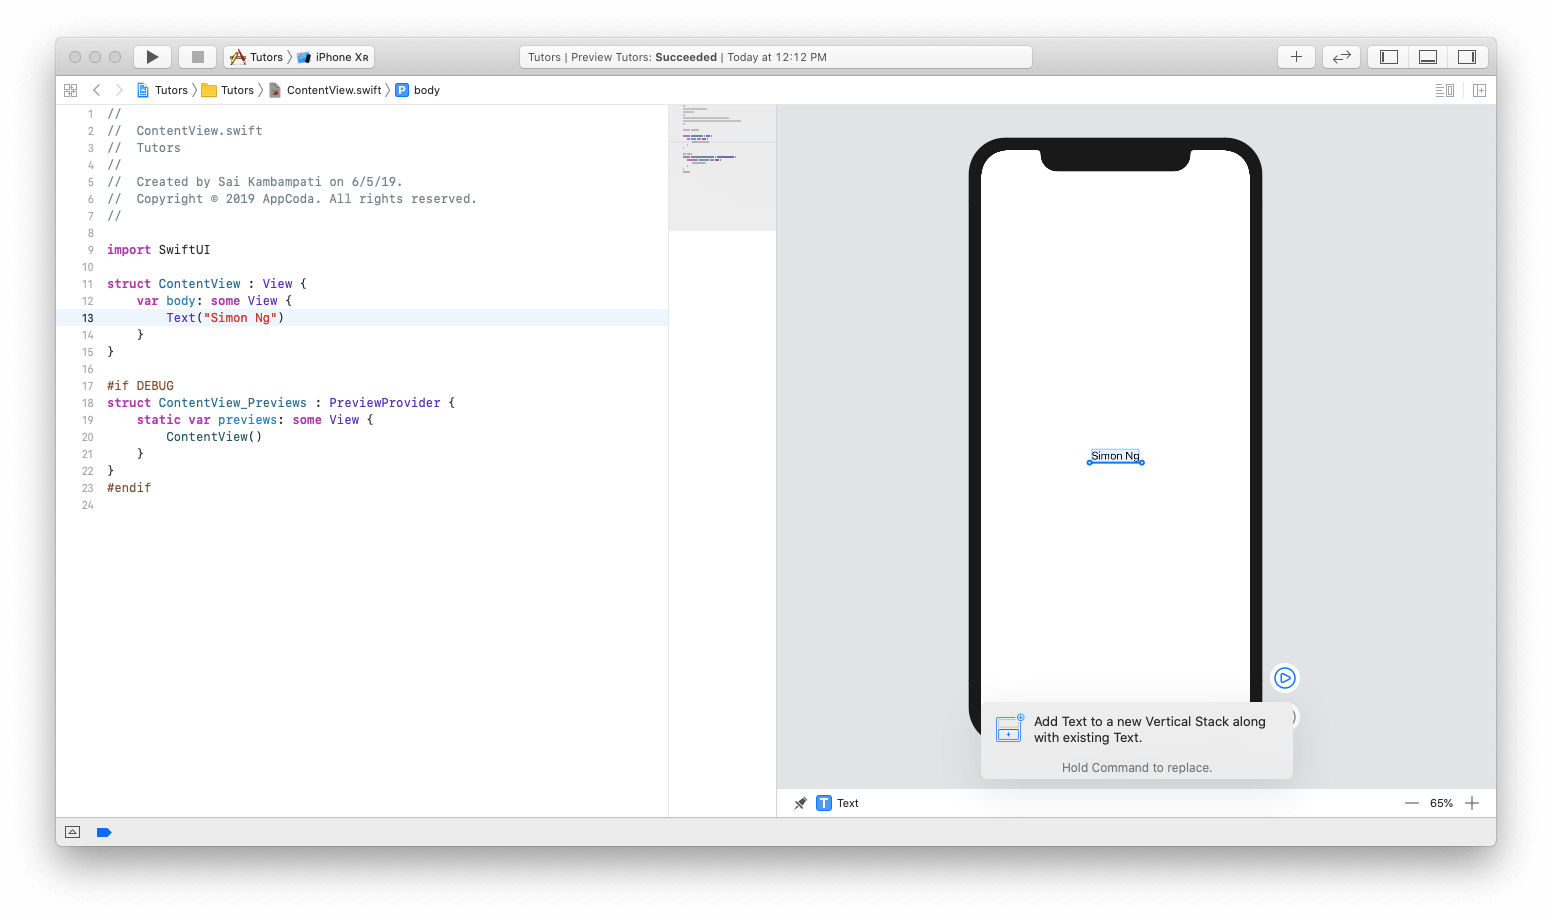
Let's add a new Text element in the application. This will be a brief description of the participant. To add a new interface element in the application, you must click the + button in the upper right corner. A new window appears with a list of different views. Move the view with the name Text and place it under the original Text element, as shown below.
Pay attention to the code on the left:
You may notice that a new Text element was added under Text View with a value of Simon Ng. The difference is that now this view seems to have wrapped the view in something called VStack. VStack is used for the vertical stack, and it is a replacement for Auto Layout in SwiftUI. If you have experience developing software for watchOS, you probably know that there are no restrictions, moreover, all elements are placed in groups. With a vertical stack, all views will be arranged vertically.
Now change the text of "Placeholder" to "Founder of AppCoda"
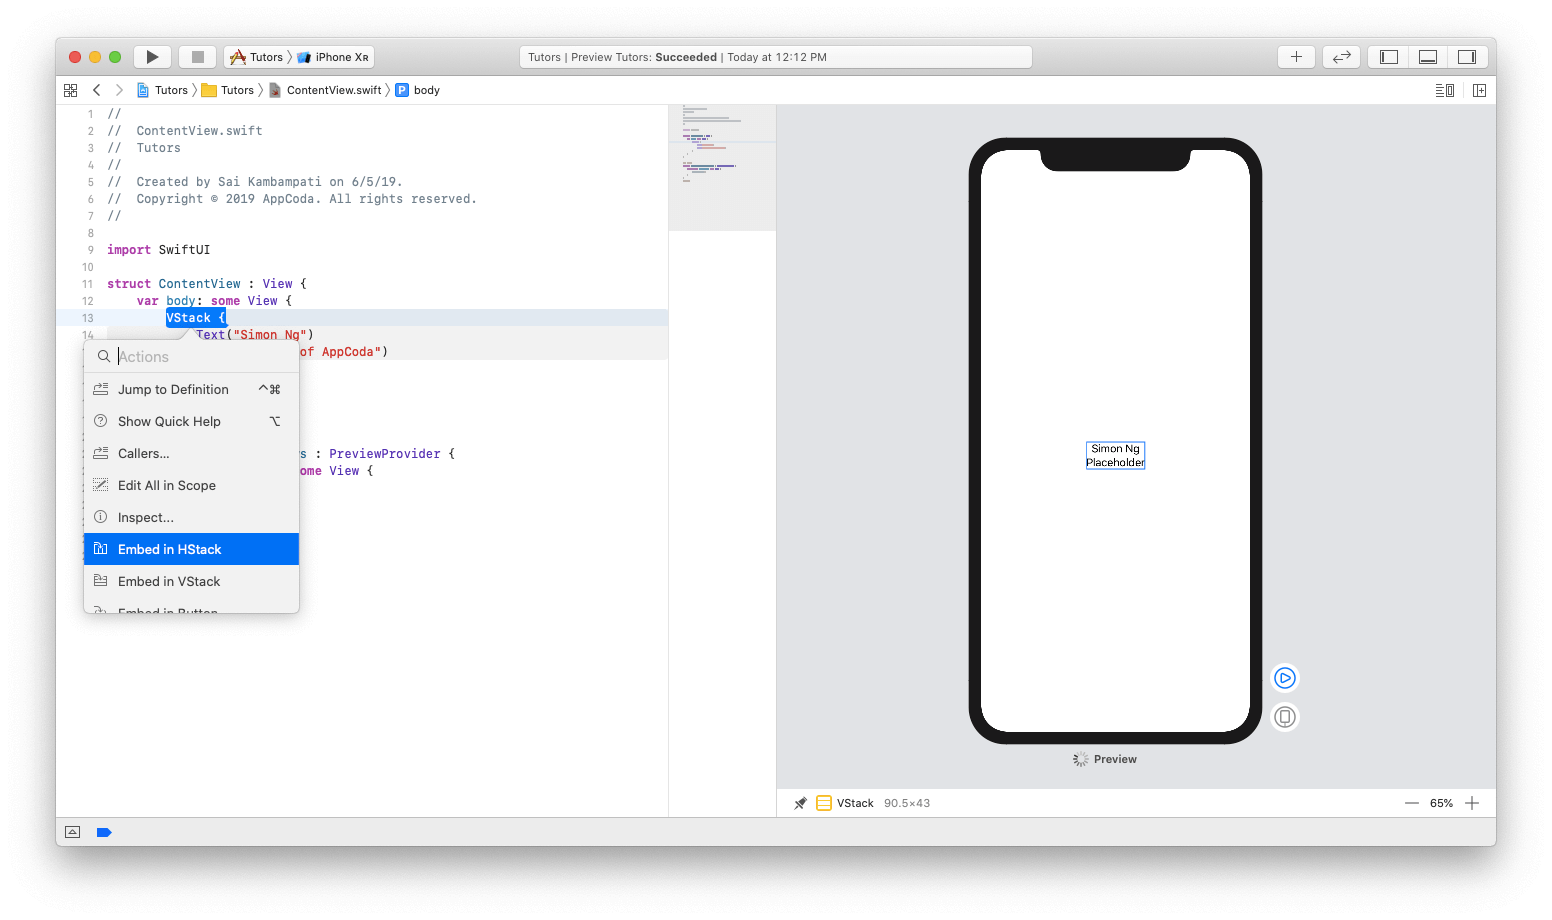
Next, let's add an image to the left of this text. Since we want to position the view horizontally with existing views, there is a need to wrap VStack in HStack. To do this, do ⌘ + Click on VStack, and then select Embed in HStack. Take a look at this below:
This code should look like this:
There are no significant changes yet, but now we will add an image. Change the code to look like this:
Starting with iOS 13, Apple introduces a new feature called SFSymbols. SF Symbols, developed by Apple, is a collection of more than 1,500 characters that can be used in applications. Because they can easily integrate with the San Francisco system font, characters automatically provide optical vertical alignment with text of any size. Since we do not yet have images of our teachers, we will use the so-called placeholder.
Now let's focus on some minor design issues. Since there is a need to emulate the appearance of UITableRow , let's align the text to the left (i.e., make it the main one). To do this, do ⌘ + Click on VStack and click Inspect . Select the left alignment icon as shown below:
Next, we will see a change in the code. Also, the code will be changed in real time to display new changes.
Now that the second text view is the title, let's change the font. As before, ⌘ + Click on the text representation of “Founder of AppCoda” in preview mode and select Inspect. Change the font to “Subheadline” and display a preview and code change in real time.
Let's also change the color and set it to “Gray”. This code should look like this:
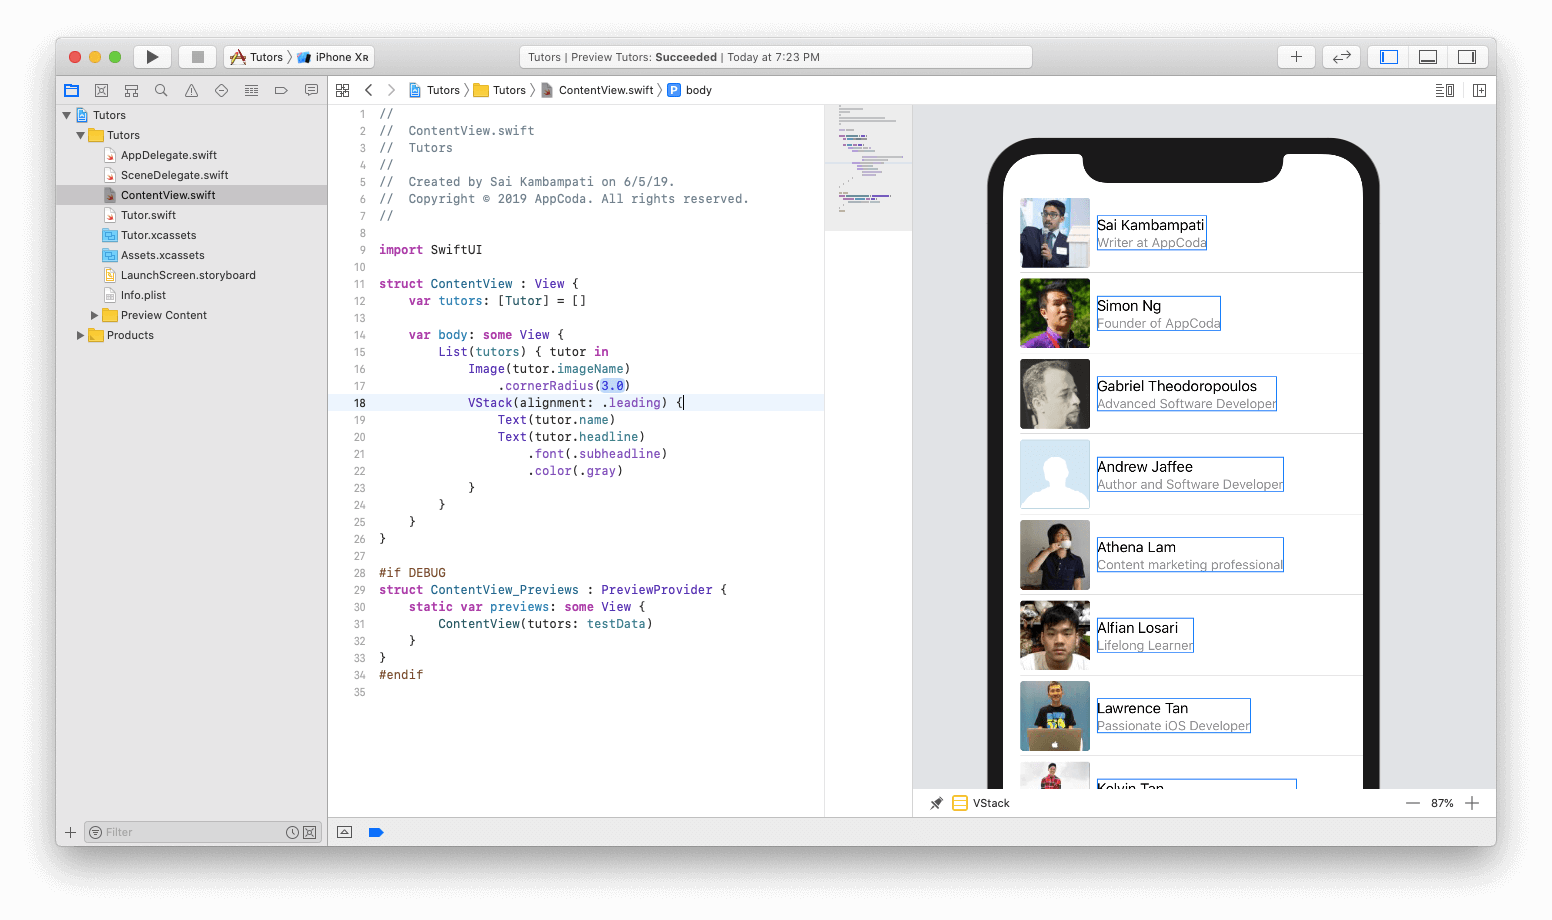
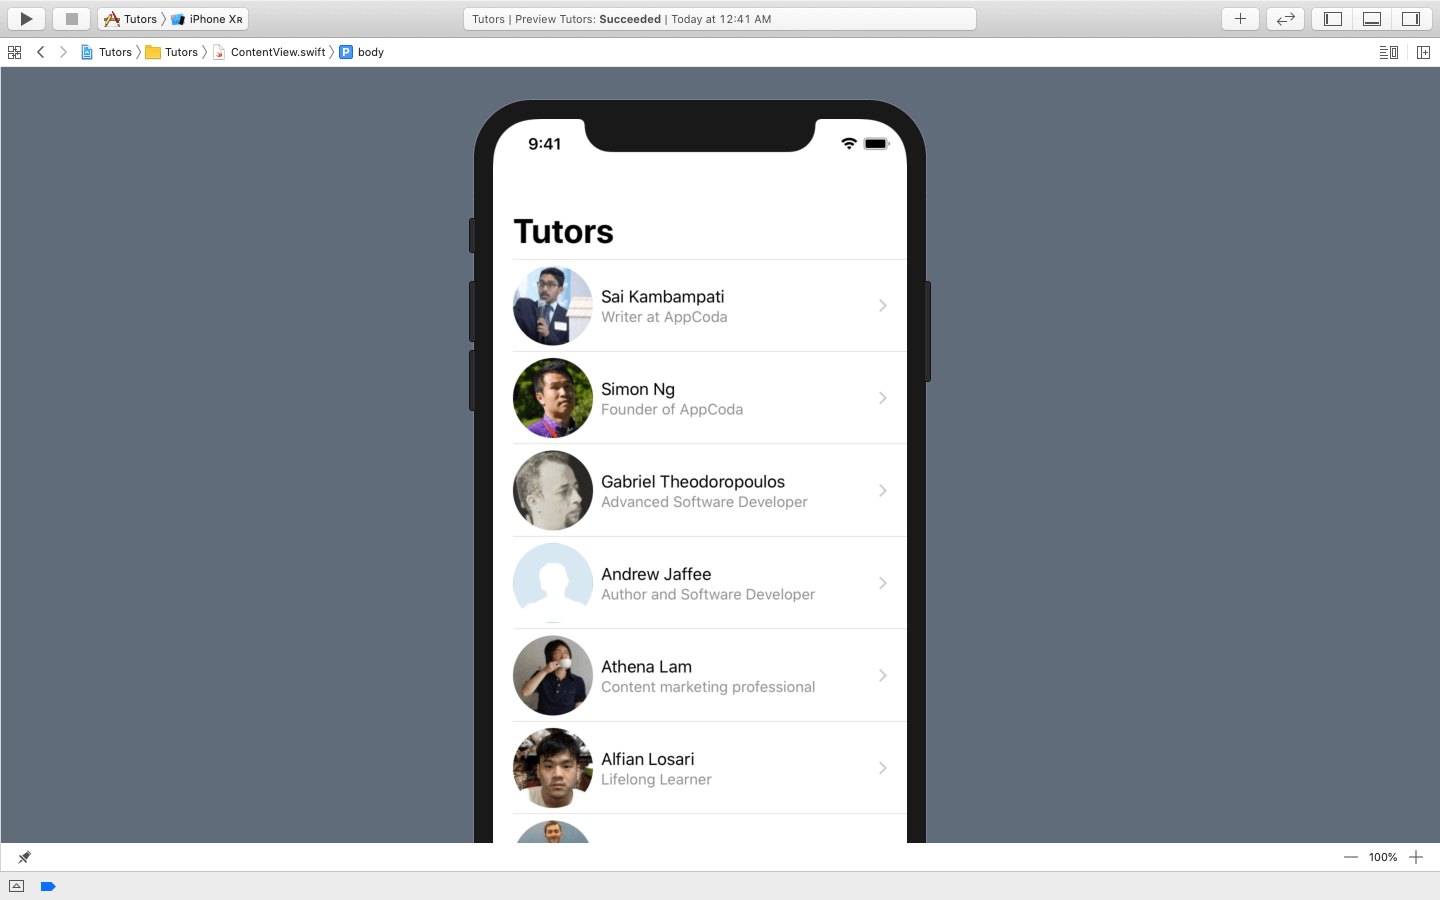
Now, after finishing the design of a number of samples, we come to the magic part. See how easy it is to create a list. Execute ⌘ + Click on the HStack and click on the Embed in List. Voila! See how the code will automatically change, and the empty area will display 5 beautiful new lines, each of which shows Simon Ng as a member of the team.

Also, be sure to note how the List was created in the code. By deleting the HStack and replacing it with a duplicate List, a table view was created. Now think about how much time you saved and how much less code you wrote, avoiding all these UITableViewDataSource, UITableViewDelegate, Auto Layout, implementations for Dark Mode, etc. All this in itself shows the power and strength of SwiftUI. However, we are far from complete. Let's add some real data to the new list.
The data we need is a list of team members and their biography along with a folder with all their images. You can download the necessary files here . You should find 2 files with the names Tutor.swif t and Tutor.xcasset s.
After downloading, import the file with the Swift extension and the resource folder into the Xcode project. To import them, just drag them into the project navigator.
In the Tutor.swif t file, we declare the Tutor structure and bring it into compliance with the Identifiable protocol. You will understand why this is important later. We also define the variables id, name, headline, bio and imageName. Finally, add some test data that will be used in our application. Tutor.xcassets has images of all team members.
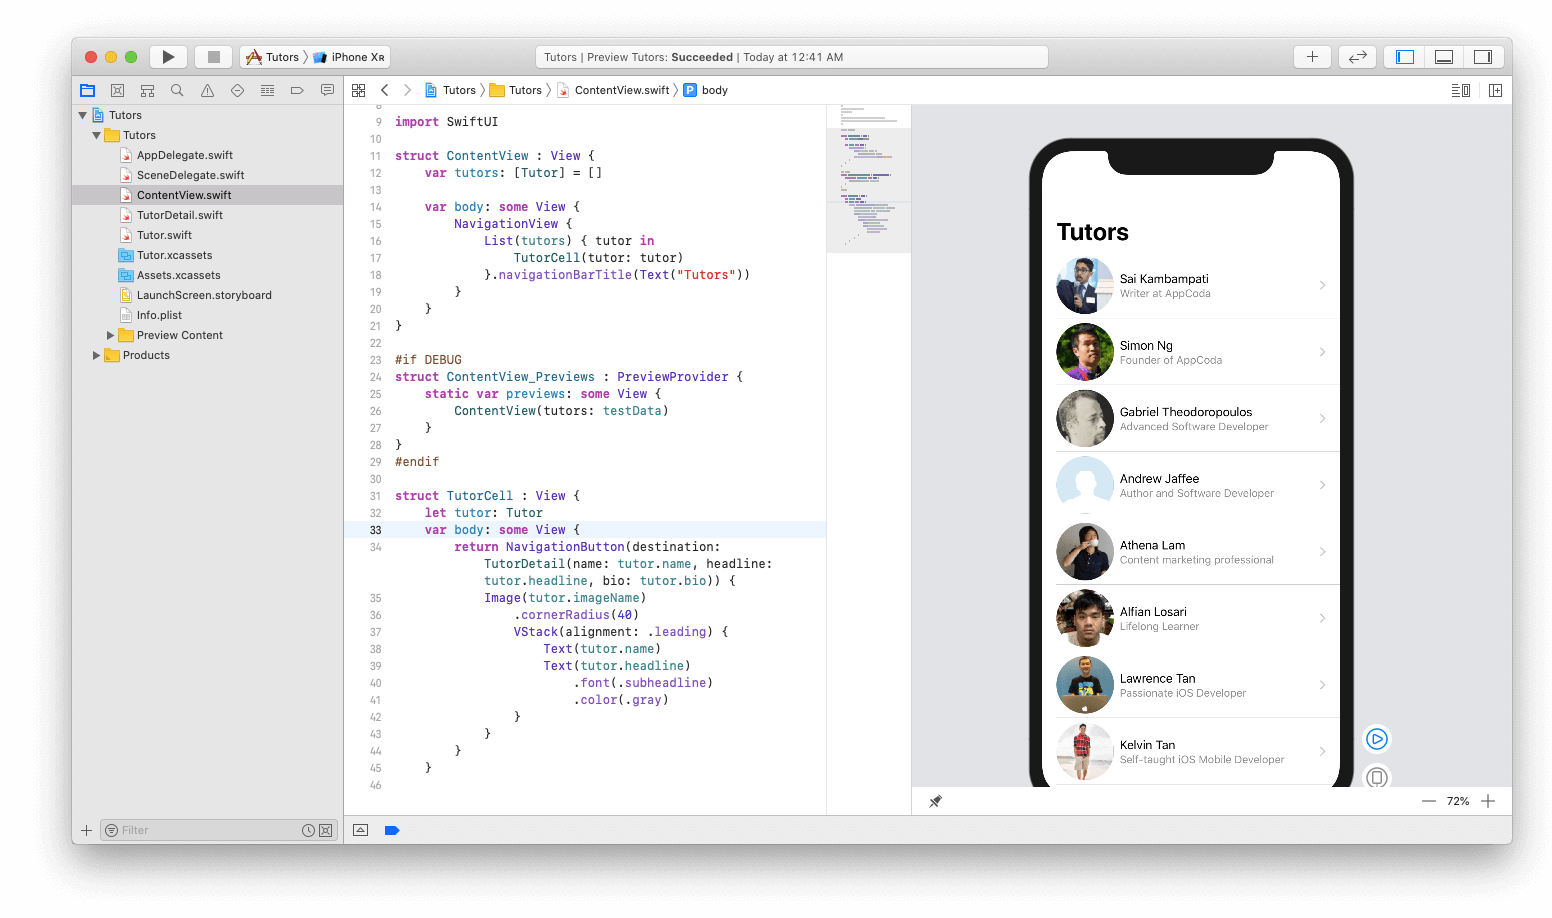
Go back to ContentView.swift and change the code as follows:
Everything is pretty simple:
There will be no changes in the preview, because we are not using test data yet. To display test data, change the code as follows:
Make sure ContentView uses tutors to display data on the screen.
Like this! See how the view has changed.
Images are displayed as a square. I would like them to look more rounded. Let's see how we can make an image with rounded corners. In the upper right corner, click the + button and go to the second tab. This will display a list of layout modifiers that you can add to images.
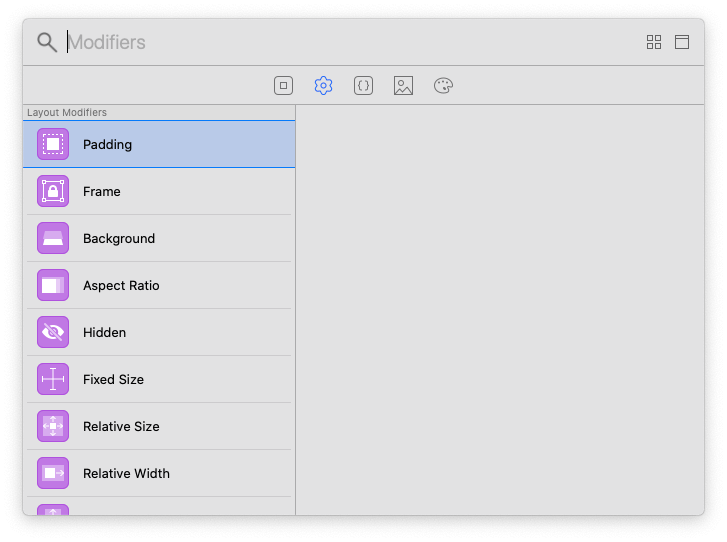
Look for Corner Radius, drag it from the preview window and place it on the image. You should see the changed code, and the preview image will be changed to the following.
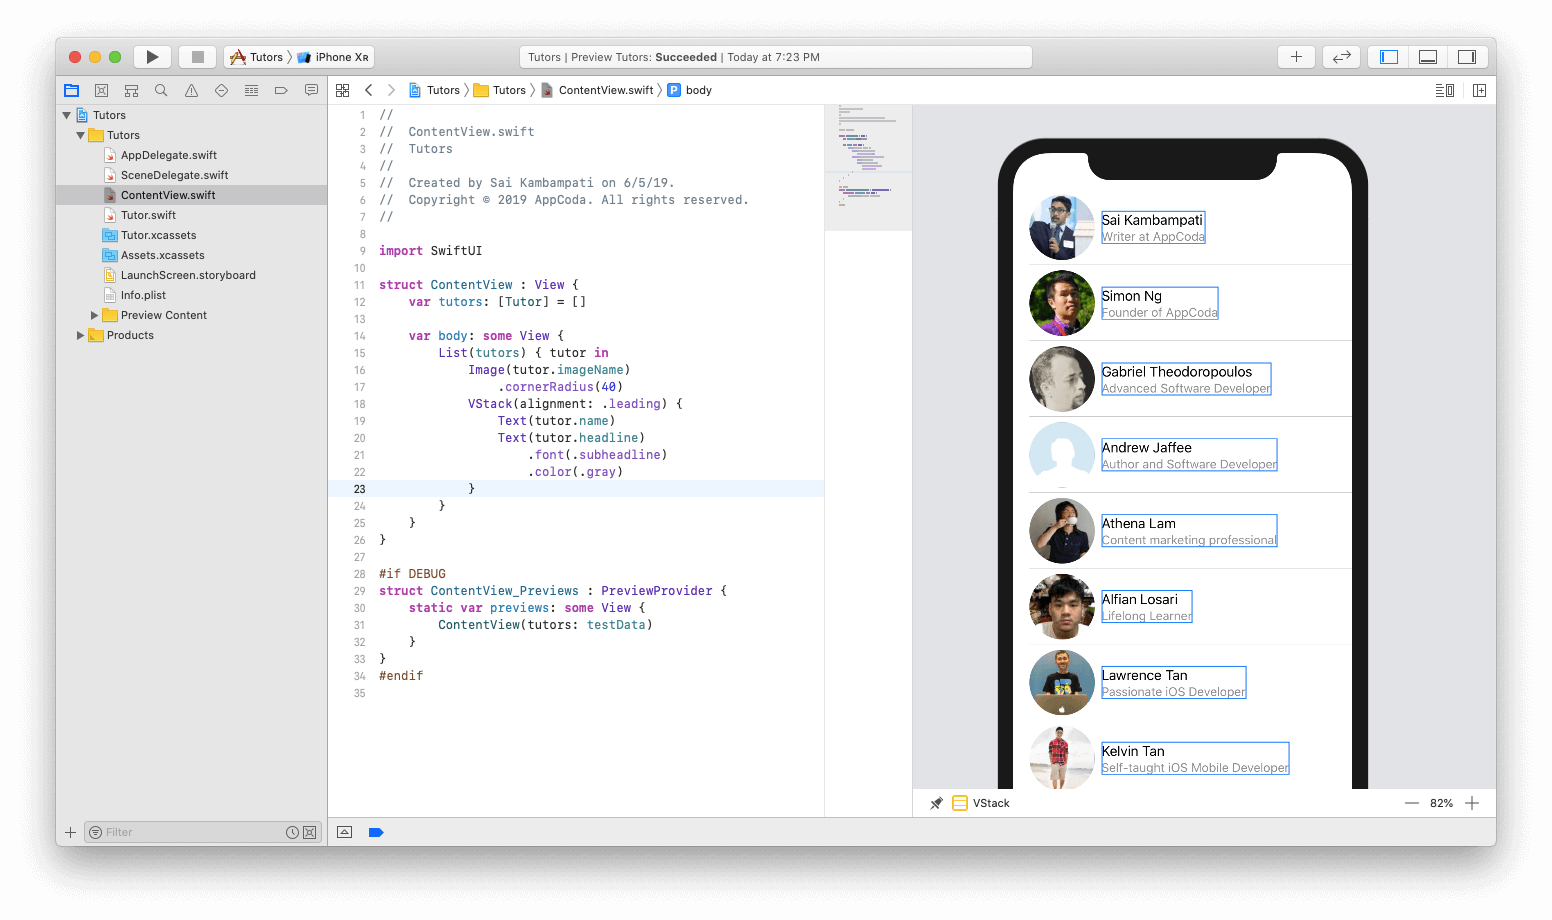
However, a curve radius of 3 is too small. So, change it to 40. Thus, we get beautiful rounded pictures.
The cell and the list are ready! Next, you need to display detailed information when the user clicks on the cell. Let's get started with creating navigation.
The navigation view wraps the existing view in the navigation bar and navigation controller. Presumably, you are already familiar with the Storyboard, and you know that it is quite simple to embed the view in the navigation interface. All you need to do is just a few clicks.
In SwiftUI, wrapping a List view in a NavigationView is also very simple. All you have to do is change the code as follows:
You must wrap the List code in a NavigationView. By default, the navigation bar does not have a title. The preview should move the list down, leaving a very large gap in the middle. This is because we did not set a title for the navigation bar. To fix this, you need to set the header by adding the following line of code (i.e. .navigationBarTitle):
Now the screen should look something like this:
Next, set the navigation button. NavigationButton leads to a new screen, which is on the navigation stack. Just as we wrapped the List in a NavigationView, we need to wrap the contents of the List with the NavigationButton, as shown below:
The team member name is now displayed in a detailed view. Now is the time to check it out.
In the current preview mode, you cannot interact with the view. Usually, when you click on a preview, a simple selection of code occurs. To run the test and check the interaction with the user interface, you must click the play button in the lower right corner.
The view will become dark, and you may have to wait a couple of seconds for the entire simulator to load before it becomes possible to really interact with the views.
When the download is finished, you can click on the cell, and it will go to a new view on the stack, in which the name of the selected cell will be displayed.
Before moving on to implementing a detailed view, let me show you a tricky technique that will help make your code more legible. ⌘ + Click NavigationButton and select “Extract Subview”.
Boom! You can see that all the code in the NavigationButton was created in a completely new structure that makes it very legible. Rename ExtractedView to TutorCell.
Now you can get the error in TutorCell. This is because we do not have the tutor parameter to pass to this structure. Correcting the error is very simple. Add a new constant to the TutorCell structure as follows:
And, in ContentView, add the missing parameter by changing the line to:
That's all! There is a list and cells, all of them are well thought out and arranged in the required order! Next, we are going to create a detailed view that will show all the information about the teacher.
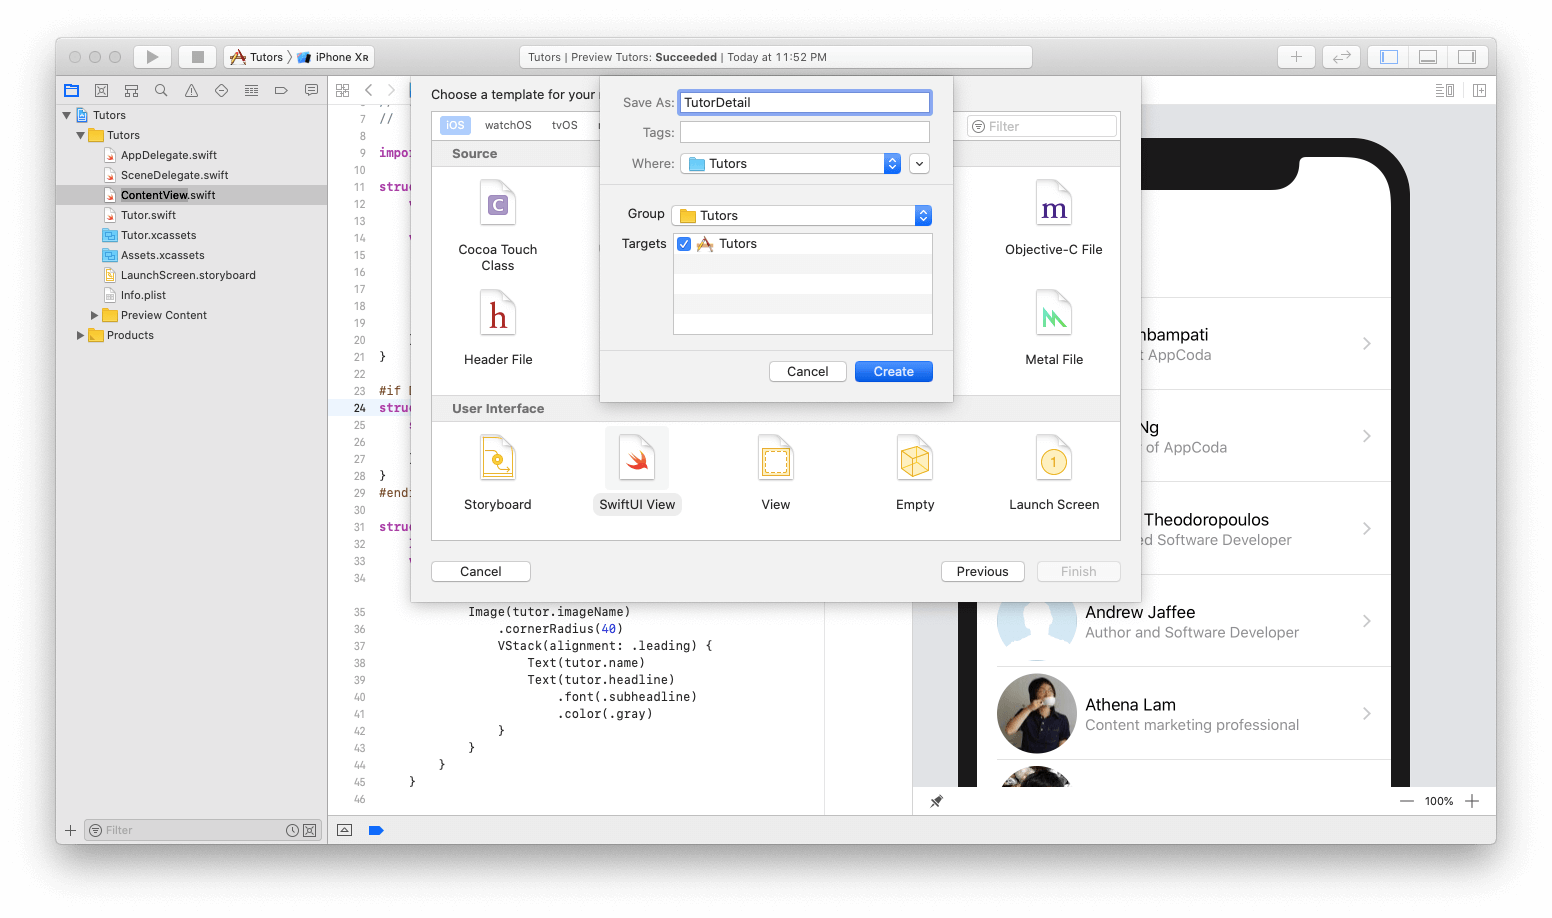
Let's create a new file by going to File> New> File. Under iOS, select SwiftUI View and name this file TutorDetail .
In the preview, the main base view has already been created. Let's work with him. First, click on the + button and place the image over the already built-in Text view. Set the image name to "Simon Ng." A picture of Simon should appear. Now change the code as shown below:
In general, this code is clear enough, but if you need clarification, do not worry. Here is what happens:
You also need to add two more text views: headline and bio. Drag the two text view below the text view with the name of the teacher, and edit them:
The good news is that we have text view. The bad news is that they look bad and do not show the difference between the title and the detailed description. In addition, the text view of the biography does not display all the text. Let's fix it.
Update the code as follows:
Let's fix the following error. We need to display the entire text of the textual representation of the biography. This can be easily done by adding a new line of code:
Everything looks good. There is one last design change I want to make. The headline and textual representations of the biography are too close together. I would like to have some space between these two views. In addition, I would like to add some indentation to all the twist so that they do not touch the edges of the device. Make sure you change the code as follows:
Here we make a few changes:
It's all! Congratulations! The detailed view screen is ready. It remains only to connect our list of teachers and their detailed description. It is pretty simple.
To transfer data, you need to declare some parameters in the TutorDetail structure. Before declaring a body variable, add the following variables:
These are the parameters that we will pass from the ContentView. Make the following changes:
Last but not least, we need to add the missing parameters to the TutorDetail_Previews structure.
In the above code, we add the missing parameters and fill in the information with the one we had before.
You may be wondering what happened with the #if DEBUG / # endif instructions. This means that any code enclosed in these commands will only be executed when previewed for debugging purposes. In your last application this will not be.
Nothing should change, since the information is also unchanged.
And so, the last step is to associate this view with the list. Switch to the ContentView.swift file. All you need to do is change one line of code in the TutorCell structure. Change the NavigationButton code to below:
Instead of displaying the view with the teacher’s name, you need to change the destination to TutorDetail when filling in the relevant data. This code should look like this:
Click the play button and interact with the view. If everything works well, the application will also work well.
Just select one of the member entries:
And then the details of the participant will be displayed on the detailed screen.
This article introduces the basics of SwiftUI. Now it will be convenient to create simple applications, such as a task scheduler, etc. I suggest taking a look at some of the resources below, such as Apple documentation and WWDC 2019 sessions on this framework.
SwiftUI Documentation
SwiftUI Tutorials
Introducing SwiftUI: Building Your First App
SwiftUI Essentials
This framework is the future of Apple, so it’s great if you start with it. Remember that if you are unsure of the code, try working with automatic previews and see if you can make changes to the user interface directly to see how the code is generated. If you have any questions, feel free to ask them in the comments below.
For reference, you can download the finished project here .
Unlike UIKit, which was commonly used in conjunction with storyboards , SwiftUI is completely software-based. However, the syntax is very easy to understand and the project can be quickly viewed using Automatic Preview.
Because SwiftUI uses the Swift language, it allows you to create applications of the same complexity with much less code. Moreover, using SwiftUI automatically allows an application to use features such as Dynamic Type , Dark Mode , Localization, and Accessibility . In addition, it is available on all platforms, including macOS , iOS , iPadOS , watchOS, and tvOS . So, now your user interface code can be synchronized across all platforms, giving you more time to focus on a secondary platform-specific code.
About this article
It is important that developers learn how to use SwiftUI at an earlier stage, as Apple will ultimately focus most of its attention on this framework. In this article, we will look at the basics of SwiftUI and learn how to create minimal navigation, display images, text and lists by creating a simple contact list that will display all the members of our team. When choosing a team member, the application displays detailed information that contains the user's image with his brief biography. Let's start!
')
Launch Xcode 11 . At the time of this writing, Xcode 11 is still in beta, so some features may not work as expected. In this article we will use Swift 5 . Although advanced knowledge of Swift is not required for this article, an understanding of the basics of the language is still recommended.
Editor's Note: To preview and interact with images from Canvas in Xcode, make sure Mac OS 10.15 beta is installed.
Creating a new project using SwiftUI
Let's start all over again so you can immediately see how to launch the SwiftUI application. First open Xcode and select “Create new Xcode project”. For the iOS platform, select the Single View App. Enter a name for the application and fill in the text fields. However, make sure that Use SwiftUI is checked at the bottom. If you do not select this option, Xcode will create a storyboard file for you.
Xcode will automatically create a file for you called ContentView.swift, and it will be amazing that a preview of your code will be displayed on the right side, as shown below.
If you do not see the preview, you must click the Resume button in the preview area. Compilation of the project will take some time. Be patient and wait for the compilation to complete.
Now let's see how you can modify these files to create an application.
Create a list view
Creating a list view is carried out in three stages. The first one is creating lines in a list. Perhaps the design is similar to a UITableView. To do this, create a ContactRow. The second stage is the transfer of the necessary data to the list. I have data that is already encoded, and it only takes a few changes to associate the list with the data. The final step is simply to add the Navigation Bar and embed the list in the Navigation View. It is pretty simple. Now let's see how all this was implemented in SwiftUI.
Create a list of teachers
First, you need to create a view to display a list of all team members, including photos of their profile and their description. Let's see how this can be done.
As we can see, the generated code has a Text component with the value “Hello World”. In the code editor, change the value of the code to "Simon Ng".
struct ContentView: View { var body: some View { Text("Simon Ng") } } If everything works correctly, on the right you should see an automatic update. This is the effect of instant viewing, as we expected.
Let's add a new Text element in the application. This will be a brief description of the participant. To add a new interface element in the application, you must click the + button in the upper right corner. A new window appears with a list of different views. Move the view with the name Text and place it under the original Text element, as shown below.
Pay attention to the code on the left:
struct ContentView: View { var body: some View { VStack { Text("Simon Ng") Text("Placeholder") } } } You may notice that a new Text element was added under Text View with a value of Simon Ng. The difference is that now this view seems to have wrapped the view in something called VStack. VStack is used for the vertical stack, and it is a replacement for Auto Layout in SwiftUI. If you have experience developing software for watchOS, you probably know that there are no restrictions, moreover, all elements are placed in groups. With a vertical stack, all views will be arranged vertically.
Now change the text of "Placeholder" to "Founder of AppCoda"
Next, let's add an image to the left of this text. Since we want to position the view horizontally with existing views, there is a need to wrap VStack in HStack. To do this, do ⌘ + Click on VStack, and then select Embed in HStack. Take a look at this below:
This code should look like this:
struct ContentView: View { var body: some View { HStack { VStack { Text("Simon Ng") Text("Founder of AppCoda") } } } } There are no significant changes yet, but now we will add an image. Change the code to look like this:
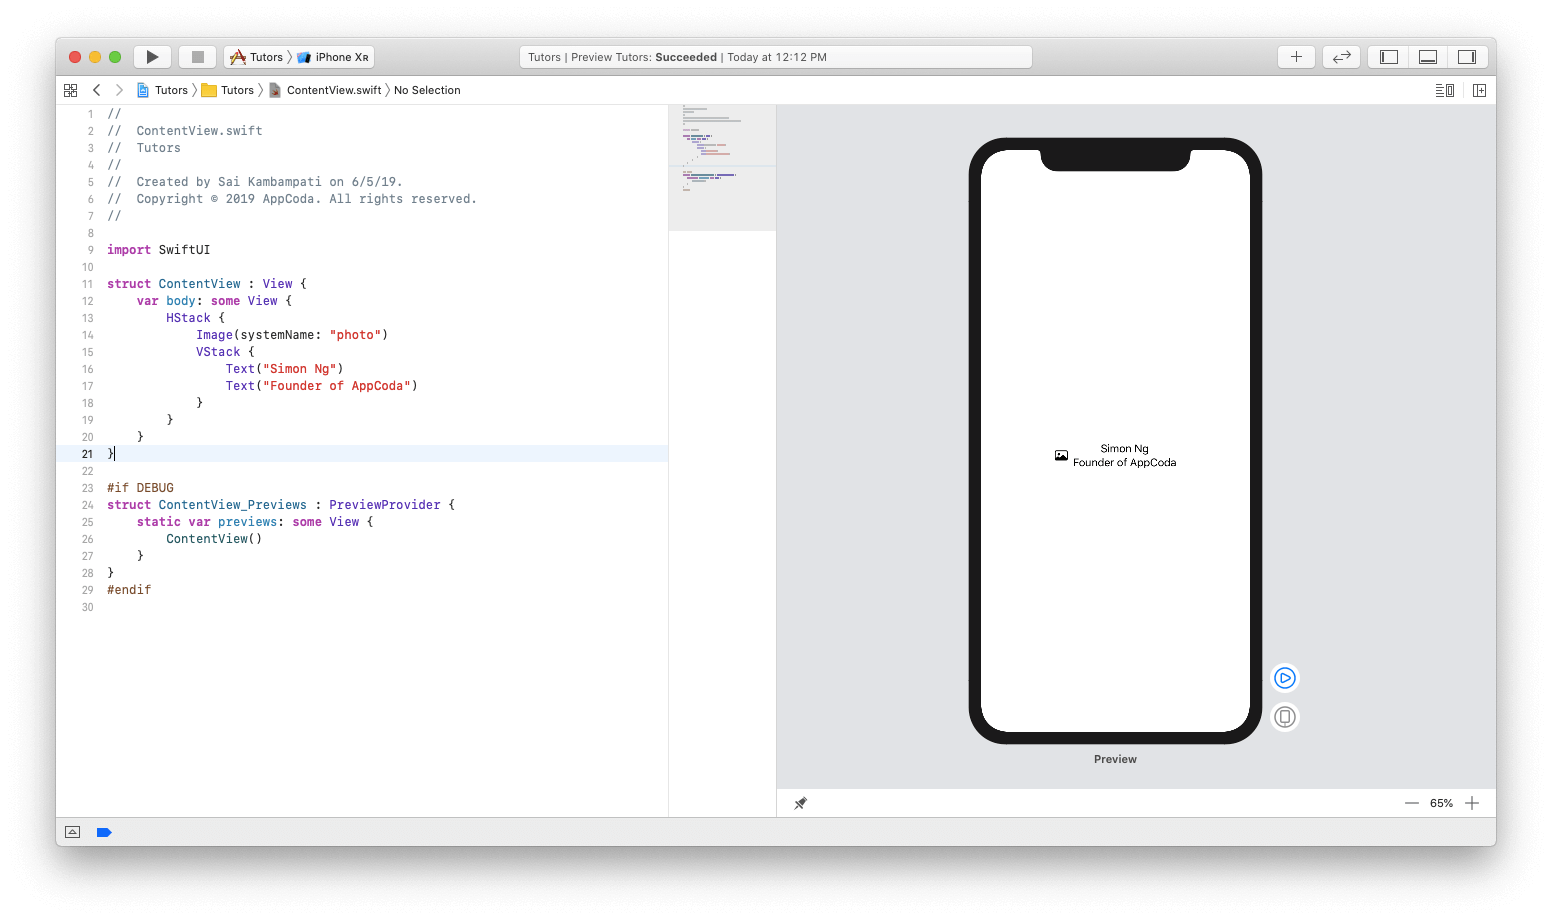
struct ContentView: View { var body: some View { HStack { Image(systemName: "photo") VStack { Text("Simon Ng") Text("Founder of AppCoda") } } } } Starting with iOS 13, Apple introduces a new feature called SFSymbols. SF Symbols, developed by Apple, is a collection of more than 1,500 characters that can be used in applications. Because they can easily integrate with the San Francisco system font, characters automatically provide optical vertical alignment with text of any size. Since we do not yet have images of our teachers, we will use the so-called placeholder.
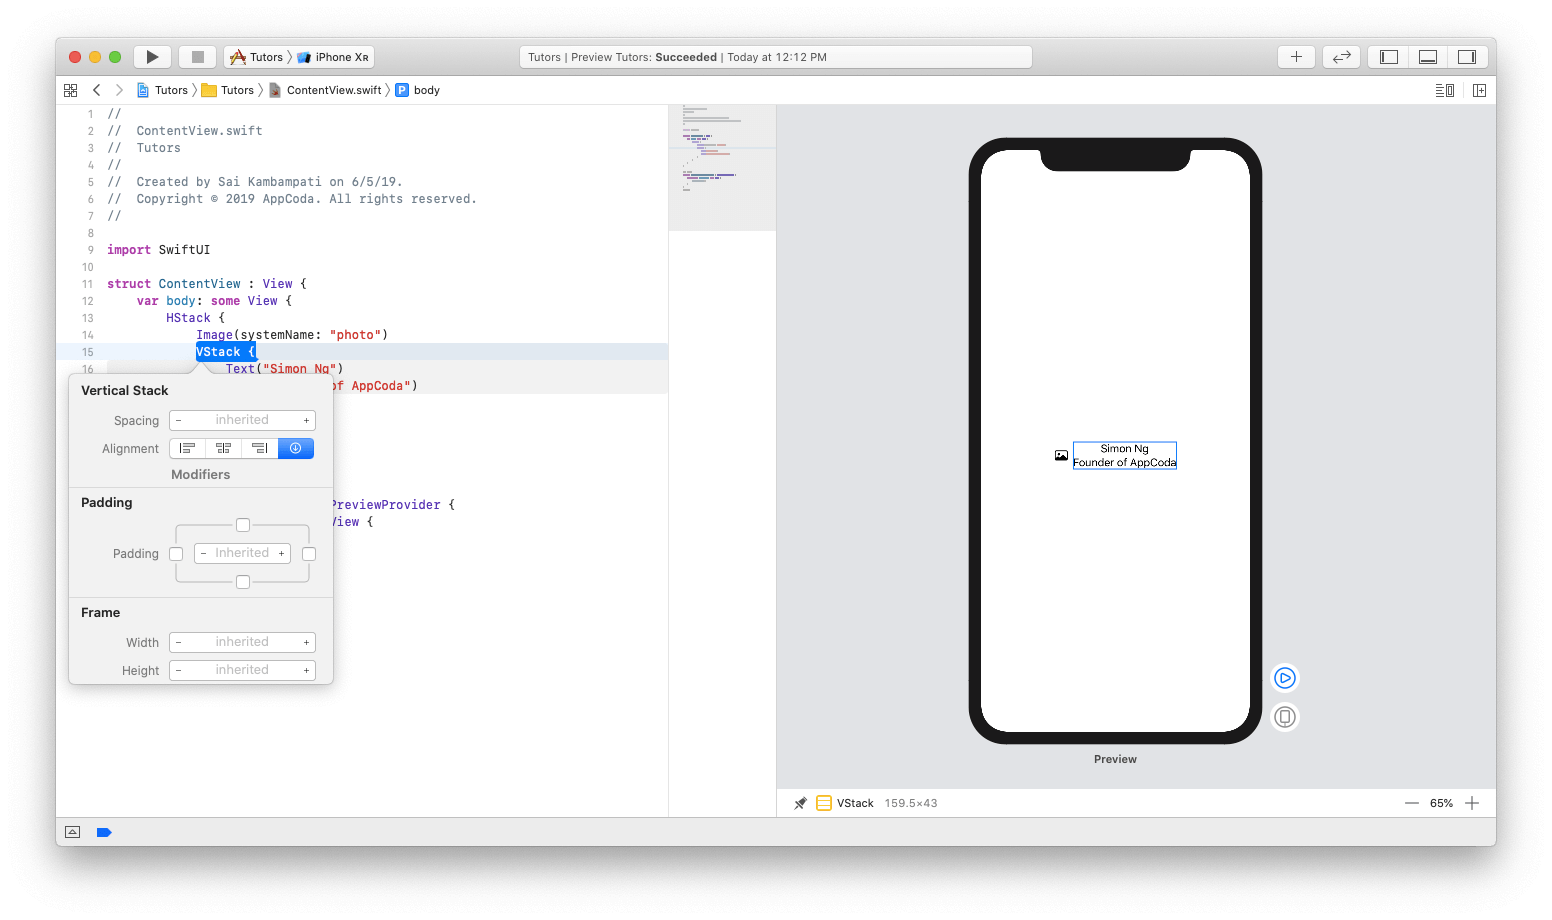
Now let's focus on some minor design issues. Since there is a need to emulate the appearance of UITableRow , let's align the text to the left (i.e., make it the main one). To do this, do ⌘ + Click on VStack and click Inspect . Select the left alignment icon as shown below:
Next, we will see a change in the code. Also, the code will be changed in real time to display new changes.
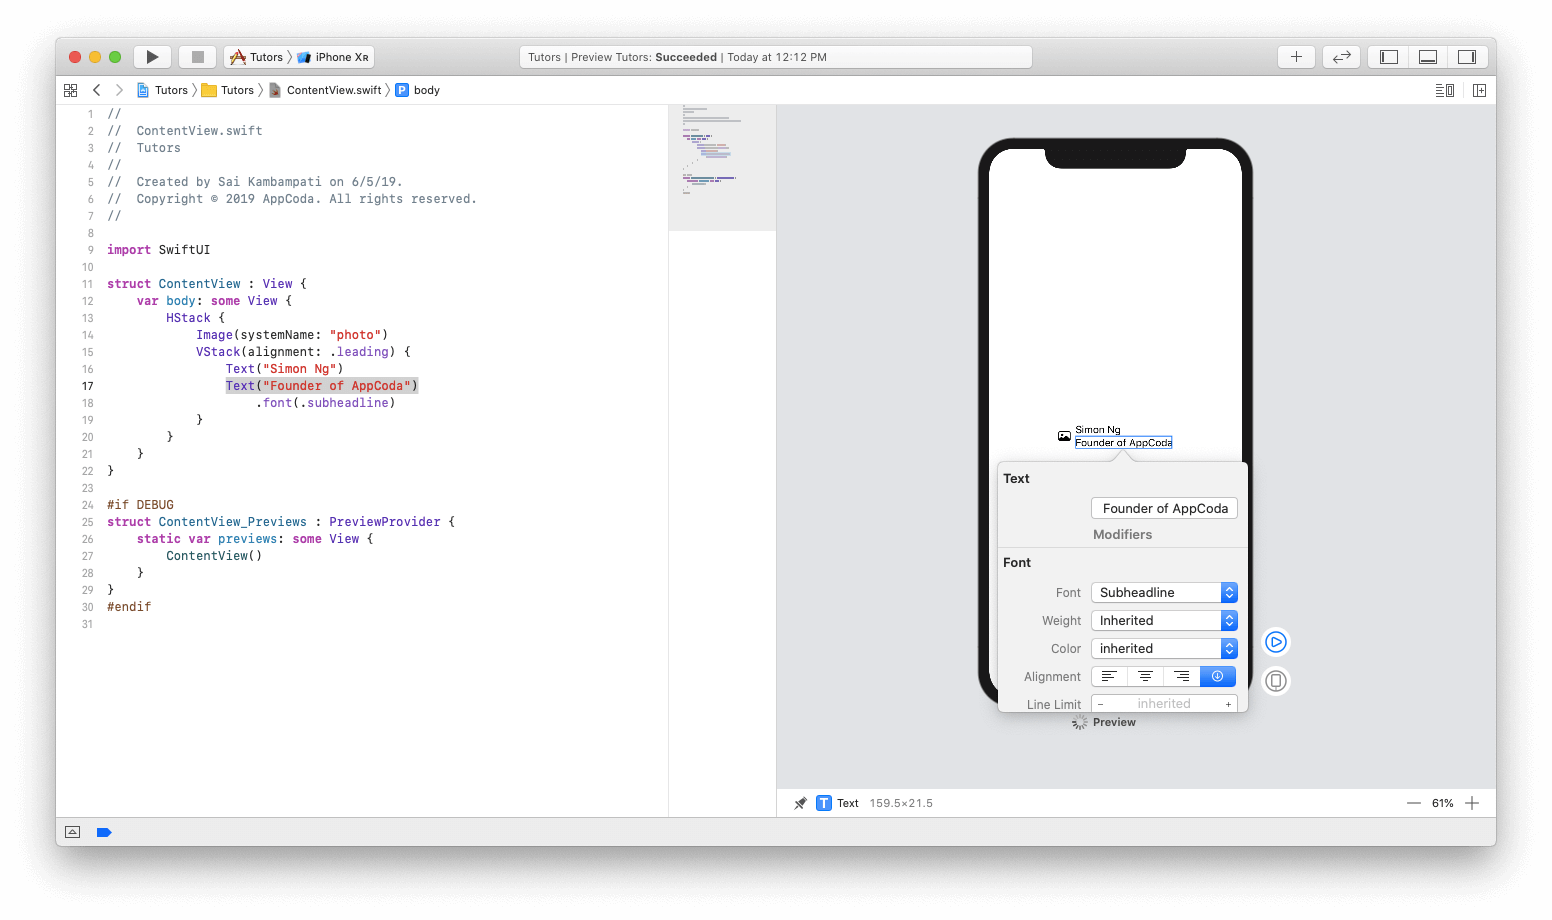
VStack(alignment: .leading) { ... } Now that the second text view is the title, let's change the font. As before, ⌘ + Click on the text representation of “Founder of AppCoda” in preview mode and select Inspect. Change the font to “Subheadline” and display a preview and code change in real time.
Let's also change the color and set it to “Gray”. This code should look like this:
struct ContentView: View { var body: some View { HStack { Image(systemName: "photo") VStack(alignment: .leading) { Text("Simon Ng") Text("Founder of AppCoda") .font(.subheadline) .color(.gray) } } } } Now, after finishing the design of a number of samples, we come to the magic part. See how easy it is to create a list. Execute ⌘ + Click on the HStack and click on the Embed in List. Voila! See how the code will automatically change, and the empty area will display 5 beautiful new lines, each of which shows Simon Ng as a member of the team.
Also, be sure to note how the List was created in the code. By deleting the HStack and replacing it with a duplicate List, a table view was created. Now think about how much time you saved and how much less code you wrote, avoiding all these UITableViewDataSource, UITableViewDelegate, Auto Layout, implementations for Dark Mode, etc. All this in itself shows the power and strength of SwiftUI. However, we are far from complete. Let's add some real data to the new list.
Connect data to a list
The data we need is a list of team members and their biography along with a folder with all their images. You can download the necessary files here . You should find 2 files with the names Tutor.swif t and Tutor.xcasset s.
After downloading, import the file with the Swift extension and the resource folder into the Xcode project. To import them, just drag them into the project navigator.
In the Tutor.swif t file, we declare the Tutor structure and bring it into compliance with the Identifiable protocol. You will understand why this is important later. We also define the variables id, name, headline, bio and imageName. Finally, add some test data that will be used in our application. Tutor.xcassets has images of all team members.
Go back to ContentView.swift and change the code as follows:
struct ContentView: View { //1 var tutors: [Tutor] = [] var body: some View { List(0..<5) { item in Image(systemName: "photo") VStack(alignment: .leading) { Text("Simon Ng") Text("Founder of AppCoda") .font(.subheadline) .color(.gray) } } } } #if DEBUG struct ContentView_Previews : PreviewProvider { static var previews: some View { //2 ContentView(tutors: testData) } } #endif Everything is pretty simple:
- Define a new variable called tutors, which is an empty array of Tutor structures.
- Since we are defining a new variable for the ContentView structure, it is therefore necessary to also modify ContentView_Previews to display this change. Set the tutors parameter to testData.
There will be no changes in the preview, because we are not using test data yet. To display test data, change the code as follows:
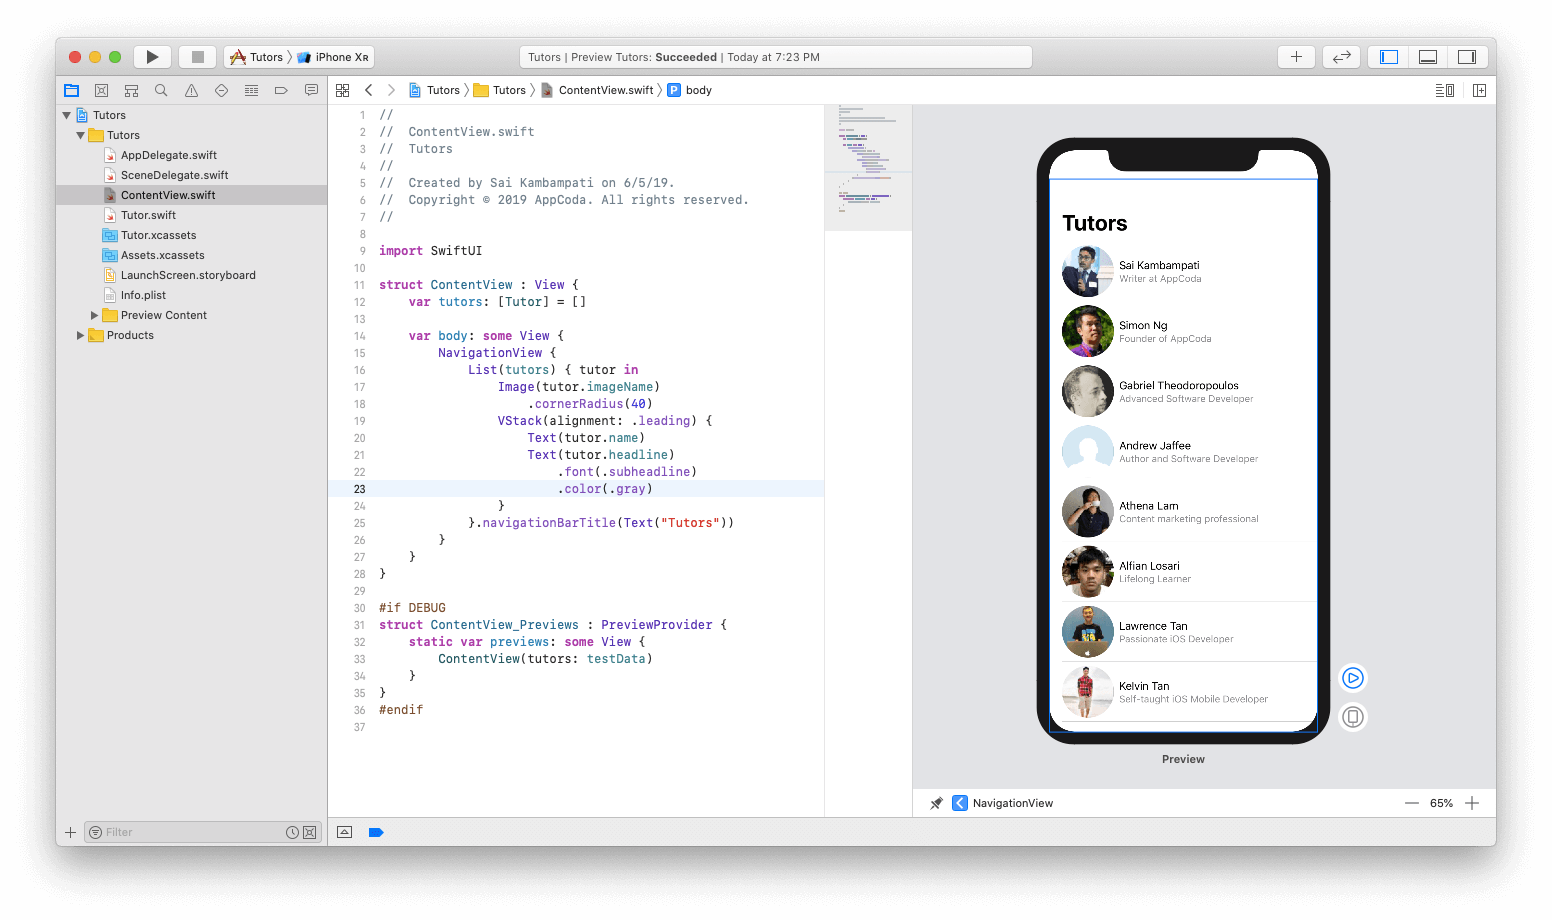
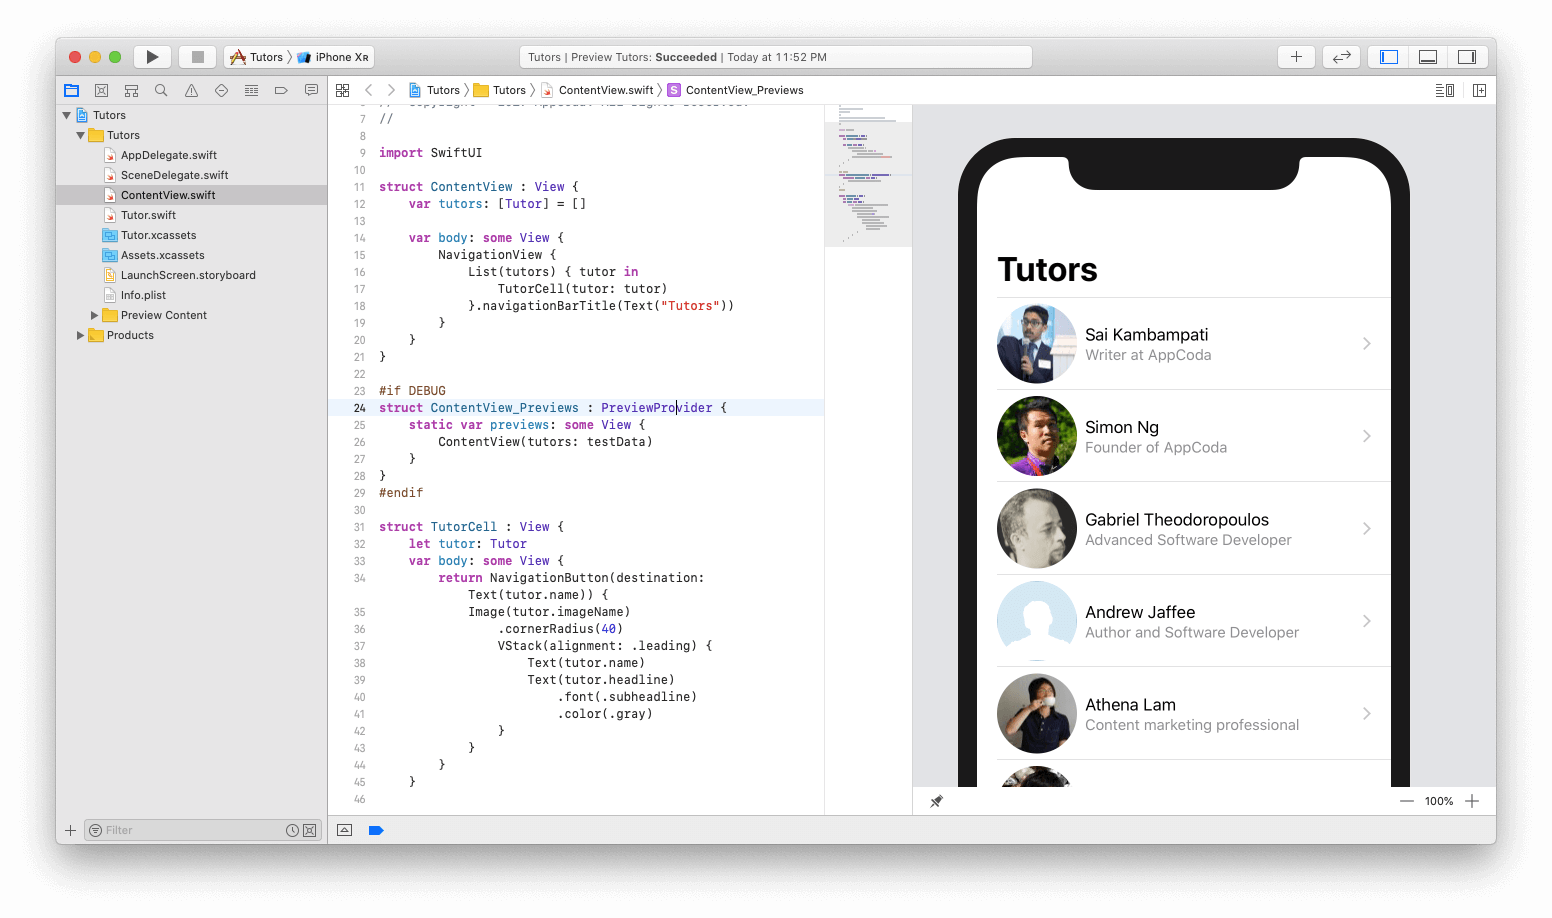
struct ContentView: View { var tutors: [Tutor] = [] var body: some View { List(tutors) { tutor in Image(tutor.imageName) VStack(alignment: .leading) { Text(tutor.name) Text(tutor.headline) .font(.subheadline) .color(.gray) } } } } Make sure ContentView uses tutors to display data on the screen.
Like this! See how the view has changed.
Images are displayed as a square. I would like them to look more rounded. Let's see how we can make an image with rounded corners. In the upper right corner, click the + button and go to the second tab. This will display a list of layout modifiers that you can add to images.
Look for Corner Radius, drag it from the preview window and place it on the image. You should see the changed code, and the preview image will be changed to the following.
However, a curve radius of 3 is too small. So, change it to 40. Thus, we get beautiful rounded pictures.
The cell and the list are ready! Next, you need to display detailed information when the user clicks on the cell. Let's get started with creating navigation.
Create navigation
The navigation view wraps the existing view in the navigation bar and navigation controller. Presumably, you are already familiar with the Storyboard, and you know that it is quite simple to embed the view in the navigation interface. All you need to do is just a few clicks.
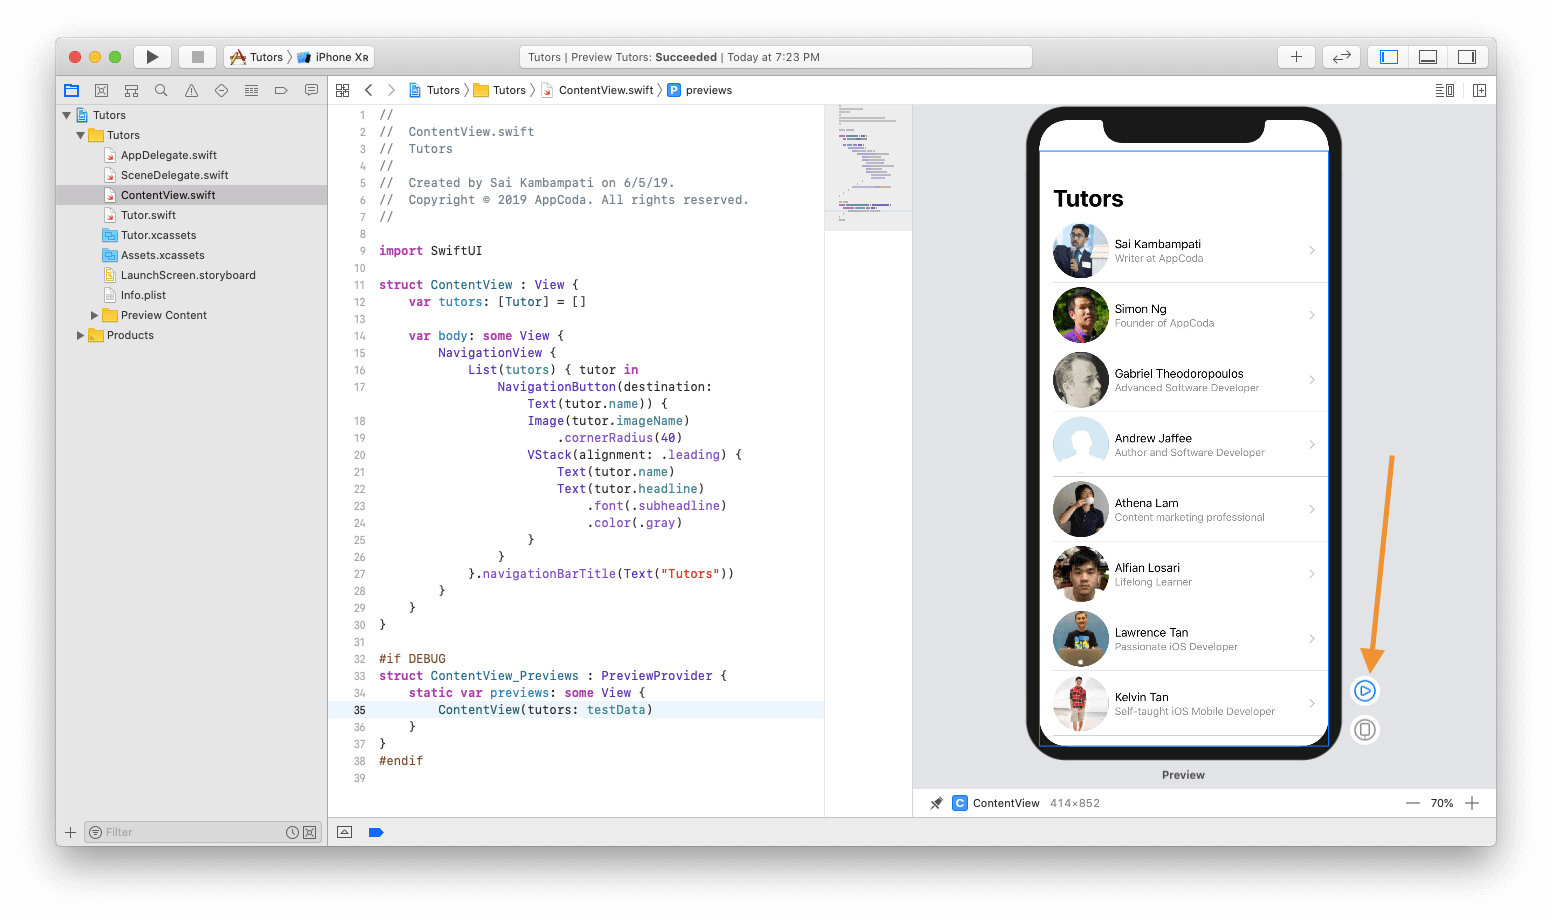
In SwiftUI, wrapping a List view in a NavigationView is also very simple. All you have to do is change the code as follows:
... var body : some View { NavigationView { List(tutors) { tutor in ... } } } ... You must wrap the List code in a NavigationView. By default, the navigation bar does not have a title. The preview should move the list down, leaving a very large gap in the middle. This is because we did not set a title for the navigation bar. To fix this, you need to set the header by adding the following line of code (i.e. .navigationBarTitle):
... var body : some View { NavigationView { List(tutors) { tutor in ... } .navigationBarTitle(Text("Tutors")) } } ... Now the screen should look something like this:
Next, set the navigation button. NavigationButton leads to a new screen, which is on the navigation stack. Just as we wrapped the List in a NavigationView, we need to wrap the contents of the List with the NavigationButton, as shown below:
... var body : some View { NavigationView { List(tutors) { tutor in NavigationButton(destination: Text(tutor.name)) { Image(tutor.imageName) VStack(alignment: .leading) { Text(tutor.name) Text(tutor.headline) .font(.subheadline) .color(.gray) } } } .navigationBarTitle(Text("Tutors")) } } ... The team member name is now displayed in a detailed view. Now is the time to check it out.
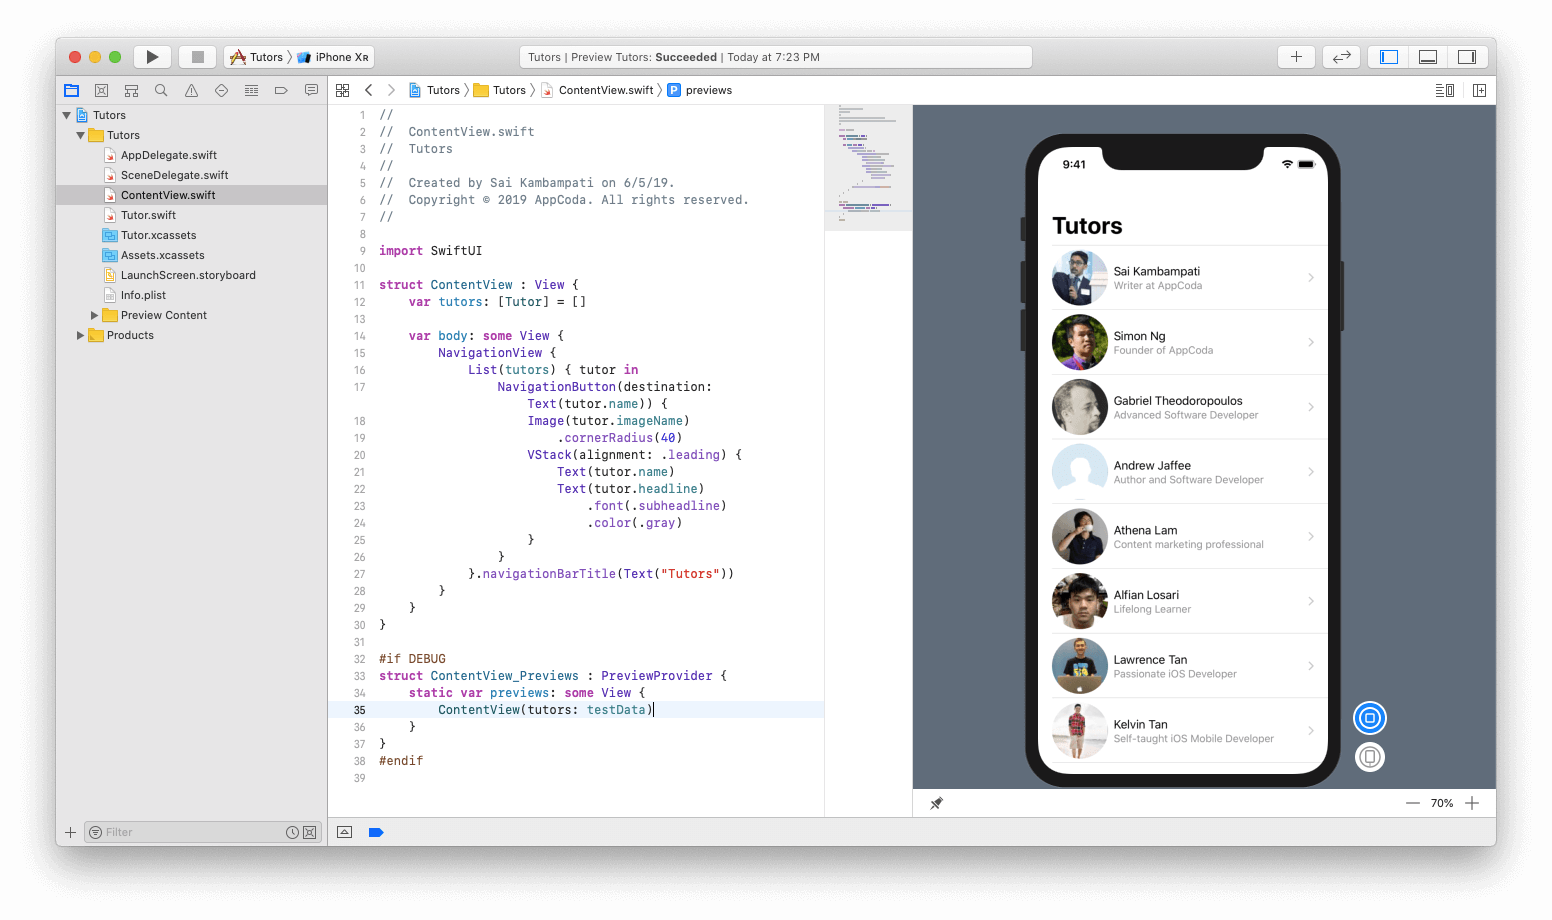
In the current preview mode, you cannot interact with the view. Usually, when you click on a preview, a simple selection of code occurs. To run the test and check the interaction with the user interface, you must click the play button in the lower right corner.
The view will become dark, and you may have to wait a couple of seconds for the entire simulator to load before it becomes possible to really interact with the views.
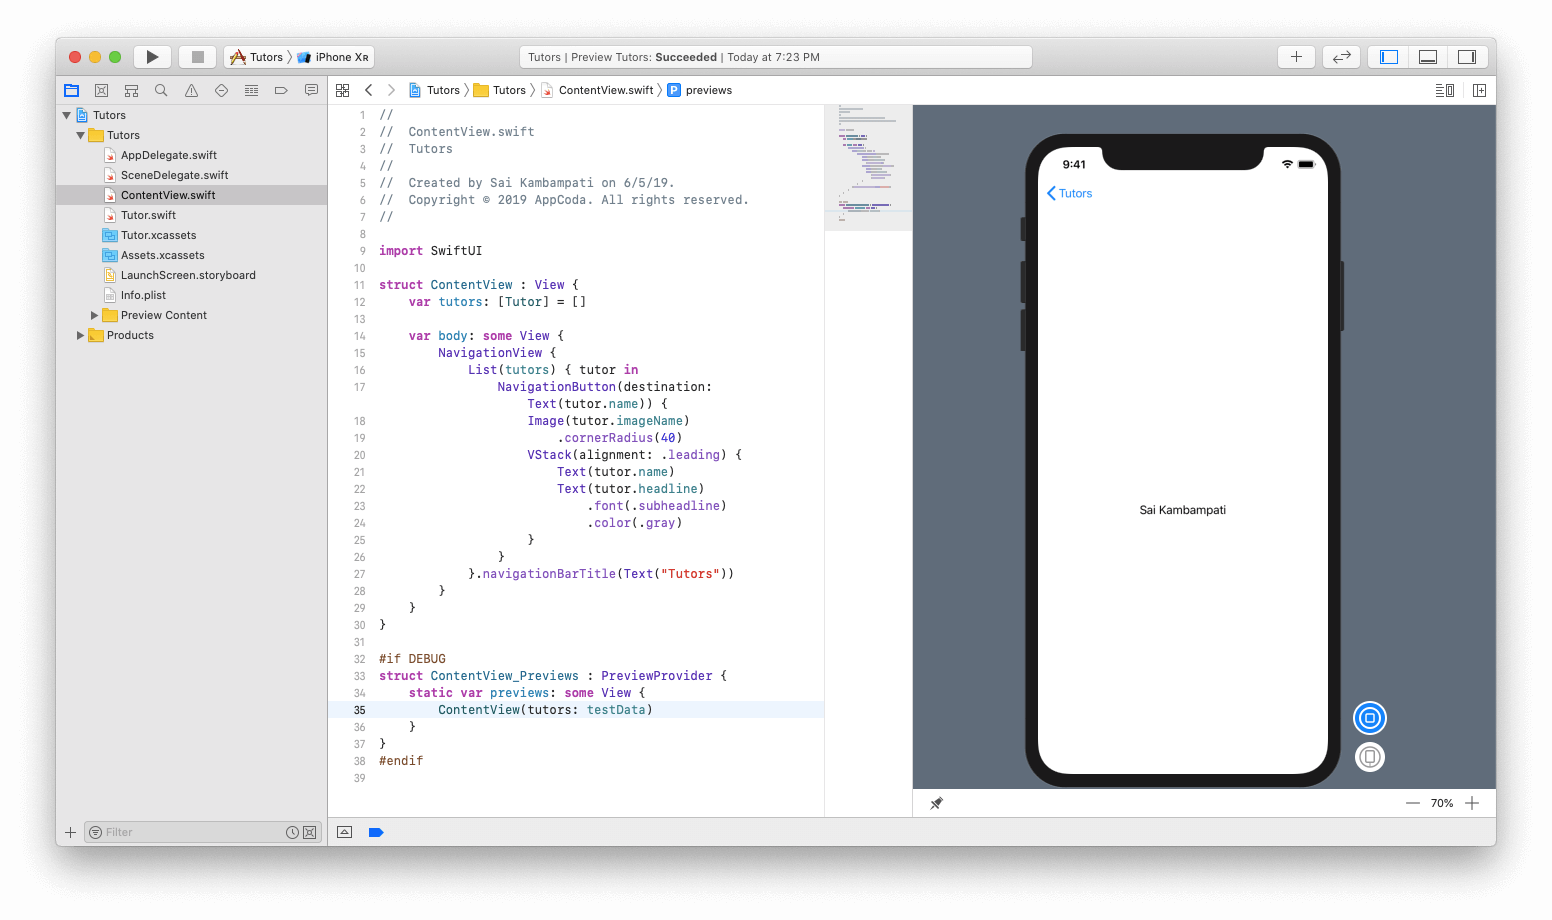
When the download is finished, you can click on the cell, and it will go to a new view on the stack, in which the name of the selected cell will be displayed.
Before moving on to implementing a detailed view, let me show you a tricky technique that will help make your code more legible. ⌘ + Click NavigationButton and select “Extract Subview”.
Boom! You can see that all the code in the NavigationButton was created in a completely new structure that makes it very legible. Rename ExtractedView to TutorCell.
Now you can get the error in TutorCell. This is because we do not have the tutor parameter to pass to this structure. Correcting the error is very simple. Add a new constant to the TutorCell structure as follows:
struct TutorCell: View { let tutor: Tutor var body: some View { ... } } And, in ContentView, add the missing parameter by changing the line to:
... List(tutors) { tutor in TutorCell(tutor: tutor) }.navigationBarTitle(Text("Tutors")) ... That's all! There is a list and cells, all of them are well thought out and arranged in the required order! Next, we are going to create a detailed view that will show all the information about the teacher.
Creating a view to display detailed information.
Let's create a new file by going to File> New> File. Under iOS, select SwiftUI View and name this file TutorDetail .
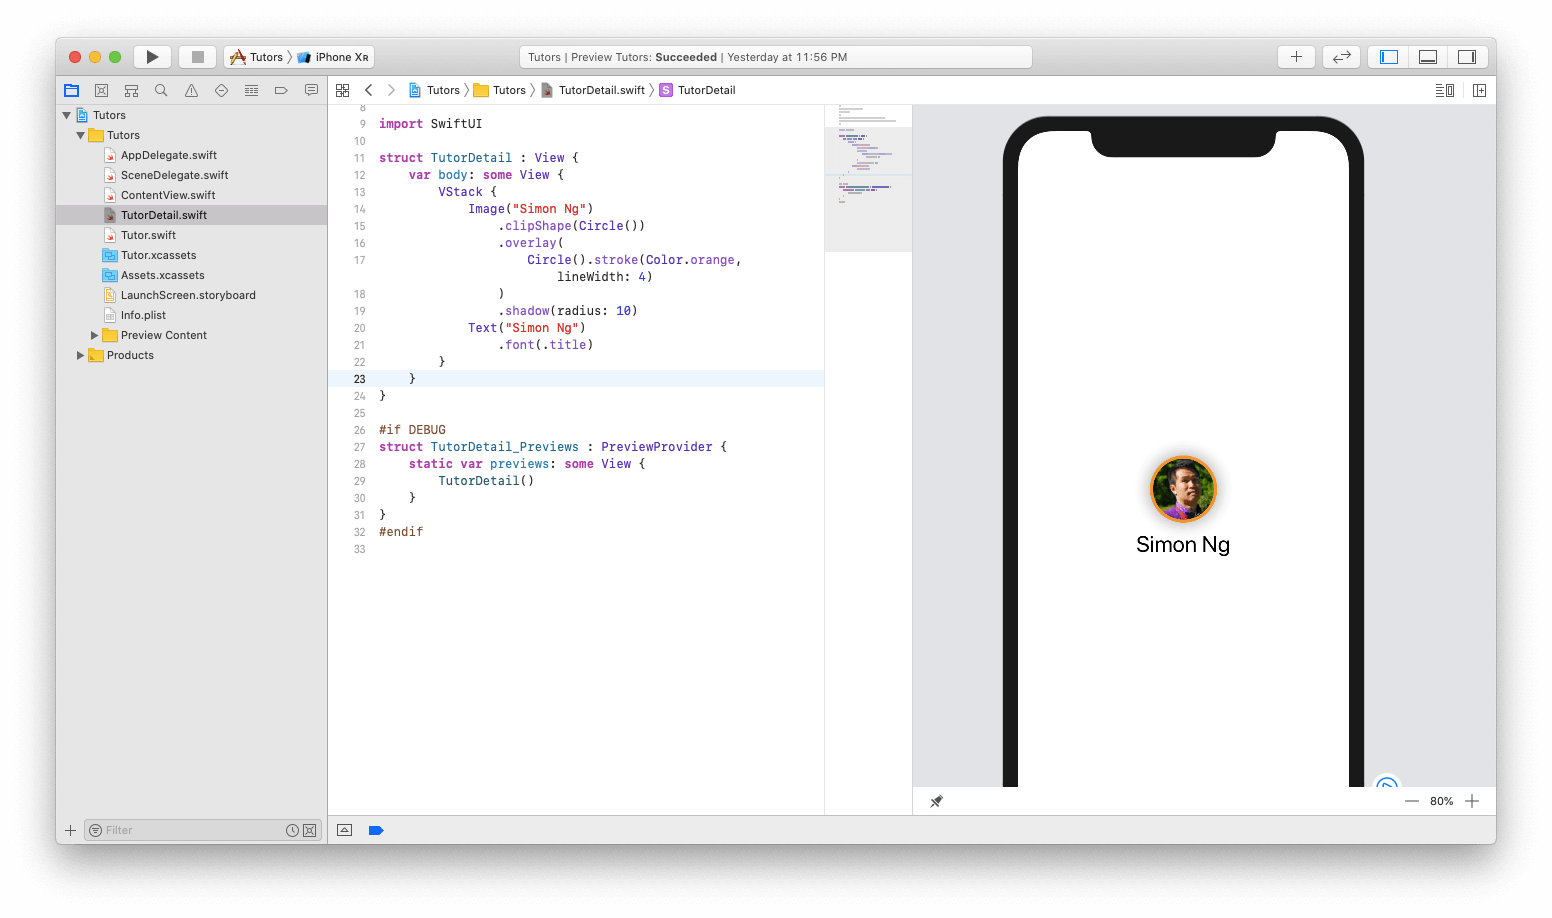
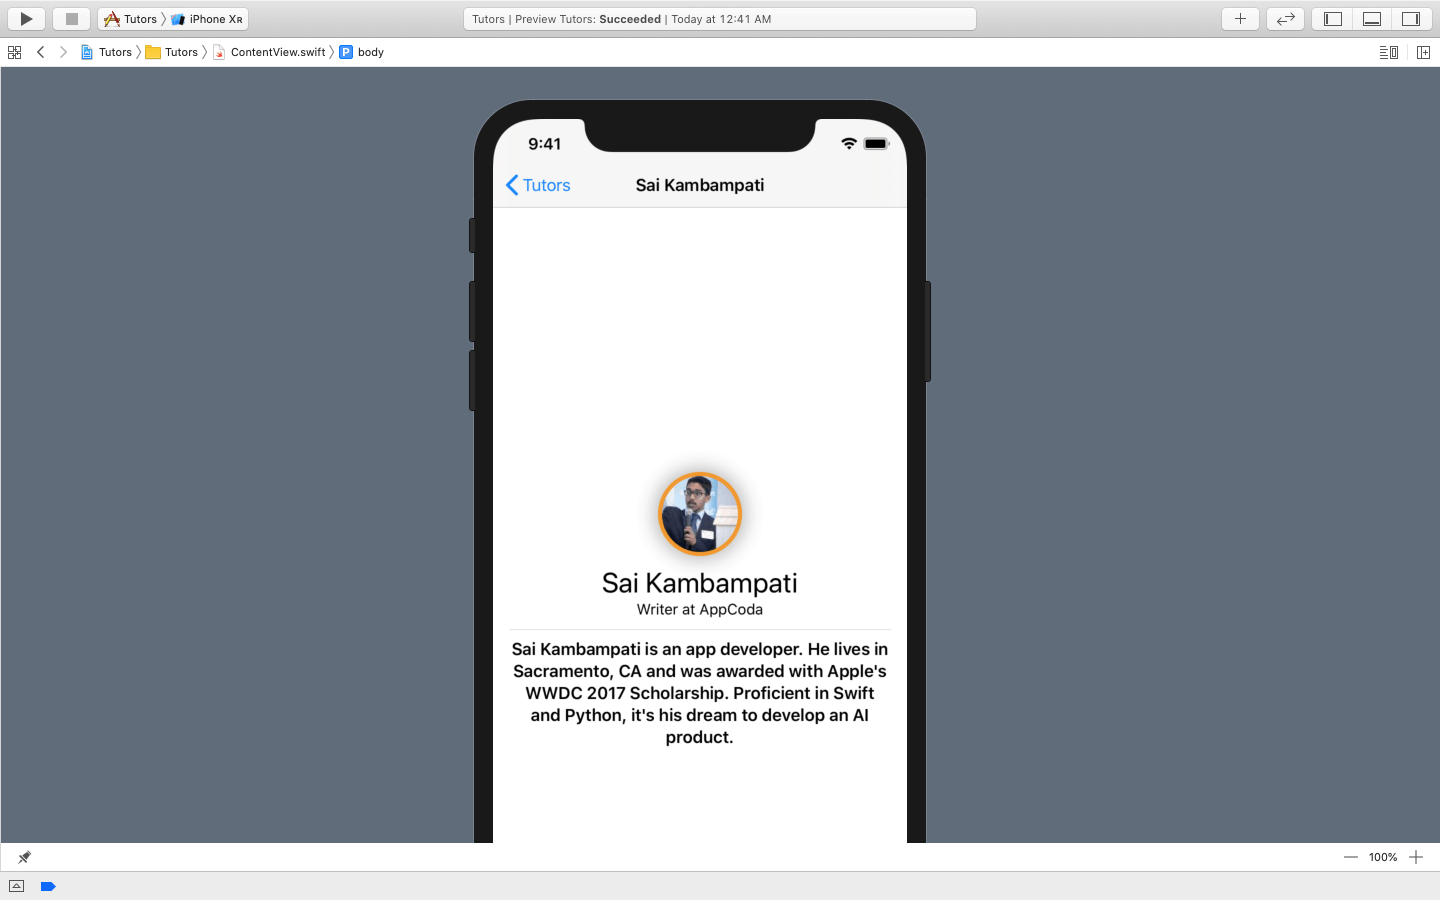
In the preview, the main base view has already been created. Let's work with him. First, click on the + button and place the image over the already built-in Text view. Set the image name to "Simon Ng." A picture of Simon should appear. Now change the code as shown below:
struct TutorDetail: View { var body: some View { //1 VStack { //2 Image("Simon Ng") .clipShape(Circle()) .overlay( Circle().stroke(Color.orange, lineWidth: 4) ) .shadow(radius: 10) //3 Text("Simon Ng") .font(.title) } } } In general, this code is clear enough, but if you need clarification, do not worry. Here is what happens:
- First we pack all our views on a vertical stack. This is critical to the layout of the design that we will take.
- Then we take the image of Simon and animate it. First, set the image clips in a circle shape. Instead of setting the cornerRadius, it’s much more effective because the circle can be adapted to different image sizes. We add a circle overlay with a white frame that provides a beautiful orange frame. Finally, we will add a slight shadow to provide some image depth.
- Our last line of code sets the teacher's name font to the title font.
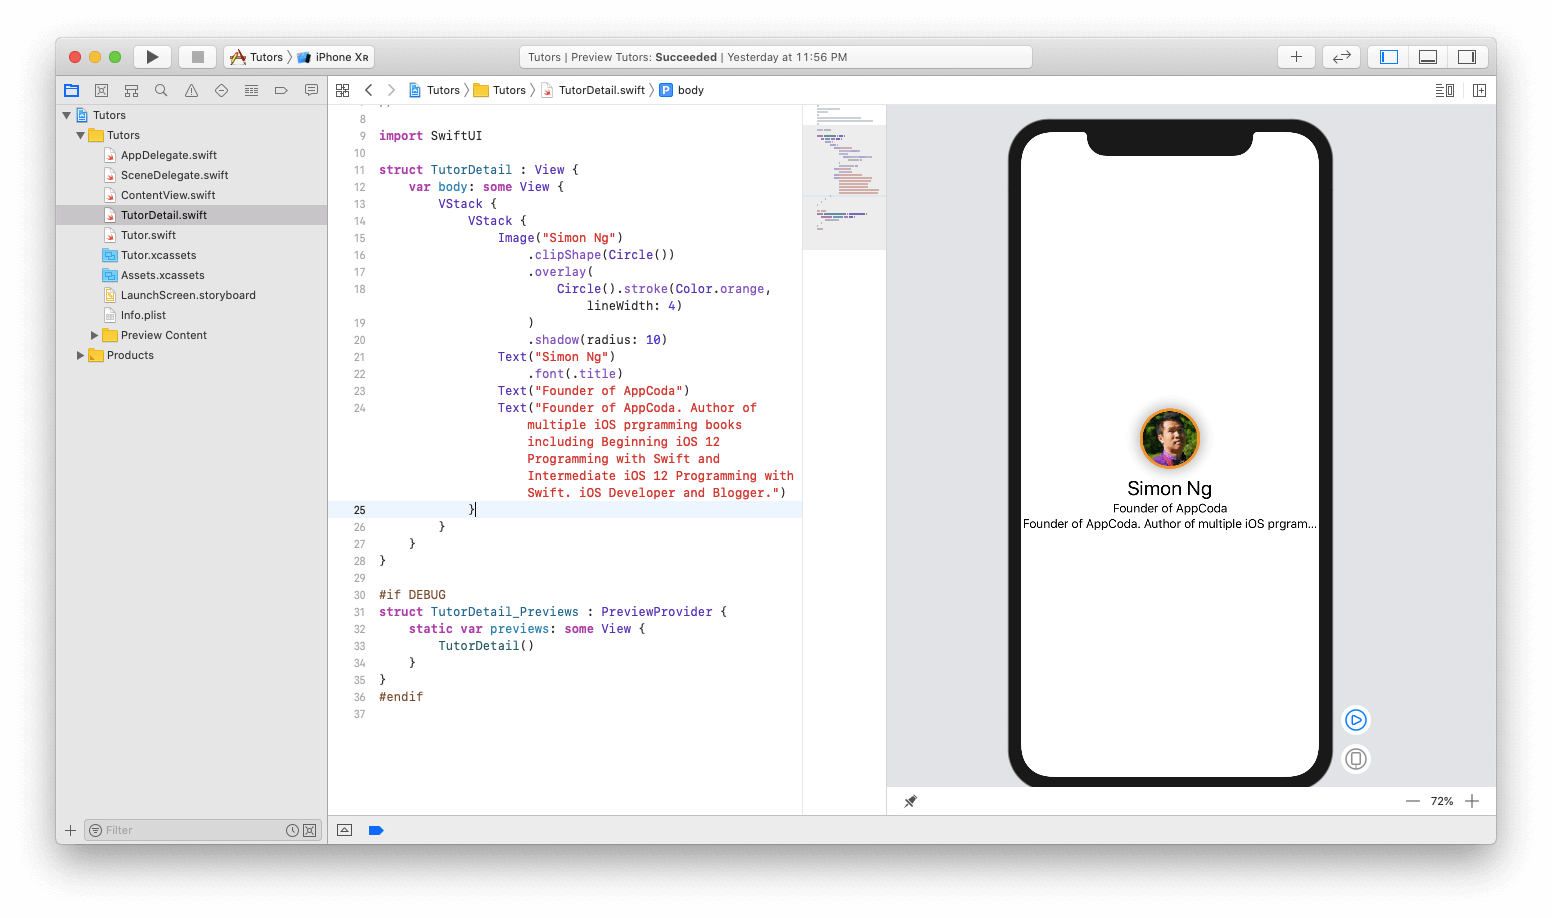
You also need to add two more text views: headline and bio. Drag the two text view below the text view with the name of the teacher, and edit them:
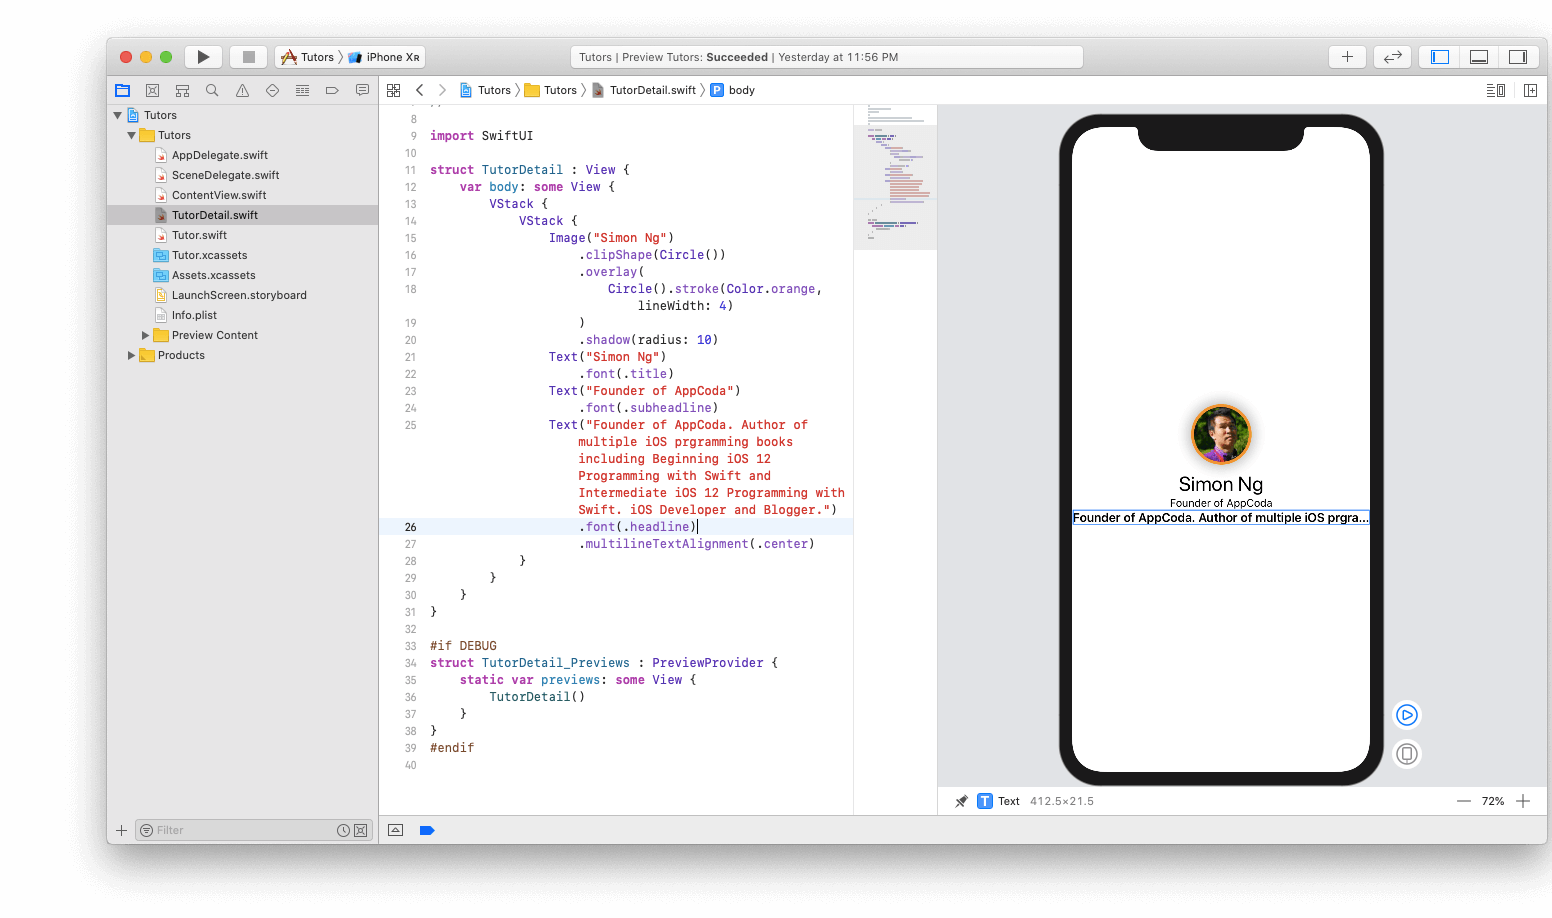
struct TutorDetail: View { var body: some View { VStack { Image("Simon Ng") .clipShape(Circle()) .overlay( Circle().stroke(Color.orange, lineWidth: 4) ) .shadow(radius: 10) Text("Simon Ng") .font(.title) Text("Founder of AppCoda") Text("Founder of AppCoda. Author of multiple iOS programming books including Beginning iOS 12 Programming with Swift and Intermediate iOS 12 Programming with Swift. iOS Developer and Blogger.") } } } The good news is that we have text view. The bad news is that they look bad and do not show the difference between the title and the detailed description. In addition, the text view of the biography does not display all the text. Let's fix it.
Update the code as follows:
struct TutorDetail: View { var body: some View { VStack { Image("Simon Ng") .clipShape(Circle()) .overlay( Circle().stroke(Color.orange, lineWidth: 4) ) .shadow(radius: 10) Text("Simon Ng") .font(.title) //1 Text("Founder of AppCoda") .font(.subheadline) //2 Text("Founder of AppCoda. Author of multiple iOS programming books including Beginning iOS 12 Programming with Swift and Intermediate iOS 12 Programming with Swift. iOS Developer and Blogger.") .font(.headline) .multilineTextAlignment(.center) } } } - First we install the “Founder of AppCoda” with the subheadline font.
- In the same way, we set the text representation of the biography using the headline font. We will also align the text with the line .multilineTextAlignment (.center)
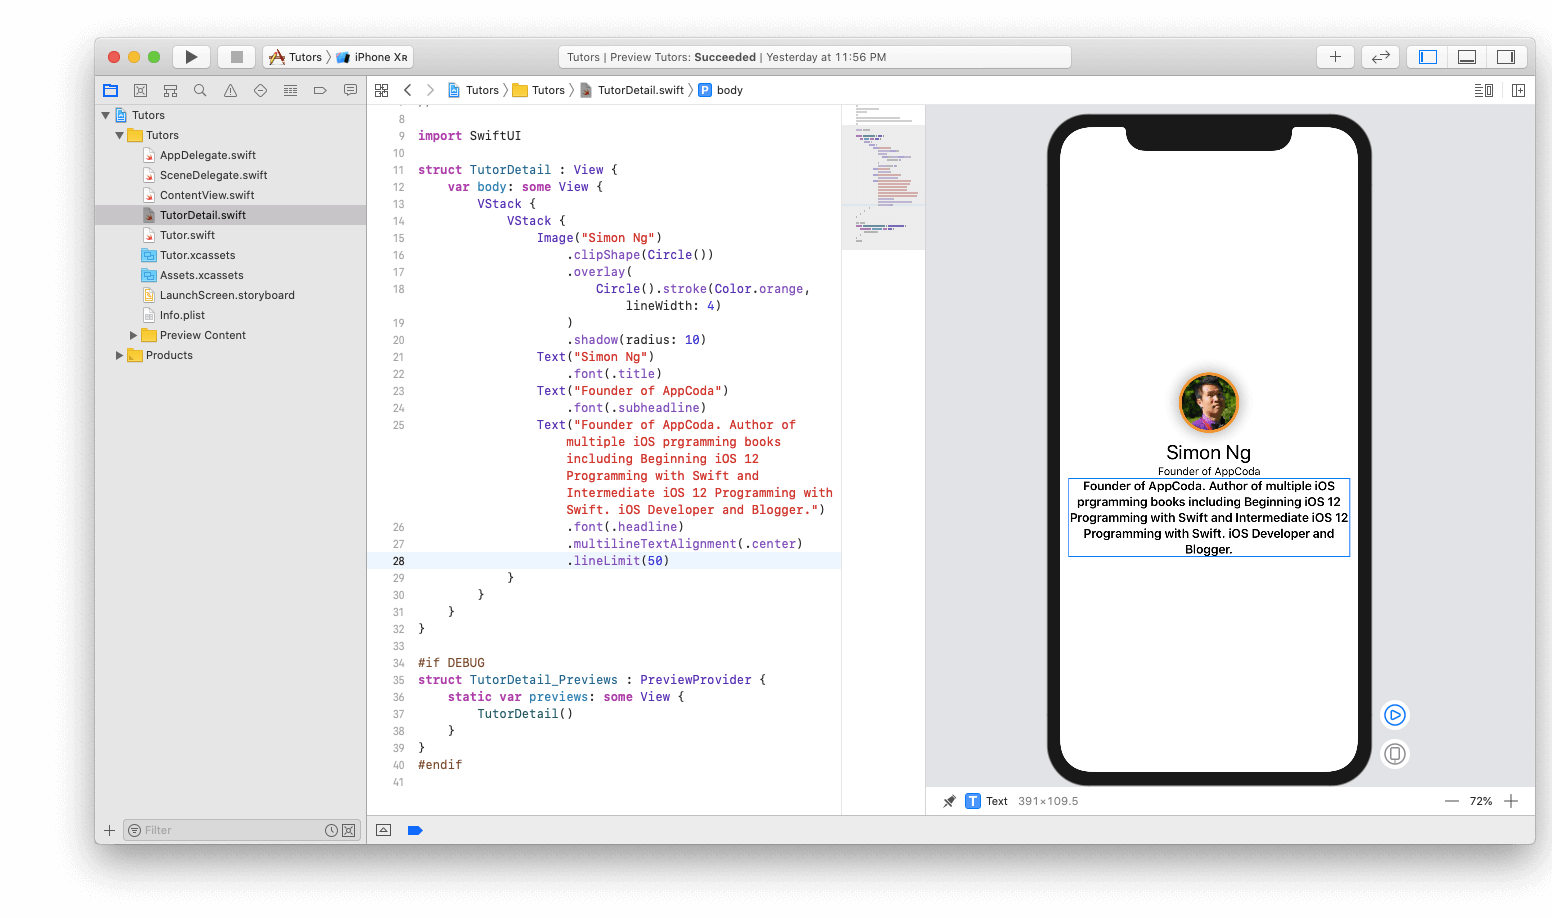
Let's fix the following error. We need to display the entire text of the textual representation of the biography. This can be easily done by adding a new line of code:
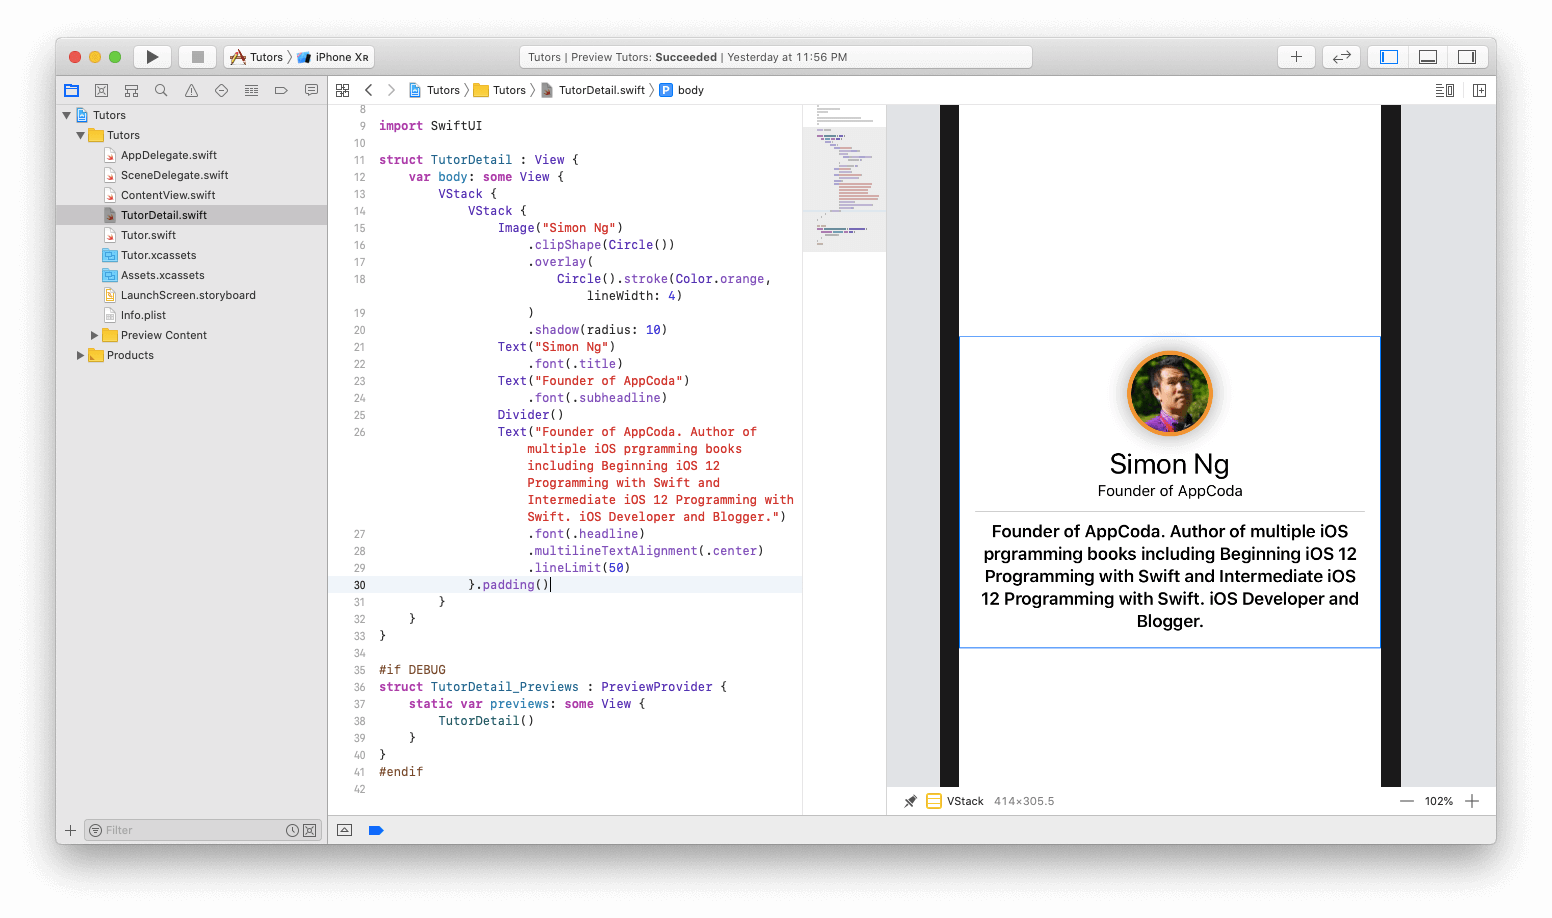
... Text("Founder of AppCoda. Author of multiple iOS programming books including Beginning iOS 12 Programming with Swift and Intermediate iOS 12 Programming with Swift. iOS Developer and Blogger.") .font(.headline) .multilineTextAlignment(.center) .lineLimit(50) ... Everything looks good. There is one last design change I want to make. The headline and textual representations of the biography are too close together. I would like to have some space between these two views. In addition, I would like to add some indentation to all the twist so that they do not touch the edges of the device. Make sure you change the code as follows:
struct TutorDetail: View { var body: some View { VStack { Image("Simon Ng") .clipShape(Circle()) .overlay( Circle().stroke(Color.orange, lineWidth: 4) ) .shadow(radius: 10) Text("Simon Ng") .font(.title) Text("Founder of AppCoda") .font(.subheadline) //1 Divider() Text("Founder of AppCoda. Author of multiple iOS programming books including Beginning iOS 12 Programming with Swift and Intermediate iOS 12 Programming with Swift. iOS Developer and Blogger.") .font(.headline) .multilineTextAlignment(.center) .lineLimit(50) //2 }.padding() } } Here we make a few changes:
- Adding a separator is as easy as calling Divider ()
- To add padding to the entire vertical stack, you must call .padding () at the end of the VStack declaration.
It's all! Congratulations! The detailed view screen is ready. It remains only to connect our list of teachers and their detailed description. It is pretty simple.
Data transfer
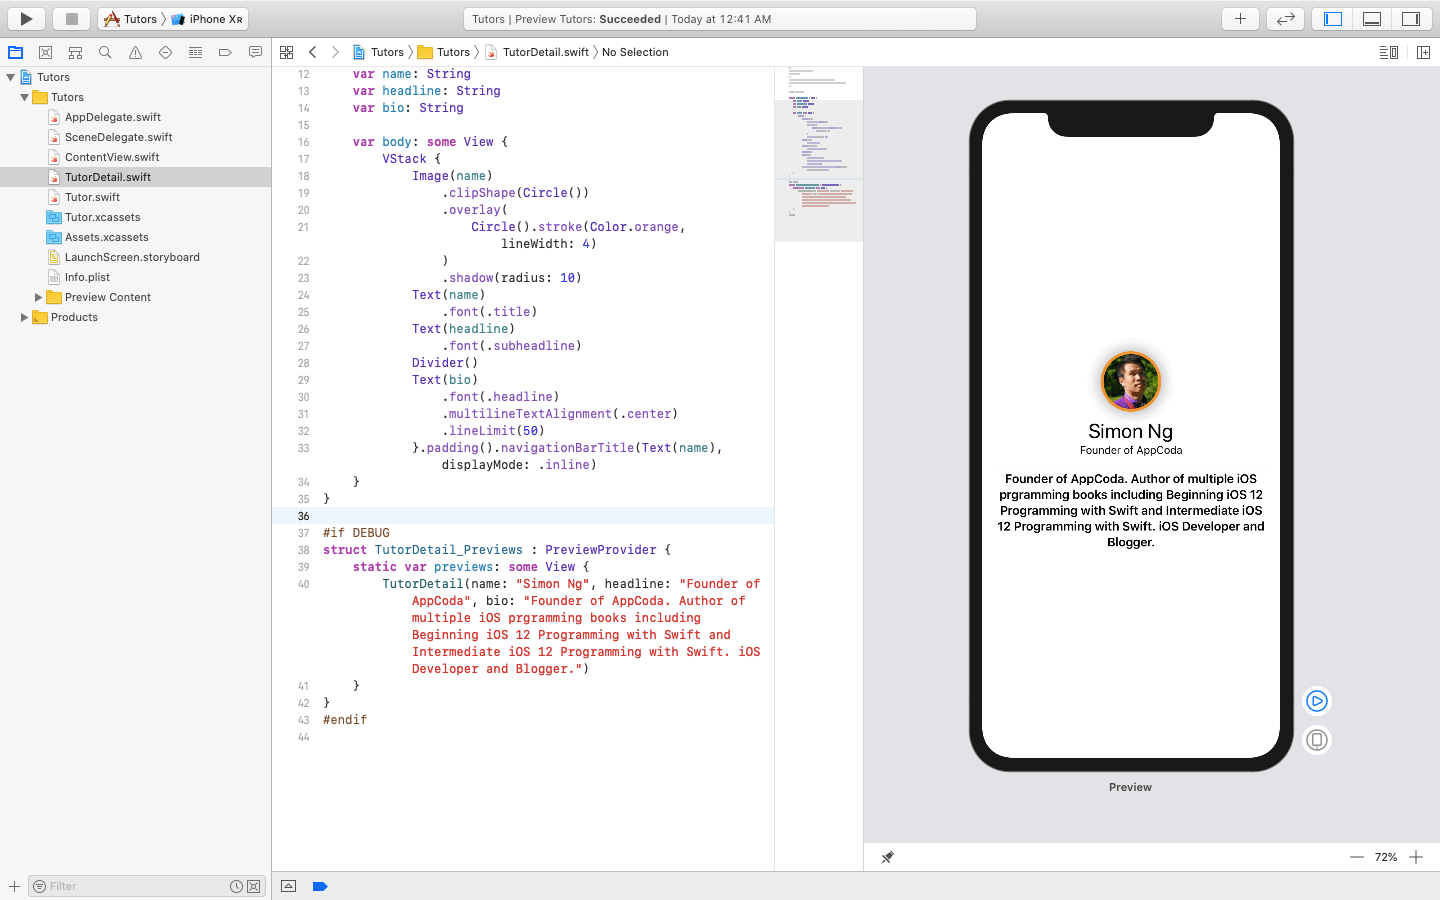
To transfer data, you need to declare some parameters in the TutorDetail structure. Before declaring a body variable, add the following variables:
var name: String var headline: String var bio: String var body: some View { ... } These are the parameters that we will pass from the ContentView. Make the following changes:
... var body: some View { VStack { // 1 Image(name) .clipShape(Circle()) .overlay( Circle().stroke(Color.orange, lineWidth: 4) ) .shadow(radius: 10) //2 Text(name) .font(.title) //3 Text(headline) .font(.subheadline) Divider() //4 Text(bio) .font(.headline) .multilineTextAlignment(.center) .lineLimit(50) //5 }.padding().navigationBarTitle(Text(name), displayMode: .inline) } ... - Replace the name of the teacher for image with the variable name
- Replace the title text with the headline variable
- Finally, replace the long paragraph of text with the variable bio
- A line of code has also been added that sets the title of the navigation bar to the name of the teacher.
Last but not least, we need to add the missing parameters to the TutorDetail_Previews structure.
#if DEBUG struct TutorDetail_Previews : PreviewProvider { static var previews: some View { TutorDetail(name: "Simon Ng", headline: "Founder of AppCoda", bio: "Founder of AppCoda. Author of multiple iOS programming books including Beginning iOS 12 Programming with Swift and Intermediate iOS 12 Programming with Swift. iOS Developer and Blogger.") } } #endif In the above code, we add the missing parameters and fill in the information with the one we had before.
You may be wondering what happened with the #if DEBUG / # endif instructions. This means that any code enclosed in these commands will only be executed when previewed for debugging purposes. In your last application this will not be.
Nothing should change, since the information is also unchanged.
And so, the last step is to associate this view with the list. Switch to the ContentView.swift file. All you need to do is change one line of code in the TutorCell structure. Change the NavigationButton code to below:
... var body: some View { return NavigationButton(destination: TutorDetail(name: tutor.name, headline: tutor.headline, bio: tutor.bio)) { ... } } ... Instead of displaying the view with the teacher’s name, you need to change the destination to TutorDetail when filling in the relevant data. This code should look like this:
Click the play button and interact with the view. If everything works well, the application will also work well.
Just select one of the member entries:
And then the details of the participant will be displayed on the detailed screen.
Conclusion
This article introduces the basics of SwiftUI. Now it will be convenient to create simple applications, such as a task scheduler, etc. I suggest taking a look at some of the resources below, such as Apple documentation and WWDC 2019 sessions on this framework.
SwiftUI Documentation
SwiftUI Tutorials
Introducing SwiftUI: Building Your First App
SwiftUI Essentials
This framework is the future of Apple, so it’s great if you start with it. Remember that if you are unsure of the code, try working with automatic previews and see if you can make changes to the user interface directly to see how the code is generated. If you have any questions, feel free to ask them in the comments below.
For reference, you can download the finished project here .
Source: https://habr.com/ru/post/461645/
All Articles