Creating Tower Defense in Unity: Ballistics
[ The first , second and third parts of the tutorial]
This is the fourth part of a tutorial on creating a simple tower defense game. In it we will add mortar towers firing detonating shells when they collide.
The tutorial was created in Unity 2018.4.4f1.
')
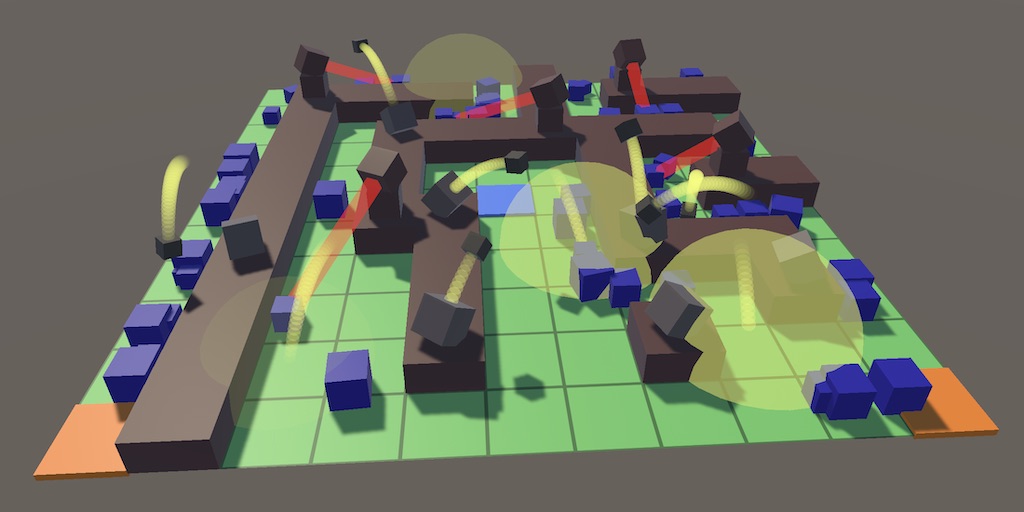
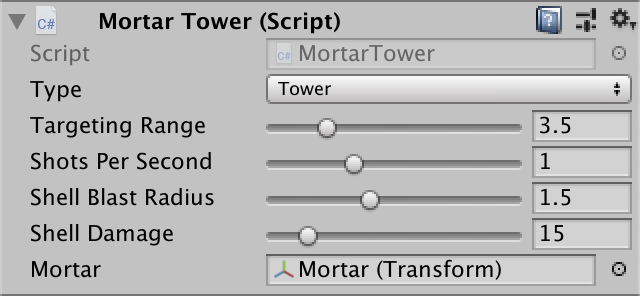
Enemies are bombed.
A laser is not the only type of weapon that can be placed on a turret. In this tutorial we will add the second type of towers, which will fire shells exploding upon contact, damaging all enemies nearby. To do this, we need support for various types of towers.
Target detection and tracking is a functionality that any tower can use, so we will put it in the abstract base class of towers. To do this, we simply use the
Let's change the duplicate class so that it turns into a
Then update the prefab of the laser tower to use the new component.
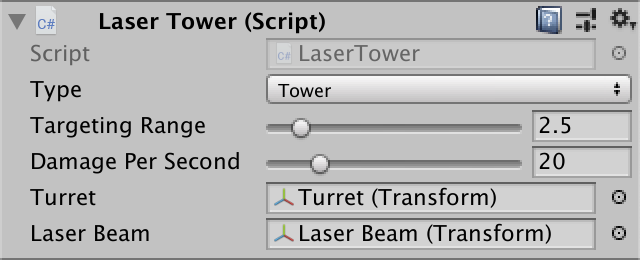
Component of a laser tower.
To be able to select which towers to be placed on the field, we will add a
Since we will create a class for each type of tower, we will add an abstract getter property to
Redefine it in
Next, change the
It would be logical to return the most specific type, so ideally, the return type of the new
While we only have a laser tower, we will make it the only element of the array of towers of the factory.
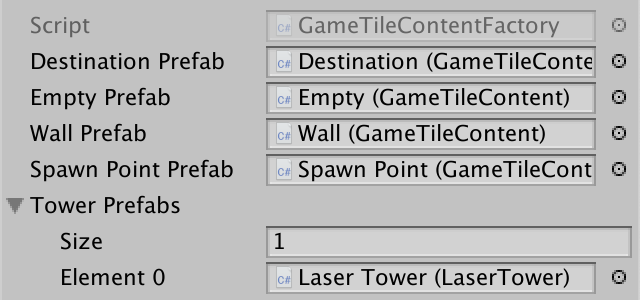
An array of prefab towers.
To create a tower of a particular type, we
This creates a new opportunity: the state of the tower switches when it already exists, but the towers are of various types. So far, switching just removes the existing tower, but it would be logical for it to be replaced with a new type, so let's implement this. Since the tile remains busy, you do not need to search for the path again.
It will not be possible to place the mortar tower yet, because it does not yet have a prefab. Let's start by creating a minimal
Now create a prefab for the mortar tower. This can be done by duplicating the laser tower prefab and replacing its tower component. Then get rid of the objects of the tower and the laser beam. Rename


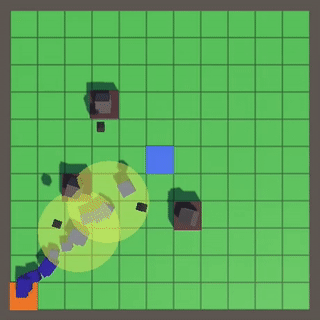
Prefab of the mortar tower.
Add the prefab mortars to the factory array so that mortar towers can be placed on the field. However, they are not doing anything yet.

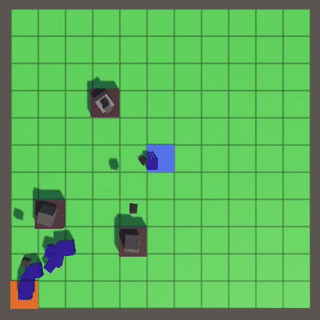
Two types of towers, one of them inactive
Mortira shoots the shell at an angle, so that he flies over obstacles and hits the target from above. Typically, shells are used that detonate when colliding with or above a target. In order not to complicate things, we will always aim at the ground so that the shells explode when their height drops to zero.
To aim the mortar, we need to point it horizontally at the target, and then change its vertical position so that the projectile lands at the right distance. We will start with the first step. First, we will use fixed relative points, rather than moving targets, to ensure that our calculations are correct.
Add a

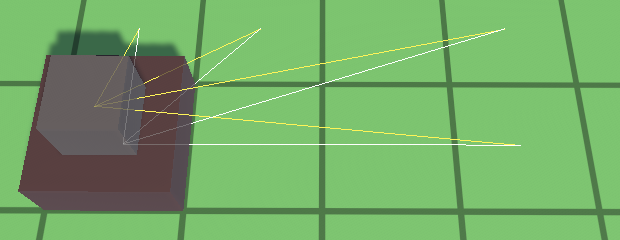
We aim at a point fixed relative to the tower.
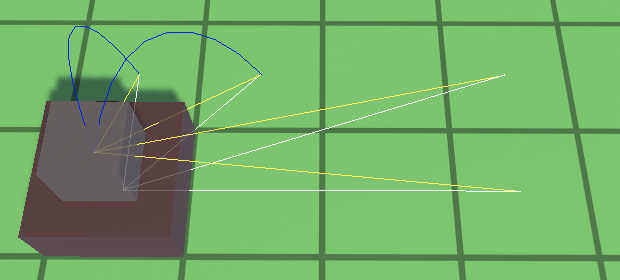
Using this line we can define a right triangle. His upper point is in the mortar position. Regarding mortars it . The point below, at the base of the tower, is , and the point in the goal is where equal to 3, and Is the negative vertical position of the mortar. We need to track these two values.
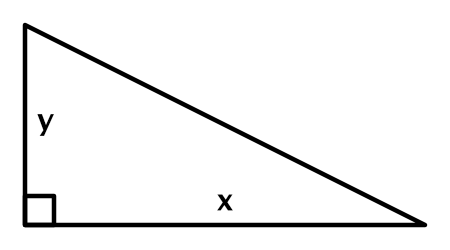
Triangle aiming.
In the general case, the target can be anywhere in the tower’s range, so Z also needs to be considered. However, the aiming triangle still remains two-dimensional, it simply rotates around the Y axis. To illustrate this, we will add the parameter of the relative displacement vector to
Now x of the aiming triangle is equal to the length of the 2D vector pointing from the base of the tower to the aiming point. By normalizing this vector, we also get the XZ direction vector, which can be used to align the triangle. You can show it by drawing the bottom of the triangle as a white line obtained from the direction and x.
Aligned aiming triangles.
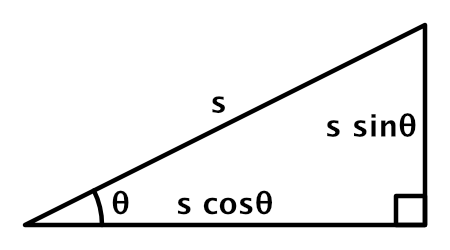
Next, we should find out the angle at which to shoot the projectile. It is necessary to derive it from the physics of the projectile trajectory. We will not take into account drag, wind and other obstacles, only the speed of the shot and gravity .
Bias the projectile is in line with the aiming triangle and can be described by two components. With horizontal displacement, it's simple: it's where - time after the shot. With the vertical component everything is similar, then it is subject to negative acceleration due to gravity, therefore it has the form .
We shoot shells at the same speed which does not depend on the angle of the shot (theta). I.e and .
Calculation of the speed of a shot.
Performing the substitution, we get and .
The projectile is fired so that its flight time is the exact value needed to achieve the goal. Since it’s easier to work with horizontal displacement, we can express the time as . At the end point , i.e . It means that .
Using this equation we find .
There are two possible angles, because you can aim high or low. A low trajectory is faster because it is closer to a straight line to the target. But the high trajectory looks more interesting, so we will choose it. This means that it’s enough for us to use only the largest solution. . We calculate it, and also with , because we need them to get the velocity vector of the shot. For this you need to convert to the radian angle using
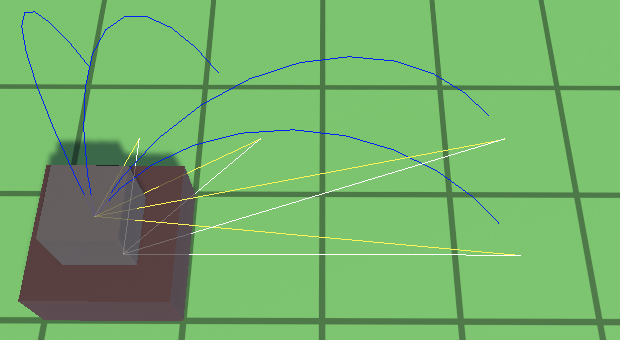
Let's visualize the trajectory by drawing ten blue segments showing the first second of flight.
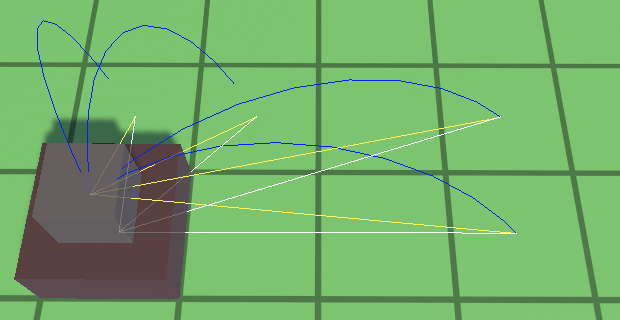
Parabola flight paths lasting one second.
The two farthest points can be reached in less than a second, so we see their entire trajectories, and the segments continue a little further underground. For the other two points, larger shot angles are needed, due to which the trajectories become longer, and the flight lasts more than a second.
If you want to reach the nearest two points in a second, then you need to reduce the speed of the shot. Let's make it equal to 4.
Shot speed reduced to 4.
Their trajectories are now complete, but the other two are gone. This happened because the speed of the shot is now not enough to reach these points. In such cases, solutions to no, that is, we get the square root of a negative number, leading to NaN values and the disappearance of lines. We can recognize this by checking to negativity.
This situation can be avoided by setting a sufficiently high shot speed. But if it is too large, then to hit targets near the tower will require very high trajectories and a long flight time, so you should leave the speed as low as possible. Shot speed should be enough to hit the target at maximum range.
At maximum range , i.e. for there is only one solution, corresponding to a low trajectory. This means that we know the required speed of the shot. .
We need to determine the required speed only when the mortars wake up (Awake) or when we change its range in Play mode. Therefore, we will track it using the field and calculate it in
However, due to limitations in the accuracy of floating point calculations, determining the target very close to the maximum range may be erroneous. Therefore, when calculating the required speed, we add a small amount to the range. In addition, the radius of the collider of the enemy essentially expands the maximum radius of the range of the tower. We made it equal to 0.125, but with an increase in the enemy’s scale, it can double as much as possible, so we’ll increase the actual range by about 0.25, for example, by 0.25001.
Next, apply the derived equation for the speed of a shot in
Apply the calculated speed to the aiming range 3.5.
Having the correct calculation of the trajectory, you can get rid of the relative test goals. Now you need to pass the
In addition, shots are not fired in every frame. We need to track the process of the shot in the same way as the process of creating enemies and capture a random target when the time comes to shoot in
We do not track targets between shots, but we need to correctly rotate the mortar during shots. You can use the horizontal direction of the shot to rotate the mortar horizontally using

Decomposition of the turn vector of the look.
In order to still see the trajectory of the shots, you can add a parameter to

Aiming.
The meaning of calculating trajectories is that we now know how to shoot shells. Next we need to create them and shoot them.
We need a factory to instantiate shell objects. When in the air, shells exist on their own and are no longer dependent on the mortars that fired them. Therefore, they should not be processed by the mortar tower, and the tile content factory is also not suitable for this. Let's create create for all that is related to weapons, a new factory and call it war factory.First, create an abstract
Then create a specific entity
Then create the
Create a prefab for the projectile. I used a simple cube with the same scale of 0.25 and dark material, as well as a component
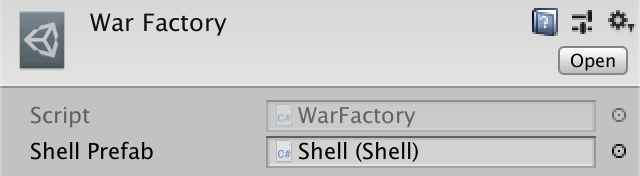
War factory.
To move the shells they need to be updated. You can use the same approach that is used
Now do the refactoring
Let's make it
We will do the same for
From now on,
The final step in implementing a shell upgrade is to add them to a collection of non-enemies. Let's do this with a function
Game with war factory.
After creating an instance of the projectile, it must fly along its path until it reaches the final goal. To do this, add to the
Now we can create a shell in
To

Shelling.
In order to align the shells with their trajectories, we need to make them look along the derived vector, which is their speed at the corresponding moment in time.

The shells are turning.
Now that it’s clear that the shells are flying exactly as they should, you can remove the
In addition, we need to make sure that the shells are destroyed after hitting the target. Since we always aim at the ground, this can be done by checking to
We shoot shells because they contain explosives. When the projectile reaches its target, it must detonate and inflict damage on all enemies in the area of the explosion. The radius of the explosion and the damage dealt depend on the type of shells fired by the mortar, so we’ll add
Explosion radius and 1.5 damage of 15 shells.
This configuration is important only during the explosion, so it needs to be added to
To shoot at enemies within range, the projectile must capture targets. We already have code for this, but it is in
Now we can receive all targets within range up to the maximum buffer size and inflict damage upon detonation
Detonation of shells.
You can also add to a
This will allow us to simplify
Everything works, but it still does not look very believable. You can improve the picture by adding visualization of the explosion when the detonation of the projectile. This will not only look more interesting, but also give the player useful feedback. To do this, we will create a prefab of the explosion like a laser beam. Only it will be a more transparent sphere of bright color. Add a new entity component
Add an explosion to

War factory with an explosion.
Also add to the
Now it
Explosions of shells.
Immutable spheres instead of explosions do not look very beautiful. You can improve them by animating opacity and scale. You can use a simple formula for this, but let's use animation curves that are easier to set up. Add
Opacity will start and end with zero, smoothly scaled to an average value of 0.3. The scale will start at 0.7, increase rapidly, and then slowly approach 1.

Explosion curves.
To set the color of the material, we will use the material properties block. where black is the opacity variable. The scale is now set to
Animated explosions.
Since the shells are small and have a fairly high speed, they can be difficult to notice. And if you look at the screenshot of a single frame, the trajectories are completely incomprehensible. You can make them more obvious by adding a trace effect to your shells. For ordinary shells, this is not very realistic, but we can say that these are tracers. Such ammunition is specially made so that they leave a bright mark, making their trajectories visible.
There are different ways to create traces, but you will use a very simple one. We remake the explosions so that
We will create an explosion at the end

Tracer shells.
Tutorial Repository
PDF Article
- Support for different types of towers.
- Creating a mortar tower.
- Calculation of parabolic trajectories.
- Launching exploding shells.
This is the fourth part of a tutorial on creating a simple tower defense game. In it we will add mortar towers firing detonating shells when they collide.
The tutorial was created in Unity 2018.4.4f1.
')
Enemies are bombed.
Types of towers
A laser is not the only type of weapon that can be placed on a turret. In this tutorial we will add the second type of towers, which will fire shells exploding upon contact, damaging all enemies nearby. To do this, we need support for various types of towers.
Abstract tower
Target detection and tracking is a functionality that any tower can use, so we will put it in the abstract base class of towers. To do this, we simply use the
Tower class, but first, duplicate its contents for later use in a specific LaserTower class. Then we remove all the laser-related code from Tower . The tower may not keep track of a specific target, so delete the target field and change the AcquireTarget and TrackTarget so that the output parameter is used as the link parameter. Then we will remove the OnDrawGizmosSelected visualization from OnDrawGizmosSelected , but we will leave the aiming range, because it is used for all towers. using UnityEngine; public abstract class Tower : GameTileContent { const int enemyLayerMask = 1 << 9; static Collider[] targetsBuffer = new Collider[100]; [SerializeField, Range(1.5f, 10.5f)] protected float targetingRange = 1.5f; protected bool AcquireTarget (out TargetPoint target) { … } protected bool TrackTarget (ref TargetPoint target) { … } void OnDrawGizmosSelected () { Gizmos.color = Color.yellow; Vector3 position = transform.localPosition; position.y += 0.01f; Gizmos.DrawWireSphere(position, targetingRange); } } Let's change the duplicate class so that it turns into a
LaserTower that extends the Tower and uses the functionality of its base class, getting rid of the duplicate code. using UnityEngine; public class LaserTower : Tower { [SerializeField, Range(1f, 100f)] float damagePerSecond = 10f; [SerializeField] Transform turret = default, laserBeam = default; TargetPoint target; Vector3 laserBeamScale; void Awake () { laserBeamScale = laserBeam.localScale; } public override void GameUpdate () { if (TrackTarget(ref target) || AcquireTarget(out target)) { Shoot(); } else { laserBeam.localScale = Vector3.zero; } } void Shoot () { … } } Then update the prefab of the laser tower to use the new component.
Component of a laser tower.
Creating a specific type of tower
To be able to select which towers to be placed on the field, we will add a
TowerType enumeration similar to GameTileContentType . We will create support for the existing laser tower and mortar tower, which we will create later. public enum TowerType { Laser, Mortar } Since we will create a class for each type of tower, we will add an abstract getter property to
Tower to indicate its type. This works similarly to the type of behavior of a figure in the Object Management series of tutorials. public abstract TowerType TowerType€ { get; } Redefine it in
LaserTower so that it returns the correct type. public override TowerType TowerType€ => TowerType.Laser; Next, change the
GameTileContentFactory so that the factory can produce the tower of the desired type. We implement this with an array of towers and add an alternative public Get method with the TowerType parameter. To verify that the array is configured correctly, we will use assertions. Another public Get method will now only apply to the contents of tiles without towers. [SerializeField] Tower[] towerPrefabs = default; public GameTileContent Get (GameTileContentType type) { switch (type) { … } Debug.Assert(false, "Unsupported non-tower type: " + type); return null; } public GameTileContent Get (TowerType type) { Debug.Assert((int)type < towerPrefabs.Length, "Unsupported tower type!"); Tower prefab = towerPrefabs[(int)type]; Debug.Assert(type == prefab.TowerType€, "Tower prefab at wrong index!"); return Get(prefab); } It would be logical to return the most specific type, so ideally, the return type of the new
Get method should be Tower . But the private Get method used to instantiate the prefab returns a GameTileContent . Here you can either perform the conversion, or make the private Get method generic. Let's choose the second option. public Tower Get (TowerType type) { … } T Get<T> (T prefab) where T : GameTileContent { T instance = CreateGameObjectInstance(prefab); instance.OriginFactory = this; return instance; } While we only have a laser tower, we will make it the only element of the array of towers of the factory.
An array of prefab towers.
Creating instances of specific tower types
To create a tower of a particular type, we
GameBoard.ToggleTower so that it requires the TowerType parameter and TowerType it to the factory. public void ToggleTower (GameTile tile, TowerType towerType) { if (tile.Content.Type == GameTileContentType.Tower€) { … } else if (tile.Content.Type == GameTileContentType.Empty) { tile.Content = contentFactory.Get(towerType); … } else if (tile.Content.Type == GameTileContentType.Wall) { tile.Content = contentFactory.Get(towerType); updatingContent.Add(tile.Content); } } This creates a new opportunity: the state of the tower switches when it already exists, but the towers are of various types. So far, switching just removes the existing tower, but it would be logical for it to be replaced with a new type, so let's implement this. Since the tile remains busy, you do not need to search for the path again.
if (tile.Content.Type == GameTileContentType.Tower€) { updatingContent.Remove(tile.Content); if (((Tower)tile.Content).TowerType€ == towerType) { tile.Content = contentFactory.Get(GameTileContentType.Empty); FindPaths(); } else { tile.Content = contentFactory.Get(towerType); updatingContent.Add(tile.Content); } } Game should now track the type of switchable tower. We simply denote each type of tower by a number. The laser tower is 1, it will be the default tower, and the mortar tower is 2. By pressing the number keys, we will select the appropriate type of towers. TowerType selectedTowerType; … void Update () { … if (Input.GetKeyDown(KeyCode.G)) { board.ShowGrid = !board.ShowGrid; } if (Input.GetKeyDown(KeyCode.Alpha1)) { selectedTowerType = TowerType.Laser; } else if (Input.GetKeyDown(KeyCode.Alpha2)) { selectedTowerType = TowerType.Mortar; } … } … void HandleTouch () { GameTile tile = board.GetTile(TouchRay); if (tile != null) { if (Input.GetKey(KeyCode.LeftShift)) { board.ToggleTower(tile, selectedTowerType); } else { board.ToggleWall(tile); } } } Mortar tower
It will not be possible to place the mortar tower yet, because it does not yet have a prefab. Let's start by creating a minimal
MortarTower type. Mortars have a frequency of fire, to indicate which you can use the “shots per second” configuration field. In addition, we will need a link to the mortar so that it can aim. using UnityEngine; public class MortarTower : Tower { [SerializeField, Range(0.5f, 2f)] float shotsPerSecond = 1f; [SerializeField] Transform mortar = default; public override TowerType TowerType€ => TowerType.Mortar; } Now create a prefab for the mortar tower. This can be done by duplicating the laser tower prefab and replacing its tower component. Then get rid of the objects of the tower and the laser beam. Rename
turret to mortar , move it down so that it stands on top of the base, give it a light gray color and attach it. We can leave the mortar collider, in this case, using a separate object, which is a simple collider superimposed on the default mortar orientation. I assigned a mortar range of 3.5 and a frequency of 1 shot per second.Prefab of the mortar tower.
Why are they called mortars?
The first varieties of this weapon were essentially iron bowls, similar to mortars, in which the ingredients were ground using a pestle.
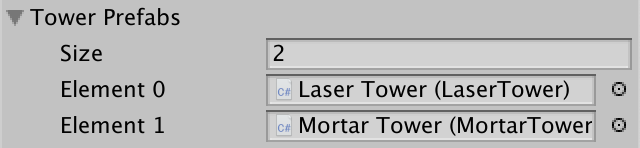
Add the prefab mortars to the factory array so that mortar towers can be placed on the field. However, they are not doing anything yet.
Two types of towers, one of them inactive
Trajectory calculation
Mortira shoots the shell at an angle, so that he flies over obstacles and hits the target from above. Typically, shells are used that detonate when colliding with or above a target. In order not to complicate things, we will always aim at the ground so that the shells explode when their height drops to zero.
Horizontal aiming
To aim the mortar, we need to point it horizontally at the target, and then change its vertical position so that the projectile lands at the right distance. We will start with the first step. First, we will use fixed relative points, rather than moving targets, to ensure that our calculations are correct.
Add a
MortarTower method to GameUpdate , which always calls the Launch method. Instead of firing a real projectile, we will visualize mathematical calculations for now. The shot point is the position of the mortar in the world, which is located just above the ground. We place the target point three units from it along the X axis, and zero out the Y component, because we always aim at the ground. Then we will show the points by Debug.DrawLine yellow line between them by calling Debug.DrawLine . The line will be visible in scene mode for one frame, but this is enough, because in each frame we draw a new line. public override void GameUpdate () { Launch(); } public void Launch () { Vector3 launchPoint = mortar.position; Vector3 targetPoint = new Vector3(launchPoint.x + 3f, 0f, launchPoint.z); Debug.DrawLine(launchPoint, targetPoint, Color.yellow); } We aim at a point fixed relative to the tower.
Using this line we can define a right triangle. His upper point is in the mortar position. Regarding mortars it . The point below, at the base of the tower, is , and the point in the goal is where equal to 3, and Is the negative vertical position of the mortar. We need to track these two values.
Vector3 launchPoint = mortar.position; Vector3 targetPoint = new Vector3(launchPoint.x + 3f, 0f, launchPoint.z); float x = 3f; float y = -launchPoint.y; Triangle aiming.
In the general case, the target can be anywhere in the tower’s range, so Z also needs to be considered. However, the aiming triangle still remains two-dimensional, it simply rotates around the Y axis. To illustrate this, we will add the parameter of the relative displacement vector to
Launch and will call it with four displacements in XZ: , , and . When the aiming point becomes equal to the point of the shot plus this offset, and then its Y coordinate becomes equal to zero. public override void GameUpdate () { Launch(new Vector3(3f, 0f, 0f)); Launch(new Vector3(0f, 0f, 1f)); Launch(new Vector3(1f, 0f, 1f)); Launch(new Vector3(3f, 0f, 1f)); } public void Launch (Vector3 offset) { Vector3 launchPoint = mortar.position; Vector3 targetPoint = launchPoint + offset; targetPoint.y = 0f; … } Now x of the aiming triangle is equal to the length of the 2D vector pointing from the base of the tower to the aiming point. By normalizing this vector, we also get the XZ direction vector, which can be used to align the triangle. You can show it by drawing the bottom of the triangle as a white line obtained from the direction and x.
Vector2 dir; dir.x = targetPoint.x - launchPoint.x; dir.y = targetPoint.z - launchPoint.z; float x = dir.magnitude; float y = -launchPoint.y; dir /= x; Debug.DrawLine(launchPoint, targetPoint, Color.yellow); Debug.DrawLine( new Vector3(launchPoint.x, 0.01f, launchPoint.z), new Vector3( launchPoint.x + dir.x * x, 0.01f, launchPoint.z + dir.y * x ), Color.white ); Aligned aiming triangles.
Shot angle
Next, we should find out the angle at which to shoot the projectile. It is necessary to derive it from the physics of the projectile trajectory. We will not take into account drag, wind and other obstacles, only the speed of the shot and gravity .
Bias the projectile is in line with the aiming triangle and can be described by two components. With horizontal displacement, it's simple: it's where - time after the shot. With the vertical component everything is similar, then it is subject to negative acceleration due to gravity, therefore it has the form .
How is offset calculation performed?
Speed determined by the distance per second, therefore, multiplying the speed by the duration we get the distance . When acceleration is involved , the speed is variable. Acceleration is the change in speed per second, that is, the distance per second squared. At any time, the speed is . In our case, there is constant acceleration , so we can divide it in half to get the average speed, and multiply by time to find the offset caused by gravity.
We shoot shells at the same speed which does not depend on the angle of the shot (theta). I.e and .
Calculation of the speed of a shot.
Performing the substitution, we get and .
The projectile is fired so that its flight time is the exact value needed to achieve the goal. Since it’s easier to work with horizontal displacement, we can express the time as . At the end point , i.e . It means that .
How to get the equation y?
and .
Using this equation we find .
How to get the equation tan θ?
First we will use the trigonometric identity and to come to .
This is an expression of the form where , , , but .
We can solve it using the formula of roots of the quadratic equation .
After its substitution, the equation will become confusing, but you can simplify it by multiplying by so to get where .
In this case, we obtain .
As a result .
This is an expression of the form where , , , but .
We can solve it using the formula of roots of the quadratic equation .
After its substitution, the equation will become confusing, but you can simplify it by multiplying by so to get where .
In this case, we obtain .
As a result .
There are two possible angles, because you can aim high or low. A low trajectory is faster because it is closer to a straight line to the target. But the high trajectory looks more interesting, so we will choose it. This means that it’s enough for us to use only the largest solution. . We calculate it, and also with , because we need them to get the velocity vector of the shot. For this you need to convert to the radian angle using
Mathf.Atan . First, let's use a constant shot speed of 5. float x = dir.magnitude; float y = -launchPoint.y; dir /= x; float g = 9.81f; float s = 5f; float s2 = s * s; float r = s2 * s2 - g * (g * x * x + 2f * y * s2); float tanTheta = (s2 + Mathf.Sqrt(r)) / (g * x); float cosTheta = Mathf.Cos(Mathf.Atan(tanTheta)); float sinTheta = cosTheta * tanTheta; Let's visualize the trajectory by drawing ten blue segments showing the first second of flight.
float sinTheta = cosTheta * tanTheta; Vector3 prev = launchPoint, next; for (int i = 1; i <= 10; i++) { float t = i / 10f; float dx = s * cosTheta * t; float dy = s * sinTheta * t - 0.5f * g * t * t; next = launchPoint + new Vector3(dir.x * dx, dy, dir.y * dx); Debug.DrawLine(prev, next, Color.blue); prev = next; } Parabola flight paths lasting one second.
The two farthest points can be reached in less than a second, so we see their entire trajectories, and the segments continue a little further underground. For the other two points, larger shot angles are needed, due to which the trajectories become longer, and the flight lasts more than a second.
Shot speed
If you want to reach the nearest two points in a second, then you need to reduce the speed of the shot. Let's make it equal to 4.
float s = 4f; Shot speed reduced to 4.
Their trajectories are now complete, but the other two are gone. This happened because the speed of the shot is now not enough to reach these points. In such cases, solutions to no, that is, we get the square root of a negative number, leading to NaN values and the disappearance of lines. We can recognize this by checking to negativity.
float r = s2 * s2 - g * (g * x * x + 2f * y * s2); Debug.Assert(r >= 0f, "Launch velocity insufficient for range!"); This situation can be avoided by setting a sufficiently high shot speed. But if it is too large, then to hit targets near the tower will require very high trajectories and a long flight time, so you should leave the speed as low as possible. Shot speed should be enough to hit the target at maximum range.
At maximum range , i.e. for there is only one solution, corresponding to a low trajectory. This means that we know the required speed of the shot. .
How to derive this equation for s?
Need to decide for .
This is an expression of the form where , , and .
You can solve it using the simplified formula of the roots of the quadratic equation .
After substitution we get .
We need a positive solution, so we come to .
This is an expression of the form where , , and .
You can solve it using the simplified formula of the roots of the quadratic equation .
After substitution we get .
We need a positive solution, so we come to .
We need to determine the required speed only when the mortars wake up (Awake) or when we change its range in Play mode. Therefore, we will track it using the field and calculate it in
Awake and OnValidate . float launchSpeed; void Awake () { OnValidate(); } void OnValidate () { float x = targetingRange; float y = -mortar.position.y; launchSpeed = Mathf.Sqrt(9.81f * (y + Mathf.Sqrt(x * x + y * y))); } However, due to limitations in the accuracy of floating point calculations, determining the target very close to the maximum range may be erroneous. Therefore, when calculating the required speed, we add a small amount to the range. In addition, the radius of the collider of the enemy essentially expands the maximum radius of the range of the tower. We made it equal to 0.125, but with an increase in the enemy’s scale, it can double as much as possible, so we’ll increase the actual range by about 0.25, for example, by 0.25001.
float x = targetingRange + 0.25001f; Next, apply the derived equation for the speed of a shot in
Launch . float s = launchSpeed; Apply the calculated speed to the aiming range 3.5.
Shooting
Having the correct calculation of the trajectory, you can get rid of the relative test goals. Now you need to pass the
Launch point to the target. public void Launch (TargetPoint target) { Vector3 launchPoint = mortar.position; Vector3 targetPoint = target.Position; targetPoint.y = 0f; … } In addition, shots are not fired in every frame. We need to track the process of the shot in the same way as the process of creating enemies and capture a random target when the time comes to shoot in
GameUpdate . But at this point, there may not be any goals available. In this case, we continue the process of firing, but without further accumulation. To avoid an infinite loop, you need to make it a little less than 1. float launchProgress; … public override void GameUpdate () { launchProgress += shotsPerSecond * Time.deltaTime; while (launchProgress >= 1f) { if (AcquireTarget(out TargetPoint target)) { Launch(target); launchProgress -= 1f; } else { launchProgress = 0.999f; } } } We do not track targets between shots, but we need to correctly rotate the mortar during shots. You can use the horizontal direction of the shot to rotate the mortar horizontally using
Quaternion.LookRotation . We also need with apply shot angle for component Y of the direction vector. This will work because the horizontal direction has a length of 1, i.e. .Decomposition of the turn vector of the look.
float tanTheta = (s2 + Mathf.Sqrt(r)) / (g * x); float cosTheta = Mathf.Cos(Mathf.Atan(tanTheta)); float sinTheta = cosTheta * tanTheta; mortar.localRotation = Quaternion.LookRotation(new Vector3(dir.x, tanTheta, dir.y)); In order to still see the trajectory of the shots, you can add a parameter to
Debug.DrawLine that allows them to be drawn for a long time. Vector3 prev = launchPoint, next; for (int i = 1; i <= 10; i++) { … Debug.DrawLine(prev, next, Color.blue, 1f); prev = next; } Debug.DrawLine(launchPoint, targetPoint, Color.yellow, 1f); Debug.DrawLine( … Color.white, 1f ); Aiming.
Shells
The meaning of calculating trajectories is that we now know how to shoot shells. Next we need to create them and shoot them.
War factory
We need a factory to instantiate shell objects. When in the air, shells exist on their own and are no longer dependent on the mortars that fired them. Therefore, they should not be processed by the mortar tower, and the tile content factory is also not suitable for this. Let's create create for all that is related to weapons, a new factory and call it war factory.First, create an abstract
WarEntitywith a property OriginFactoryand method Recycle. using UnityEngine; public abstract class WarEntity : MonoBehaviour { WarFactory originFactory; public WarFactory OriginFactory { get => originFactory; set { Debug.Assert(originFactory == null, "Redefined origin factory!"); originFactory = value; } } public void Recycle () { originFactory.Reclaim(this); } } Then create a specific entity
Shellfor the shells. using UnityEngine; public class Shell : WarEntity { } Then create the
WarFactoryone that will create the shell using the public getter property. using UnityEngine; [CreateAssetMenu] public class WarFactory : GameObjectFactory { [SerializeField] Shell shellPrefab = default; public Shell Shell€ => Get(shellPrefab); T Get<T> (T prefab) where T : WarEntity { T instance = CreateGameObjectInstance(prefab); instance.OriginFactory = this; return instance; } public void Reclaim (WarEntity entity) { Debug.Assert(entity.OriginFactory == this, "Wrong factory reclaimed!"); Destroy(entity.gameObject); } } Create a prefab for the projectile. I used a simple cube with the same scale of 0.25 and dark material, as well as a component
Shell. Then create the factory asset and assign it the prefab of the projectile.War factory.
Game behavior
To move the shells they need to be updated. You can use the same approach that is used
Gameto update the status of enemies. In fact, we can even make this approach generalized by creating an abstract component GameBehaviorthat extends MonoBehaviourand adds a virtual method GameUpdate. using UnityEngine; public abstract class GameBehavior : MonoBehaviour { public virtual bool GameUpdate () => true; } Now do the refactoring
EnemyCollection, turning it into GameBehaviorCollection. public class GameBehaviorCollection { List<GameBehavior> behaviors = new List<GameBehavior>(); public void Add (GameBehavior behavior) { behaviors.Add(behavior); } public void GameUpdate () { for (int i = 0; i < behaviors.Count; i++) { if (!behaviors[i].GameUpdate()) { int lastIndex = behaviors.Count - 1; behaviors[i] = behaviors[lastIndex]; behaviors.RemoveAt(lastIndex); i -= 1; } } } } Let's make it
WarEntityexpand GameBehavior, not MonoBehavior. public abstract class WarEntity : GameBehavior { … } We will do the same for
Enemy, this time overriding the method GameUpdate. public class Enemy : GameBehavior { … public override bool GameUpdate () { … } … } From now on,
Gameit will have to track two collections, one for enemies, the other for non-enemies. Non-enemies must be updated after everything else. GameBehaviorCollection enemies = new GameBehaviorCollection(); GameBehaviorCollection nonEnemies = new GameBehaviorCollection(); … void Update () { … enemies.GameUpdate(); Physics.SyncTransforms(); board.GameUpdate(); nonEnemies.GameUpdate(); } The final step in implementing a shell upgrade is to add them to a collection of non-enemies. Let's do this with a function
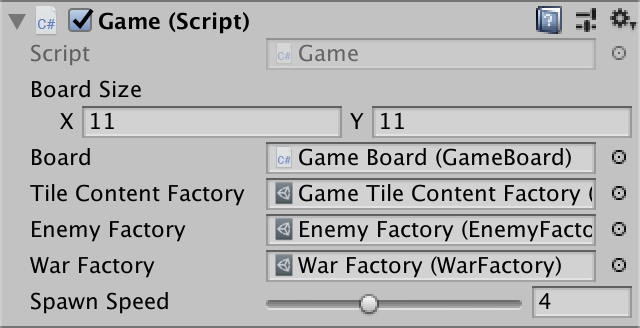
Gamethat will be a static facade for a war factory so that projectiles can be created by a challenge Game.SpawnShell(). For this to work, you Gamemust have a link to war factory and keep track of your own instance. [SerializeField] WarFactory warFactory = default; … static Game instance; public static Shell SpawnShell () { Shell shell = instance.warFactory.Shell€; instance.nonEnemies.Add(shell); return shell; } void OnEnable () { instance = this; } Game with war factory.
Is a static facade a good solution?
, , .
We shoot a shell
After creating an instance of the projectile, it must fly along its path until it reaches the final goal. To do this, add to the
Shellmethod Initializeand use it to set the shot point, target point and shot speed. Vector3 launchPoint, targetPoint, launchVelocity; public void Initialize ( Vector3 launchPoint, Vector3 targetPoint, Vector3 launchVelocity ) { this.launchPoint = launchPoint; this.targetPoint = targetPoint; this.launchVelocity = launchVelocity; } Now we can create a shell in
MortarTower.Launchand send it on the road. mortar.localRotation = Quaternion.LookRotation(new Vector3(dir.x, tanTheta, dir.y)); Game.SpawnShell().Initialize( launchPoint, targetPoint, new Vector3(s * cosTheta * dir.x, s * sinTheta, s * cosTheta * dir.y) ); Projectile movement
To
Shellmove, we need to track the duration of its existence, that is, the time elapsed since the shot. Then we can calculate his position in GameUpdate. We always do this with respect to its firing point, so that the projectile perfectly follows the path regardless of the refresh rate. float age; … public override bool GameUpdate () { age += Time.deltaTime; Vector3 p = launchPoint + launchVelocity * age; py -= 0.5f * 9.81f * age * age; transform.localPosition = p; return true; } Shelling.
In order to align the shells with their trajectories, we need to make them look along the derived vector, which is their speed at the corresponding moment in time.
public override bool GameUpdate () { … Vector3 d = launchVelocity; dy -= 9.81f * age; transform.localRotation = Quaternion.LookRotation(d); return true; } The shells are turning.
We clean the game
Now that it’s clear that the shells are flying exactly as they should, you can remove the
MortarTower.Launchtrajectories from the visualization. public void Launch (TargetPoint target) { … Game.SpawnShell().Initialize( launchPoint, targetPoint, new Vector3(s * cosTheta * dir.x, s * sinTheta, s * cosTheta * dir.y) ); } In addition, we need to make sure that the shells are destroyed after hitting the target. Since we always aim at the ground, this can be done by checking to
Shell.GameUpdatesee if the vertical position is below zero. You can do this immediately after calculating them, before changing the position and turning the projectile. public override bool GameUpdate () { age += Time.deltaTime; Vector3 p = launchPoint + launchVelocity * age; py -= 0.5f * 9.81f * age * age; if (py <= 0f) { OriginFactory.Reclaim(this); return false; } transform.localPosition = p; … } Detonation
We shoot shells because they contain explosives. When the projectile reaches its target, it must detonate and inflict damage on all enemies in the area of the explosion. The radius of the explosion and the damage dealt depend on the type of shells fired by the mortar, so we’ll add
MortarTowerconfiguration options for them. [SerializeField, Range(0.5f, 3f)] float shellBlastRadius = 1f; [SerializeField, Range(1f, 100f)] float shellDamage = 10f; Explosion radius and 1.5 damage of 15 shells.
This configuration is important only during the explosion, so it needs to be added to
Shelland its method Initialize. float age, blastRadius, damage; public void Initialize ( Vector3 launchPoint, Vector3 targetPoint, Vector3 launchVelocity, float blastRadius, float damage ) { … this.blastRadius = blastRadius; this.damage = damage; } MortarTower should only transmit data to the projectile after its creation. Game.SpawnShell().Initialize( launchPoint, targetPoint, new Vector3(s * cosTheta * dir.x, s * sinTheta, s * cosTheta * dir.y), shellBlastRadius, shellDamage ); To shoot at enemies within range, the projectile must capture targets. We already have code for this, but it is in
Tower. Since it is useful for everything that needs a goal, copy its functionality into TargetPointand make it statically available. Add a method to fill the buffer, a property to get the buffered amount, and a method to get the buffered target. const int enemyLayerMask = 1 << 9; static Collider[] buffer = new Collider[100]; public static int BufferedCount { get; private set; } public static bool FillBuffer (Vector3 position, float range) { Vector3 top = position; top.y += 3f; BufferedCount = Physics.OverlapCapsuleNonAlloc( position, top, range, buffer, enemyLayerMask ); return BufferedCount > 0; } public static TargetPoint GetBuffered (int index) { var target = buffer[index].GetComponent<TargetPoint>(); Debug.Assert(target != null, "Targeted non-enemy!", buffer[0]); return target; } Now we can receive all targets within range up to the maximum buffer size and inflict damage upon detonation
Shell. if (py <= 0f) { TargetPoint.FillBuffer(targetPoint, blastRadius); for (int i = 0; i < TargetPoint.BufferedCount; i++) { TargetPoint.GetBuffered(i).Enemy€.ApplyDamage(damage); } OriginFactory.Reclaim(this); return false; } Detonation of shells.
You can also add to a
TargetPointstatic property to get a random target from the buffer. public static TargetPoint RandomBuffered => GetBuffered(Random.Range(0, BufferedCount)); This will allow us to simplify
Tower, because now you can use to search for a random target TargetPoint. protected bool AcquireTarget (out TargetPoint target) { if (TargetPoint.FillBuffer(transform.localPosition, targetingRange)) { target = TargetPoint.RandomBuffered; return true; } target = null; return false; } Explosions
Everything works, but it still does not look very believable. You can improve the picture by adding visualization of the explosion when the detonation of the projectile. This will not only look more interesting, but also give the player useful feedback. To do this, we will create a prefab of the explosion like a laser beam. Only it will be a more transparent sphere of bright color. Add a new entity component
Explosionwith a custom duration. Half a second will be enough. Add her a method Initializethat sets the position and radius of the explosion. When setting the scale, you need to double the radius, because the radius of the sphere mesh is 0.5. It is also a good place to deal damage to all enemies within range, so we’ll also add a damage parameter. In addition, he needs a method GameUpdateto check if time is running out. using UnityEngine; public class Explosion : WarEntity { [SerializeField, Range(0f, 1f)] float duration = 0.5f; float age; public void Initialize (Vector3 position, float blastRadius, float damage) { TargetPoint.FillBuffer(position, blastRadius); for (int i = 0; i < TargetPoint.BufferedCount; i++) { TargetPoint.GetBuffered(i).Enemy.ApplyDamage(damage); } transform.localPosition = position; transform.localScale = Vector3.one * (2f * blastRadius); } public override bool GameUpdate () { age += Time.deltaTime; if (age >= duration) { OriginFactory.Reclaim(this); return false; } return true; } } Add an explosion to
WarFactory. [SerializeField] Explosion explosionPrefab = default; [SerializeField] Shell shellPrefab = default; public Explosion Explosion€ => Get(explosionPrefab); public Shell Shell => Get(shellPrefab); War factory with an explosion.
Also add to the
Gamefacade method. public static Explosion SpawnExplosion () { Explosion explosion = instance.warFactory.Explosion€; instance.nonEnemies.Add(explosion); return explosion; } Now it
Shellcan generate and initiate an explosion upon reaching the target. The explosion itself will cause damage. if (py <= 0f) { Game.SpawnExplosion().Initialize(targetPoint, blastRadius, damage); OriginFactory.Reclaim(this); return false; } Explosions of shells.
Smoother explosions
Immutable spheres instead of explosions do not look very beautiful. You can improve them by animating opacity and scale. You can use a simple formula for this, but let's use animation curves that are easier to set up. Add
Explosiontwo configuration fields to this AnimationCurve. We will use the curves to adjust the values over the life of the explosion, and time 1 will indicate the end of the explosion, regardless of its true duration. The same applies to the scale and radius of the explosion. This will simplify their configuration. [SerializeField] AnimationCurve opacityCurve = default; [SerializeField] AnimationCurve scaleCurve = default; Opacity will start and end with zero, smoothly scaled to an average value of 0.3. The scale will start at 0.7, increase rapidly, and then slowly approach 1.
Explosion curves.
To set the color of the material, we will use the material properties block. where black is the opacity variable. The scale is now set to
GameUpdate, but we need to track using the radius field. You Initializecan use the doubling scale. The values of the curves are found by calling them Evaluatewith an argument, calculated as the current lifetime of the explosion, divided by the duration of the explosion. static int colorPropertyID = Shader.PropertyToID("_Color"); static MaterialPropertyBlock propertyBlock; … float scale; MeshRenderer meshRenderer; void Awake () { meshRenderer = GetComponent<MeshRenderer>(); Debug.Assert(meshRenderer != null, "Explosion without renderer!"); } public void Initialize (Vector3 position, float blastRadius, float damage) { … transform.localPosition = position; scale = 2f * blastRadius; } public override bool GameUpdate () { … if (propertyBlock == null) { propertyBlock = new MaterialPropertyBlock(); } float t = age / duration; Color c = Color.clear; ca = opacityCurve.Evaluate(t); propertyBlock.SetColor(colorPropertyID, c); meshRenderer.SetPropertyBlock(propertyBlock); transform.localScale = Vector3.one * (scale * scaleCurve.Evaluate(t)); return true; } Animated explosions.
Tracer shells
Since the shells are small and have a fairly high speed, they can be difficult to notice. And if you look at the screenshot of a single frame, the trajectories are completely incomprehensible. You can make them more obvious by adding a trace effect to your shells. For ordinary shells, this is not very realistic, but we can say that these are tracers. Such ammunition is specially made so that they leave a bright mark, making their trajectories visible.
There are different ways to create traces, but you will use a very simple one. We remake the explosions so that
Shellcreates a small explosion in each frame. These explosions will not cause any damage, so capturing targets will be a waste of resources. Add toExplosionsupport for this use by making the damage be done if it is greater than zero, and then make the damage parameter Initializeoptional. public void Initialize ( Vector3 position, float blastRadius, float damage = 0f ) { if (damage > 0f) { TargetPoint.FillBuffer(position, blastRadius); for (int i = 0; i < TargetPoint.BufferedCount; i++) { TargetPoint.GetBuffered(i).Enemy.ApplyDamage(damage); } } transform.localPosition = position; radius = 2f * blastRadius; } We will create an explosion at the end
Shell.GameUpdatewith a small radius, for example, 0.1, in order to turn them into tracer shells. It should be noted that with this approach, explosions will be created frame by frame, that is, they depend on the frame rate, but for such a simple effect this is permissible. public override bool GameUpdate () { … Game.SpawnExplosion().Initialize(p, 0.1f); return true; } Tracer shells.
Tutorial Repository
PDF Article
Source: https://habr.com/ru/post/461605/
All Articles