Arduino timer
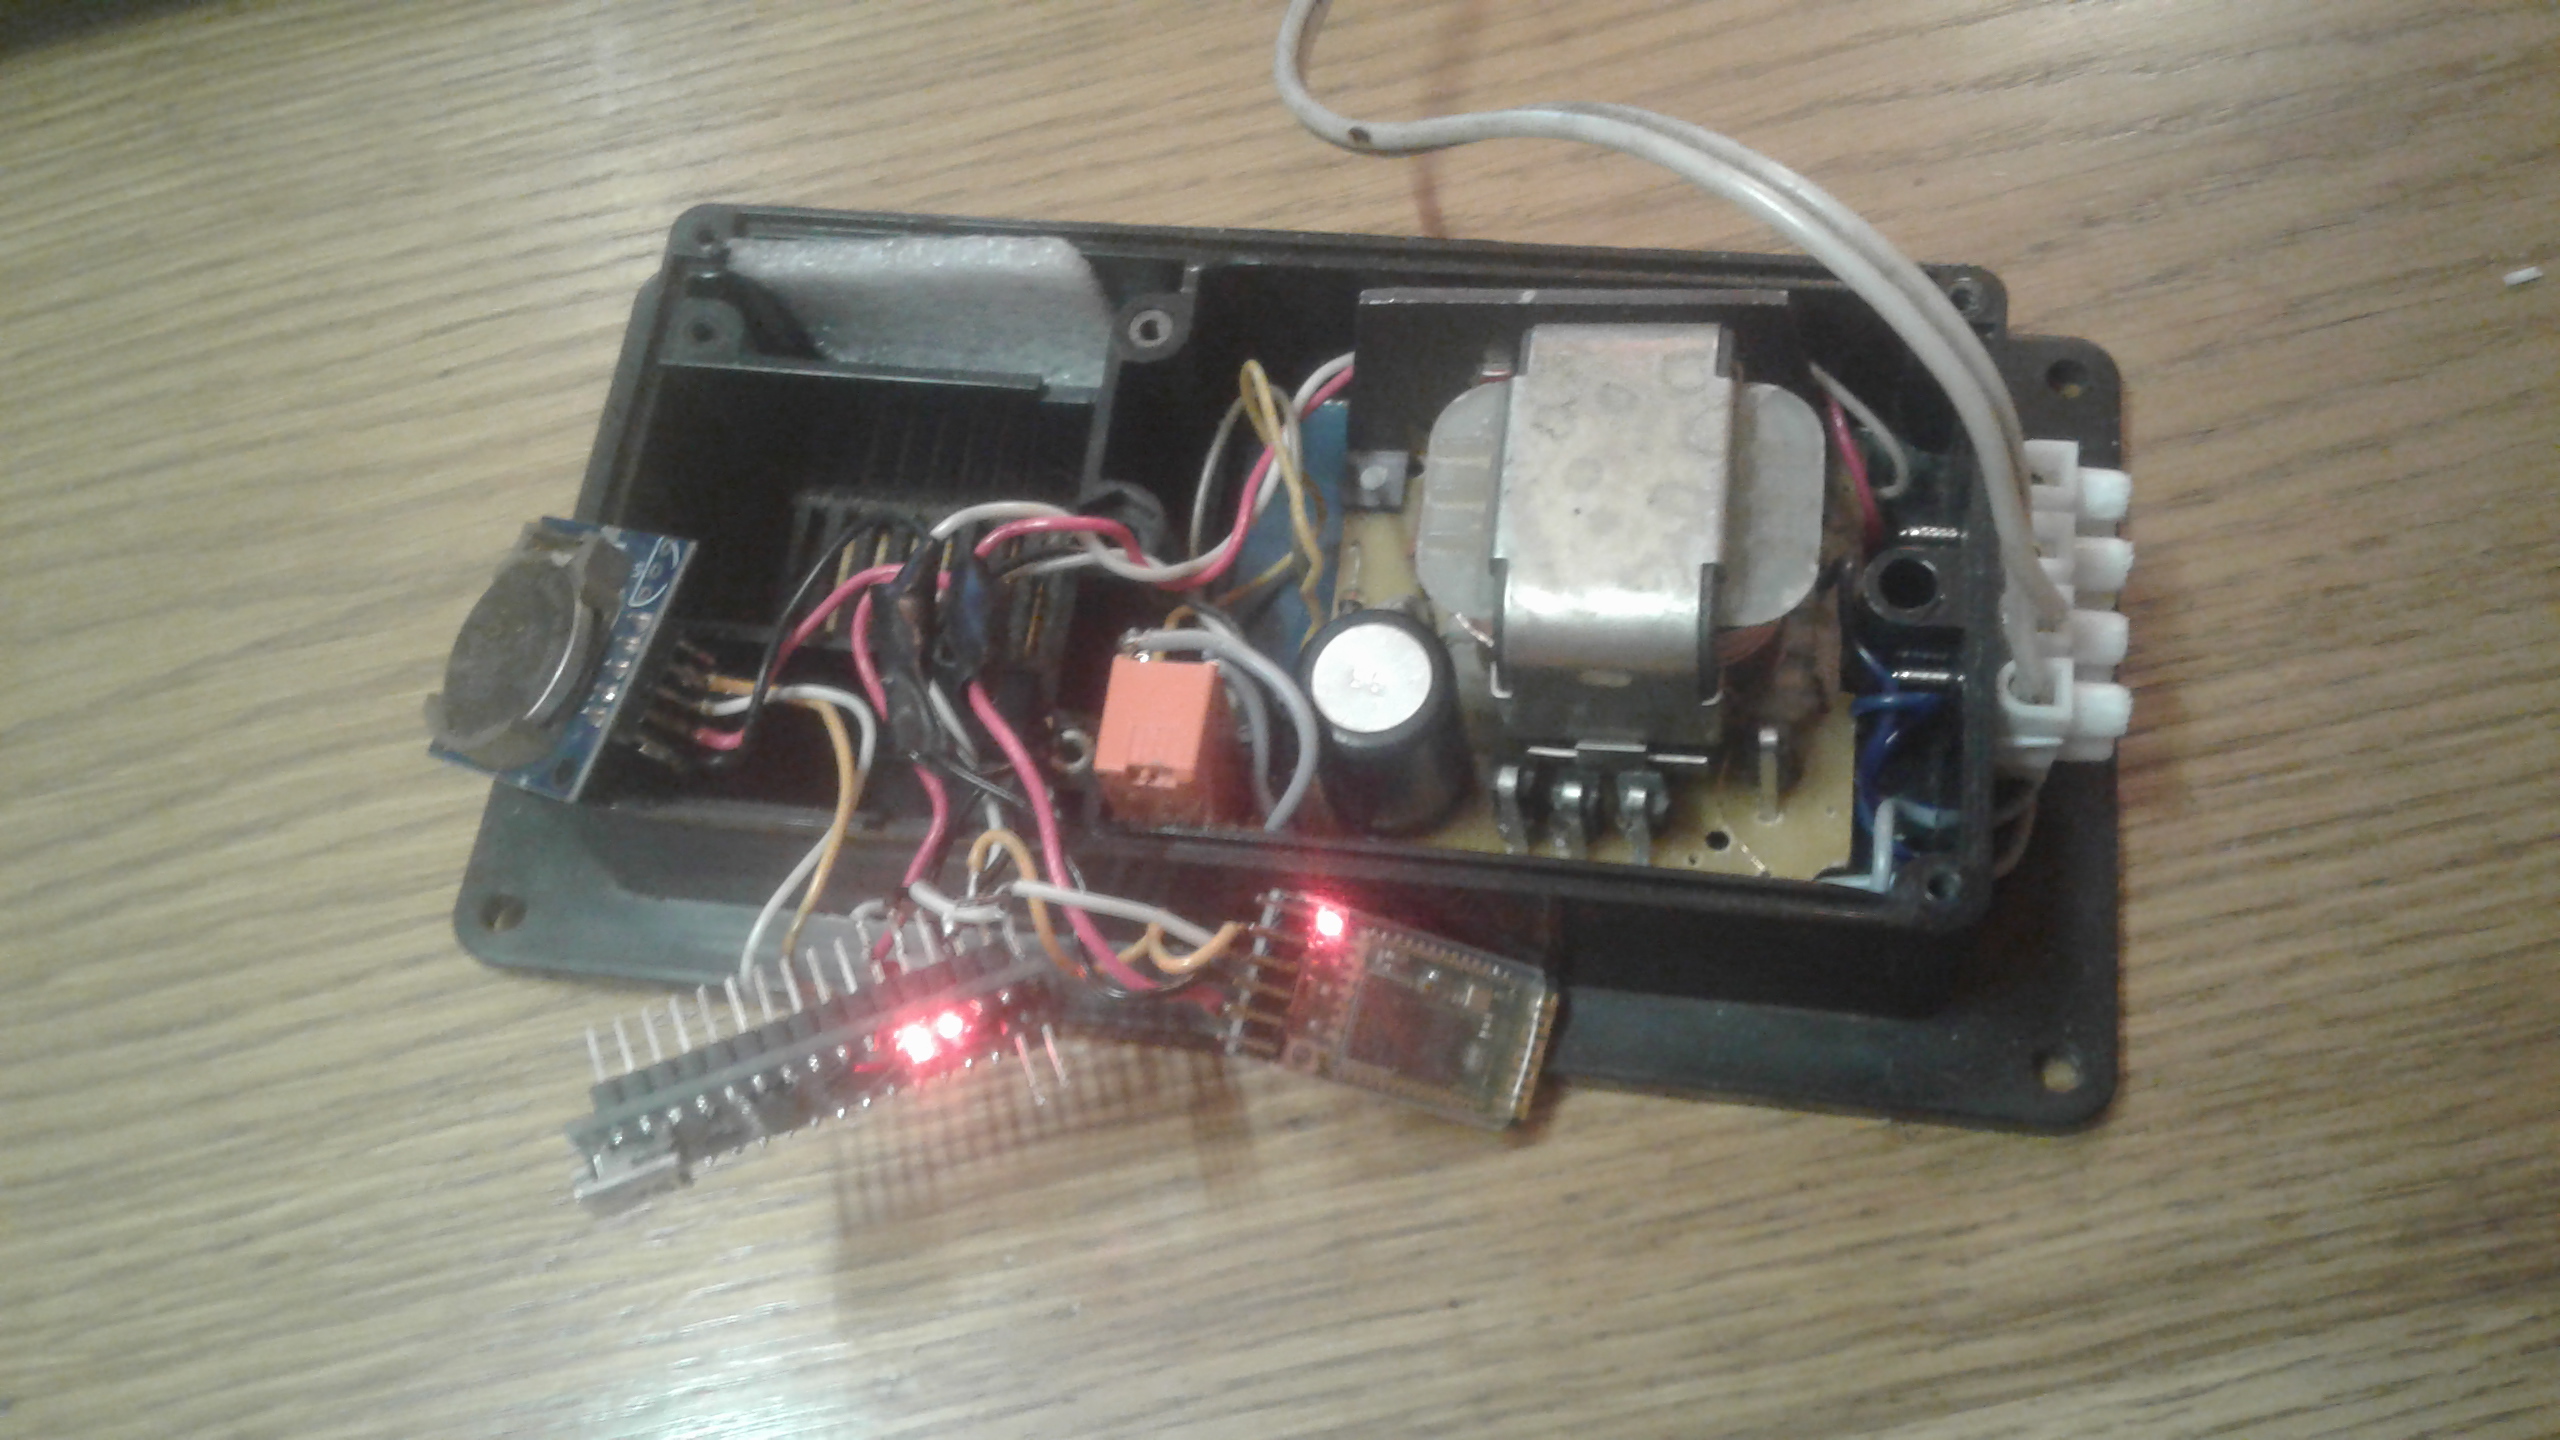
Good day. My name is Nikita Sergeevich, I’m 14 years old and in this post I want to tell you about the device (and application) I developed half a year ago, because the finished device was soldered and assembled by my father. Although you may have seen such a device more than once, but it does not bother me.
All this was created to automatically turn on and off the light in the chicken coop, but also applicable for other purposes.

')
The finished and assembled device can send to the specified digital pin arduino 1 or 0 in the period from and to the specified time, up to exactly minutes (outside the period, the value opposite to that specified in the application when adding a timer is supplied).
All parameters are indicated in the application. But from here in more detail ...
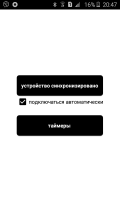
There is an application for android in which you need to connect to the bluetooth module and add a timer. The application is intuitive and I think there will be no problems with it.
The .apk file will be in the folder of this project.
Required Items:
We deal with arduino and plug-ins.
Yeah, paragraphs 1-4:
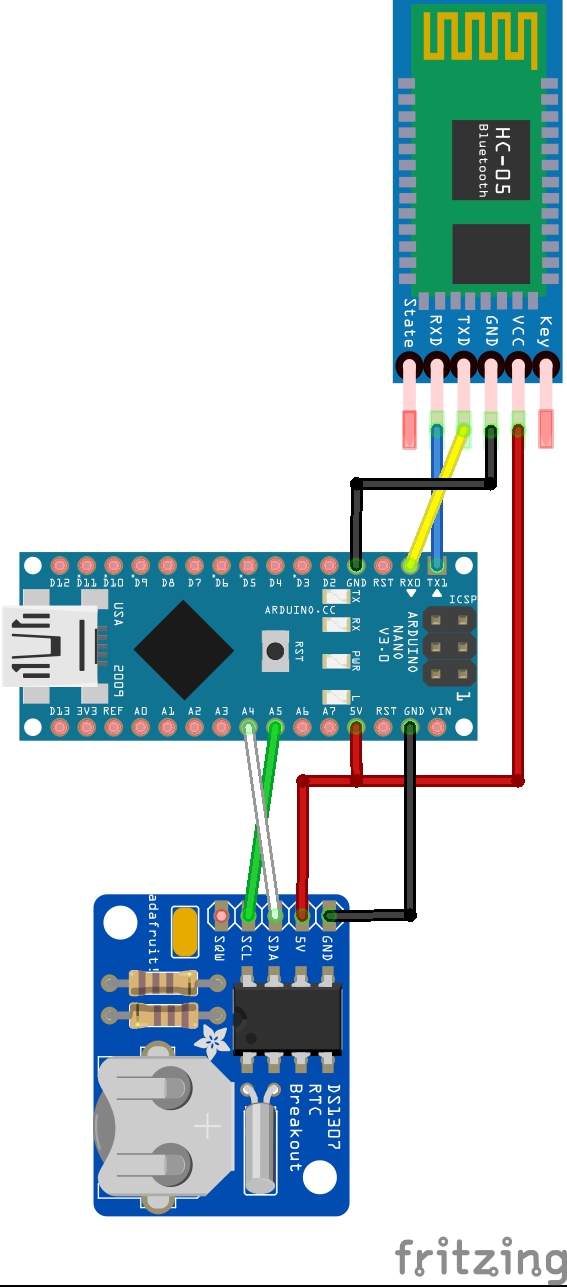
Do not forget to disconnect the RX0 pin on the arduino when loading the sketch. Did you say sketch?
5. Sketch to the studio:
But all this without an application will be cold and motionless like a stone, so move on.
6.
and select our module. With the “connect automatically” checkbox, the phone itself will try to connect to the bluetooth module when the application is opened (this chip was taken from alex gyver). “Timers” is a list of all timers and their search by name. Clicking on the name of the timer opens the screen for changing this timer. Here (where is the list of timers) in the lower right corner is located "+" by clicking on which the add timer screen opens, where it is indicated:
Project Archive;
There is an application.
On this I want to thank you for your attention and say that if you find any jambs or bugs - feel free to write about it, we will fix it.
All this was created to automatically turn on and off the light in the chicken coop, but also applicable for other purposes.
')
The finished and assembled device can send to the specified digital pin arduino 1 or 0 in the period from and to the specified time, up to exactly minutes (outside the period, the value opposite to that specified in the application when adding a timer is supplied).
All parameters are indicated in the application. But from here in more detail ...
There is an application for android in which you need to connect to the bluetooth module and add a timer. The application is intuitive and I think there will be no problems with it.
The .apk file will be in the folder of this project.
Required Items:
- arduino;
- rtc module ds1307;
- bluetooth module HC-05;
- connecting elements (e.g. wires);
- firmware for arduino; the sketch is complicated in my opinion and it’s better not to go into details.
- application for android;
We deal with arduino and plug-ins.
Yeah, paragraphs 1-4:
arduino - hc-05 5v - vcc gnd - gnd TX1 - RXD RX0 - TXD arduino - ds1307 5v - 5v gnd - gnd A5 - scl A4 - sda Do not forget to disconnect the RX0 pin on the arduino when loading the sketch. Did you say sketch?
5. Sketch to the studio:
#include <Wire.h> // i2c #include <iarduino_RTC.h> // rtc ( c, (Timer->firmware_for_timer->iarduino_RTC)) #include <EEPROM.h> // iarduino_RTC time(RTC_DS1307); // int values; // unsigned int to_minutes(unsigned int hours, unsigned int minutes)// { return (60*hours)+minutes; } void setup() { time.begin(); // Serial.begin(9600); // } void loop() { if(Serial.available() > 0) // - { values = Serial.read(); time.settime(0,-1, values); // delay(50); values = Serial.read(); time.settime(0, values); // delay(50); // for (int i = 0 ; i < EEPROM.length() ; i++) { EEPROM.write(i, 0); } ////////////////////////////////// values = Serial.read(); delay(50); // , while (values > 0) // { for(int i = 0; i < 7; ++i) { EEPROM.write(EEPROM.read(EEPROM.length() - 1) * 7 + i, Serial.read()); delay(50); } EEPROM.write(EEPROM.length() - 1, EEPROM.read(EEPROM.length() - 1) + 1); values = Serial.read(); delay(50); } ///////////////////////////////////////// } // for(int i = 0; i < EEPROM.read(EEPROM.length() - 1); ++i) { if(EEPROM.read(i * 7 + 0) == 1) // { bool find = 0; // time.gettime(); if((to_minutes(EEPROM.read(i * 7 + 1), EEPROM.read(i * 7 + 2)) <= to_minutes(time.Hours, time.minutes)) && // (to_minutes(EEPROM.read(i * 7 + 3), EEPROM.read(i * 7 + 4)) > to_minutes(time.Hours, time.minutes))) { pinMode(EEPROM.read(i * 7 + 5), OUTPUT); // digitalWrite(EEPROM.read(i * 7 + 5), EEPROM.read(i * 7 + 6)); // } else // { // for (int j = 0; j < EEPROM.read(EEPROM.length() - 1); ++j) { if(EEPROM.read(i * 7 + 5) == EEPROM.read(j * 7 + 5) && (i != j) && (EEPROM.read(j * 7 + 0) == 1)) { // if((to_minutes(EEPROM.read(j * 7 + 1), EEPROM.read(j * 7 + 2)) <= to_minutes(time.Hours, time.minutes)) && (to_minutes(EEPROM.read(j * 7 + 3), EEPROM.read(j * 7 + 4)) > to_minutes(time.Hours, time.minutes))) // { pinMode(EEPROM.read(i * 7 + 5), OUTPUT); // digitalWrite(EEPROM.read(i * 7 + 5), EEPROM.read(j * 7 + 6)); // find = 1; // } } } if(find == 0) // { pinMode(EEPROM.read(i * 7 + 5), OUTPUT); // digitalWrite(EEPROM.read(i * 7 + 5), !EEPROM.read(i * 7 + 6)); // } } } } } But all this without an application will be cold and motionless like a stone, so move on.
6.
The application is intuitive and I think there will be no problems with it.But it’s better to understand right away. When you first enter the application, you will need to connect to the bluetooth module, for this, click "synchronize device"
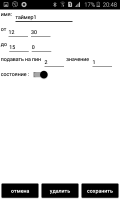
and select our module. With the “connect automatically” checkbox, the phone itself will try to connect to the bluetooth module when the application is opened (this chip was taken from alex gyver). “Timers” is a list of all timers and their search by name. Clicking on the name of the timer opens the screen for changing this timer. Here (where is the list of timers) in the lower right corner is located "+" by clicking on which the add timer screen opens, where it is indicated:
- his name,
- from what time (hours minutes)
- what time (hours minutes)
- controlled pin
- value to him
- and state (will arduino turn it on or not at the right time).
Project Archive;
There is an application.
On this I want to thank you for your attention and say that if you find any jambs or bugs - feel free to write about it, we will fix it.
Source: https://habr.com/ru/post/461561/
All Articles