Texturing, or what you need to know to become a Surface Artist. Part 5. Material system
In the previous parts of the tutorials, we looked at how textures are created. More precisely, the way everything looks under the hood (as Yoooriii put it in the comments on the 4th part). Terms have been put in place - pixels and texels. Dismantled a little scan and grid models, PBR and materials. And finally, we drew a line under the profession of “texture artist”. It would seem that you can stop and start work already.
Part 1. Pixel here .
Part 2. Masks and textures here .
Part 3. PBR and Materials here .
Part 4. Models, normals and scan here .
Part 5. System of materials - you read it.
In this part, we will not have practice, since the fifth part has turned out to be quite large. All information on how to create materials and customize them in Unreal Engine 4 can be found in Flakky tutorials and many others. Our task now is to analyze the theory in as much detail as possible (And if any information is lacking, please let me know about it).
In 2017, the technical artist Harrison Moore performed at Unreal Dev Day Montreal. He talked about what approach for texturing he and his team used to ensure that the game Paragon had very beautiful materials. Below is a link to his lecture.
')
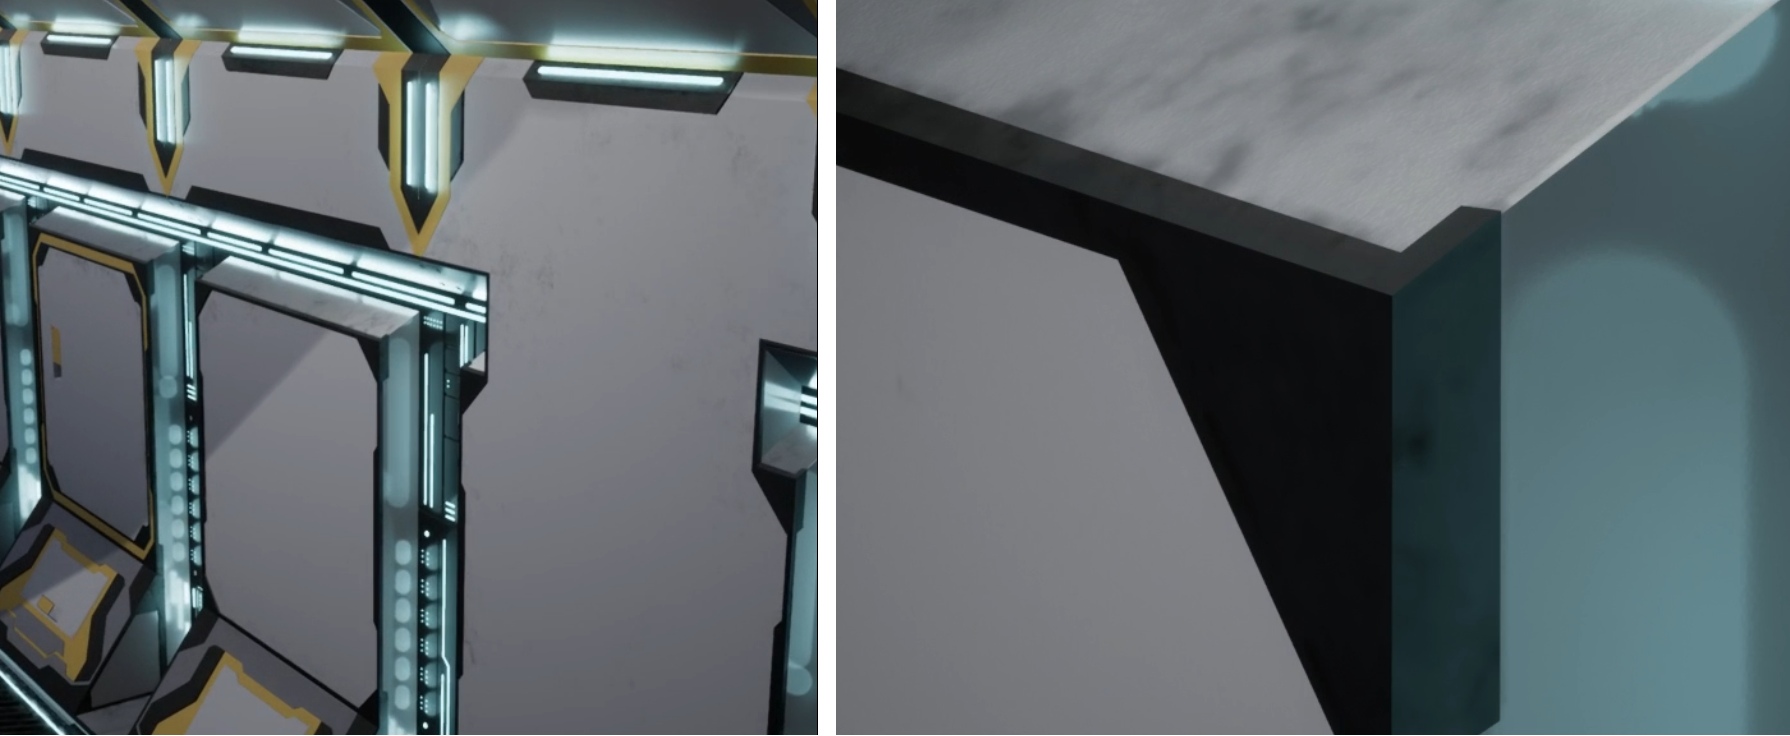
The fact is that we are creating a VR project where the quality of textures is of great importance. For example, creating textures for large objects (walls, floors, large cabinets, boxes, etc.), we came across the fact that the standard method gave very pixelated textures, and the chamfers that were created using hard edges and a normal map (we sorted this out 4 parts) when objects were close to their eyes, they looked so pixelated and wretched that we had to increase the size of the textures to fix this. Ultimately, in order to achieve at least an approximate result, we began to rivet 8k texture. It turned out that it was very expensive to create 8k textures on the main large objects, but visually it was satisfactory (maximum).
At first, everything went smoothly. The textures were riveted, the quality is normal, but having assembled a scene from objects with such textures, we realized that this does not work. The volume of textures was very large - in order for our project to work with the end user, it was required that the video card had at least 3 gigabytes of RAM. And the size of one such texture was 67 million texels. Even despite the fact that these are already completely calculated and baked textures, not a small computing power of the video card was required to drive all the texels and display them on the screen. But we understand that for the full implementation of PBR we need not 1 texture (and not 1 channel), but at least 9 channels.
As a result, we got scenes in which the volume of textures was huge, it required the wildest calculations and failed FPS from the frames we needed to 90 to 45. It became clear why almost all games use only BaseColor textures, while others practically do not connect. For example, the Torn game for VR:
Most (I would say 90%) of the objects are made simple - the material consisted exclusively of BaseColor. Neither normal maps, nor metallic nor roughness. Unfortunately, screenshots of the game available on the network do not allow us to show the minus of this approach, and vice versa, very often screenshots show that there are all the cards, and the picture is very beautiful. But let's not talk about this game.
At first, I ignored the lecture, the video of which I inserted above. More precisely, I looked over and thought that it seemed to be a good approach, but we did not change the pipeline for creating objects and textures in our team, as this would require a large enough piece of time to master, to introduce, to develop skills. And yet, faced with the problem of material quality, I decided to reconsider the approach to texturing.
We began to make out what Harrison Moore was offering.
So. The guys from Epic Games have developed an interesting approach for texturing (more precisely, talked about it). They took the approach to creating textures in Substance Painter (or any other texturing program) and transferred the baking of textures from the program to the engine directly (to be more precise, this process can be called procedural generation of materials). That is, now the calculations for baking textures are already carried out in the engine itself, and the textures are not created, but compiled in advance. The compilation result (shader) is stored in a format that the engine understands, and when a model with this shader is displayed, the result is superimposed on the model.
How it works?
In the engine load the texture of any texture (material) in sizes of 1k. That is, the standard set is Base Color, ORM, Normal Map. Such textures are loaded with 10-20 pieces. For example, 4 varieties of metal, 5 varieties of leather, several varieties of plastic, wood and so on. All this is combined into shader functions so that you can easily connect them later. 1 invoice = 1 function.

After that, they create masks for the object we need. Here Substance Painter becomes necessary again - with the help of it masks are created on the object. That is, you need to specify in which places of the object which textures should be displayed, then to draw the desired texture in the right place on the object:
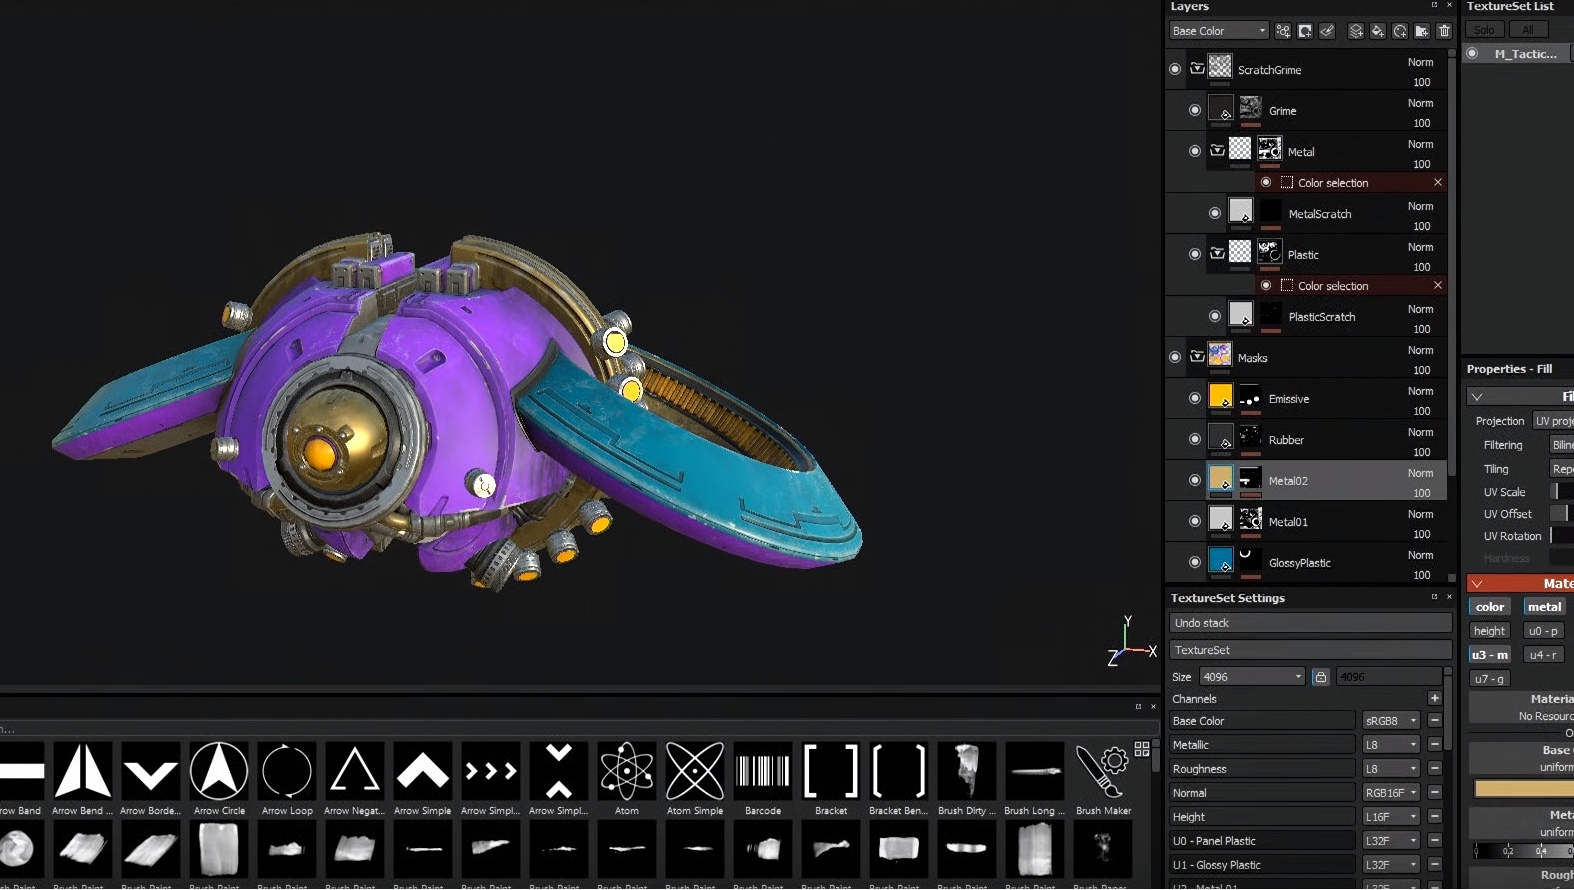
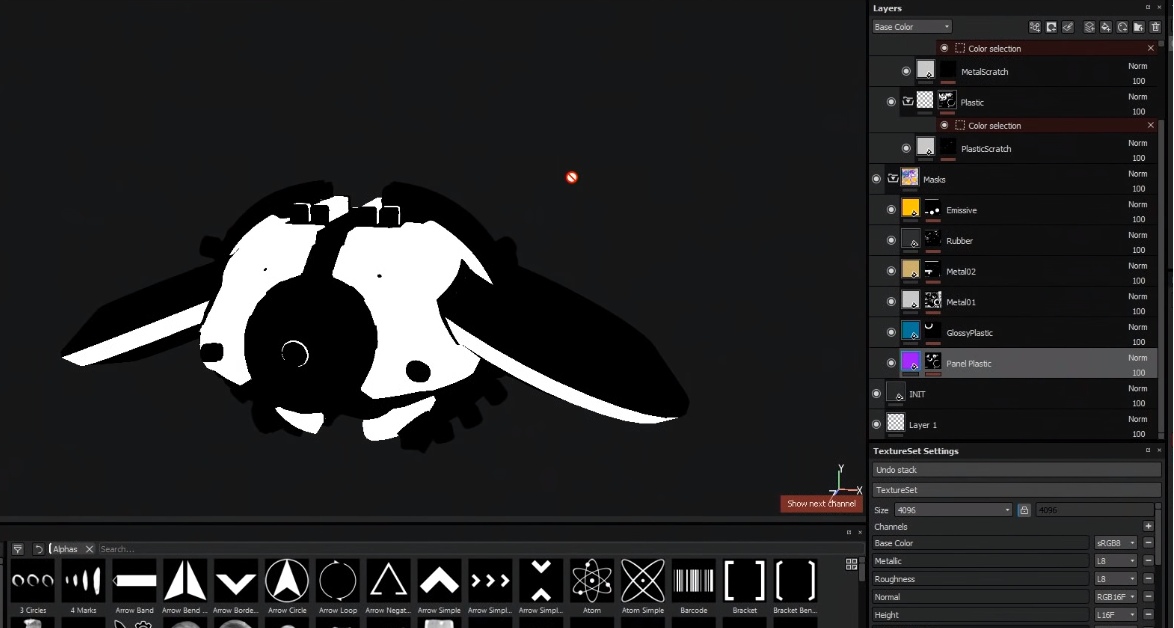
Above in the screenshot you can see how the flying robot is painted in bright colors. Briefly - this is done specifically to see which masks are located where where. The second screenshot shows one of the masks.
These masks are uploaded to the engine. They also create a normal map for each object separately in order to smooth the chamfers, display some small technical elements with the help of it and also load it into the engine.
Next, a new shader (material) is created, into which the created masks are added. The necessary shader functions are added with the desired textures (for example, rusty metal, plastic and fresh metal) and then the code is written (almost nothing needs to be written, after all, Epic Games did everything possible to make it convenient for us to work), in which we indicate how to mix masks correctly, which textures to display under which masks, how to display dirt texture and so on and so forth.
After everything is assembled, the shader is compiled and the result is displayed.
Well, it would seem that such a thing - after all, the same thing can be done in Painter and get a ready-made result. However, it is not. And tiling is to blame.
Tiling (literally - tiled, tile) - This is a repetition of the texture, as if the tile, if it is smaller than the area for texturing (UV). This is necessary in order to fill in the gaps that form in the UV space if the texture is smaller in size. The video card just starts duplicating it as many times as needed to close the gap. Tiling works in an interesting way - the video card calculates each texel texture (for example, 1k in size). And when it comes to the part that is duplicated, no calculations are already made, since they already exist. The video card simply copies and pastes the data. Copy paste. And it costs virtually nothing for performance. This is not so resource-demanding that it does not affect anything, even if you do a tiling of 10,000 * 10,000 repetitions (and repeat this with our example of about 10 billion texels for a minute about the numbers), your project will not slow down for a second.
That is, we can now take the invoice. Show in the right place on the object and tint (duplicate) it exactly as much as you need to achieve the desired quality. Due to tiling, the size of texels is very much reduced, which increases the quality of the texture itself.
The disadvantage of this approach is mathematics - now, to display textures on an object, the shader needs to calculate various operations many times to display the final result, and instead of the standard 3 textures, the engine needs to take into account masks, mixing normals, colors, and so on.
In fact, the loss in the calculations is leveled:
It should be understood that this approach is not for all platforms. For example, mobile games are already difficult to assemble in this way because of the complexity of the calculations.
The simplest example of the disadvantages of the standard approach to texturing and the new Material Layer System (as the guys from Epic Games called this approach) is Final Fantasy 15. In order to improve the quality of the picture, they released a pack with 4k textures. And what is 4K texture? This is 16 million texel miscalculations per channel. And if there are 9 of them for the PBR standard?
And here the power of the System of Layers of Materials begins to emerge as much as possible. To collect clothes on the character using textures, it is enough to use 3-4 textures (maybe more). In total, it will be less than standard high-resolution textures, performance is approximately at the same level, and quality can be controlled by tiling and set much higher.
The guys from Epic Games went further and presented a beta version of the “Material Layer System”, which did not create hype and turned out to be quite buggy.
An example of her work can be seen in this video:
Based on the fact that the system was not yet suitable for work, we familiarized ourselves with it, were glad that someday we would finish it, but for now we refused to work with it and switched to creating shaders manually, specifying each mask in the shader directly.
As a result, we began to try and experiment.
At first, working with textures didn’t go quite smoothly - we achieved the desired effect with textures, but we were still very much inhibited by the normal map, since it needed to be generated for each object to create a feeling of beautiful chamfers. Despite the quality of the textures created by us, when approaching the camera object, the bevels left much to be desired even with 8k textures (I recall that we were developing a project for VR). But 8k texture is a very large volume of texels. So big that 2 full sets of textures squeezed FPS up to 45 frames (for VR you need 90).
Then we got acquainted with the method of creating bevels, which I talked about briefly in the 4th part. Creating chamfers on object models made it possible to get rid of normal maps almost completely. Yes, we have increased the polygon models, but not more than 20-40%, while the quality of the bevels skyrocketed.
This approach allowed us to get rid of another problem - seams on the edges. Creating chamfers on the model, it was no longer necessary to cut the model along hard edges. In principle, there were no hard edges on the models, so the islands became large, they began to include large spaces, and now that we are applying texture to the models, there are practically no seams on the models.
This does not mean that now on all objects we do not have a separate normal map. Simply, most of the standard objects can do with chamfers in models without an additional normal map.
Ultimately, gradually reducing the masks, increasing and complicating the shaders, we began to create complex materials that allow us to texture very beautiful surfaces:
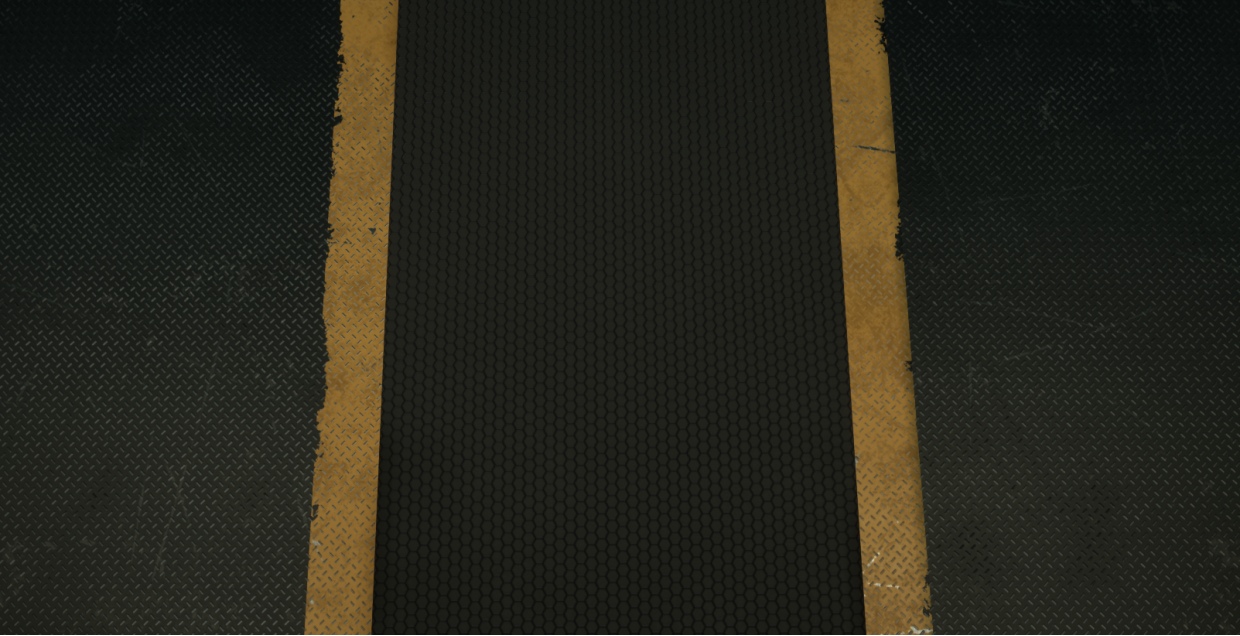
Above the floor consists of 2 textures - iron strips - 32x32 pixels and hexagons - 32x32 pixels. The material has a very complex formula - a very large number of operations for calculations - about 295 instructions. For ordinary material, such a shader would require more processing power, but we use only 32x32 = 1024 texels per channel. 9 channels = 10k texels, which must be taken into account when calculating this material + mask 128x128. A very large number of operations are leveled by a small number of texels for processing. As a result, we got a beautiful picture with a very fast and easy shader.
Due to masks, competent control of tiling and channels, you can create very complex shaders that will generate beautiful materials and at the same time practically do not eat resources.
For example, at the moment we use about 10-15 textures for the entire project (plus several unique fully textured objects using the standard method). The same metal is on almost every object. It changes in shaders - we add different colors to the material, we shift texture roughness maps, apply scratches on the mask, and their coordinates control the object coordinates (if we are talking about static objects), which leads to unique objects with their chips, cracks, dirt .
When increasing the screen resolution, it’s enough for us to simply adjust the tiling so that the number of texels matches the number of pixels on the screen. With the standard texturing method, you will have to shovel all the textures, pick up old projects in Painter and re-save them. And you need to make sure that the texture does not go. And then all this will need to be re-imported into the engine and make sure that everything will be fine there, that the shaders will quickly calculate larger textures than before.
When I talked with 3D artists on the topic of textures, I was repeatedly told that most objects cannot be assembled using textures, that this requires a separate texture with unique patterns and other components. For example, here is this gazebo:
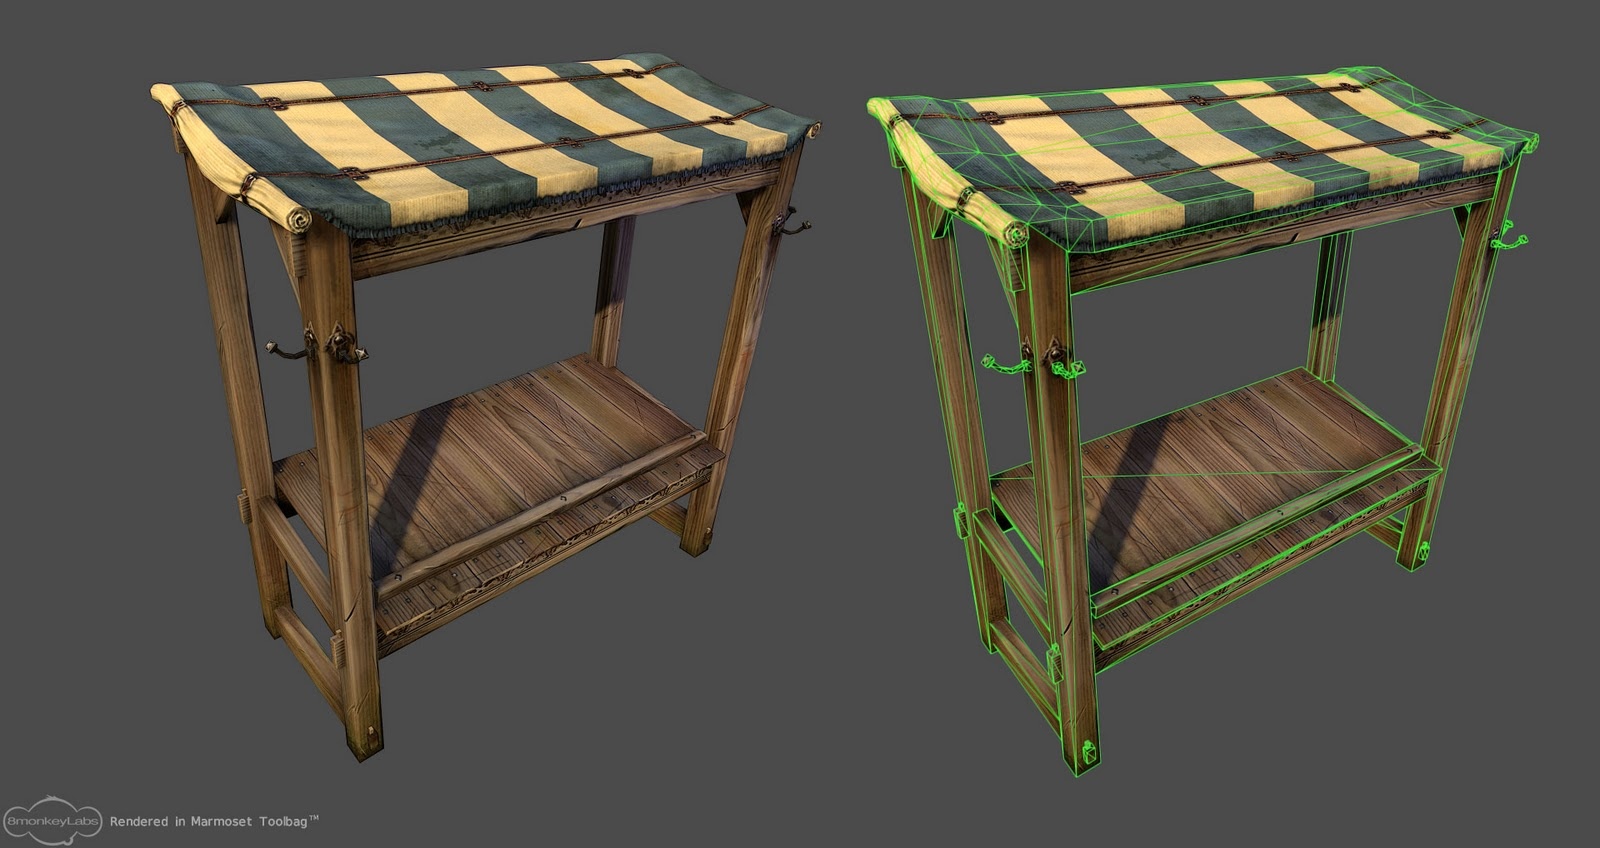
The complexity of representing this object in the textured plan is that it has unique moments:
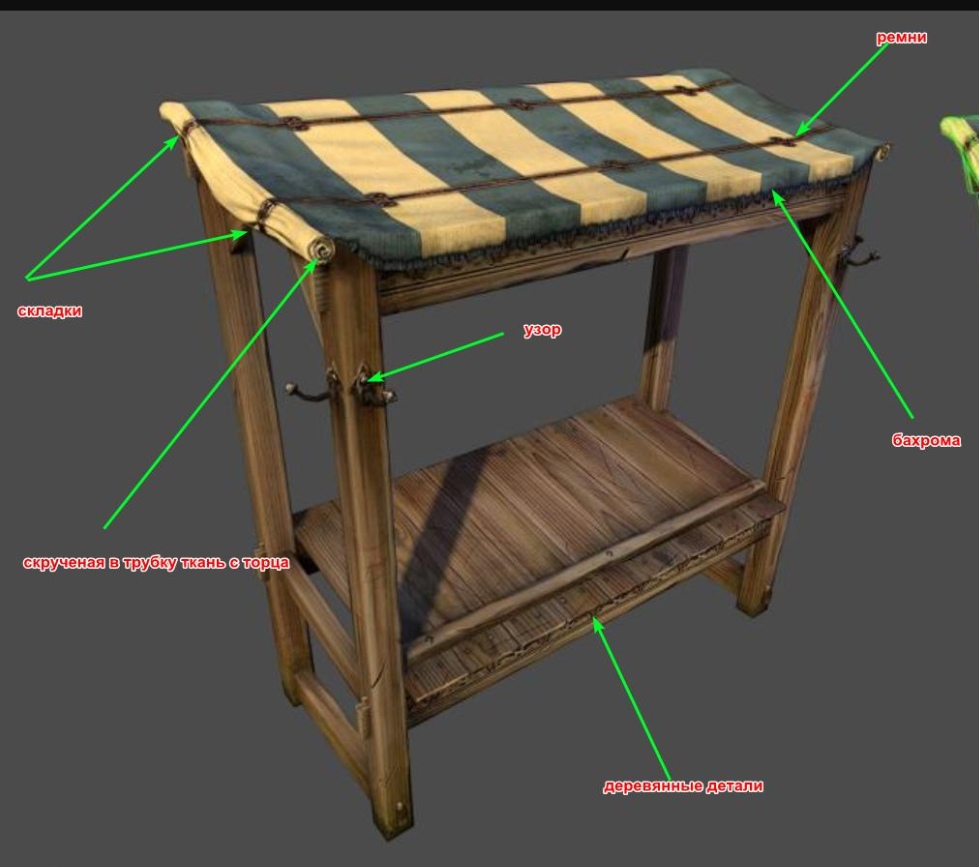
The belt pattern on top of the fabric can be made a separate texture and simply applied over the fabric texture. Or sew a belt into the fabric texture, and then we get a unique fabric texture with a belt:

When using this texture, the sewing of belts to the fabric will be constantly repeated in the same area, but this will not be evident.
Wet spots are made by a mask and dirt or something else is applied. And it already looks unique.
Fringe is also distinguished by texture, and its size will be very small, as it repeats. You can display it on the model through the mask.
A unique pattern on a metal hook can be applied either with a decal or with a separate layer of a small normal card, which can be smoothed under the sweep position and developed through the mask.
Folds on a roll of fabric can be realized using geometry or masking with shading. In the current generation of iron, the addition of a small number of vertices will not cause any load, and you can always hide them with lods at a distance.
Wooden objects can be chamfered, and thereby completely remove the normal map from the calculations. And so on. The most important thing here is that all this can be adjusted very quickly without third-party programs and wasting time.
And most importantly, all these textures can be used in any other shader, adjusting colors and spots.
Most, I would say, 95% of all objects in the game are covered by this method. In general, even handmade painting falls under the texture and can be implemented through it. However, not all objects at this technological stage can be implemented. For example, complex characters who have special elements. And even if you think carefully about them, you can cover them with textures - it is important to see them in a timely manner, cut them off and darken them.
I was offered to demonstrate the sofa (picture below) as an element that cannot be textured.

However, if you look closely, the sofa has 3 textures (leather on top, upholstery, wood for legs) and 2 difficulties - these are folds and seams. Foldings can be imitated in 2 ways:
The same applies to seams - they can be highlighted with a mask and enlighten the texture for seams or, again, with an additional normal map.
All breaks, all transitions can be simulated with textures and masks, creating the same result, but with a smaller number of textures (we just need to use the textures of the standard fabric for our project and just change its color in the shader directly).
Here you can ask a question - what to do with the fading around the pillows? Masks solve such problems with a bang =)
Further we can use the same textures for chairs. For other sofas, for chairs with the same fabric on the seat. And we can diversify all this by multiplying the colors of the textures by the ones we need. And we don’t need to create textures from scratch - just collect the masks and correctly apply texture layers. Thus, we will reduce the volume of loaded textures, but maintain the quality and even raise it. However, it is worth noting that this is our pipeline, and the collection of materials may differ from studio to studio, platforms and projects in general.
And so we smoothly approached the artist on the surfaces. The main task of the surface artist is to learn to see what can be done with textures, what are vertexes, and what is the standard method of texturing. Understand which masks to use and where to achieve the desired result.
You also need to understand that not everything can be done with masks - it happens that some objects must have a normal map with a high-poly model in order to convey all the subtleties of surface bends. For example, complex bends of clothing fabrics on a character, or the subtleties of details on weapons. The fabric itself, again, is already textured using textures and masks.
Recognition of textures, it seems to me, is a rather difficult task, because our brain is aimed at unique textures, as it is just used to working with them. Moreover, this is the standard of the gaming industry, which is the basis of everything. But once upon a time, the standard was a simple color texture without additional parameters.
It is important to learn how to use Substance Designer - this is the program that allows you to create your own masks and textures of very high quality.
And the guys from Epic Games have posted a wonderful article, " Jobs in Unreal Engine - Surface Artist ", which discusses the requirements for becoming a full-fledged surface artist. I highly recommend that you familiarize yourself with them in order to understand where to grow and what to strive for.
Instead of a conclusion:
My name is Denis Kuznetsov, and I represent Qbercat Studio, we are also developing the Movies Tycoon game (at the moment we do not post information about the game, however, we have a contact group in which we plan to release developer diaries and promotional materials. Therefore, do not be surprised that the group is empty) and almost all of our materials are created exclusively by the invoice method. Our studio has three 3D artists and 1 surface artist. On the 1st artist on the surface on average 3-5 3D-artists are enough. It all depends on the complexity of the shaders, the final result, the platform and the project itself.
Special thanks to Snake from the discord chat " Unreal Engine - RuCommunity " with which we generated conclusions in a heated debate.
Thanks to Flakky for editing the text.
Remember, if you see any inaccuracies or incorrect information in the article, I will always be glad to hear from you. These tutors are not created for advertising, but so that everyone can get involved in the work as quickly as possible, understanding the very essence of texturing and its types.
Thank you for your attention =)
Part 1. Pixel here .
Part 2. Masks and textures here .
Part 3. PBR and Materials here .
Part 4. Models, normals and scan here .
Part 5. System of materials - you read it.
Introductory block
In this part, we will not have practice, since the fifth part has turned out to be quite large. All information on how to create materials and customize them in Unreal Engine 4 can be found in Flakky tutorials and many others. Our task now is to analyze the theory in as much detail as possible (And if any information is lacking, please let me know about it).
In 2017, the technical artist Harrison Moore performed at Unreal Dev Day Montreal. He talked about what approach for texturing he and his team used to ensure that the game Paragon had very beautiful materials. Below is a link to his lecture.
')
The fact is that we are creating a VR project where the quality of textures is of great importance. For example, creating textures for large objects (walls, floors, large cabinets, boxes, etc.), we came across the fact that the standard method gave very pixelated textures, and the chamfers that were created using hard edges and a normal map (we sorted this out 4 parts) when objects were close to their eyes, they looked so pixelated and wretched that we had to increase the size of the textures to fix this. Ultimately, in order to achieve at least an approximate result, we began to rivet 8k texture. It turned out that it was very expensive to create 8k textures on the main large objects, but visually it was satisfactory (maximum).
At first, everything went smoothly. The textures were riveted, the quality is normal, but having assembled a scene from objects with such textures, we realized that this does not work. The volume of textures was very large - in order for our project to work with the end user, it was required that the video card had at least 3 gigabytes of RAM. And the size of one such texture was 67 million texels. Even despite the fact that these are already completely calculated and baked textures, not a small computing power of the video card was required to drive all the texels and display them on the screen. But we understand that for the full implementation of PBR we need not 1 texture (and not 1 channel), but at least 9 channels.
As a result, we got scenes in which the volume of textures was huge, it required the wildest calculations and failed FPS from the frames we needed to 90 to 45. It became clear why almost all games use only BaseColor textures, while others practically do not connect. For example, the Torn game for VR:
Most (I would say 90%) of the objects are made simple - the material consisted exclusively of BaseColor. Neither normal maps, nor metallic nor roughness. Unfortunately, screenshots of the game available on the network do not allow us to show the minus of this approach, and vice versa, very often screenshots show that there are all the cards, and the picture is very beautiful. But let's not talk about this game.
At first, I ignored the lecture, the video of which I inserted above. More precisely, I looked over and thought that it seemed to be a good approach, but we did not change the pipeline for creating objects and textures in our team, as this would require a large enough piece of time to master, to introduce, to develop skills. And yet, faced with the problem of material quality, I decided to reconsider the approach to texturing.
We began to make out what Harrison Moore was offering.
Prerequisites for the formation of the concept of “surface artist”
So. The guys from Epic Games have developed an interesting approach for texturing (more precisely, talked about it). They took the approach to creating textures in Substance Painter (or any other texturing program) and transferred the baking of textures from the program to the engine directly (to be more precise, this process can be called procedural generation of materials). That is, now the calculations for baking textures are already carried out in the engine itself, and the textures are not created, but compiled in advance. The compilation result (shader) is stored in a format that the engine understands, and when a model with this shader is displayed, the result is superimposed on the model.
How it works?
In the engine load the texture of any texture (material) in sizes of 1k. That is, the standard set is Base Color, ORM, Normal Map. Such textures are loaded with 10-20 pieces. For example, 4 varieties of metal, 5 varieties of leather, several varieties of plastic, wood and so on. All this is combined into shader functions so that you can easily connect them later. 1 invoice = 1 function.
After that, they create masks for the object we need. Here Substance Painter becomes necessary again - with the help of it masks are created on the object. That is, you need to specify in which places of the object which textures should be displayed, then to draw the desired texture in the right place on the object:
Above in the screenshot you can see how the flying robot is painted in bright colors. Briefly - this is done specifically to see which masks are located where where. The second screenshot shows one of the masks.
These masks are uploaded to the engine. They also create a normal map for each object separately in order to smooth the chamfers, display some small technical elements with the help of it and also load it into the engine.
Next, a new shader (material) is created, into which the created masks are added. The necessary shader functions are added with the desired textures (for example, rusty metal, plastic and fresh metal) and then the code is written (almost nothing needs to be written, after all, Epic Games did everything possible to make it convenient for us to work), in which we indicate how to mix masks correctly, which textures to display under which masks, how to display dirt texture and so on and so forth.
After everything is assembled, the shader is compiled and the result is displayed.
Well, it would seem that such a thing - after all, the same thing can be done in Painter and get a ready-made result. However, it is not. And tiling is to blame.
A bit about tiling
Tiling (literally - tiled, tile) - This is a repetition of the texture, as if the tile, if it is smaller than the area for texturing (UV). This is necessary in order to fill in the gaps that form in the UV space if the texture is smaller in size. The video card just starts duplicating it as many times as needed to close the gap. Tiling works in an interesting way - the video card calculates each texel texture (for example, 1k in size). And when it comes to the part that is duplicated, no calculations are already made, since they already exist. The video card simply copies and pastes the data. Copy paste. And it costs virtually nothing for performance. This is not so resource-demanding that it does not affect anything, even if you do a tiling of 10,000 * 10,000 repetitions (and repeat this with our example of about 10 billion texels for a minute about the numbers), your project will not slow down for a second.
Continue
That is, we can now take the invoice. Show in the right place on the object and tint (duplicate) it exactly as much as you need to achieve the desired quality. Due to tiling, the size of texels is very much reduced, which increases the quality of the texture itself.
The disadvantage of this approach is mathematics - now, to display textures on an object, the shader needs to calculate various operations many times to display the final result, and instead of the standard 3 textures, the engine needs to take into account masks, mixing normals, colors, and so on.
In fact, the loss in the calculations is leveled:
- You can and will reuse invoiced functions. Time after time at other objects. That is, the calculations will be the same in total, but the number of texture maps themselves will be less at times. You no longer need to create new textures for each object, just define areas for textures and use the same textures.
- You can create smaller mask sizes — for example, 128 by 128 pixels. Which reduces the calculations by hundreds of times.
- You can tile textures as you please, achieving a result that cannot be achieved using the standard texture method.
- By adding other calculations and masks, you can play with individual channels, for example, make the roughness channel tiling smaller than color maps, thereby disrupting the visual repetition of the picture and creating a feeling of uniqueness of the entire surface.
- You can impose texture functions in such a way that they shift relative to the coordinates of the object in world space - this way you can put 2 identical objects with the same shaders, but they will both look unique.
It should be understood that this approach is not for all platforms. For example, mobile games are already difficult to assemble in this way because of the complexity of the calculations.
The simplest example of the disadvantages of the standard approach to texturing and the new Material Layer System (as the guys from Epic Games called this approach) is Final Fantasy 15. In order to improve the quality of the picture, they released a pack with 4k textures. And what is 4K texture? This is 16 million texel miscalculations per channel. And if there are 9 of them for the PBR standard?
And here the power of the System of Layers of Materials begins to emerge as much as possible. To collect clothes on the character using textures, it is enough to use 3-4 textures (maybe more). In total, it will be less than standard high-resolution textures, performance is approximately at the same level, and quality can be controlled by tiling and set much higher.
Material layer system
The guys from Epic Games went further and presented a beta version of the “Material Layer System”, which did not create hype and turned out to be quite buggy.
An example of her work can be seen in this video:
Based on the fact that the system was not yet suitable for work, we familiarized ourselves with it, were glad that someday we would finish it, but for now we refused to work with it and switched to creating shaders manually, specifying each mask in the shader directly.
As a result, we began to try and experiment.
How we got rid of normal maps
At first, working with textures didn’t go quite smoothly - we achieved the desired effect with textures, but we were still very much inhibited by the normal map, since it needed to be generated for each object to create a feeling of beautiful chamfers. Despite the quality of the textures created by us, when approaching the camera object, the bevels left much to be desired even with 8k textures (I recall that we were developing a project for VR). But 8k texture is a very large volume of texels. So big that 2 full sets of textures squeezed FPS up to 45 frames (for VR you need 90).
Then we got acquainted with the method of creating bevels, which I talked about briefly in the 4th part. Creating chamfers on object models made it possible to get rid of normal maps almost completely. Yes, we have increased the polygon models, but not more than 20-40%, while the quality of the bevels skyrocketed.
This approach allowed us to get rid of another problem - seams on the edges. Creating chamfers on the model, it was no longer necessary to cut the model along hard edges. In principle, there were no hard edges on the models, so the islands became large, they began to include large spaces, and now that we are applying texture to the models, there are practically no seams on the models.
This does not mean that now on all objects we do not have a separate normal map. Simply, most of the standard objects can do with chamfers in models without an additional normal map.
Ultimately, gradually reducing the masks, increasing and complicating the shaders, we began to create complex materials that allow us to texture very beautiful surfaces:
Above the floor consists of 2 textures - iron strips - 32x32 pixels and hexagons - 32x32 pixels. The material has a very complex formula - a very large number of operations for calculations - about 295 instructions. For ordinary material, such a shader would require more processing power, but we use only 32x32 = 1024 texels per channel. 9 channels = 10k texels, which must be taken into account when calculating this material + mask 128x128. A very large number of operations are leveled by a small number of texels for processing. As a result, we got a beautiful picture with a very fast and easy shader.
Due to masks, competent control of tiling and channels, you can create very complex shaders that will generate beautiful materials and at the same time practically do not eat resources.
For example, at the moment we use about 10-15 textures for the entire project (plus several unique fully textured objects using the standard method). The same metal is on almost every object. It changes in shaders - we add different colors to the material, we shift texture roughness maps, apply scratches on the mask, and their coordinates control the object coordinates (if we are talking about static objects), which leads to unique objects with their chips, cracks, dirt .
When increasing the screen resolution, it’s enough for us to simply adjust the tiling so that the number of texels matches the number of pixels on the screen. With the standard texturing method, you will have to shovel all the textures, pick up old projects in Painter and re-save them. And you need to make sure that the texture does not go. And then all this will need to be re-imported into the engine and make sure that everything will be fine there, that the shaders will quickly calculate larger textures than before.
To think with textures
When I talked with 3D artists on the topic of textures, I was repeatedly told that most objects cannot be assembled using textures, that this requires a separate texture with unique patterns and other components. For example, here is this gazebo:
The complexity of representing this object in the textured plan is that it has unique moments:
The belt pattern on top of the fabric can be made a separate texture and simply applied over the fabric texture. Or sew a belt into the fabric texture, and then we get a unique fabric texture with a belt:
When using this texture, the sewing of belts to the fabric will be constantly repeated in the same area, but this will not be evident.
Wet spots are made by a mask and dirt or something else is applied. And it already looks unique.
Fringe is also distinguished by texture, and its size will be very small, as it repeats. You can display it on the model through the mask.
A unique pattern on a metal hook can be applied either with a decal or with a separate layer of a small normal card, which can be smoothed under the sweep position and developed through the mask.
Folds on a roll of fabric can be realized using geometry or masking with shading. In the current generation of iron, the addition of a small number of vertices will not cause any load, and you can always hide them with lods at a distance.
Wooden objects can be chamfered, and thereby completely remove the normal map from the calculations. And so on. The most important thing here is that all this can be adjusted very quickly without third-party programs and wasting time.
And most importantly, all these textures can be used in any other shader, adjusting colors and spots.
Exceptions
Most, I would say, 95% of all objects in the game are covered by this method. In general, even handmade painting falls under the texture and can be implemented through it. However, not all objects at this technological stage can be implemented. For example, complex characters who have special elements. And even if you think carefully about them, you can cover them with textures - it is important to see them in a timely manner, cut them off and darken them.
I was offered to demonstrate the sofa (picture below) as an element that cannot be textured.
However, if you look closely, the sofa has 3 textures (leather on top, upholstery, wood for legs) and 2 difficulties - these are folds and seams. Foldings can be imitated in 2 ways:
- Additional vertices.
- An additional small normal map that will emit fold waves (a more attractive method).
The same applies to seams - they can be highlighted with a mask and enlighten the texture for seams or, again, with an additional normal map.
All breaks, all transitions can be simulated with textures and masks, creating the same result, but with a smaller number of textures (we just need to use the textures of the standard fabric for our project and just change its color in the shader directly).
Here you can ask a question - what to do with the fading around the pillows? Masks solve such problems with a bang =)
Further we can use the same textures for chairs. For other sofas, for chairs with the same fabric on the seat. And we can diversify all this by multiplying the colors of the textures by the ones we need. And we don’t need to create textures from scratch - just collect the masks and correctly apply texture layers. Thus, we will reduce the volume of loaded textures, but maintain the quality and even raise it. However, it is worth noting that this is our pipeline, and the collection of materials may differ from studio to studio, platforms and projects in general.
Surface artist
And so we smoothly approached the artist on the surfaces. The main task of the surface artist is to learn to see what can be done with textures, what are vertexes, and what is the standard method of texturing. Understand which masks to use and where to achieve the desired result.
You also need to understand that not everything can be done with masks - it happens that some objects must have a normal map with a high-poly model in order to convey all the subtleties of surface bends. For example, complex bends of clothing fabrics on a character, or the subtleties of details on weapons. The fabric itself, again, is already textured using textures and masks.
Recognition of textures, it seems to me, is a rather difficult task, because our brain is aimed at unique textures, as it is just used to working with them. Moreover, this is the standard of the gaming industry, which is the basis of everything. But once upon a time, the standard was a simple color texture without additional parameters.
It is important to learn how to use Substance Designer - this is the program that allows you to create your own masks and textures of very high quality.
And the guys from Epic Games have posted a wonderful article, " Jobs in Unreal Engine - Surface Artist ", which discusses the requirements for becoming a full-fledged surface artist. I highly recommend that you familiarize yourself with them in order to understand where to grow and what to strive for.
Instead of a conclusion:
My name is Denis Kuznetsov, and I represent Qbercat Studio, we are also developing the Movies Tycoon game (at the moment we do not post information about the game, however, we have a contact group in which we plan to release developer diaries and promotional materials. Therefore, do not be surprised that the group is empty) and almost all of our materials are created exclusively by the invoice method. Our studio has three 3D artists and 1 surface artist. On the 1st artist on the surface on average 3-5 3D-artists are enough. It all depends on the complexity of the shaders, the final result, the platform and the project itself.
Special thanks to Snake from the discord chat " Unreal Engine - RuCommunity " with which we generated conclusions in a heated debate.
Thanks to Flakky for editing the text.
Remember, if you see any inaccuracies or incorrect information in the article, I will always be glad to hear from you. These tutors are not created for advertising, but so that everyone can get involved in the work as quickly as possible, understanding the very essence of texturing and its types.
Thank you for your attention =)
Source: https://habr.com/ru/post/461545/
All Articles