Making the database available for remote connection
To begin with, there are times when you need to make an application with a connection to the database. This is done so as not to delve into the backend development and concentrate on the frontend due to lack of hands and skills. I do not presume to say that my solution will be safe, but it works.
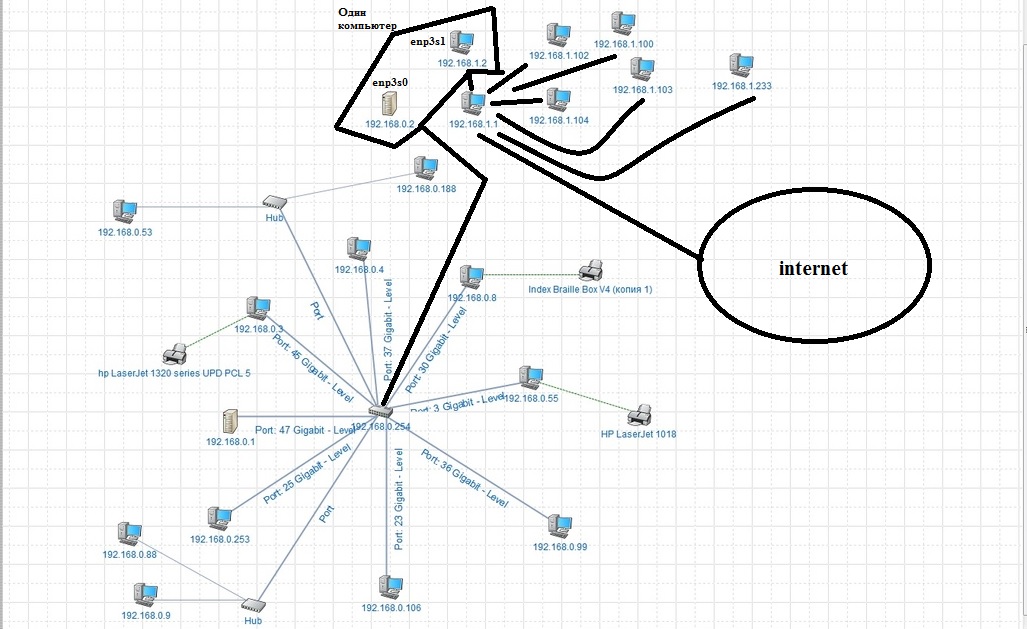
Since I do not like to pay for hosting, I used the network at my work, there is a white IP there. Here is its structure:
')
I have access to several computers more precisely to 192.168.1.2 (aka 192.168.0.2) Linux is there and to 192.168.0.3 with Windows. In general, for my application, I chose mysql and looked at what is on Linux. It was already installed there, but no one knows the password, and those who knew forgot (those who worked before me). Having found out that nobody needs him, I deleted it and tried to reinstall it. There was not enough memory, and since I would have to connect a monitor and keyboard with a mouse to it to fix this error, I decided to quit this business. Moreover, a Windows machine is much more powerful and plus everything, I myself have it on my home laptop. In principle, I will not describe the installation itself, there are a bunch of manuals and videos about it. Having installed mysql on a Windows machine, I decided to backup the tables from the laptop to the workstation.
This is done like this (in my case):
Next, in the new database, create the database and restore the backup on the "new" machine.
The backup file must be put on a new machine and possibly if not in the utility directory then the full path to it. (I just uploaded a backup to the github and cloned it to a new machine). I would add how the tables themselves are created, but I did not save the screenshots, and I think it’s not difficult even for a 2-3 year student.
When I restored all the tables, it's time to make remote access to the database accessible. In general, such commands did not lead to success (issued only read permissions to select)
More precisely, I could connect to the database only with a team,
but this one couldn’t
it didn’t suit me and couldn’t connect via this address and from root.
The mysql workbench program helped in the settings, change localhost to% and it works, although client did not help it. Now you can connect to the database from the console or from the code from any address.

You also need to make a home or enterprise network and turn off the Windows firewall otherwise you can’t even ping this machine (not that it connects to the database).
Half the work is done, then I need to be able to connect to the database from home.
As can be seen from the network diagram, then you need to go from 192.168.0.3 to 192.168.1.1 (router) to the Internet, let's go in the opposite direction. Set up the route from 192.168.1.1 to 192.168.1.2 like this:

In general, the picture does not show - I will write with my hands:
This can only be done on one subnet, that is, you cannot immediately forward it to the address 192.168.0.2 or 192.168.0.3
This is necessary so that the router knows where the 192.168.0.0/24 subnet is located (learn the basics of networks, this is useful).
Now we add the probros of port 3306 (the mysql port is defaulted (if you just did not change it during installation)) to the address 192.168.1.2

It remains to do the most difficult thing is to do forwarding on a Linux machine (there are two network cards 192.168.1.2 on it (interface enp3s1) and 192.168.0.2 (interface enp3s0) so that network cards know what to transfer them from 192.168.1.2 to 192.168.0.2, and then to our windows machine with mysql.
Those. The 1st line means that we accept the first connection, the 2nd and 3rd that you can send packets on both sides, the 4th and 5th means replacing the destination address and source. And voila, you can connect from home through mysql. And finally, my C ++ code that does this:
Now you can safely drop this program to anyone, and you do not need to rewrite it to work locally.
Since I do not like to pay for hosting, I used the network at my work, there is a white IP there. Here is its structure:
')
I have access to several computers more precisely to 192.168.1.2 (aka 192.168.0.2) Linux is there and to 192.168.0.3 with Windows. In general, for my application, I chose mysql and looked at what is on Linux. It was already installed there, but no one knows the password, and those who knew forgot (those who worked before me). Having found out that nobody needs him, I deleted it and tried to reinstall it. There was not enough memory, and since I would have to connect a monitor and keyboard with a mouse to it to fix this error, I decided to quit this business. Moreover, a Windows machine is much more powerful and plus everything, I myself have it on my home laptop. In principle, I will not describe the installation itself, there are a bunch of manuals and videos about it. Having installed mysql on a Windows machine, I decided to backup the tables from the laptop to the workstation.
This is done like this (in my case):
mysqldump -uroot -p your_base > dump_file.sql Next, in the new database, create the database and restore the backup on the "new" machine.
mysql -h localhost -u root -p create database your_base; use your_base; mysql -uroot -p your_base < dump_file.sql show tables; The backup file must be put on a new machine and possibly if not in the utility directory then the full path to it. (I just uploaded a backup to the github and cloned it to a new machine). I would add how the tables themselves are created, but I did not save the screenshots, and I think it’s not difficult even for a 2-3 year student.
When I restored all the tables, it's time to make remote access to the database accessible. In general, such commands did not lead to success (issued only read permissions to select)
create user 'client'@'%' IDENTIFIED by 'client'; grant select on your_base . * to 'client'@'%'; flush privileges; More precisely, I could connect to the database only with a team,
mysql -h localhost -u client -pclient but this one couldn’t
mysql -h 192.168.0.3 -u client -pclient it didn’t suit me and couldn’t connect via this address and from root.
The mysql workbench program helped in the settings, change localhost to% and it works, although client did not help it. Now you can connect to the database from the console or from the code from any address.
You also need to make a home or enterprise network and turn off the Windows firewall otherwise you can’t even ping this machine (not that it connects to the database).
Half the work is done, then I need to be able to connect to the database from home.
As can be seen from the network diagram, then you need to go from 192.168.0.3 to 192.168.1.1 (router) to the Internet, let's go in the opposite direction. Set up the route from 192.168.1.1 to 192.168.1.2 like this:
In general, the picture does not show - I will write with my hands:
route add 192.168.0.0 mask 255.255.255.0 gateway 192.168.1.2 This can only be done on one subnet, that is, you cannot immediately forward it to the address 192.168.0.2 or 192.168.0.3
This is necessary so that the router knows where the 192.168.0.0/24 subnet is located (learn the basics of networks, this is useful).
Now we add the probros of port 3306 (the mysql port is defaulted (if you just did not change it during installation)) to the address 192.168.1.2
It remains to do the most difficult thing is to do forwarding on a Linux machine (there are two network cards 192.168.1.2 on it (interface enp3s1) and 192.168.0.2 (interface enp3s0) so that network cards know what to transfer them from 192.168.1.2 to 192.168.0.2, and then to our windows machine with mysql.
sudo iptables -A FORWARD -i enp3s1 -o enp3s0 -p tcp --syn --dport 3306 -m conntrack --ctstate NEW -j ACCEPT sudo iptables -A FORWARD -i enp3s1 -o enp3s0 -m conntrack --ctstate ESTABLISHED,RELATED -j ACCEPT sudo iptables -A FORWARD -i enp3s0 -o enp3s1 -m conntrack --ctstate ESTABLISHED,RELATED -j ACCEPT sudo iptables -t nat -A PREROUTING -i enp3s1 -p tcp --dport 3306 -j DNAT --to-destination 192.168.0.3 sudo iptables -t nat -A POSTROUTING -o enp3s0 -p tcp --dport 3306 -d 192.168.0.3 -j SNAT --to-source 192.168.1.2 sudo service iptables-persistent save Those. The 1st line means that we accept the first connection, the 2nd and 3rd that you can send packets on both sides, the 4th and 5th means replacing the destination address and source. And voila, you can connect from home through mysql. And finally, my C ++ code that does this:
//DataBaseConnection.cpp #include "DataBaseConnection.h" DataBaseConnection::DataBaseConnection() { } void DataBaseConnection::Connect() { // conn = mysql_init(NULL); if (conn == NULL) { // – fprintf(stderr, "Error: can'tcreate MySQL-descriptor\n"); //exit(1); // } // if (!mysql_real_connect(conn, "192.168.0.3", "root", "password", "your_base", NULL, NULL, 0)) { // // fprintf(stderr, "Error: can't connect to database: %s\n", mysql_error(conn)); } else { // - "Success!" fprintf(stdout, "Success!\n"); } } std::vector<std::string> DataBaseConnection::Query() { vectordrum.clear(); std::string query = "SELECT * FROM drum where id=0"; const char * q = query.c_str(); qstate = mysql_query(conn, q); if (!qstate) { res = mysql_store_result(conn); while (row = mysql_fetch_row(res)) { //printf("ID: %s,Position: %s, Image: %s\n", row[0], row[1], row[2]); vectordrum.push_back(row[2]); } } else { std::cout << "Query failed:" << mysql_error(conn) << std::endl; } return vectordrum; } void DataBaseConnection::Close() { // mysql_close(conn); } DataBaseConnection::~DataBaseConnection() { vectordrum.clear(); } //DataBaseConnection.h #pragma once #include <iostream> #include <mysql.h> #include <vector> #pragma comment(lib,"mysqlcppconn.lib") #pragma comment(lib,"libmysql.lib") class DataBaseConnection { public: DataBaseConnection(); void Connect(); std::vector<std::string> Query(); void Close(); ~DataBaseConnection(); MYSQL *conn; MYSQL_ROW row; MYSQL_RES *res; int qstate; std::vector<std::string> vectordrum; }; Now you can safely drop this program to anyone, and you do not need to rewrite it to work locally.
Source: https://habr.com/ru/post/461503/
All Articles