Create Azure DevOps extension
We have a project with a customized CI / CD process. When the developer finishes the task and injects his changes into develop \ qa, the build automatically launches, which puts the new version of the application on the test environment. In an ideal world, the tester automatically learns about the tasks that were completed, and on what environment they are deployed. In this case, the workflow becomes continuous, uninterrupted and requires less communication, distracting from concentrated work. In practice, everything is not so rosy.
So one morning, the team leader asked me: “Can you make such a thing for TFS so that the tags that are attached to the build hang the specified tag after passing through this build?”
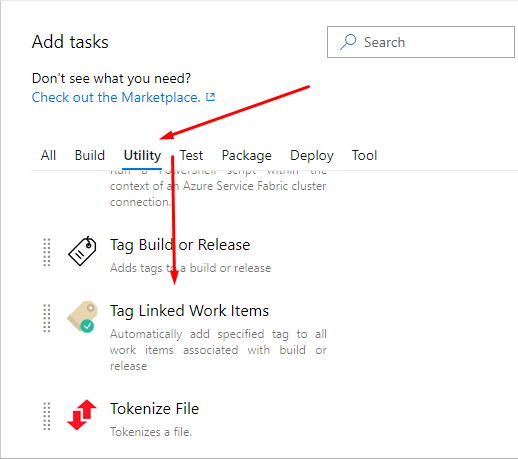
I decided to implement my build \ release task for the task. Moreover, the sources of all build tasks are on github , and all information is available.
')
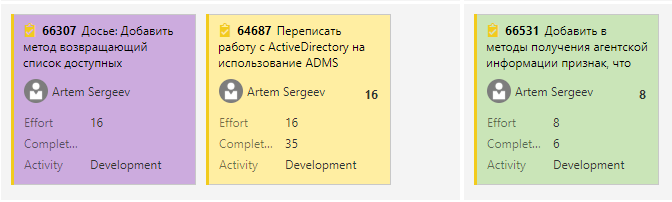
Our task marks the color of the task, which is completed, but not tested. Thanks to this, the developer will immediately notice if he forgot to put the desired tag, and QA immediately sees what needs to be checked. This visualizes the status of tasks and speeds up work on the project.
In this article I will talk about the implementation of the necessary logic, packaging in extension. So if you are interested in how to create such a plugin, welcome to cat.
For the most impatient: github and a ready extension on the marketplace .

Azure DevOps has the ability to create filters that allow you to color the masks on the board in different colors.
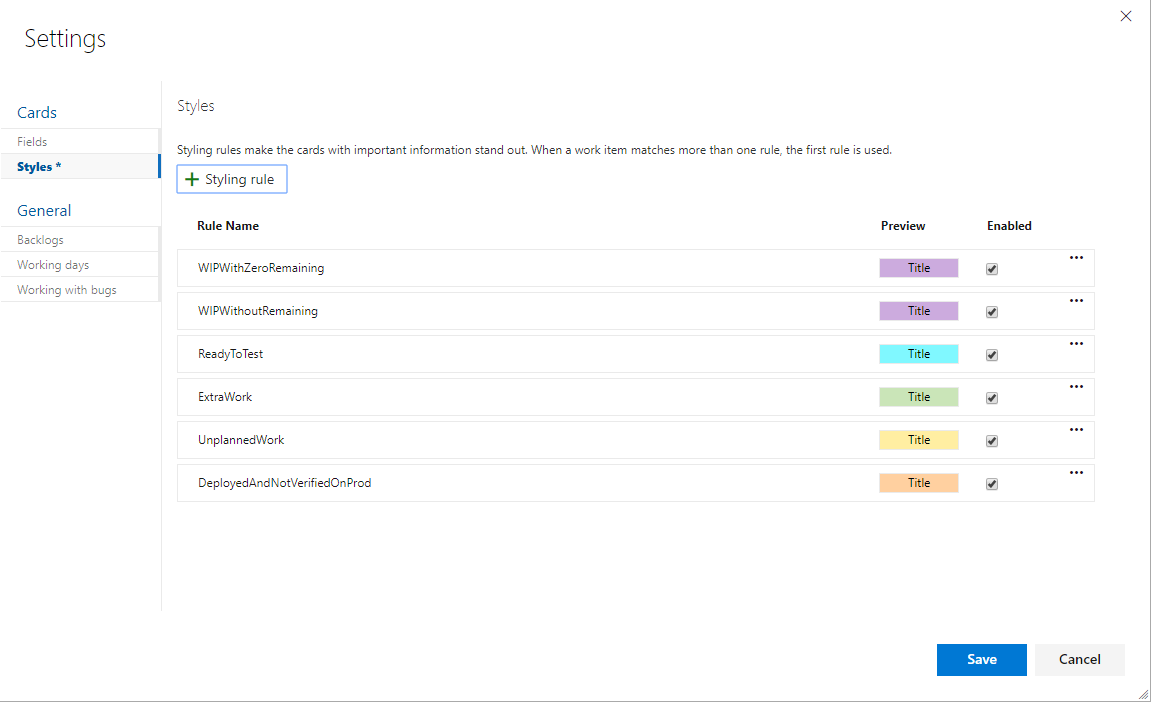
We are interested in tasks that:
Tags are most suitable for points b and c, but manually setting them is disgusting, and everyone forgets to do it. So we’ll write an extension, which after the deployment will automatically affix them.
Thus, we need the custom build \ release step to reduce the human factor (the developer forgot to put a tag) and to help QA (you can immediately see what needs to be checked).
To develop the extension, we need:
Note the presence of the -g flag
Microsoft has some good documentation in which they are just at the top and tell how to create some kind of extension. In addition, in the same way there is a dock on creating a build \ release task.
In my opinion, there are drawbacks in both articles from the point of view of detailing or explaining certain points, so I will rely on them, focusing on those points that in reality seemed to me not quite obvious.
Generally speaking, you can write build \ release step in a fairly large number of languages. I will give an example on TypeScript.
The very first version of build step'a was written in PowerShell'e, only our team and a couple of people knew about it. Almost immediately, we were faced with the fact that if you try to add task to the build that runs on the docker build agent, then there will be no PowerShell and the task will simply not work. In addition, from time to time, various kinds of errors took off from people, which were attributed to PowerShell kooky. Hence the conclusion - the solution should be cross-platform.
Next, we need to install the library for the implementation of build step'a
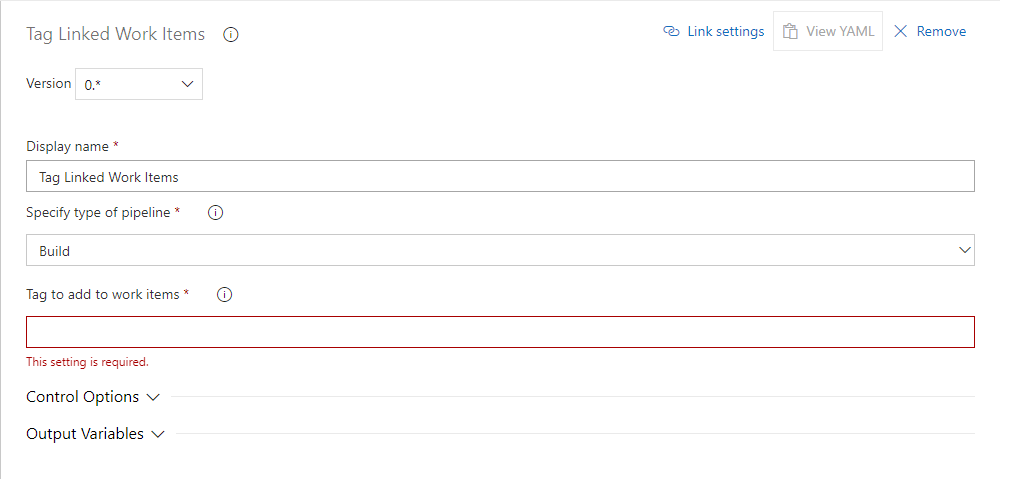
First of all, inside the TaskFolder we need to create the task.json file - this is the manifest file for the build step itself. It contains service information (version, creator, description), an environment for launching and configuration of all inputs, which we will see in the future on the form.
I propose to study its structure in more detail in the documentation .
In our case, there will be 2 input'a on the form - the tag that we will add to work items, and the choice of the pipeline type (build or release).
By name, in the code below we will refer to the value of each of the inputs.
Create an index.ts in TaskFolder and write the first piece of code
It is worth noting that TFS has a very rich documentation on the existing REST API, but for now, all we need to do is get work items attached to the build.
Install a library for easy query execution
Add it to index.ts
We implement the function, which from the current build will get the attached work items
To access the REST API, we need to get accessToken
Next, set the header authorization to “Bearer $ {accessToken}”
We return to receiving work items bound to the build.
Url Azure DevOps server and the name of TeamProject can be obtained from environment variables as follows
As a response to a GET request by URL
we get this kind of JSON
For each url, through the same REST API, you can get data on the work item.
At the moment, our run method is as follows.
The method for getting work items from the release is almost identical to that already described.
The next step is to get the current set of tags for each of the received work items and add the one we specified.
Let's add the run method:
Let's consider adding a tag to work items.
First, we need to get the tag that we indicated on the form.
Because 2 steps back we received urls to the API of each work item, then with their help we can easily request a list of current tags:
In response, we get this JSON:
We take all the old tags and add a new one to them:
We send a patch request to work item api:
For the beauty of everything that happens, I propose to add in tsconfig.json to compilerOptions
Because our index.js is located in the dist folder and then we will copy it to the final package as well, we need to fix task.json a bit:
In vss-extension.json in the files section, you must explicitly declare what will be copied to the final package.
Last step - we need to pack our extension.
To do this, run the command:
After execution, we get a * .vsix file, which will be further installed in TFS.
PS * .vsix file is essentially an ordinary archive, you can easily open it through 7-zip, for example, and see that everything you need is really inside.
If you want to have an image when you select your build step while adding it to the pipeline, then this file should be placed next to task.json and named icon.png. You do not need to make any changes to task.json itself.
You can add a section to vss-extension.json:
This image will be displayed in the gallery of local extensions.
In this article, I showed how to make a plug-in for Azure DevOps, which automatically puts the right tag to the tasks for the release. Colleagues built it into the pipeline, which runs on both windows and linux build agents.
Thanks to this plugin, it has become easier for us to work with tasks and build continuous work on the project. Developers are no longer distracted by extraneous things, and QA quickly learns about new tasks for testing.
Once again, I recall the download link : link
We look forward to feedback and suggestions for revision :)
There is also an idea to add the ability to remove the specified tags into the plugin. If the tester found a bug and had to deploy the task again, it would be possible to get rid of the “Verified“ tags).
So one morning, the team leader asked me: “Can you make such a thing for TFS so that the tags that are attached to the build hang the specified tag after passing through this build?”
I decided to implement my build \ release task for the task. Moreover, the sources of all build tasks are on github , and all information is available.
')
Our task marks the color of the task, which is completed, but not tested. Thanks to this, the developer will immediately notice if he forgot to put the desired tag, and QA immediately sees what needs to be checked. This visualizes the status of tasks and speeds up work on the project.
In this article I will talk about the implementation of the necessary logic, packaging in extension. So if you are interested in how to create such a plugin, welcome to cat.
For the most impatient: github and a ready extension on the marketplace .
Azure DevOps has the ability to create filters that allow you to color the masks on the board in different colors.
We are interested in tasks that:
- completed
- poured into the test environment
- not yet verified QA
Tags are most suitable for points b and c, but manually setting them is disgusting, and everyone forgets to do it. So we’ll write an extension, which after the deployment will automatically affix them.
Thus, we need the custom build \ release step to reduce the human factor (the developer forgot to put a tag) and to help QA (you can immediately see what needs to be checked).
Prerequisites
To develop the extension, we need:
- favorite IDE
- installed TypeScript + node.js + npm (now I have installed versions 3.5.1 \ 12.4 \ 6.9.0)
- tfx-cli - library for packaging extension'a (npm i -g tfx-cli).
Note the presence of the -g flag
Microsoft has some good documentation in which they are just at the top and tell how to create some kind of extension. In addition, in the same way there is a dock on creating a build \ release task.
In my opinion, there are drawbacks in both articles from the point of view of detailing or explaining certain points, so I will rely on them, focusing on those points that in reality seemed to me not quite obvious.
Generally speaking, you can write build \ release step in a fairly large number of languages. I will give an example on TypeScript.
Why TypeScript?
The very first version of build step'a was written in PowerShell'e, only our team and a couple of people knew about it. Almost immediately, we were faced with the fact that if you try to add task to the build that runs on the docker build agent, then there will be no PowerShell and the task will simply not work. In addition, from time to time, various kinds of errors took off from people, which were attributed to PowerShell kooky. Hence the conclusion - the solution should be cross-platform.
Project structure
|--- README.md |--- images |---extension-icon.png |--- TaskFolder ( build\release step'a) |--- vss-extension.json ( ) Next, we need to install the library for the implementation of build step'a
- cd TaskFolder
- npm init
- npm install azure-pipelines-task-lib --save && npm install @ types / node --save-dev && npm install @ types / q --save-dev
- tsc --init
Development extension
First of all, inside the TaskFolder we need to create the task.json file - this is the manifest file for the build step itself. It contains service information (version, creator, description), an environment for launching and configuration of all inputs, which we will see in the future on the form.
I propose to study its structure in more detail in the documentation .
In our case, there will be 2 input'a on the form - the tag that we will add to work items, and the choice of the pipeline type (build or release).
"inputs": [ { "name": "pipelineType", "type": "pickList", "label": "Specify type of pipeline", "helpMarkDown": "Specify whether task is used for build or release", "required": true, "defaultValue": "Build", "options":{ "Build": "Build", "Release": "Release" } }, { "name": "tagToAdd", "type": "string", "label": "Tag to add to work items", "defaultValue": "", "required": true, "helpMarkDown": "Specify a tag that will be added to work items" } ] By name, in the code below we will refer to the value of each of the inputs.
Create an index.ts in TaskFolder and write the first piece of code
import * as tl from 'azure-pipelines-task-lib/task'; async function run() { try { const pipelineType = tl.getInput('pipelineType'); } catch (err) { tl.setResult(tl.TaskResult.Failed, err.message); } } run(); It is worth noting that TFS has a very rich documentation on the existing REST API, but for now, all we need to do is get work items attached to the build.
Install a library for easy query execution
npm install request --save && npm install request-promise-native --save Add it to index.ts
import * as request from "request-promise-native"; We implement the function, which from the current build will get the attached work items
A little bit about authorization
To access the REST API, we need to get accessToken
const accessToken = tl.getEndpointAuthorization('SystemVssConnection', true).parameters.AccessToken; Next, set the header authorization to “Bearer $ {accessToken}”
We return to receiving work items bound to the build.
Url Azure DevOps server and the name of TeamProject can be obtained from environment variables as follows
const collectionUrl = process.env["SYSTEM_TEAMFOUNDATIONCOLLECTIONURI"]; const teamProject = process.env["SYSTEM_TEAMPROJECT"]; async function getWorkItemsFromBuild() { const buildId = process.env["BUILD_BUILDID"]; const uri = `${collectionUrl}/${teamProject}/_apis/build/builds/${buildId}/workitems`; const options = createGetRequestOptions(uri); const result = await request.get(options); return result.value; } function createGetRequestOptions(uri: string): any { let options = { uri: uri, headers: { "authorization": `Bearer ${accessToken}`, "content-type": "application/json" }, json: true }; return options; } As a response to a GET request by URL
${collectionUrl}/${teamProject}/_apis/build/builds/${buildId}/workitems we get this kind of JSON
{ "count": 3, "value": [ { "id": "55402", "url": "https://.../_apis/wit/workItems/55402" }, { "id": "59777", "url": "https://.../_apis/wit/workItems/59777" }, { "id": "60199", "url": "https://.../_apis/wit/workItems/60199" } ] } For each url, through the same REST API, you can get data on the work item.
At the moment, our run method is as follows.
The method for getting work items from the release is almost identical to that already described.
async function run() { try { const pipelineType = tl.getInput('pipelineType'); const workItemsData = pipelineType === "Build" ? await getWorkItemsFromBuild() : await getWorkItemsFromRelease(); catch (err) { tl.setResult(tl.TaskResult.Failed, err.message); } The next step is to get the current set of tags for each of the received work items and add the one we specified.
Let's add the run method:
async function run() { try { const pipelineType = tl.getInput('pipelineType'); const workItemsData = pipelineType === "Build" ? await getWorkItemsFromBuild() : await getWorkItemsFromRelease(); workItemsData.forEach(async (workItem: any) => { await addTagToWorkItem(workItem); }); } catch (err) { tl.setResult(tl.TaskResult.Failed, err.message); } } Let's consider adding a tag to work items.
First, we need to get the tag that we indicated on the form.
const tagFromInput = tl.getInput('tagToAdd'); Because 2 steps back we received urls to the API of each work item, then with their help we can easily request a list of current tags:
const uri = workItem.url + "?fields=System.Tags&api-version=2.0"; const getOptions = createGetRequestOptions(uri) const result = await request.get(getOptions); In response, we get this JSON:
{ "id": 55402, "rev": 85, "fields": { "System.Tags": "added-to-prod-package; test-tag" }, "_links": { "self": { "href": "https://.../_apis/wit/workItems/55402" }, "workItemUpdates": { "href": "https://.../_apis/wit/workItems/55402/updates" }, "workItemRevisions": { "href": "https://.../_apis/wit/workItems/55402/revisions" }, "workItemHistory": { "href": "https://.../_apis/wit/workItems/55402/history" }, "html": { "href": "https://..../web/wi.aspx?pcguid=e3c978d9-6ea1-406f-987d-5b03e24973a1&id=55402" }, "workItemType": { "href": "https://.../602fd27d-4e0d-4aec-82a0-dcf55c8eef73/_apis/wit/workItemTypes" }, "fields": { "href": "https://.../_apis/wit/fields" } }, "url": "https://.../_apis/wit/workItems/55402" } We take all the old tags and add a new one to them:
const currentTags = result.fields['System.Tags']; let newTags = ''; if (currentTags !== undefined) { newTags = currentTags + ";" + tagFromInput; } else { newTags = tagFromInput; } We send a patch request to work item api:
const patchOptions = getPatchRequestOptions(uri, newTags); await request.patch(patchOptions) function getPatchRequestOptions(uri: string, newTags: string): any { const options = { uri: uri, headers: { "authorization": `Bearer ${accessToken}`, "content-type": "application/json-patch+json" }, body: [{ "op": "add", "path": "/fields/System.Tags", "value": newTags }], json: true }; return options } Assembly and packaging extension'a
For the beauty of everything that happens, I propose to add in tsconfig.json to compilerOptions
"outDir": "dist" . Now, if we execute the tsc command inside the TaskFolder, we get the dist folder, inside which will be index.js, which will go to the final package.Because our index.js is located in the dist folder and then we will copy it to the final package as well, we need to fix task.json a bit:
"execution": { "Node": { "target": "dist/index.js" } } In vss-extension.json in the files section, you must explicitly declare what will be copied to the final package.
"files": [ { "path": "TaskFolder/dist", "packagePath": "TaskFolder/dist" }, { "path": "TaskFolder/node_modules", "packagePath": "TaskFolder/node_modules" }, { "path": "TaskFolder/icon.png", "packagePath": "TaskFolder/icon.png" }, { "path": "TaskFolder/task.json", "packagePath": "TaskFolder/task.json" } ] Last step - we need to pack our extension.
To do this, run the command:
tfx extension create --manifest-globs ./vss-extension.json After execution, we get a * .vsix file, which will be further installed in TFS.
PS * .vsix file is essentially an ordinary archive, you can easily open it through 7-zip, for example, and see that everything you need is really inside.
Add some beauty
If you want to have an image when you select your build step while adding it to the pipeline, then this file should be placed next to task.json and named icon.png. You do not need to make any changes to task.json itself.
You can add a section to vss-extension.json:
"icons": { "default": "images/logo.png" } This image will be displayed in the gallery of local extensions.
Install extension
- Go to tfs_server_url / _gallery / manage
- Click Upload extension
- We indicate the path or drag'n'drop'om throw over the previously received * .vsix file
- After verification passes, in the context menu of the extension, select view extension, on the opened page, select the collection in which you want to install it
- After this extension, you can start using it.
Using build step'a
- Open the pipeline you need
- Go to the add build step'a
- We are looking for extension
- We indicate all the necessary settings
- Enjoy life :)
Conclusion
In this article, I showed how to make a plug-in for Azure DevOps, which automatically puts the right tag to the tasks for the release. Colleagues built it into the pipeline, which runs on both windows and linux build agents.
Thanks to this plugin, it has become easier for us to work with tasks and build continuous work on the project. Developers are no longer distracted by extraneous things, and QA quickly learns about new tasks for testing.
Once again, I recall the download link : link
We look forward to feedback and suggestions for revision :)
PS
There is also an idea to add the ability to remove the specified tags into the plugin. If the tester found a bug and had to deploy the task again, it would be possible to get rid of the “Verified“ tags).
Source: https://habr.com/ru/post/461389/
All Articles