Charity Cloud: Migration Guide

Not so long ago, Mail.Ru Cloud Solutions (MCS) and the Welcome Mail.Ru service launched the Cloud for Charitable Funds project, thanks to which non-profit organizations can get MCS cloud platform resources for free. The Arithmetic of Good charity foundation took part in the project and successfully deployed part of its infrastructure based on MCS.
After validation, an NPO can receive virtual power from MCS, but further tuning requires certain qualifications. In this article we want to share specific instructions for setting up a server based on Ubuntu Linux for the main fund website and a number of subdomains using free SSL certificates. For many, this will be a simple guide, but we hope that our experience will be useful for other non-profit organizations, and not only.
FYI : what can I get from MCS? 4 CPU, 32 GB RAM, 1 TB HDD, Ubuntu Linux OS, 500 GB object storage.
Step 1: start the virtual server
Let's get down to business immediately and create our virtual server (aka “instance”) in your personal MCS account. In the application store, you need to select and install a ready-made LAMP stack, which is a complex of server software (LAMP = Linux, Apache, MySQL, PHP), which is necessary for launching most websites.
')


Choose the appropriate configuration for the server and create a new SSH key. After clicking on the “Install” button, the server and LAMP stack will begin to install, it will take some time. The system will also offer to download a private key to the computer to control the virtual machine through the console, save it.
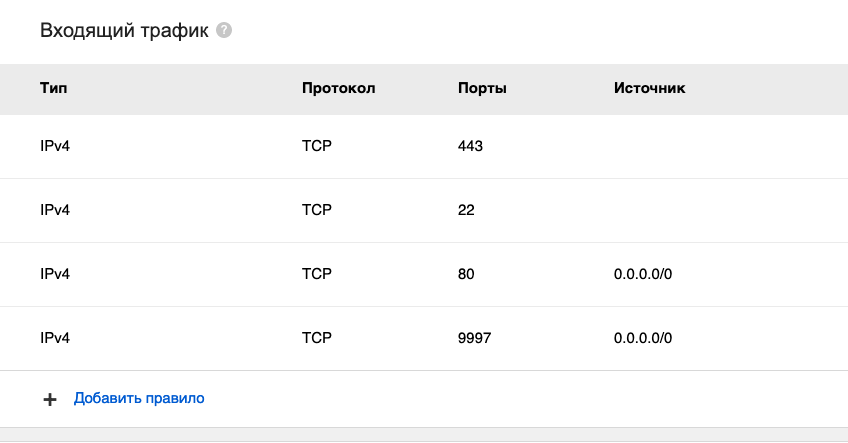
After installing the application, let's immediately configure the firewall, this is also done in your personal account: go to the section "Cloud Computing -> Virtual Machines" and select the "Configure firewall" item:

You need to add permission for incoming traffic through port 80 and 9997. This is necessary in the future to install SSL certificates and to work with phpMyAdmin. In the end, the ruleset should look like this:
Now you can connect to your server via the command line using the SSH protocol. To do this, type the following command, pointing to the SSH key on your computer and the external IP address of your server (you can find it in the "Virtual Machines" section):
$ ssh -i ////key.pem ubuntu@<ip_> During the first connection to the server, it is recommended to install all current updates on it and reboot it. To do this, run the following commands:
$ sudo apt-get update The system will receive a list of updates, install them using this command and follow the instructions:
$ sudo apt-get upgrade After installing the updates, restart the server:
$ sudo reboot Step 2: configure virtual hosts
Many NPOs need to contain several domains or subdomains at the same time (for example, the main site and several landing pages for promotional campaigns, etc.). All this can be conveniently hosted on a single server by creating multiple virtual hosts.
First, we need to create a directory structure for sites that will be displayed to visitors. Let's create some directories:
$ sudo mkdir -p /var/www/a-dobra.ru/public_html $ sudo mkdir -p /var/www/promo.a-dobra.ru/public_html And indicate the owner of the current user:
$ sudo chown -R $USER:$USER /var/www/a-dobra.ru/public_html $ sudo chown -R $USER:$USER /var/www/promo.a-dobra.ru/public_html The variable
$USER contains the name of the user you are currently logged in to (the default is the ubuntu user). Now the current user owns the public_html directories in which we will store the content.We also need to edit the permissions a bit to make sure that read access is allowed to the shared web directory, all files and folders contained in it. This is necessary for the site pages to display correctly:
$ sudo chmod -R 755 /var/www Your web server should now have the permissions necessary to display the content. In addition, now your user has the ability to create content in the necessary directories.
There is already an index.php file in the / var / www / html directory, let's copy it to our new directories - this will be our content for now:
$ cp /var/www/html/index.php /var/www/a-dobra.ru/public_html/index.php $ cp /var/www/html/index.php /var/www/promo.a-dobra.ru/public_html/index.php Now you need to make sure that the user can enter your site. To do this, first of all, we will configure the virtual host files, which determine how exactly the Apache web server will respond to requests to different domains.
By default, Apache has a virtual host file 000-default.conf, which we can use as a starting point. We are going to copy it to create virtual host files for each of our domains. We start from one domain, configure it, copy it to another domain, and then make the necessary edits again.
Ubuntu's default configuration requires that each virtual host file has a * .conf extension.
Let's start by copying the file for the first domain:
$ sudo cp /etc/apache2/sites-available/000-default.conf /etc/apache2/sites-available/a-dobra.ru.conf Open a new file in the editor with root privileges:
$ sudo nano /etc/apache2/sites-available/a-dobra.ru.conf Edit the data as follows, indicating port 80, your data for
ServerAdmin , ServerName , ServerAlias , as well as the path to the root directory of your site, save the file (Ctrl + X, then Y): <VirtualHost *:80> ServerAdmin e.valuisky@a-dobra.ru ServerName a-dobra.ru ServerAlias www.a-dobra.ru DocumentRoot /var/www/a-dobra.ru/public_html ErrorLog ${APACHE_LOG_DIR}/error.log CustomLog ${APACHE_LOG_DIR}/access.log combined <Directory /var/www/a-dobra.ru/public_html> Options -Indexes +FollowSymLinks +MultiViews AllowOverride All Require all granted </Directory> <FilesMatch \.php$> SetHandler "proxy:unix:/var/run/php/php7.2-fpm.sock|fcgi://localhost/" </FilesMatch> </VirtualHost> ServerName sets the primary domain, which must match the name of the virtual host. This must be your domain name. The second, ServerAlias , defines other names that should be interpreted as if it were the primary domain. This is convenient for using additional domain names, for example, using www.We copy this config for another host and also edit it by analogy:
$ sudo cp /etc/apache2/sites-available/a-dobra.ru.conf /etc/apache2/sites-available/promo.a-dobra.ru.conf You can create any number of directories and virtual hosts for your websites! Now that we have created our virtual host files, we need to include them. We can use the a2ensite utility to enable each of our sites as follows:
$ sudo a2ensite a-dobra.ru.conf $ sudo a2ensite promo.a-dobra.ru.conf By default, port 80 is closed in LAMP, and we will need it in the future to install an SSL certificate. Therefore, let's immediately edit the ports.conf file and then restart Apache:
$ sudo nano /etc/apache2/ports.conf Add a new line and save the file so that it looks like this:
Listen 80 Listen 443 Listen 9997 After completing the settings, you must restart Apache so that all changes take effect:
$ sudo systemctl reload apache2 Step 3: set up domain names
Next, you need to add DNS records that will point to your new server. To manage domains, our Arithmetic of Good Foundation uses the dns-master.ru service, we will show it by example.
The A-record setting for the main domain is usually indicated as follows (
@ sign):
An A-record for subdomains is usually indicated as follows:

The IP address is the address of the Linux server we just created. TTL can specify = 3600.
After a while, it will already be possible to access your site, but so far only through
http:// . In the next step, we will add https:// support.Step 4: configure free SSL certificates
For your main site and all sub-domains, you can get Let's Encrypt free SSL certificates. You can also configure their automatic renewal, which is very convenient. To obtain SSL certificates, install Certbot on your server:
$ sudo add-apt-repository ppa:certbot/certbot Install the Certbot package for Apache using
apt : $ sudo apt install python-certbot-apache Certbot is now ready for use, we execute the command:
$ sudo certbot --apache -d a-dobra.ru -d www.a-dobra.ru -d promo.a-dobra.ru This command runs certbot, the
-d switches specify the domain names for which the certificate is to be issued.If this is the first time you run certbot, you will be prompted to enter an email address and agree to the terms of service. After that, certbot will contact the Let's Encrypt server and then verify that you are really in control of the domain for which you requested the certificate.
If everything went well, certbot will ask how you want to configure the HTTPS configuration:
Please choose whether or not to redirect HTTP traffic to HTTPS, removing HTTP access. - - - - - - - - - - - - - - - - - - - - - - - - - - - - - - - - - - - - - - - - 1: No redirect - Make no further changes to the webserver configuration. 2: Redirect - Make all requests redirect to secure HTTPS access. Choose this for new sites, or if you're confident your site works on HTTPS. You can undo this change by editing your web server's configuration. - - - - - - - - - - - - - - - - - - - - - - - - - - - - - - - - - - - - - - - - Select the appropriate number [1-2] then [enter] (press 'c' to cancel): We recommend that you select option 2 and press ENTER. The configuration will be updated and Apache restarted to apply the changes.
Now your certificates are uploaded, installed and working. Try reloading your site using https: // and you will see the security icon in the browser. If you test your server with an SSL Labs Server Test , it will receive a grade of A.
Let's Encrypt certificates are only valid for 90 days, but the certbot package we just installed will renew the certificates automatically. To test the upgrade process, we can do a dry run certbot:
$ sudo certbot renew --dry-run If you don’t see any errors resulting from this command, then everything works!
Step 5: access to MySQL and phpMyAdmin
Many websites use databases. The phpMyAdmin tool for managing the database is already installed on our server. To access it, click on the link in your browser like:
https://<ip- >:9997 The password for root access can be obtained in your personal MCS account ( https://mcs.mail.ru/app/services/marketplace/apps/ ). Do not forget to change the root password the first time you log in!
Step 6: configure file upload via SFTP
It will be convenient for developers to upload files for your website through SFTP. To do this, we will create a new user, call him webmaster:
$ sudo adduser webmaster The system will ask you to set a password and enter some other data.
Change the owner of the directory with your website:
$ sudo chown -R webmaster:webmaster /var/www/a-dobra.ru/public_html Now let's change the SSH config so that the new user has access only to SFTP, and not to the SSH terminal:
$ sudo nano /etc/ssh/sshd_config Scroll the configuration file to the very end and add the following block:
Match User webmaster ForceCommand internal-sftp PasswordAuthentication yes ChrootDirectory /var/www/a-dobra.ru PermitTunnel no AllowAgentForwarding no AllowTcpForwarding no X11Forwarding no Save the file and reload the service:
$ sudo systemctl restart sshd Now you can connect to the server through any client for SFTP, for example, through FileZilla.
Total
- Now you know how to create new directories and configure virtual hosts for your websites on the same server.
- You can easily create the necessary SSL certificates - it's free, and they will be updated automatically.
- You can conveniently work with the MySQL database through the familiar phpMyAdmin.
- Creating new SFTP accounts and setting permissions does not require much effort. Such accounts can be transferred to third-party web developers and site administrators.
- Do not forget to periodically update the system, and also recommend making backups - in MCS, you can take “snapshots” of the entire system with one click, and then, if necessary, launch entire images.
Resources used that may be useful:
https://www.digitalocean.com/community/tutorials/apache-ubuntu-14-04-lts-ru
https://www.digitalocean.com/community/tutorials/apache-let-s-encrypt-ubuntu-18-04-ru
https://www.digitalocean.com/community/tutorials/how-to-enable-sftp-without-shell-access-on-ubuntu-18-04
By the way, here you can read on VC how our foundation has launched a platform for online education of orphans based on the MCS cloud.
Source: https://habr.com/ru/post/461155/
All Articles