We connect online maps to the navigator on the smartphone. Part 2 - vector cards
We are writing a server application that will generate PNG raster tiles based on online vector maps. Use web scraping with Puppeteer to get map data.
Content:
1 - Introduction. Standard raster maps
2 - Continuation. Writing a simple rasterizer for vector maps
3 - A special case. We connect the OverpassTurbo card
Continuation
And so we got to the most interesting topic. Imagine that we found a site with a map that we really want to add to our navigator. We do everything in accordance with the instructions from the previous part . We open the viewing of the contents of the site, and there are no pictures! Absolutely. Well, a couple of icons and that's it. And some other text file with a list of coordinates.
Congratulations, we found a vector map. Roughly speaking, it is rendered in real time by your browser. So she doesn’t need any prepared tiles at all. On the one hand, there are not so many vector maps so far. But this technology is very promising and over time they can become many times more. Well, we figured it out. And yet, what do we do now?
Firstly, you can try to download a browser of a very, very old version. One that does not support the functions required to render the map. It is possible that you will be shown a different version of the site. With raster map. Well, what you need to do with it you already know.
However, if this trick did not work, but you still really want to get this card, and, moreover, not in the smartphone’s browser, namely in your navigator, then there is a way.
main idea
We will proceed from the fact that we want to get a map that can be opened in any of the navigators. Then we need an adapter - a kind of intermediary that will generate tiles for us in PNG format.
It turns out that you need invent a bicycle develop another engine for visualizing vector data. Well, or you can write a script that will go to the site, letting it draw its own vector map on its own. And then it will wait for the download, take a screenshot, crop and return to the user. Perhaps I will choose the second option.
To take screenshots, I will use a “remote-control browser” - Headless Chrome. You can control it using the node js library Puppeteer . You can learn about the basics of working with this library from this article .
Hello World! Or create and customize a project
If you have not already installed Node.js then go to this or this page, select your operating system and perform the installation according to the instructions.
Create a new folder for the project and open it in the terminal.
$ cd /Mapshoter_habr We start the manager of creating a new project
$ npm init Here you can specify the name of the project ( package name ), the name of the file for entering the application ( entry point ) and the name of the author ( author ). For all other queries, we agree to the default parameters: do not enter anything and just press Enter . At the end - press y and Enter .
Next, install the necessary frameworks to work. Express for creating a server and Puppeteer for working with a browser.
$ npm install express $ npm i puppeteer As a result, the project configuration file package.json appears in the project folder. In my case, this:
{ "name": "mapshoter_habr", "version": "1.0.0", "description": "", "main": "router.js", "scripts": { "test": "echo \"Error: no test specified\" && exit 1" }, "author": "nnngrach", "license": "ISC", "dependencies": { "express": "^4.17.1", "puppeteer": "^1.18.1" } } I’ll add a start line to the scripts section to launch our application more conveniently.
"scripts": { "start": "node router.js", "test": "echo \"Error: no test specified\" && exit 1" }, Now create two files with the implementation of the basic functionality. The first file is the entry point to the application. In my case, router.js . He will create a server and do routing.
// const express = require( 'express' ) const mapshoter = require( './mapshoter' ) // , const PORT = process.env.PORT || 5000 // const app = express() app.listen( PORT, () => { console.log( ' ', PORT ) }) // // http://siteName.com/x/y/z app.get( '/:x/:y/:z', async ( req, res, next ) => { // const x = req.params.x const y = req.params.y const z = req.params.z // const screenshot = await mapshoter.makeTile( x, y, z ) // const imageBuffer = Buffer.from( screenshot, 'base64' ) // res.writeHead( 200, { 'Content-Type': 'image/png', 'Content-Length': imageBuffer.length }) // res.end( imageBuffer ) }) Now create a second file. He will control the browser and take screenshots. I have it called mapshoter.js .
const puppeteer = require( 'puppeteer' ) async function makeTile( x, y, z ) { // const browser = await puppeteer.launch() // const page = await browser.newPage() await page.goto( 'https://www.google.ru/' ) // const screenshot = await page.screenshot() // await browser.close() return screenshot } module.exports.makeTile = makeTile Run our script and check its performance. To do this, type in the console:
$ npm start
A message appears that says “Server is created on port 5000”. Now open a browser on your computer and go to the local address of our server. Instead of the x, y, z coordinates , you can enter any numbers. I entered 1, 2, 3.
http://localhost:5000/1/2/3
If everything is done correctly, a screenshot of the Google site will appear.
Press in the console Ctrl + C to stop our script.
Congratulations, the basis of our application is ready! We created a server that accepts our html requests, takes a screenshot and returns an image to us. Now it's time to move on to the implementation of the details.
Calculate the coordinates
The idea is that the browser will open a site with a map and enter the coordinates of the place that we need in the search bar. After clicking the “Find” button, this place will be exactly in the center of the screen. So it will be easy to cut out the area we need.
But first, you need to calculate the coordinates of the center of the tile based on its serial number. I will do this based on the formula for finding the upper left corner. I put it in the getCoordinates () function.
And since for some sites, in addition to the center of the tile, you also need to specify its borders, then I will look for them as well. Well, let's create a separate module for these calculations under the name geoTools.js . Here is his code:
// - function getCoordinates( x, y, z ) { const n = Math.pow( 2, z ) const lon = x / n * 360.0 - 180.0 const lat = 180.0 * ( Math.atan( Math.sinh( Math.PI * ( 1 - 2 * y / n) ) ) ) / Math.PI return { lat: lat, lon: lon } } // function getCenter( left, rigth, top, bottom ) { let lat = ( left + rigth ) / 2 let lon = ( top + bottom ) / 2 return { lat: lat, lon: lon } } // function getAllCoordinates( stringX, stringY, stringZ ) { // const x = Number( stringX ) const y = Number( stringY ) const z = Number( stringZ ) // // - - const topLeft = getCoordinates( x, y, z ) const bottomRight = getCoordinates( x+1, y+1, z ) // const center = getCenter( topLeft.lat, bottomRight.lat, topLeft.lon, bottomRight.lon ) // const bBox = { latMin: bottomRight.lat, lonMin: topLeft.lon, latMax: topLeft.lat, lonMax: bottomRight.lon } return { bBox: bBox, center: center } } module.exports.getAllCoordinates = getAllCoordinates Now we are ready to start implementing the script for working with the browser. Let's look at a few scenarios of how this can be done.
Scenario 1 - API Search
Let's start with the simplest case when you can simply enter the coordinates in the URL of the map page. For example, like this:
https://nakarte.me/#m=5/50.28144/89.30666&l=O/Wp
Let's look at the script. Just replace, delete the entire contents of the mapshoter.js file and paste the code below.
In this version, when the browser starts, we specify additional parameters that will allow it to start and work on Linux servers, such as Heroku. Also now we will reduce the size of the window so that as few map tiles as possible fit on the screen. Thus, we increase the page loading speed.
Next, we calculate the coordinates of the center of the desired tile. We paste them into the URL and click on it. The tile appears exactly in the center of the screen. Cut a piece of 256x256 pixels. This will be the tile that we need. It remains only to return it to the user.
Before moving on to the code, I note that for clarity, all error handling has been removed from the script.
const puppeteer = require( 'puppeteer' ) const geoTools = require( './geoTools' ) async function makeTile( x, y, z ) { // , Heroku const herokuDeploymentParams = {'args' : ['--no-sandbox', '--disable-setuid-sandbox']} const browser = await puppeteer.launch( herokuDeploymentParams ) // // const page = await browser.newPage() await page.setViewport( { width: 660, height: 400 } ) // URL const coordinates = geoTools.getAllCoordinates( x, y, z ) const centerCoordinates = `${z}/${coordinates.center.lat}/${coordinates.center.lon}&l=` const pageUrl = 'https://nakarte.me/#m=' + centerCoordinates + "O/Wp" // URL , await page.goto( pageUrl, { waitUntil: 'networkidle0', timeout: 20000 } ) // const cropOptions = { fullPage: false, clip: { x: 202, y: 67, width: 256, height: 256 } } const screenshot = await page.screenshot( cropOptions ) // await browser.close() return screenshot } module.exports.makeTile = makeTile Now run our script and see the map for this section.
http://localhost:5000/24/10/5
If everything is done correctly, then the server should return such a tile:
To make sure we don’t mix anything up when cropping, compare our tile with the original from OpenStreetMaps.org

Scenario 2 - Search Using the Interface
However, it is not always possible to control a card through a browser line. Well, in such cases, our script will behave like a real living user. He will print the coordinates in the search box and click on the Search button. After that, he will remove the marker of the found point, which usually appears in the center of the screen. And then he will click on the buttons to increase or decrease the scale until he reaches the desired one. Then it will take a screenshot and return it to the user.
I note that usually after the search the same scale is set. 15th, for example. In our example, this does not always happen. Therefore, we will learn the zoom level from the parameters of the html elements on the page.
Also in this example, we will look for interface elements using XPath selectors. But how do you recognize them?
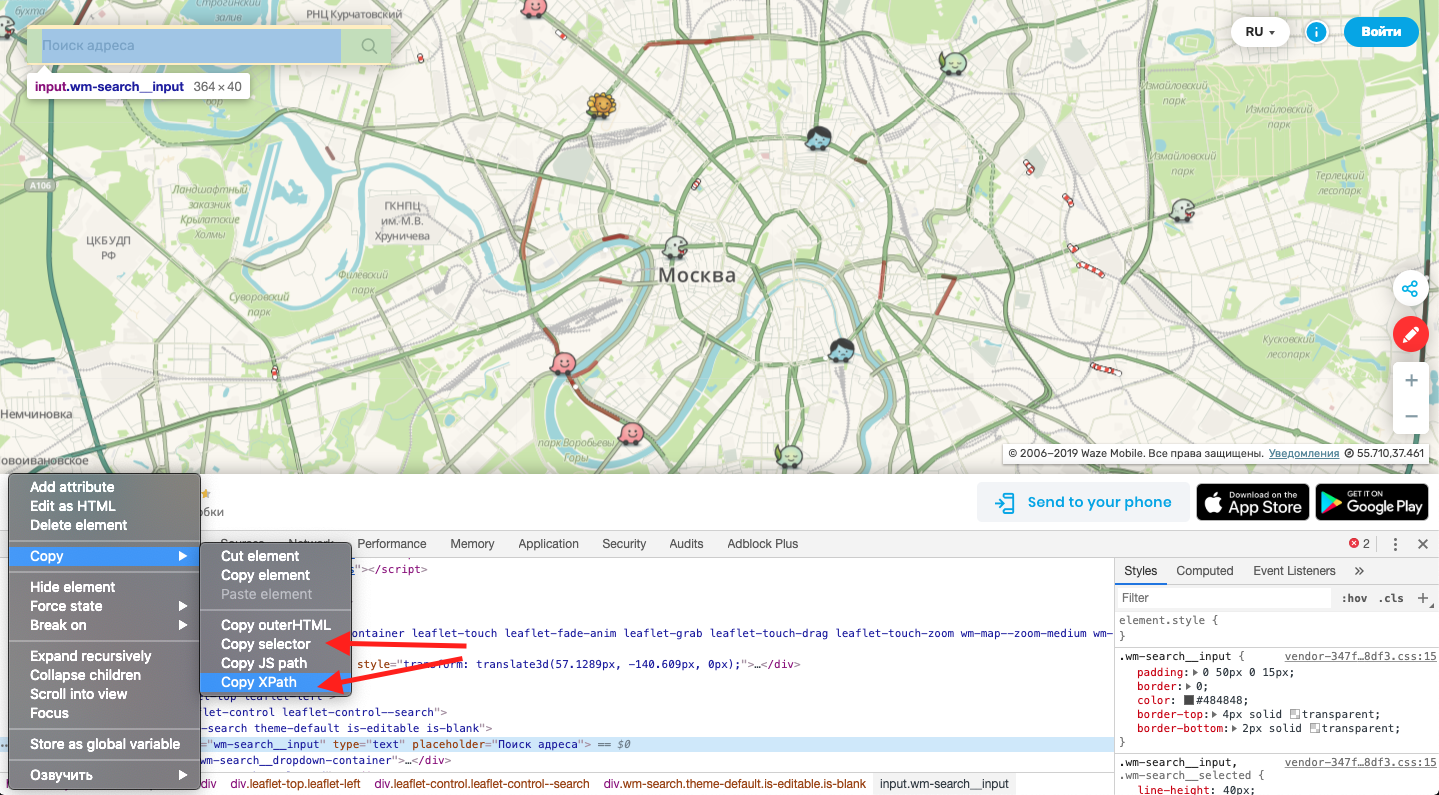
To do this, open the required page in the browser and open the developer toolbar ( Ctll + Alt + I for Google Chrome). Press the button to select items. We click on the element you are interested in (I clicked on the search field).

The list of items scrolls to the one you clicked on and it is highlighted in blue. Click on the button with three dots to the left of the name.
From the pop-up menu, select Copy. Next, if you need a regular selector, then click Copy selector . But for the same example we will use the Copy XPath item.
Now we will pass to the code in which selectors for all necessary interface elements are already collected.
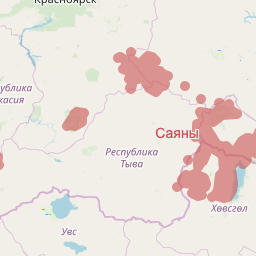
const puppeteer = require( 'puppeteer' ) const geoTools = require( './geoTools' ) async function makeTile( x, y, z ) { // const searchFieldXPath = '//*[@id="map"]/div[2]/div[2]/div[1]/div/div/input' const zoomPlusXPath = '//*[@id="map"]/div[2]/div[2]/div[4]/div[1]/a[1]' const zoomMinusXPath = '//*[@id="map"]/div[2]/div[2]/div[4]/div[1]/a[2]' const directionButonSelector = '#gtm-poi-card-get-directions > i' const deletePinButonSelector = '#map > div.wm-cards > div.wm-card.is-routing > div > div.wm-routing__top > div.wm-routing__search > div > div.wm-route-search__to > div > div.wm-search__clear-icon > div' // () const coordinates = geoTools.getAllCoordinates( x, y, z ) const centerCoordinates = `lat=${coordinates.center.lat} lng=${coordinates.center.lon}` // const herokuDeploymentParams = {'args' : ['--no-sandbox', '--disable-setuid-sandbox']} const browser = await puppeteer.launch( herokuDeploymentParams ) const page = await browser.newPage() await page.setViewport( { width: 1100, height: 450 } ) // const pageUrl = 'https://www.waze.com/en/livemap?utm_campaign=waze_website' await page.goto( pageUrl, { waitUntil: 'networkidle2', timeout: 10000 } ) // , await click( searchFieldXPath, page ) // await page.keyboard.type( centerCoordinates ) // Enter page.keyboard.press( 'Enter' ); // 500 await page.waitFor( 500 ) // // await page.click ( directionButonSelector ) await page.waitFor( 100 ) await page.click ( deletePinButonSelector ) await page.waitFor( 100 ) // // while( z > await fetchCurrentZoom( page )) { await click( zoomPlusXPath, page ) await page.waitFor( 300 ) } while( z < await fetchCurrentZoom( page )) { await click( zoomMinusXPath, page ) await page.waitFor( 300 ) } // const cropOptions = { fullPage: false, clip: { x: 422, y: 97, width: 256, height: 256 } } const screenshot = await page.screenshot( cropOptions ) // await browser.close() return screenshot } // : // async function click( xPathSelector, page ) { await page.waitForXPath( xPathSelector ) const foundedElements = await page.$x( xPathSelector ) if ( foundedElements.length > 0 ) { await foundedElements[0].click() } else { throw new Error( "XPath element not found: ", xPathSelector ) } } // html async function fetchCurrentZoom( page ) { const xPathSelector = '//*[@id="map"]/div[2]' await page.waitForXPath( xPathSelector ) const elems = await page.$x(xPathSelector) const elementParams = await page.evaluate((...elems) => { return elems.map(e => e.className); }, ...elems); const zoom = elementParams[0].split('--zoom-').pop() return zoom } module.exports.makeTile = makeTile Run our script and follow the link. If everything is done correctly, then the script will return to us something like this tile.
http://localhost:5000/1237/640/11

Optimization
In principle, the two methods described above are enough to connect to many sites with vector maps. But if you suddenly need access to some new map, you will only need to slightly modify the script in the mapshoter.js file. That is, this method makes it very easy to add new cards. This is from its advantages.
But there are also disadvantages. And the main one is the speed of work. Just compare. On average, it takes about 0.5 seconds to download one regular raster tile. At the same time, getting one tile from our script at the moment takes about 8 seconds.
But that is not all! We use single-threaded node js and our requests will be processed in a queue order. And when we try to load a map for the whole screen (on which, for example, 24 tiles are placed), that is, there is a risk of encountering a problem. Some navigators have a timeout: they will stop loading after 30 seconds. And this means that only 3-4 tiles will have time to load. Well, let's see what we can do about it.
Probably the most obvious way is to simply increase the number of servers on which our script will run. For example, if we have 10 servers, then they will have time to process the tiles for the entire screen in 30 seconds. In this article, I (soon) will tell you how this can be implemented using free Heroku accounts.
Secondly, it is still possible to implement multithreading on node js using the worker_threads module. According to my observations, on a server with a single-core processor on a free Heroku account, I can start three threads. Three threads with a separate browser in each, which can work simultaneously without blocking each other. In fairness, I note that as a result of the increased load on the processor, the download speed of one tile even increased slightly. However, if you try to load the map for the entire screen, then after 30 seconds more than half the map will have time to load. More than 12 tiles. Already better.
Thirdly. In the current implementation of the script, with each request, we spend time downloading the Chrome browser, and then completing it. Now we will create a browser in advance and will transfer a link to it in mapshoter.js. As a result, the speed will not change for the first request. But for all subsequent ones, the download speed of one tile is reduced to 4 seconds. And after 30 seconds the whole map has time to load - all 24 tiles that are placed on my screen.
Well, let's try to implement all this. To work with multithreading, I will use the node-worker-threads-pool module - a kind of wrapper over worker_threads. Let's install it.
$ npm install node-worker-threads-pool --save
Correct the router.js file. Add to it the creation of a thread pool. Threads will be 3 pieces. Their code will be described in the file worker.js , we will look at it later. In the meantime, delete the launch of the screenshot module directly. Instead, we will add a new task to the thread pool. They will start processing it when any of the threads is freed.
const express = require( 'express' ) const PORT = process.env.PORT || 5000 const app = express() app.listen( PORT, () => { console.log( ' ', PORT ) }) // . const { StaticPool } = require( 'node-worker-threads-pool' ) const worker = "./worker.js" const workersPool = new StaticPool({ size: 3, task: worker, workerData: "no" }) app.get( '/:x/:y/:z', async ( req, res, next ) => { const x = req.params.x const y = req.params.y const z = req.params.z // // const screenshot = await workersPool.exec( { x, y, z } ) const imageBuffer = Buffer.from( screenshot, 'base64' ) res.writeHead( 200, { 'Content-Type': 'image/png', 'Content-Length': imageBuffer.length }) res.end( imageBuffer ) }) Now take a look at the worker.js file. Each time a new task arrives, the parentPort.on () method will be launched. Unfortunately, it cannot handle async / await functions. So we will use the adapter function in the form of the doMyAsyncCode () method.
In it in a conveniently readable format we will put the logic of the worker. That is, launch the browser (if it is not already running) and activate the method for taking a screenshot. At startup, we will pass into this method a link to the running browser.
const { parentPort, workerData } = require( 'worker_threads' ); const puppeteer = require( 'puppeteer' ) const mapshoter = require( './mapshoter' ) // var browser = "empty" // // , parentPort.on( "message", ( params ) => { doMyAsyncCode( params ) .then( ( result) => { parentPort.postMessage( result ) }) }) // , async/aswit // async function doMyAsyncCode( params ) { // await prepareEnviroment() // const screenshot = await mapshoter.makeTile( params.x, params.y, params.z, browser ) return screenshot } // . , async function prepareEnviroment( ) { if ( browser === "empty" ) { const herokuDeploymentParams = {'args' : ['--no-sandbox', '--disable-setuid-sandbox']} browser = await puppeteer.launch( herokuDeploymentParams ) } } For clarity, let us return to the first version of mapshoter.js . It will not change much. Now in the input parameters it will accept a link to the browser, and when the script ends, it will not turn off the browser, but simply close the created tab.
const puppeteer = require( 'puppeteer' ) const geoTools = require( './geoTools' ) async function makeTile( x, y, z, browserLink ) { // const browser = await browserLink // const page = await browser.newPage() await page.setViewport( { width: 660, height: 400 } ) const coordinates = geoTools.getAllCoordinates( x, y, z ) const centerCoordinates = `${z}/${coordinates.center.lat}/${coordinates.center.lon}&l=` const pageUrl = 'https://nakarte.me/#m=' + centerCoordinates + "O/Wp" await page.goto( pageUrl, { waitUntil: 'networkidle0', timeout: 20000 } ) const cropOptions = { fullPage: false, clip: { x: 202, y: 67, width: 256, height: 256 } } const screenshot = await page.screenshot( cropOptions ) // . . await page.close() return screenshot } module.exports.makeTile = makeTile In principle, that's all. Now you can upload the result to the server in any way convenient for you. For example, through docker. If you want to look at the finished result, you can click on this link . You can also find the full project code on my GitHub .
Conclusion
Now let's evaluate the result. On the one hand, even despite all the tricks done, the download speed is still very low. Moreover, because of the brakes, such a card is simply unpleasant to scroll.
On the other hand, this script nevertheless copes with cards that before that it was generally impossible to connect to the navigator on the smartphone. It is unlikely that this solution will be applied as the main method of obtaining cartographic data. But here as an additional one, with the help of which, if necessary, it will be possible to open some exotic card - it is likely.
Also, the advantages of this script include the fact that it is easy to work with it. It is easy to write. And, most importantly, it can be extremely easily remade to connect any other online card.
Well, in the next article I will deal with just that. I will transform the script into a kind of API for working with the OverpassTurbo interactive map.
')
Source: https://habr.com/ru/post/461053/
All Articles