We deploy the ML project using Flask as a REST API and make it accessible through the Flutter application

Introduction
Machine learning is already everywhere and it is almost impossible to find software that does not use it directly or indirectly. Let's create a small application that can upload images to a server for later recognition using ML. And then we will make them available through a mobile application with text search by content.
We will use Flask for our REST API, Flutter for mobile application and Keras for machine learning. We use MongoDB as a database for storing information about the contents of images, and for information we take the already trained ResNet50 model. If necessary, we can replace the model using the save_model () and load_model () methods available in Keras. The latter will require about 100 MB upon initial loading of the model. You can read about other available models in the documentation .
Let's start with Flask
If you are unfamiliar with Flask, you can create a route on it simply by adding the app .route ('/') decorator to the controller, where app is the application variable. Example:
from flask import Flask app = Flask(__name__) @app.route('/') def hello_world(): return 'Hello, World!' When you start and go to the default address 127.0.0.1 : 5000 / we will see the answer Hello World! You can read about how to do something more complicated in the documentation .
Let's start creating a full backend:
import os import tensorflow as tf from tensorflow.keras.models import load_model from tensorflow.keras.preprocessing import image as img from keras.preprocessing.image import img_to_array import numpy as np from PIL import Image from keras.applications.resnet50 import ResNet50,decode_predictions,preprocess_input from datetime import datetime import io from flask import Flask,Blueprint,request,render_template,jsonify from modules.dataBase import collection as db As you can see, imports contain tensorflow , which we will use as a backend for keras , as well as numpy for working with multi-sized arrays.
mod = Blueprint('backend', __name__, template_folder='templates', static_folder='./static') UPLOAD_URL = 'http://192.168.1.103:5000/static/' model = ResNet50(weights='imagenet') model._make_predict_function() On the first line, we create a blueprint for a more convenient organization of the application. Because of this, you will need to use mod .route ('/') to decorate the controller. Resnet50 pre-trained on imagenet needs to call _make_predict_function () to initialize. Without this step, there is a chance of getting an error. And another model can be used by replacing the line
model = ResNet50(weights='imagenet') on
model = load_model('saved_model.h5') Here's what the controller will look like:
@mod.route('/predict', methods=['POST']) def predict(): if request.method == 'POST': # , if 'file' not in request.files: return "someting went wrong 1" user_file = request.files['file'] temp = request.files['file'] if user_file.filename == '': return "file name not found ..." else: path = os.path.join(os.getcwd()+'\\modules\\static\\'+user_file.filename) user_file.save(path) classes = identifyImage(path) db.addNewImage( user_file.filename, classes[0][0][1], str(classes[0][0][2]), datetime.now(), UPLOAD_URL+user_file.filename) return jsonify({ "status":"success", "prediction":classes[0][0][1], "confidence":str(classes[0][0][2]), "upload_time":datetime.now() }) In the code above, the downloaded image is passed to the identifyImage (file_path) method, which is implemented as follows:
def identifyImage(img_path): image = img.load_img(img_path, target_size=(224,224)) x = img_to_array(image) x = np.expand_dims(x, axis=0) # images = np.vstack([x]) x = preprocess_input(x) preds = model.predict(x) preds = decode_predictions(preds, top=1) print(preds) return preds First we convert the image to size 224 * 224, because it is he who is needed by our model. Then we pass to the model.predict () pre-processed image bytes. Now our model can predict what is in the image ( top = 1 is needed to get the single most likely result).
Save the received data about the image content in MongoDB using the db.addData () function. Here is the relevant piece of code:
from pymongo import MongoClient from bson import ObjectId client = MongoClient("mongodb://localhost:27017") # host uri db = client.image_predition #Select the database image_details = db.imageData def addNewImage(i_name, prediction, conf, time, url): image_details.insert({ "file_name":i_name, "prediction":prediction, "confidence":conf, "upload_time":time, "url":url }) def getAllImages(): data = image_details.find() return data Since we used blueprint, the code for the API can be placed in a separate file:
from flask import Flask,render_template,jsonify,Blueprint mod = Blueprint('api',__name__,template_folder='templates') from modules.dataBase import collection as db from bson.json_util import dumps @mod.route('/') def api(): return dumps(db.getAllImages()) As you can see, we use json to return database data. You can look at the result at the address 127.0.0.1 : 5000 / api
Above, of course, are only the most important pieces of code. The full project can be viewed in the GitHub repository . And more about Pymongo can be found here .
Create Flutter App
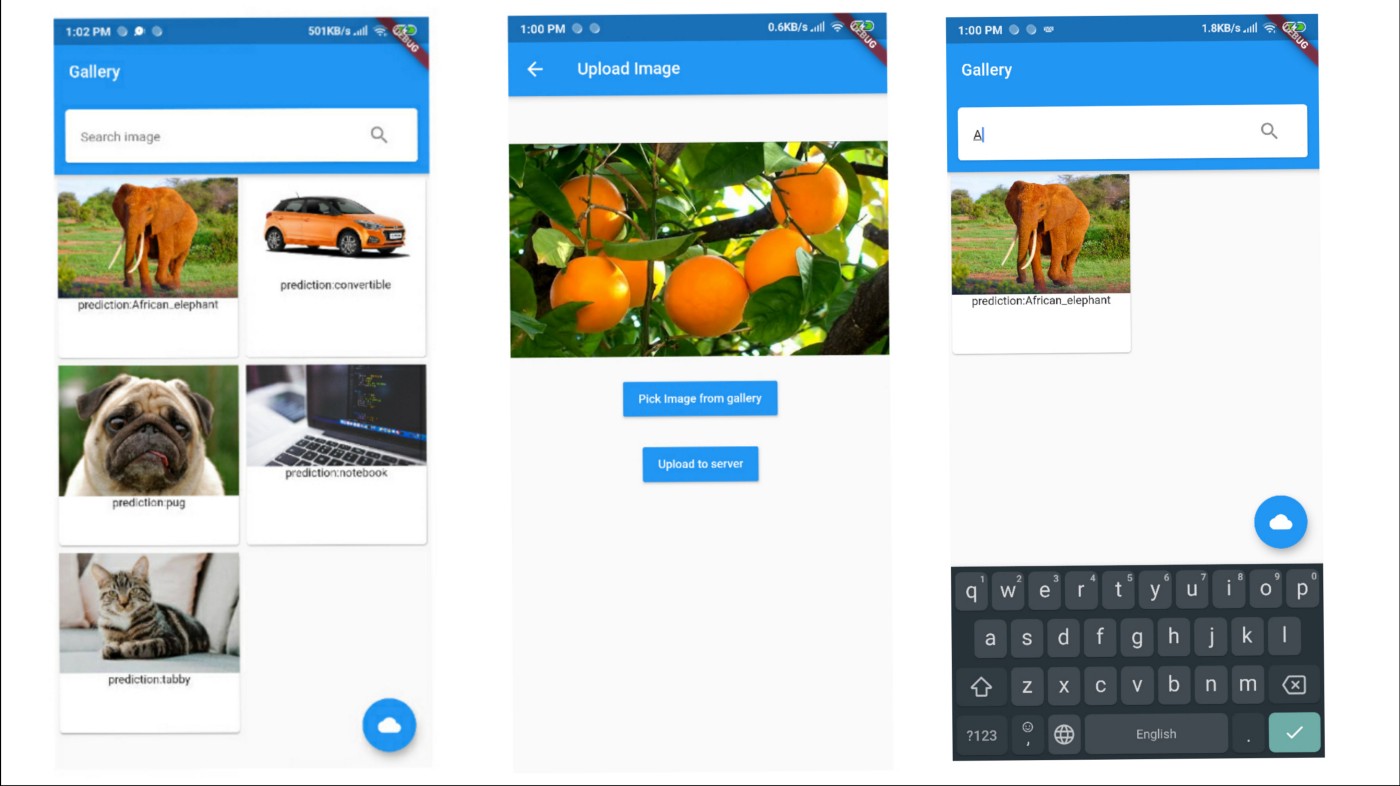
The mobile version will receive images and data on their contents via the REST API. Here is the result:

The ImageData class encapsulates image data:
import 'dart:convert'; import 'package:http/http.dart' as http; import 'dart:async'; class ImageData { // static String BASE_URL ='http://192.168.1.103:5000/'; String uri; String prediction; ImageData(this.uri,this.prediction); } Future<List<ImageData>> LoadImages() async { List<ImageData> list; //complete fetch .... var data = await http.get('http://192.168.1.103:5000/api/'); var jsondata = json.decode(data.body); List<ImageData> newslist = []; for (var data in jsondata) { ImageData n = ImageData(data['url'],data['prediction']); newslist.add(n); } return newslist; } Here we get json, convert it to a list of ImageData objects and return it to Future Builder using the LoadImages () function
Uploading images to the server
uploadImageToServer(File imageFile) async { print("attempting to connecto server......"); var stream = new http.ByteStream(DelegatingStream.typed(imageFile.openRead())); var length = await imageFile.length(); print(length); var uri = Uri.parse('http://192.168.1.103:5000/predict'); print("connection established."); var request = new http.MultipartRequest("POST", uri); var multipartFile = new http.MultipartFile('file', stream, length, filename: basename(imageFile.path)); //contentType: new MediaType('image', 'png')); request.files.add(multipartFile); var response = await request.send(); print(response.statusCode); } To make Flask available on the local network, disable debug mode and find the ipv4 address using ipconfig . You can start the local server like this:
app.run(debug=False, host='192.168.1.103', port=5000) Sometimes a firewall can prevent an application from accessing a localhost, then it will have to be reconfigured or disabled.
All application source code is available on github . Here are the links that will help you understand what is happening:
Keras: https://keras.io/
Flutter: https://flutter.dev/
MongoDB: https://www.tutorialspoint.com/mongodb/
Harvard Python and Flask Course: https://www.youtube.com/watch?v=j5wysXqaIV8&t=5515s (lectures 2,3,4 are especially important)
')
Source: https://habr.com/ru/post/460995/
All Articles