Contact welding for 18650 batteries
A small article about the independent manufacture of an apparatus for contact welding of batteries (18650 and similar). With the help of such a device, at home and from improvised materials , batteries and assemblies can be welded and repaired. Cheap, cheerful and affordable for everyone.
Greetings to all!
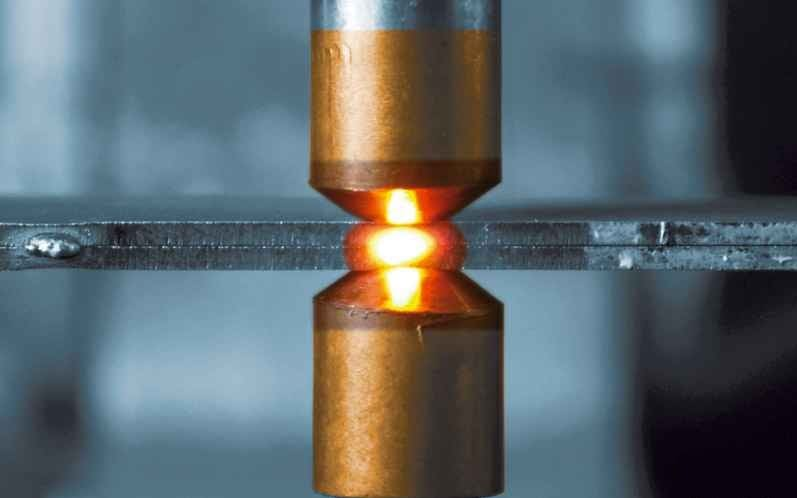
Spot welding is a type of contact welding ( source ).
')
There are purchased options, the same SUNKKO, but almost all options require refinement for their materials and are needed - increasing current, replacing the timer, and so on. It’s easier to make the option “for yourself” on your own.
Advantages - you get a obviously functional option, with the incorporated characteristics. What you need - and provide such.
Basic and proven DIY options are built on the basis of a powerful transformer (step-down) and a timer with a relay. There is an opportunity to make it even simpler - simply electrodes powered by a car battery, but this is not the most convenient option.
Specifically required:
The selected control board option is based on the ATmega microcontroller. In pluses - the presence of a power converter (Hi-Link) and galvanic isolation of the low-voltage part of the circuit.

The control board can be found assembled or separately ( printed circuit board ). For self-production of a printed circuit board (LUT), I attach the file dot_svarka.lay6 .

In addition, the KY-040 encoder was purchased to control the menu and make adjustments.

For convenience, we selected an OLED display with a diagonal of 0.96 "and an I2C bus (4pin). This option works correctly with Arduino libraries, and looks decent outwardly. You can use other options, provided that you have the appropriate edits.

To send a welding signal, a button or microswitch (limit switch) is used.
A simple pedal is also suitable, here to whom and what is convenient. This is a simple two-wire connection.

Additionally, you will need wires, fuses, plugs, connectors, a fan and so on ... Small things that can be found at hand or in the nearest radio store. And a thrifty home-made man should be available.

Consumables, such as nickel tape for welding elements, will be required.

There is a good model of a 3D-printed handle for contact welding ( Spot Welder Handle ZBU-4.2 w / button ).

Link to the sketch welding__dot.ino .
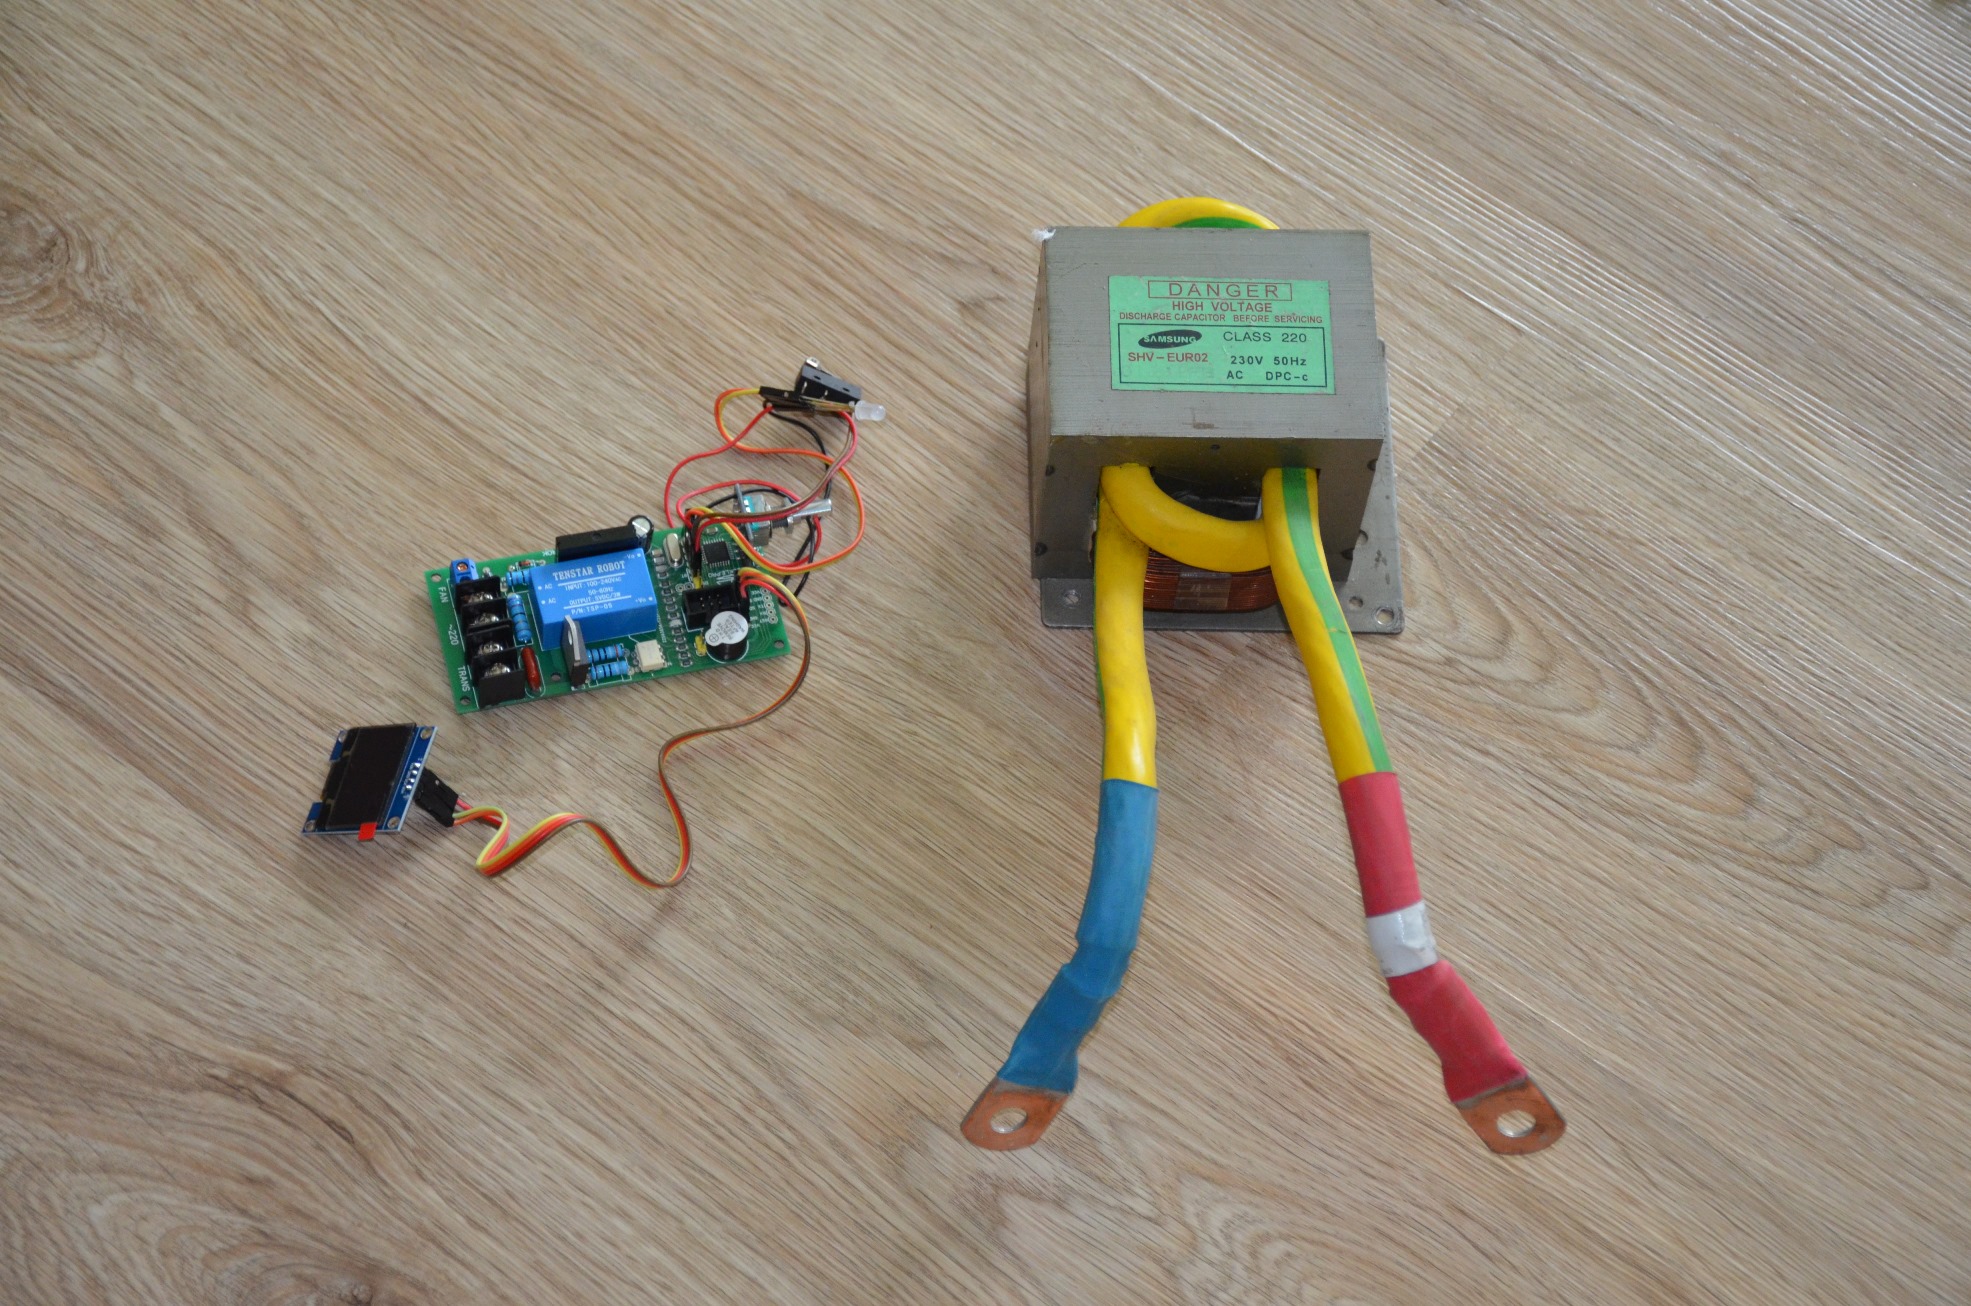
Assembly of the device is not difficult. The most expensive thing for me was to find a good powerful step-down transformer. One of the most affordable options is a transformer from a microwave oven, instead of a secondary raising winding of which 1.5 ... 2 turns of thick copper wire are wound (cross section 50 ... 70 sq. Mm).
I do not knowingly write about the device case - there are no special requirements. Usually use cases for CEA or from older devices. From myself, I can recommend shielding the case from the inside from pulse interference, and also provide for a cooling fan for the transformer, which decently heats up during prolonged operation.
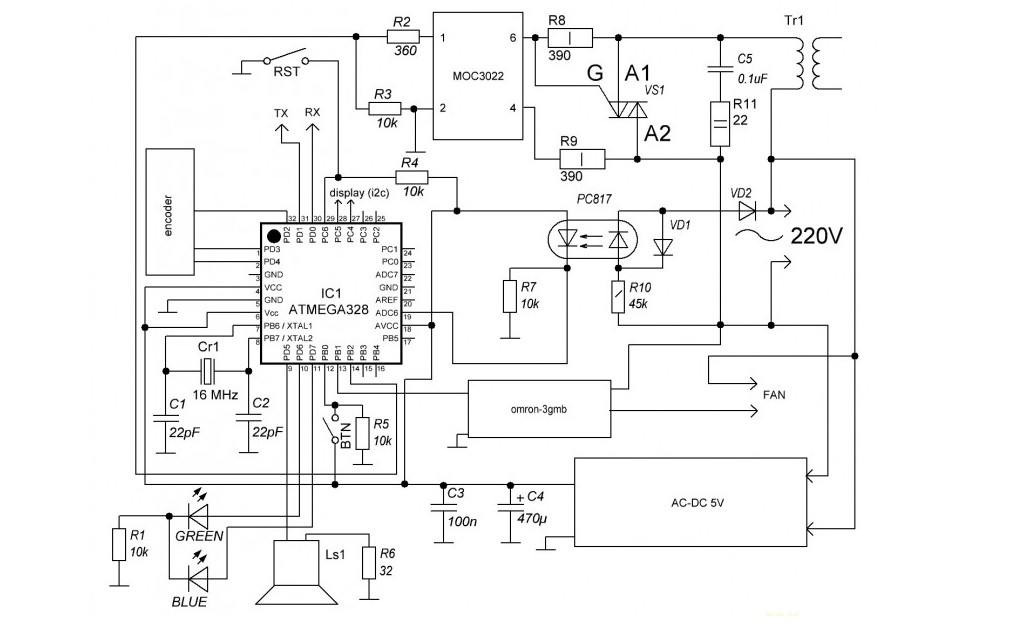
The circuit board welding is as follows.
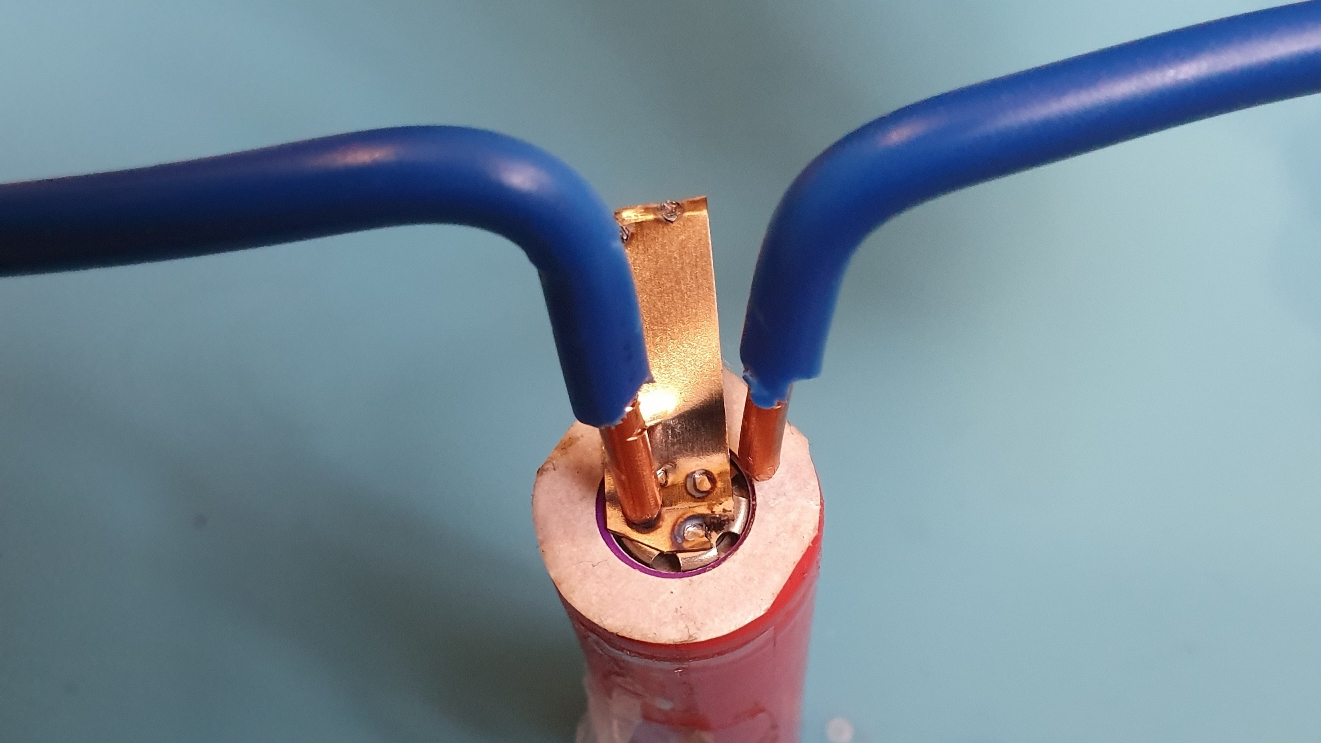
After assembly, it is best to conduct tests and determine the optimal values of the pulse duration. In my case, a copper wire of 6 square meters was used. mm as electrodes.

The double pulse boils well, the duration is selected depending on the thickness of the tape. Keeps on a gap not worse than factory welding.
Now you can easily assemble a large battery for an electric bike, repair a battery for a gyro scooter and upgrade a screwdriver.

Video of testing homemade contact welding.
The welding process of the 18650 cells in the battery.
For me, this option cost almost half the price than the factory ones. Which still require refinement. And the result gives a homemade contact welding excellent.
Greetings to all!
Spot welding is a type of contact welding ( source ).
')
There are purchased options, the same SUNKKO, but almost all options require refinement for their materials and are needed - increasing current, replacing the timer, and so on. It’s easier to make the option “for yourself” on your own.
Advantages - you get a obviously functional option, with the incorporated characteristics. What you need - and provide such.
Basic and proven DIY options are built on the basis of a powerful transformer (step-down) and a timer with a relay. There is an opportunity to make it even simpler - simply electrodes powered by a car battery, but this is not the most convenient option.
Specifically required:
- high welding current (up to 600 ... 900A);
- double pulse of welding;
- adjustment of the pulse duration (fractions of a second);
- board power supply without auxiliary transformer;
- open firmware (Arduino) and the ability to adjust the code.
The selected control board option is based on the ATmega microcontroller. In pluses - the presence of a power converter (Hi-Link) and galvanic isolation of the low-voltage part of the circuit.
The control board can be found assembled or separately ( printed circuit board ). For self-production of a printed circuit board (LUT), I attach the file dot_svarka.lay6 .
In addition, the KY-040 encoder was purchased to control the menu and make adjustments.
For convenience, we selected an OLED display with a diagonal of 0.96 "and an I2C bus (4pin). This option works correctly with Arduino libraries, and looks decent outwardly. You can use other options, provided that you have the appropriate edits.
To send a welding signal, a button or microswitch (limit switch) is used.
A simple pedal is also suitable, here to whom and what is convenient. This is a simple two-wire connection.
Additionally, you will need wires, fuses, plugs, connectors, a fan and so on ... Small things that can be found at hand or in the nearest radio store. And a thrifty home-made man should be available.
Consumables, such as nickel tape for welding elements, will be required.
There is a good model of a 3D-printed handle for contact welding ( Spot Welder Handle ZBU-4.2 w / button ).
Link to the sketch welding__dot.ino .
Part of Encoder Processing Code
// encoder pin and interrupt const byte encoder_A_Pin = 3; const byte encoder_B_Pin = 2; const byte encoderButtonPin = 4; const byte interruptA = 1; const byte interruptB = 0; boolean encoder_rotate = false; // last state encoder A pin boolean currentA = false; // last state encoder B pin boolean currentB = false; // Timeout for different long and short button on const unsigned long timoutHoldButton = 9000; // 9 sec // Timeout for bounce protect encoder button const unsigned long debounceEncButton = 20; // 20 ms // Time on encoder button unsigned long timeOnEncButton = 0; // Time off encoder button unsigned long timeOffEncButton = 0; unsigned int buttonEncCurrentVal = HIGH; unsigned int buttonEncLastVal = HIGH; boolean ignoreEncOff = false; void setup() { // encoder init pinMode(encoder_A_Pin, INPUT); digitalWrite(encoder_A_Pin, HIGH); pinMode(encoder_B_Pin, INPUT); digitalWrite(encoder_B_Pin, HIGH); pinMode(encoderButtonPin, INPUT); digitalWrite(encoderButtonPin, HIGH); // enable encoder change interrupt attachInterrupt(interruptA, onA, CHANGE); attachInterrupt(interruptB, onB, CHANGE); } //////////////////////////////////////////////////////////////////////////////////////////////////////////////////// // increment rotate //////////////////////////////////////////////////////////////////////////////////////////////////////////////////// void onA(){ if (encoder_rotate) delay (1); if (digitalRead(encoder_A_Pin) != currentA ) { currentA = !currentA; if ( currentA && !currentB ) { Serial.println("+ encoder"); } encoder_rotate = false; } } //////////////////////////////////////////////////////////////////////////////////////////////////////////////////// // decrement rotate //////////////////////////////////////////////////////////////////////////////////////////////////////////////////// void onB(){ if ( encoder_rotate ) delay (1); if( digitalRead(encoder_B_Pin) != currentB ) { currentB = !currentB; if( currentB && !currentA ){ Serial.println("- encoder"); } encoder_rotate = false; } } //////////////////////////////////////////////////////////////////////////////////////////////////////////////////// // main loop //////////////////////////////////////////////////////////////////////////////////////////////////////////////////// void loop() { CurrentTime = millis(); //////////////////////////////////////////////////////////////////////////////////////////////////////////////////// // ENCODER BUTTON encoder_rotate = true; buttonEncCurrentVal = digitalRead(encoderButtonPin); // Test for button pressed and store the down time if (buttonEncCurrentVal == LOW && buttonEncLastVal == HIGH && (CurrentTime - timeOffEncButton) > long(debounceEncButton)){ timeOnEncButton = CurrentTime; } // Test for button release and store the up time if (buttonEncCurrentVal == HIGH && buttonEncLastVal == LOW && (CurrentTime - timeOnEncButton) > long(debounceEncButton)){ if (ignoreEncOff == false){ Serial.println(F("short enc")); }else{ ignoreEncOff = false; } timeOffEncButton = CurrentTime; } // Test for button held down for longer than the hold time if (buttonEncCurrentVal == LOW && (CurrentTime - timeOnEncButton) > long(timoutHoldButton)){ Serial.println(F("long enc")); ignoreEncOff = true; timeOnEncButton = CurrentTime; } buttonEncLastVal = buttonEncCurrentVal; } Assembly of the device is not difficult. The most expensive thing for me was to find a good powerful step-down transformer. One of the most affordable options is a transformer from a microwave oven, instead of a secondary raising winding of which 1.5 ... 2 turns of thick copper wire are wound (cross section 50 ... 70 sq. Mm).
I do not knowingly write about the device case - there are no special requirements. Usually use cases for CEA or from older devices. From myself, I can recommend shielding the case from the inside from pulse interference, and also provide for a cooling fan for the transformer, which decently heats up during prolonged operation.
The circuit board welding is as follows.
After assembly, it is best to conduct tests and determine the optimal values of the pulse duration. In my case, a copper wire of 6 square meters was used. mm as electrodes.
The double pulse boils well, the duration is selected depending on the thickness of the tape. Keeps on a gap not worse than factory welding.
Now you can easily assemble a large battery for an electric bike, repair a battery for a gyro scooter and upgrade a screwdriver.
Video of testing homemade contact welding.
The welding process of the 18650 cells in the battery.
For me, this option cost almost half the price than the factory ones. Which still require refinement. And the result gives a homemade contact welding excellent.
Source: https://habr.com/ru/post/460973/
All Articles