NVIDIA Jetson Nano: tests and first impressions - part 2, AI tests
Hello, Habr.
In the first part , NVIDIA Jetson Nano was considered - a board in the Raspberry Pi form factor, focused on performance computing using the GPU. It is time to test the board for what it was designed for - for AI-oriented calculations.
')
Consider how different tasks go on the board, such as classifying images or recognizing pedestrians or seals (where without them). For all tests, the source codes that can be run on the desktop, Jetson Nano or Raspberry Pi are given. For those who are interested, continued under the cut.
There are two ways to use this board. The first is to run standard frameworks like Keras and Tensorflow. It will work in principle, it will, but as already seen from the first part, Jetson Nano, of course, is inferior to a full-fledged desktop or laptop video card. The user will have to take on the task of optimizing the model. The second way is to take ready-made classes that come with the board. It is simpler and works “out of the box”, the minus is that all implementation details are hidden to a much greater extent, in addition, you will have to study and use custom-sdk, which, besides these boards, will not be useful anywhere else. However, we will look at both ways, start with the first.
Consider the problem of image recognition. To do this, we will use the ResNet50 model supplied with Keras (this model was the winner of the ImageNet Challenge in 2015). To use it, a few lines of code are enough.
I did not even begin to remove the code under the spoiler, because he is very small. As you can see, the image is first resized to 224x224 (this is the input network format), at the end, the predict function does all the work.
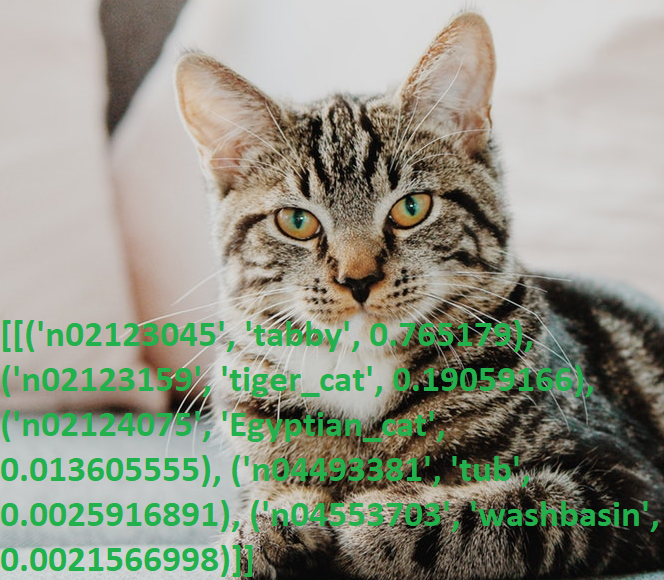
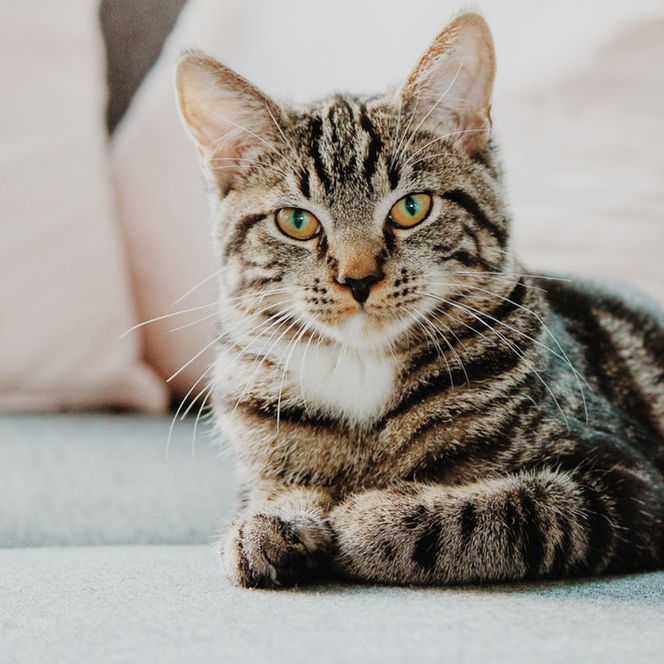
We take a photo of the cat and run the program.
Results:
Once again, upset by his knowledge of English (I wonder how many non-native people know what “tabby” is?), I checked the output with the dictionary, yes, everything works.
The PC code execution time was 0.5 s for calculations on the CPU and 2 s (!) For calculations on the GPU. Judging by the log, the problem is either in the model or in Tensorflow, but when it starts, the code tries to allocate a lot of memory, getting several warnings like “Allocator (GPU_0_bfc) ran out of memory trying to allocate 2.13GiB with freed_by_count = 0.” . This is a warning and not an error, while the code works, but much slower than it should.
On Jetson Nano, it’s still slower: 2.8c on the CPU and 18.8c on the GPU, while the output looks like this:
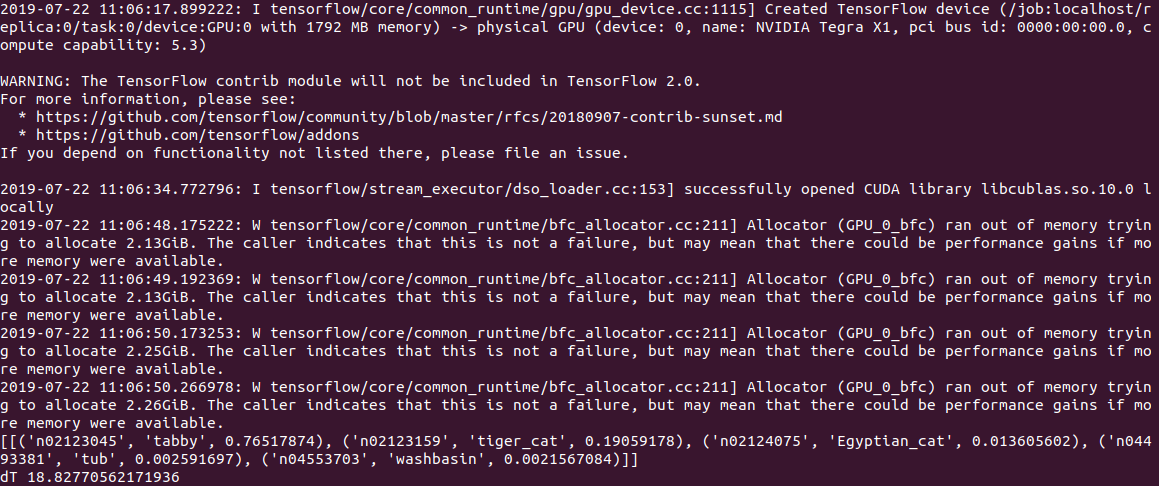
In general, even 3s per image, this is not yet real time. Setting the gpu_options.allow_growth option recommended on stack overflow does not help, if anyone knows another way, write in the comments.
Edit : as suggested in the comments, the first start of tensorflow always takes a long time, and it’s incorrect to measure time using it. Indeed, when processing the second and subsequent files, the results are much better - 0.6s without a GPU and 0.2s with a GPU. On the desktop, speed is, however, 2.0s and 0.05s, respectively.
A convenient feature of ResNet50 is that at the first start it pumps out the entire model to disk (about 100 MB), then the code works completely autonomously, without registration and SMS. Which is especially nice, given that most modern AI-services work only on the server, and without the Internet, the device turns into a "pumpkin".
Consider the following problem. Using Keras, we’ll create a neural network that can distinguish between cats and dogs. It will be a convolutional neural network (CNN - Convolutional Neural Network), we will take network design from this publication. A training set of images of cats and dogs is already included in the tensorflow_datasets package, so you don’t have to photograph them yourself.
We load a set of images and divide it into three blocks - training, verification and test. We “normalize” each picture, bringing the colors to the range 0..1.
We write the function of generating a convolutional neural network.
Now we can run network training on our “cat-dog” kit. Training takes a long time (20 minutes on the GPU and 1-2 hours on the CPU), so when finished, save the model to a file.
By the way, the attempt to start training directly on the Jetson Nano failed - the board in 5 minutes overheated and hung. For resource-intensive calculations, a cooler is required for the board, although by and large, there is no sense in doing such tasks directly on Jetson Nano - the model can be trained on a PC, and the finished saved file can be used on Nano.
Then another pitfall came out - the tensowflow version 14 library was installed on the PC, and the latest version for Jetson Nano so far is 13. And the model saved in the 14th version was not read in the 13th, I had to install the same versions using pip.
Finally, we can load the model from a file and use it to recognize images.
The photo of the cat was used the same, but for the “dog” test 2 pictures were used:
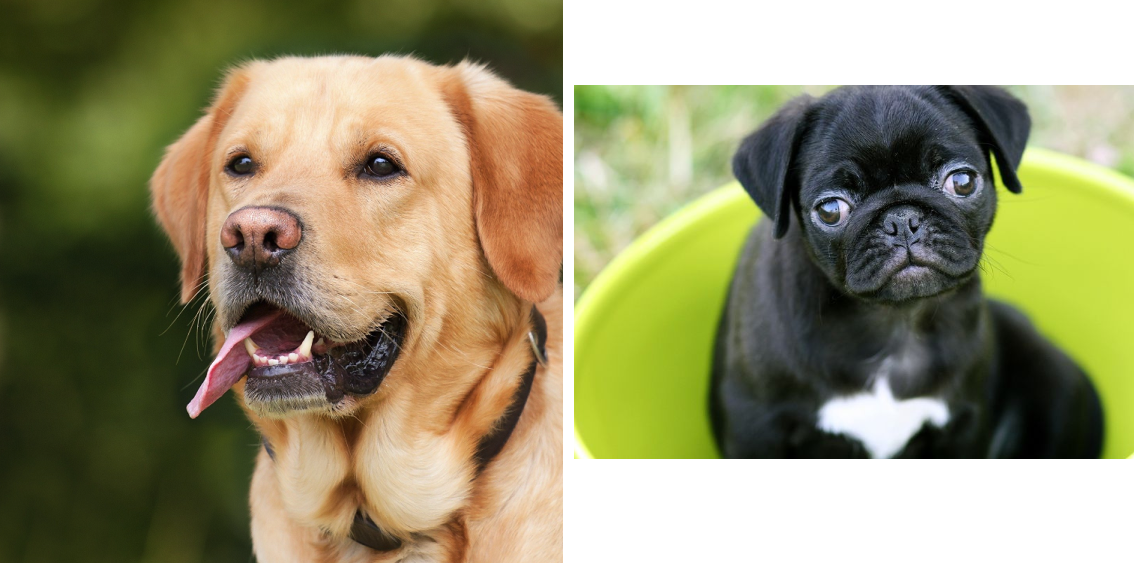
The first guessed correctly, and the second at first had errors and the neural network thought it was a cat, I had to increase the number of iterations of training. However, I would probably be wrong the first time too;)
The execution time on Jetson Nano turned out to be quite small - the very first photo was processed in 0.3s, but all subsequent ones were much faster, apparently the data is cached in memory.
In general, we can assume that on such simple neural networks the board speeds are quite enough even without any optimizations, 100fps is a value sufficient even for video in real time.
As you can see, even standard models from Keras and Tensorflow can be used on Nano, albeit with varying success - something works, something doesn't. However, the results can be improved, instructions on optimizing the model and reducing memory size can be read here .
But fortunately for us, manufacturers have already done this for us. If readers still have interest, the final part will be devoted to ready-made libraries optimized for working with Jetson Nano.
In the first part , NVIDIA Jetson Nano was considered - a board in the Raspberry Pi form factor, focused on performance computing using the GPU. It is time to test the board for what it was designed for - for AI-oriented calculations.
')
Consider how different tasks go on the board, such as classifying images or recognizing pedestrians or seals (where without them). For all tests, the source codes that can be run on the desktop, Jetson Nano or Raspberry Pi are given. For those who are interested, continued under the cut.
There are two ways to use this board. The first is to run standard frameworks like Keras and Tensorflow. It will work in principle, it will, but as already seen from the first part, Jetson Nano, of course, is inferior to a full-fledged desktop or laptop video card. The user will have to take on the task of optimizing the model. The second way is to take ready-made classes that come with the board. It is simpler and works “out of the box”, the minus is that all implementation details are hidden to a much greater extent, in addition, you will have to study and use custom-sdk, which, besides these boards, will not be useful anywhere else. However, we will look at both ways, start with the first.
Image classification
Consider the problem of image recognition. To do this, we will use the ResNet50 model supplied with Keras (this model was the winner of the ImageNet Challenge in 2015). To use it, a few lines of code are enough.
import tensorflow as tf import numpy as np import time IMAGE_SIZE = 224 IMG_SHAPE = (IMAGE_SIZE, IMAGE_SIZE, 3) resnet = tf.keras.applications.ResNet50(input_shape=IMG_SHAPE) img = tf.contrib.keras.preprocessing.image.load_img('cat.png', target_size=(IMAGE_SIZE, IMAGE_SIZE)) t_start = time.time() img_data = tf.contrib.keras.preprocessing.image.img_to_array(img) x = tf.contrib.keras.applications.resnet50.preprocess_input(np.expand_dims(img_data, axis=0)) probabilities = resnet.predict(x) print(tf.contrib.keras.applications.resnet50.decode_predictions(probabilities, top=5)) print("dT", time.time() - t_start) I did not even begin to remove the code under the spoiler, because he is very small. As you can see, the image is first resized to 224x224 (this is the input network format), at the end, the predict function does all the work.
We take a photo of the cat and run the program.
Results:
[[('n02123045', 'tabby', 0.765179), ('n02123159', 'tiger_cat', 0.19059166), ('n02124075', 'Egyptian_cat', 0.013605555), ('n04493381', 'tub', 0.0025916891), ('n04553703', 'washbasin', 0.0021566998)]] Once again, upset by his knowledge of English (I wonder how many non-native people know what “tabby” is?), I checked the output with the dictionary, yes, everything works.
The PC code execution time was 0.5 s for calculations on the CPU and 2 s (!) For calculations on the GPU. Judging by the log, the problem is either in the model or in Tensorflow, but when it starts, the code tries to allocate a lot of memory, getting several warnings like “Allocator (GPU_0_bfc) ran out of memory trying to allocate 2.13GiB with freed_by_count = 0.” . This is a warning and not an error, while the code works, but much slower than it should.
On Jetson Nano, it’s still slower: 2.8c on the CPU and 18.8c on the GPU, while the output looks like this:
In general, even 3s per image, this is not yet real time. Setting the gpu_options.allow_growth option recommended on stack overflow does not help, if anyone knows another way, write in the comments.
Edit : as suggested in the comments, the first start of tensorflow always takes a long time, and it’s incorrect to measure time using it. Indeed, when processing the second and subsequent files, the results are much better - 0.6s without a GPU and 0.2s with a GPU. On the desktop, speed is, however, 2.0s and 0.05s, respectively.
A convenient feature of ResNet50 is that at the first start it pumps out the entire model to disk (about 100 MB), then the code works completely autonomously, without registration and SMS. Which is especially nice, given that most modern AI-services work only on the server, and without the Internet, the device turns into a "pumpkin".
Cats vs dogs
Consider the following problem. Using Keras, we’ll create a neural network that can distinguish between cats and dogs. It will be a convolutional neural network (CNN - Convolutional Neural Network), we will take network design from this publication. A training set of images of cats and dogs is already included in the tensorflow_datasets package, so you don’t have to photograph them yourself.
We load a set of images and divide it into three blocks - training, verification and test. We “normalize” each picture, bringing the colors to the range 0..1.
import tensorflow as tf from tensorflow.keras import layers import tensorflow_datasets as tfds from keras.preprocessing import image import numpy as np import time IMAGE_SIZE = 64 IMG_SHAPE = (IMAGE_SIZE, IMAGE_SIZE, 3) splits = tfds.Split.TRAIN.subsplit(weighted=(80, 10, 10)) (cat_train, cat_valid, cat_test), info = tfds.load('cats_vs_dogs', split=list(splits), with_info=True, as_supervised=True) label_names = info.features['label'].int2str def pre_process_image(image, label): image = tf.cast(image, tf.float32) image = image / 255.0 # Normalize image: 0..255 -> 0..1 image = tf.image.resize(image, (IMAGE_SIZE, IMAGE_SIZE)) return image, label BATCH_SIZE = 32 SHUFFLE_BUFFER_SIZE = 1000 train_batch = cat_train.map(pre_process_image).shuffle(SHUFFLE_BUFFER_SIZE).repeat().batch(BATCH_SIZE) validation_batch = cat_valid.map(pre_process_image).repeat().batch(BATCH_SIZE) We write the function of generating a convolutional neural network.
def custom_model(): # Source: https://medium.com/@ferhat00/deep-learning-with-keras-classifying-cats-and-dogs-part-1-982067594856 classifier = tf.keras.Sequential() # Step 1 — Convolution classifier.add(layers.Conv2D(32, (3, 3), input_shape=IMG_SHAPE, activation='relu')) # Step 2 — Pooling classifier.add(layers.MaxPooling2D(pool_size=(2, 2))) # Adding a second convolutional layer classifier.add(layers.Conv2D(32, (3, 3), activation='relu')) classifier.add(layers.MaxPooling2D(pool_size=(2, 2))) # Step 3 — Flattening classifier.add(layers.Flatten()) # Step 4 — Full connection classifier.add(layers.Dense(units=128, activation='relu')) classifier.add(layers.Dense(units=1, activation='sigmoid')) # Compiling the CNN we shall use the Adam stochastic optimisation method, binary cross entropy loss function classifier.compile(optimizer=tf.keras.optimizers.Adam(), loss='binary_crossentropy', metrics=['accuracy']) return classifier Now we can run network training on our “cat-dog” kit. Training takes a long time (20 minutes on the GPU and 1-2 hours on the CPU), so when finished, save the model to a file.
tl_model = custom_model() t_start = time.time() tl_model.fit(train_batch, steps_per_epoch=8000, epochs=2, validation_data=validation_batch, validation_steps=10, callbacks=None) print("Training done, dT:", time.time() - t_start) print(tl_model.summary()) validation_steps = 20 loss0, accuracy0 = tl_model.evaluate(validation_batch, steps=validation_steps) print("Loss: {:.2f}".format(loss0)) print("Accuracy: {:.2f}".format(accuracy0)) tl_model.save("dog_cat_model.h5") By the way, the attempt to start training directly on the Jetson Nano failed - the board in 5 minutes overheated and hung. For resource-intensive calculations, a cooler is required for the board, although by and large, there is no sense in doing such tasks directly on Jetson Nano - the model can be trained on a PC, and the finished saved file can be used on Nano.
Then another pitfall came out - the tensowflow version 14 library was installed on the PC, and the latest version for Jetson Nano so far is 13. And the model saved in the 14th version was not read in the 13th, I had to install the same versions using pip.
Finally, we can load the model from a file and use it to recognize images.
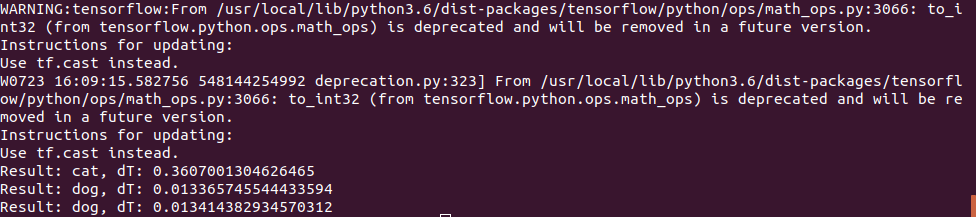
def predict_model(model, image_file): img = image.load_img(image_file, target_size=(IMAGE_SIZE, IMAGE_SIZE)) t_start = time.time() img_arr = np.expand_dims(img, axis=0) result = model.predict_classes(img_arr) print("Result: {}, dT: {}".format(label_names(result[0][0]), time.time() - t_start)) model = tf.keras.models.load_model('dog_cat_model.h5') predict_model(model, "cat.png") predict_model(model, "dog1.png") predict_model(model, "dog2.png") The photo of the cat was used the same, but for the “dog” test 2 pictures were used:
The first guessed correctly, and the second at first had errors and the neural network thought it was a cat, I had to increase the number of iterations of training. However, I would probably be wrong the first time too;)
The execution time on Jetson Nano turned out to be quite small - the very first photo was processed in 0.3s, but all subsequent ones were much faster, apparently the data is cached in memory.
In general, we can assume that on such simple neural networks the board speeds are quite enough even without any optimizations, 100fps is a value sufficient even for video in real time.
Conclusion
As you can see, even standard models from Keras and Tensorflow can be used on Nano, albeit with varying success - something works, something doesn't. However, the results can be improved, instructions on optimizing the model and reducing memory size can be read here .
But fortunately for us, manufacturers have already done this for us. If readers still have interest, the final part will be devoted to ready-made libraries optimized for working with Jetson Nano.
Source: https://habr.com/ru/post/460971/
All Articles