Introduction to Screen Capture API - Scan QR codes in a browser
Introduction
In this article, we’ve guessed that we’ll talk about the Screen Capture API. This API was born in 2014, and it is difficult to call it new, but browser support is still quite weak. Nevertheless, it can be used for personal projects or where this support is not so important.
A few links to get you started:
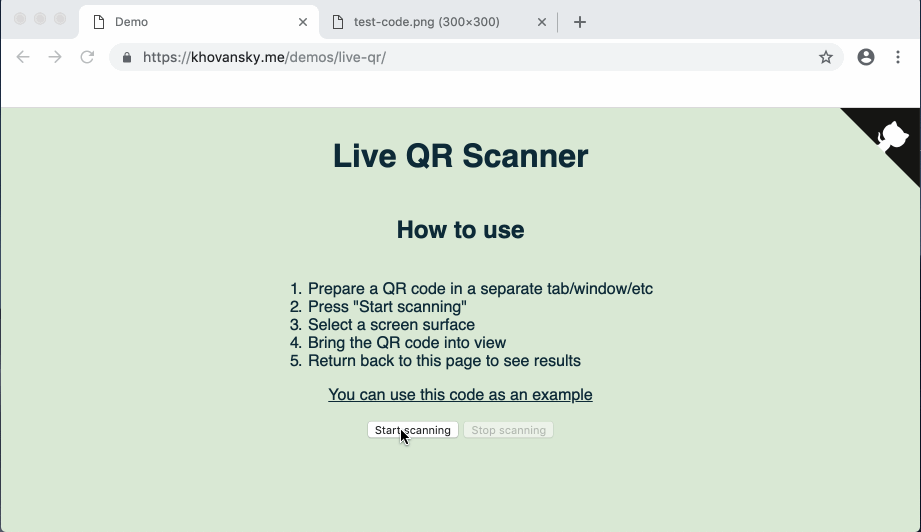
In case the link with the demo falls off (or if you are too lazy to go there) - this is how the finished demo looks:
Let's get started.
Motivation
Recently I came up with the idea of a web application that uses QR codes in its work. And although they are usually convenient for sending, for example, long links in the real world, where you can point the phone at them, on the desktop it’s a little more complicated. If the QR code is on the screen of the same device on which you need to read it, you need to mess with the services for recognition or recognize from the phone and transfer the data back to the PC. Inconveniently.
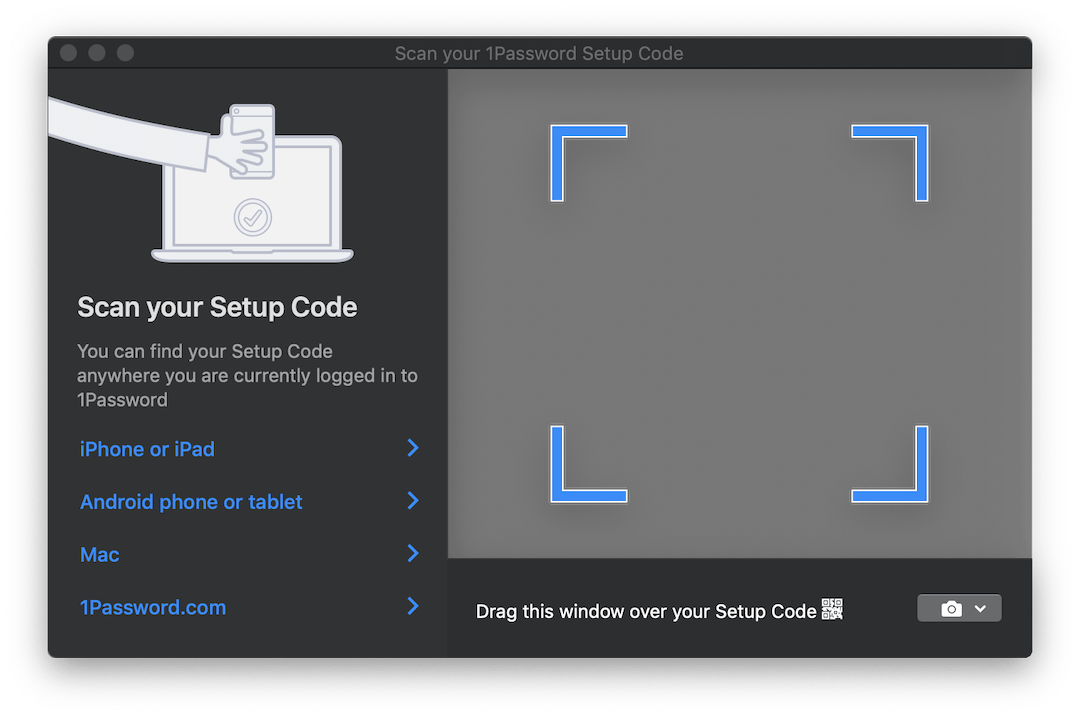
Some products, such as 1Password , include an interesting solution for this situation. If you need to set up an account from a QR code, they open a translucent window that you can drag over the image with the code, and it is automatically recognized. Here's what it looks like:
It would be ideal if we could implement something similar for our application. But probably it won’t work out in the browser ...
Meet - getDisplayMedia
Almost. Here the Screen Capture API with its only getDisplayMedia method will getDisplayMedia . getDisplayMedia is like getUserMedia , only for the device screen, instead of its camera. Unfortunately, browser support, as mentioned above, is far from as widespread as access to the camera. According to MDN, you can use it in Firefox, Chrome, Edge (although it’s in the wrong place there - right in navigator , and not in navigator.mediaDevices ) + Edge Mobile and ... Opera for Android.
A pretty curious selection of mobile browsers next to the expected Big Two.
The API itself is extremely simple. It works the same as getUserMedia , but it allows you to capture a video stream from one of the defined display surfaces :
- from the monitor (entire screen),
- from a window or all windows of a specific application,
- from a browser , or rather from a specific document. In Chrome, this document is a separate tab, but in FF there is no such option.
Browser API, which allows you to look outside the browser ... It sounds familiar and usually bodes down to some troubles, but in this case it can be quite convenient. You can capture a picture from other windows and, for example, in real time recognize and translate text, like Google Translate Camera. Well, and there are probably many more interesting uses.
We collect
So, we figured out the capabilities that the API gives us. What's next?
And then we need to overtake this video stream into images that we can work on. To do this, we use the <video> , <canvas> elements and some more JS.
A close-up of the process looks something like this:
- Direct stream to
<video>; - With a certain frequency, draw the contents of the
<video>in<canvas>; - Collect an ImageData object from
<canvas>using thegetImageData2D context method.
This whole procedure may sound a little strange due to such a long pipeline, but this method is quite popular and was used to capture data from webcams in getUserMedia .
Omitting everything irrelevant, in order to start the stream and pull out the frame from it, we need about the following code:
async function run() { const video = document.createElement('video'); const canvas = document.createElement('canvas'); const context = canvas.getContext('2d'); const displayMediaOptions = { video: { cursor: "never" }, audio: false } video.srcObject = await navigator.mediaDevices.getDisplayMedia(displayMediaOptions); const videoTrack = video.srcObject.getVideoTracks()[0]; const { height, width } = videoTrack.getSettings(); context.drawImage(video, 0, 0, width, height); return context.getImageData(0, 0, width, height); } await run(); As mentioned above: first, we create the <video> and <canvas> elements and ask the canvas for a 2D context ( CanvasRenderingContext2D ).
Then we define flow restrictions / conditions . Unlike streams from the camera, there are few of them. We say that we do not want to see the cursor, and that we do not need audio. Although at the time of this writing, audio capture is still not supported by anyone.
After that, we hook the received stream of type MediaStream to the <video> element. Note that getDisplayMedia returns a Promise.
Finally, from the received data about the stream, we remember the resolution of the video in order to correctly draw it onto the canvas, draw the frame and pull out the ImageData object from the ImageData .
For full use, you most likely will want to process frames in a loop rather than once. For example, while you wait when the desired image appears in the frame. And here a few words need to be said.
When it comes to “handling something in the DOM in a constant loop,” the first thing that comes to mind is most likely requestAnimationFrame . However, in our case, using it will not work. The thing is that when the tab ceases to be active - browsers pause rAF loop processing. In our case, it is at this time that we will want to process the images.
In this regard, instead of rAF, we will use the good old setInterval . But things are not so smooth with him. In an inactive tab, the interval between callback operations is at least 1 second . Nevertheless, this is enough for us.
Finally, when we get to the frames, we can process them as we please. For the purposes of this demo, we will use the jsQR library. It is extremely simple: it accepts ImageData as input, the width and height of the image. If the received image has a QR code, you will get a JS object with recognized data back.
Let's complement our previous example with just a couple more lines of code:
const imageData = await run(); const code = jsQR(imageData.data, streamWidth, streamHeight); Done!
NPM
I thought that the main code behind this example could be packaged into an npm library and save some time for initial setup in later use. The library is very simple, at this stage it just accepts the callback to which ImageData will be sent, and one additional parameter is the frequency of sending data. All processing you need to bring your own. I'll think about whether it makes sense to expand its functionality.
The library is called stream-display : NPM | Github .
Its use is reduced to literally three lines of code and a callback:
const callback = imageData => {...} // do whatever with those images const capture = new StreamDisplay(callback); // specify where the ImageData will go await capture.startCapture(); // when ready capture.stopCapture(); // when done The demo can be seen here . There is also a CodePen version for quick experiments. Both examples use the above NPM package.
A little bit about testing
Packing this code into the library, I had to think about how to test it. I absolutely did not want to drag 50MB of headless Chrome to run a few small tests in it. And although the idea of writing stubs for all the components seemed too painful, in the end I did so.
As a test runner, tape was selected. Here is what I finally had to simulate:
documentobject and DOM elements. For this, I took jsdom ;- some jsdom methods that lack implementation:
HTMLMediaElement#play,HTMLCanvasElement#getContextandnavigator.mediaDevices#getDisplayMedia; - time. To do this, I used the
useFakeTimerslibrary, which under the hood callslolex. It sets its replacements tosetInterval,requestAnimationFrameand many other functions that work with time, and also allows you to control the flow of this fake time. But be careful: jsdom uses the passage of time in one place of its initialization process, and if you turn on sinon first, everything will freeze.
I also used sinon for all function stubs that needed to be monitored. The rest was implemented by empty JS functions.
Of course, you are free to choose the tools with which you are already familiar. But I hope this list will allow you to prepare it in advance, since now you know what you have to deal with.
The end result can be seen in the library repository. It doesn’t look too pretty, but it works.
Conclusion
The solution was not as elegant as the transparent window mentioned at the beginning of the article, but perhaps the web will come to this one day. One can only hope that when browsers learn to see through their windows - these capabilities will be strictly controlled by us. In the meantime, remember that when you fumble the screen in Chrome - it can be parsed, recorded, etc. So do not rummage more than necessary!
I hope someone after this article has learned a new trick for themselves. If you have ideas for what else this can be used, write in the comments. And see you soon.
')
Source: https://habr.com/ru/post/460825/
All Articles