Standard Browser API Payment Request
Do you know that many modern browsers have a built-in API called Payment Request? This API is described in the W3C standard, which aims to support the work with billing and contact information. Here is an overview of the standard on developers.google.com. A review of the implementation of this API on the MDN website suggests that the Payment Request gives the developer browser tools that allow users to associate their preferred payment systems and platforms with online stores. This increases the convenience of making payments for goods and services, speeding up and simplifying this process. In particular, for example, the Payment Request API allows the user to enter their billing information and address only once, and not enter the same information on each site. Payment on all sites that support this API will look the same for the user. The Payment Request API has other valuable features. Among them - solving problems with the availability of payment tools for users with disabilities, synchronization of payment data between different user devices, standardized error handling tools.

The material, the translation of which we publish today, is devoted to a demonstration of the practical use of the Payment Payment API. It is immediately worth noting that the Payment Request API is an experimental technology that may well change in the future. However, the author of this material says that, despite this, she is worthy to get acquainted with her. He is confident that this technology has a bright future, and that the changes that can be made to it will not affect the basic principles of working with it too much.
The widespread adoption of the Payment Request API will benefit everyone involved in the creation and use of online payment systems. In particular, for programmers and site owners, this will mean facilitating the creation of payment acceptance systems, and for users, simplifying and speeding up the process of paying for goods and services.
')
To use this API in JavaScript, you first need to create a
The
In the documentation with MDN, you can find information that the Payment Request API can only be used with HTTPS. This is pretty obvious considering what this API works with.
Here's what the user interaction with the Payment Request API looks like.

Using Payment Request API
As you can see, the payment system is integrated directly into the browser. This means that you do not need to use unsafe redirection operations to complete the payment, you do not need to use any external APIs either. Everything happens directly in the browser.
Here is a project in which an implementation of a screen is presented, showing the user a list of saved payment card data.

Saved Cards
Consider a practical example of working with the Payment Request API.
If you want to experiment with the project on your own, which we will analyze, you can execute the following command:
It clones the appropriate repository, installs the project dependencies, and starts the server, available at
The main page of the application is very simple. It imitates a fragment of the interface of an online store that allows you to "put in a basket" a certain product. To start the checkout process, click on the

Application page
We are dealing with a very simple application. Therefore, we can place all the logic related to the interface of the “online store” and to payments in the
Here we get links to DOM elements, in particular, to buttons for increasing and decreasing the quantity of “goods”, and we attach event handlers to them. The total amount is displayed in the corresponding page element.
The
The following code also gets into
After the user clicks the
The first argument to the constructor is represented by a call to the
The second argument to the constructor,
This information may include, for example, a description of the purchased goods, their value, total purchase amount. The code for the
Note that this function returns an object, not an array of objects.
Now we are ready to show the user a window for making a payment. Call the
As a result, after we press the

User payment review
At this step, you will probably need to add bank card information to the system. I recommend using the VISA test card here. Enter the card number, your name and address in the appropriate fields. We are just testing the API, so the data entered may not be real.

Visa Test Card Number
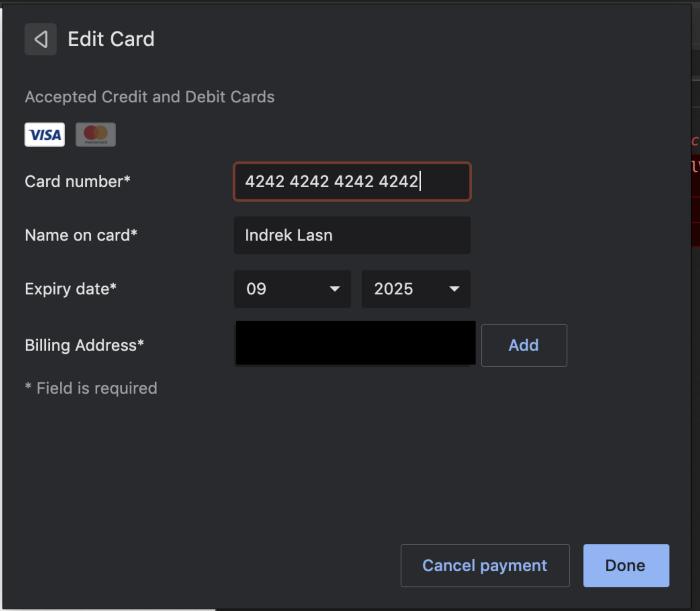
Enter card details
After we entered the card information into the system and confirmed the payment, we get the PaymentResponse object returned from the promise.
Call its .complete () method to tell the user that everything is going as it should. Here's what it looks like in code:
That's all! We just examined the code that is needed to implement the simplest basket of an online store.
Here is a complete demonstration of the application.

Application Demonstration
→ Here you can find the source code of the project.
Here is information on supporting the Payment Request API with caniuse.com.

Which browsers support the Payment Request API?
As you can see, this API is relatively new, so it does not yet have particularly wide browser support. The good thing is that it is supported by Chrome, Safari, Firefox and Edge. You probably use at least one of these browsers, so you can fully experience everything that we talked about above.
It should be noted that it is obvious that in the area of support for Payment Request API browsers still have a lot of work to do. This is especially true for mobile browsers. Therefore, if I were to use this API now, I would not count on its work on mobile devices so far.
The Payment Request API has every chance of becoming a widespread and popular technology. Therefore, if this technology interests you - here , here , here and here - materials that can help you better understand it.
Dear readers! Are you considering using the Payment Request API in your projects?

The material, the translation of which we publish today, is devoted to a demonstration of the practical use of the Payment Payment API. It is immediately worth noting that the Payment Request API is an experimental technology that may well change in the future. However, the author of this material says that, despite this, she is worthy to get acquainted with her. He is confident that this technology has a bright future, and that the changes that can be made to it will not affect the basic principles of working with it too much.
The basics
The widespread adoption of the Payment Request API will benefit everyone involved in the creation and use of online payment systems. In particular, for programmers and site owners, this will mean facilitating the creation of payment acceptance systems, and for users, simplifying and speeding up the process of paying for goods and services.
')
To use this API in JavaScript, you first need to create a
PaymentRequest object. The command to create it looks like this: new PaymentRequest(methodData: fn, details: fn, options?); The
PaymentRequest constructor PaymentRequest passed two required parameters and one optional:- The
methodDataparameter is an array of objects containing information about the payment service provider. This, for example, is information about supported payment methods. - The
detailsparameter is an object that contains information about a specific payment. For example, the total payment amount, tax amount, shipping cost. - The
optionsparameter, optional, is an object that contains additional information about the payment.
In the documentation with MDN, you can find information that the Payment Request API can only be used with HTTPS. This is pretty obvious considering what this API works with.
Here's what the user interaction with the Payment Request API looks like.
Using Payment Request API
As you can see, the payment system is integrated directly into the browser. This means that you do not need to use unsafe redirection operations to complete the payment, you do not need to use any external APIs either. Everything happens directly in the browser.
Here is a project in which an implementation of a screen is presented, showing the user a list of saved payment card data.
Saved Cards
Consider a practical example of working with the Payment Request API.
Project Overview
If you want to experiment with the project on your own, which we will analyze, you can execute the following command:
git clone https://github.com/indreklasn/payments-request-api-example.git && yarn && yarn start It clones the appropriate repository, installs the project dependencies, and starts the server, available at
localhost:3000 . Please note that the application under consideration is launched in the local system for research purposes.The main page of the application is very simple. It imitates a fragment of the interface of an online store that allows you to "put in a basket" a certain product. To start the checkout process, click on the
BUY button.Application page
We are dealing with a very simple application. Therefore, we can place all the logic related to the interface of the “online store” and to payments in the
app.js file: let count = 0 const cartIncrementButton = document.getElementById('cartIncrement') const cartDecrementButton = document.getElementById('cartDecrement') const countElement = document.getElementById('count') const buyButton = document.getElementById('purchase') function init() { countElement.innerHTML = count cartIncrementButton.addEventListener('click', () => { count++ countElement.innerHTML = `${count}$` }) cartDecrementButton.addEventListener('click', () => { if (count === 0) return count-- countElement.innerHTML = `${count}$` }) } init() Here we get links to DOM elements, in particular, to buttons for increasing and decreasing the quantity of “goods”, and we attach event handlers to them. The total amount is displayed in the corresponding page element.
The
cartIncrementButton button from our code can be imagined as a button that allows you to add some product to the basket. The cartDecrementButton button allows cartDecrementButton to remove the goods from the basket, and the price of all goods that were put in the basket is displayed in the countElement element.Implementation of a payment system
The following code also gets into
app.js It is an implementation of the event handler that occurs when you click on the BUY button (it is called buyButton in the code): buyButton.addEventListener('click', () => { const request = new PaymentRequest( buildSupportedPaymentMethodData(), buildShoppingCartDetails() ); }) After the user clicks the
BUY button, we create a new instance of the PaymetnRequest object. We use here a couple of functions that return what needs to be passed to the constructor of the object. These are the functions buildSupportedPaymentMethodData and buildShoppingCartDetails .The first argument to the constructor is represented by a call to the
buildSupportedPaymentMethodData function. It returns an array of objects that are supported payment methods. This function is declared in app.js : function buildSupportedPaymentMethodData() { // : return [{ supportedMethods: 'basic-card', data: { supportedNetworks: ['visa', 'mastercard'], supportedTypes: ['debit', 'credit'] } }]; The second argument to the constructor,
buildShoppingCartDetails , is a function call that generates the information needed to complete the purchase.This information may include, for example, a description of the purchased goods, their value, total purchase amount. The code for the
buildShoppingCartDetails function buildShoppingCartDetails also in app.js : function buildShoppingCartDetails() { return { id: 'count-order', displayItems: [ { label: 'Example item', amount: {currency: 'USD', value: '1.00'} } ], total: { label: 'Total', amount: {currency: 'USD', value: count } } }; } Note that this function returns an object, not an array of objects.
Now we are ready to show the user a window for making a payment. Call the
.show() method of the request object. This call will return the promise. If you are not familiar with promises, take a look at this material. The code, again, is in app.js : buyButton.addEventListener('click', () => { const request = new PaymentRequest( buildSupportedPaymentMethodData(), buildShoppingCartDetails() ); request.show().then(paymentResponse => { console.log(paymentResponse) }) }) As a result, after we press the
BUY button, we should see what is shown in the following figure.User payment review
At this step, you will probably need to add bank card information to the system. I recommend using the VISA test card here. Enter the card number, your name and address in the appropriate fields. We are just testing the API, so the data entered may not be real.
Visa Test Card Number
Enter card details
Payment processing
After we entered the card information into the system and confirmed the payment, we get the PaymentResponse object returned from the promise.
Call its .complete () method to tell the user that everything is going as it should. Here's what it looks like in code:
buyButton.addEventListener('click', () => { const request = new PaymentRequest(buildSupportedPaymentMethodData(), buildShoppingCartDetails()); request.canMakePayment().then(result => { if (result) { request.show().then(paymentResponse => { console.log(paymentResponse.details) // . , , , . paymentResponse.complete('success') .then(() => thankYouMessage.style.opacity = 1) }) } }) }) That's all! We just examined the code that is needed to implement the simplest basket of an online store.
Here is a complete demonstration of the application.
Application Demonstration
→ Here you can find the source code of the project.
About support for Payment Request API browsers
Here is information on supporting the Payment Request API with caniuse.com.
Which browsers support the Payment Request API?
As you can see, this API is relatively new, so it does not yet have particularly wide browser support. The good thing is that it is supported by Chrome, Safari, Firefox and Edge. You probably use at least one of these browsers, so you can fully experience everything that we talked about above.
It should be noted that it is obvious that in the area of support for Payment Request API browsers still have a lot of work to do. This is especially true for mobile browsers. Therefore, if I were to use this API now, I would not count on its work on mobile devices so far.
Summary
The Payment Request API has every chance of becoming a widespread and popular technology. Therefore, if this technology interests you - here , here , here and here - materials that can help you better understand it.
Dear readers! Are you considering using the Payment Request API in your projects?
Source: https://habr.com/ru/post/460799/
All Articles