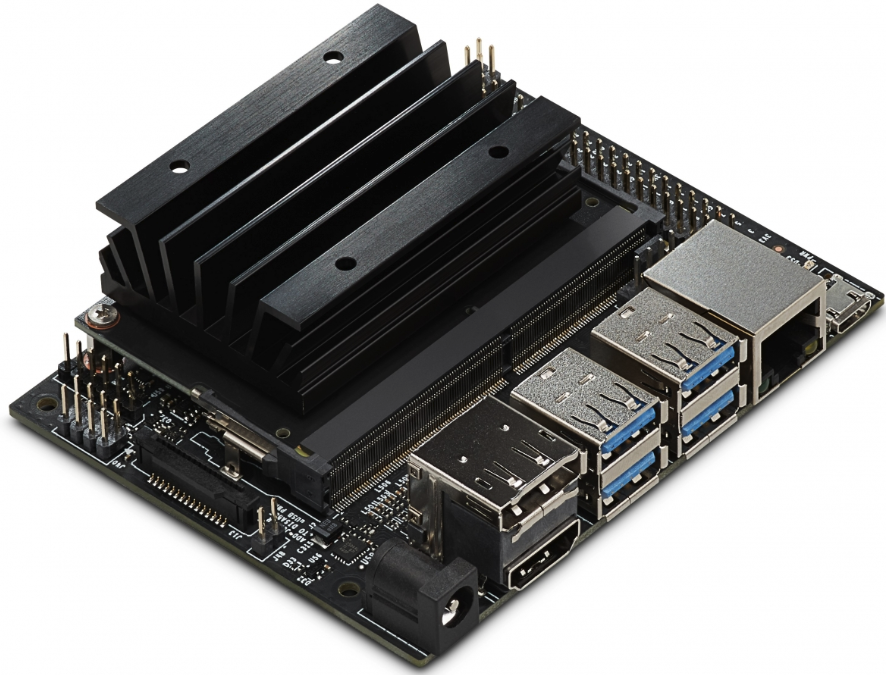
NVIDIA Jetson Nano: Tests and First Impressions
Hi, Habr.
Relatively recently, in this year, 2019, NVIDIA announced a single-board computer compatible with the Raspberry Pi form factor, focused on AI and demanding calculations.
')
After its appearance on sale, it became interesting to see how it works and what can be done on it. Standard benchmarks are not so interesting to use, so let's think up our own, for all the tests in the text are the source. For those who are interested in what happened, continued under the cut.
To begin with, specifications from the NVIDIA website:
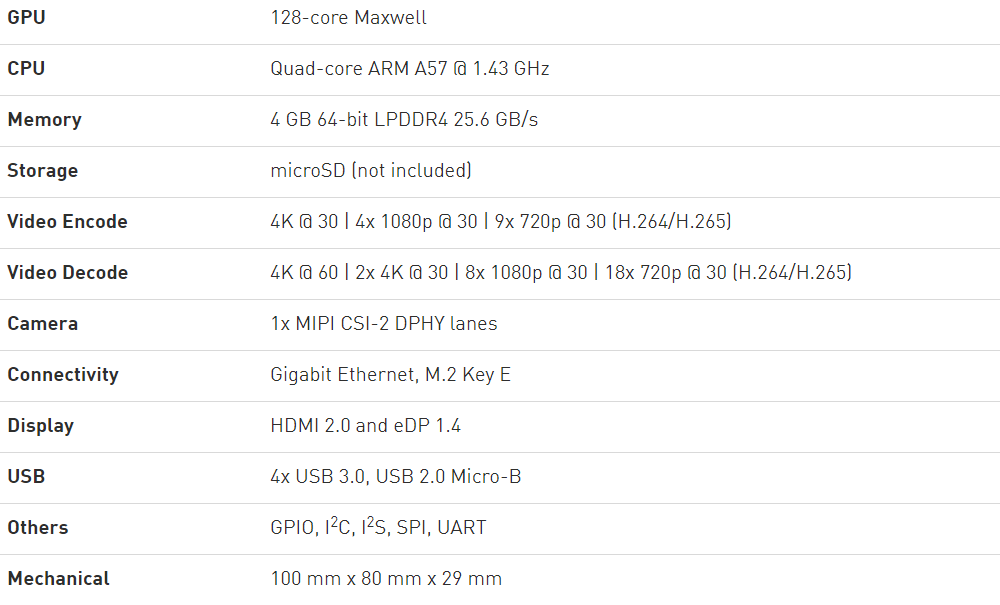
From interesting, here it is possible to note several points.
The first is the GPU, which has 128 cores, respectively, on the board, you can run GPU-oriented tasks, like CUDA (supported and installed out of the box) or Tensorflow. The main processor is 4 core, and as will be shown below, it is quite good. 4GB memory shared between CPU and GPU.
The second is compatibility with Raspberry Pi. The board has a 40-pin connector with various interfaces (I2C, SPI, etc.), there is also a camera connector, which is also compatible with the Raspberry Pi. It can be assumed that a large number of existing accessories (screens, motor control boards, etc.) will work (you may have to use an extension cable, because the Jetson Nano is still different in size).
Thirdly, there are 2 video outputs on the board, Gigabit-Ethernet and USB 3.0, i.e. Jetson Nano as a whole is even slightly more functional than the “prototype.” 5V power supply can be taken both via Micro USB and through a separate connector, which is recommended formining bitcoin- intensive tasks. Just like in the Raspberry Pi, the software is loaded from the SD card, the image of which you need to pre-record. In general, according to the ideology, the board is quite similar to the Raspberry Pi, which was apparently conceived in NVIDIA. But there is no WiFi on the board, that there is a certain minus, those who wish will have to use the USB-WiFi module.
If you look closely, you can see that, structurally, the device consists of two modules - the Jetson Nano module itself, and the bottom board with connectors, the connection is made through the connector.
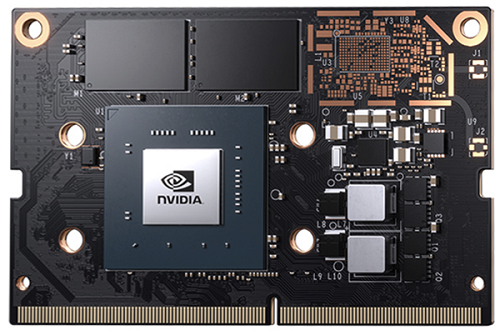
Those. the board can be disconnected and used separately; it can be convenient for embedded solutions.
Speaking of price. The original price of Jetson Nano in the US is $ 99, the price in Europe is about 130 Euros in local stores (if you catch discounts, you can probably find it cheaper). How much is Nano in Russia, is unknown.
As mentioned above, downloading and installing is a little different from Raspberry Pi. Download the image to the SD card via Etcher or Win32DiskImager, get into Linux, install the necessary libraries. Excellent step by step guide is here , I used it. Let's go straight to the tests - we will try to run different programs under Nano, and see how they work. For comparison, I used three computers - my own working laptop (Core I7-6500U 2.5 GHz), Raspberry Pi 3B + and Jetson Nano.
CPU test
First, a screenshot of the lscpu command.
Raspberry Pi 3B +:
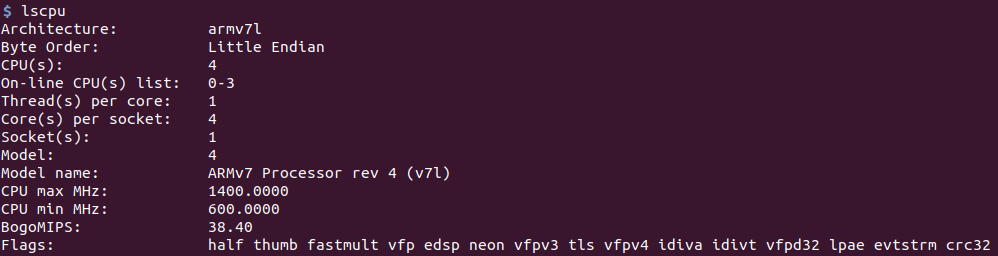
Jetson nano:

For calculations, let's start with something simple, but requiring CPU time. For example, calculating the number of pi. I took a simple Python program with stackoverflow .
I do not know whether it is optimal or not, but it does not matter to us - we are interested in the relative time .
As expected, the program does not work quickly. Result for Jetson Nano: 0.8c.
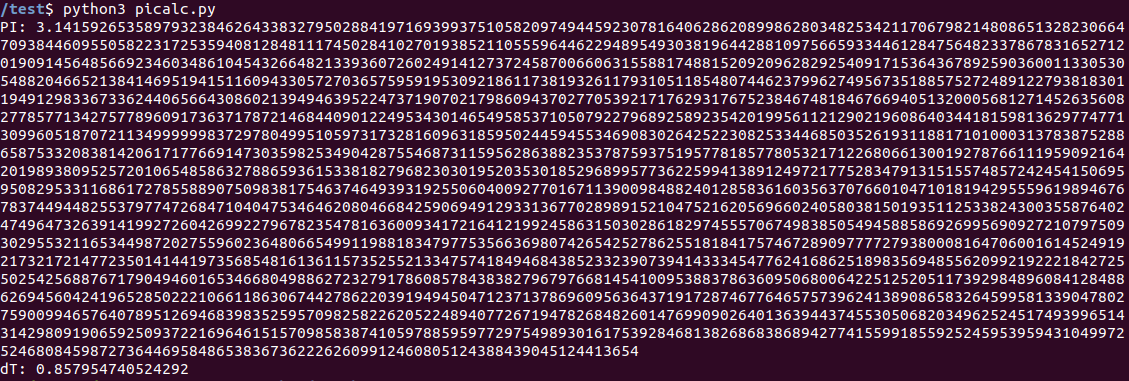
Raspberry Pi 3B + showed significantly longer time: 3.06c. "Exemplary" laptop completed the task for 0.27s. In general, even without using a GPU, the main processor in Nano is quite good for its form factor. Those interested can check for Raspberry Pi 4, I have it not available.
Surely there are those who wish to write in the comments that Python is not the best choice for such calculations, I repeat once again that it was important for us to compare the time, the need to minimize it is not here. It is clear that there are programs that calculate the Pi number much faster.
PyCUDA
Let us turn to the more interesting, calculations using the GPU, which is of course (the card from NVIDIA), we will use CUDA. The PyCUDA library required some shamanism during installation, it did not find cuda.h, it was helped by using the command “sudo env„ PATH = $ PATH “pip install pycuda”, maybe there is another way (more options were discussed on the devtalk.nvidia.com forum ).
For the test, I took the simple program SimpleSpeedTest for PyCUDA, which simply considers the sinuses in a cycle, such a test does not do anything useful, but it is quite possible to evaluate the time, and its code is simple and straightforward.
As you can see, the calculation is done using the GPU through CUDA and using the CPU, through numpy.
Results:
Jetson nano - 0.67c GPU, 13.3c CPU.
Raspberry Pi 3B + - 41.85c CPU, GPU - no data, CUDA on the RPi does not work.
Laptop - 0.05s GPU, 3.08c CPU.
Everything is quite expected. The calculations on the GPU are much faster than the calculations on the CPU (still 128 cores), the Raspberry Pi lags far behind. Well, of course,how many wolves do not feed, the elephant still has more laptop video card much faster than the card in Jetson Nano - it is quite likely that it has much more computing cores.
As you can see, the board at NVIDIA turned out to be quite interesting and very productive. It is slightly larger and more expensive than the Raspberry Pi, but if someone needs more computational power with a compact size, then it is well worth it. Of course, this is not always necessary - for example, to send the temperature to narodmon, Raspberry Pi Zero will suffice, and with multiple reserves. So Jetson Nano does not pretend to replace Raspberry and clones, but for demanding tasks it is very interesting (it can be not only drones or mobile robots, but also, for example, a camera for a doorbell with face recognition).
In one part, all conceived did not fit. In the second part there will be tests of the AI part - tests of Keras / Tensorflow and tasks on the classification and recognition of images.
Relatively recently, in this year, 2019, NVIDIA announced a single-board computer compatible with the Raspberry Pi form factor, focused on AI and demanding calculations.
')
After its appearance on sale, it became interesting to see how it works and what can be done on it. Standard benchmarks are not so interesting to use, so let's think up our own, for all the tests in the text are the source. For those who are interested in what happened, continued under the cut.
Hardware
To begin with, specifications from the NVIDIA website:
From interesting, here it is possible to note several points.
The first is the GPU, which has 128 cores, respectively, on the board, you can run GPU-oriented tasks, like CUDA (supported and installed out of the box) or Tensorflow. The main processor is 4 core, and as will be shown below, it is quite good. 4GB memory shared between CPU and GPU.
The second is compatibility with Raspberry Pi. The board has a 40-pin connector with various interfaces (I2C, SPI, etc.), there is also a camera connector, which is also compatible with the Raspberry Pi. It can be assumed that a large number of existing accessories (screens, motor control boards, etc.) will work (you may have to use an extension cable, because the Jetson Nano is still different in size).
Thirdly, there are 2 video outputs on the board, Gigabit-Ethernet and USB 3.0, i.e. Jetson Nano as a whole is even slightly more functional than the “prototype.” 5V power supply can be taken both via Micro USB and through a separate connector, which is recommended for
If you look closely, you can see that, structurally, the device consists of two modules - the Jetson Nano module itself, and the bottom board with connectors, the connection is made through the connector.
Those. the board can be disconnected and used separately; it can be convenient for embedded solutions.
Speaking of price. The original price of Jetson Nano in the US is $ 99, the price in Europe is about 130 Euros in local stores (if you catch discounts, you can probably find it cheaper). How much is Nano in Russia, is unknown.
Software
As mentioned above, downloading and installing is a little different from Raspberry Pi. Download the image to the SD card via Etcher or Win32DiskImager, get into Linux, install the necessary libraries. Excellent step by step guide is here , I used it. Let's go straight to the tests - we will try to run different programs under Nano, and see how they work. For comparison, I used three computers - my own working laptop (Core I7-6500U 2.5 GHz), Raspberry Pi 3B + and Jetson Nano.
CPU test
First, a screenshot of the lscpu command.
Raspberry Pi 3B +:
Jetson nano:
For calculations, let's start with something simple, but requiring CPU time. For example, calculating the number of pi. I took a simple Python program with stackoverflow .
I do not know whether it is optimal or not, but it does not matter to us - we are interested in the relative time .
Source code under spoiler
import time # Source: https://stackoverflow.com/questions/9004789/1000-digits-of-pi-in-python def make_pi(): q, r, t, k, m, x = 1, 0, 1, 1, 3, 3 for j in range(10000): if 4 * q + r - t < m * t: yield m q, r, t, k, m, x = 10*q, 10*(rm*t), t, k, (10*(3*q+r))//t - 10*m, x else: q, r, t, k, m, x = q*k, (2*q+r)*x, t*x, k+1, (q*(7*k+2)+r*x)//(t*x), x+2 t1 = time.time() pi_array = [] for i in make_pi(): pi_array.append(str(i)) pi_array = pi_array[:1] + ['.'] + pi_array[1:] pi_array_str = "".join(pi_array) print("PI:", pi_array_str) print("dT:", time.time() - t1) As expected, the program does not work quickly. Result for Jetson Nano: 0.8c.
Raspberry Pi 3B + showed significantly longer time: 3.06c. "Exemplary" laptop completed the task for 0.27s. In general, even without using a GPU, the main processor in Nano is quite good for its form factor. Those interested can check for Raspberry Pi 4, I have it not available.
Surely there are those who wish to write in the comments that Python is not the best choice for such calculations, I repeat once again that it was important for us to compare the time, the need to minimize it is not here. It is clear that there are programs that calculate the Pi number much faster.
PyCUDA
Let us turn to the more interesting, calculations using the GPU, which is of course (the card from NVIDIA), we will use CUDA. The PyCUDA library required some shamanism during installation, it did not find cuda.h, it was helped by using the command “sudo env„ PATH = $ PATH “pip install pycuda”, maybe there is another way (more options were discussed on the devtalk.nvidia.com forum ).
For the test, I took the simple program SimpleSpeedTest for PyCUDA, which simply considers the sinuses in a cycle, such a test does not do anything useful, but it is quite possible to evaluate the time, and its code is simple and straightforward.
Source code under spoiler
# SimpleSpeedTest.py # https://wiki.tiker.net/PyCuda/Examples/SimpleSpeedTest import pycuda.driver as drv import pycuda.autoinit from pycuda.compiler import SourceModule import numpy import time blocks = 64 block_size = 128 nbr_values = blocks * block_size n_iter = 100000 print("Calculating %d iterations" % (n_iter)) print() ##################### # SourceModule SECTION # create two timers so we can speed-test each approach start = drv.Event() end = drv.Event() mod = SourceModule("""__global__ void gpusin(float *dest, float *a, int n_iter) { const int i = blockDim.x*blockIdx.x + threadIdx.x; for(int n = 0; n < n_iter; n++) { a[i] = sin(a[i]); } dest[i] = a[i]; }""") gpusin = mod.get_function("gpusin") # create an array of 1s a = numpy.ones(nbr_values).astype(numpy.float32) # create a destination array that will receive the result dest = numpy.zeros_like(a) start.record() # start timing gpusin(drv.Out(dest), drv.In(a), numpy.int32(n_iter), grid=(blocks,1), block=(block_size,1,1) ) end.record() # end timing # calculate the run length end.synchronize() secs = start.time_till(end)*1e-3 print("PyCUDA time and first three results:") print("%fs, %s" % (secs, str(dest[:3]))) print() ############# # CPU SECTION # use numpy the calculate the result on the CPU for reference a = numpy.ones(nbr_values).astype(numpy.float32) t1 = time.time() for i in range(n_iter): a = numpy.sin(a) print("CPU time and first three results:") print("%fs, %s" % (time.time() - t1, str(a[:3]))) As you can see, the calculation is done using the GPU through CUDA and using the CPU, through numpy.
Results:
Jetson nano - 0.67c GPU, 13.3c CPU.
Raspberry Pi 3B + - 41.85c CPU, GPU - no data, CUDA on the RPi does not work.
Laptop - 0.05s GPU, 3.08c CPU.
Everything is quite expected. The calculations on the GPU are much faster than the calculations on the CPU (still 128 cores), the Raspberry Pi lags far behind. Well, of course,
Conclusion
As you can see, the board at NVIDIA turned out to be quite interesting and very productive. It is slightly larger and more expensive than the Raspberry Pi, but if someone needs more computational power with a compact size, then it is well worth it. Of course, this is not always necessary - for example, to send the temperature to narodmon, Raspberry Pi Zero will suffice, and with multiple reserves. So Jetson Nano does not pretend to replace Raspberry and clones, but for demanding tasks it is very interesting (it can be not only drones or mobile robots, but also, for example, a camera for a doorbell with face recognition).
In one part, all conceived did not fit. In the second part there will be tests of the AI part - tests of Keras / Tensorflow and tasks on the classification and recognition of images.
Source: https://habr.com/ru/post/460723/
All Articles