Auto Photo Studio, Part 1
A year and a half ago, I was browsing the blog of one of the successful Russian portrait photographers with a recognizable style, and a thought crept into my head, so why not just put the camera on a tripod, put a light in the studio once, set all the camera settings and do automatic processing of photos with a given profile? Photos in the blog were great, but very similar to each other.
Since I relate to people who do not know how to take pictures on the phone and love cameras, I really liked the idea. Yes, I saw all kinds of photo booths and photo stands, but the developers of these devices did not even master making normal colors. I decided that this was due to the fact that the developers did not understand the photos.
So that this idea does not happen the same as with the others (which did not budge or stalled at the initial stage). I decided that the most important thing is to make everything work as a whole, and not to polish to any one separate component. And since I have very little time to develop, after the main full-time work, the forces remain for 1-2 hours maximum, and a little more on weekends, you should try not to learn anything new, to maximize the use of existing knowledge.
I want to tell in this article what problems I had on the way and how I solved them.
A small explanation of the conditions of shooting and equipment: I considered only cameras with an APS-C matrix minimum and professional studio flashes, this is the only way to ensure high quality of images at any time of the day or night.
All people of different heights
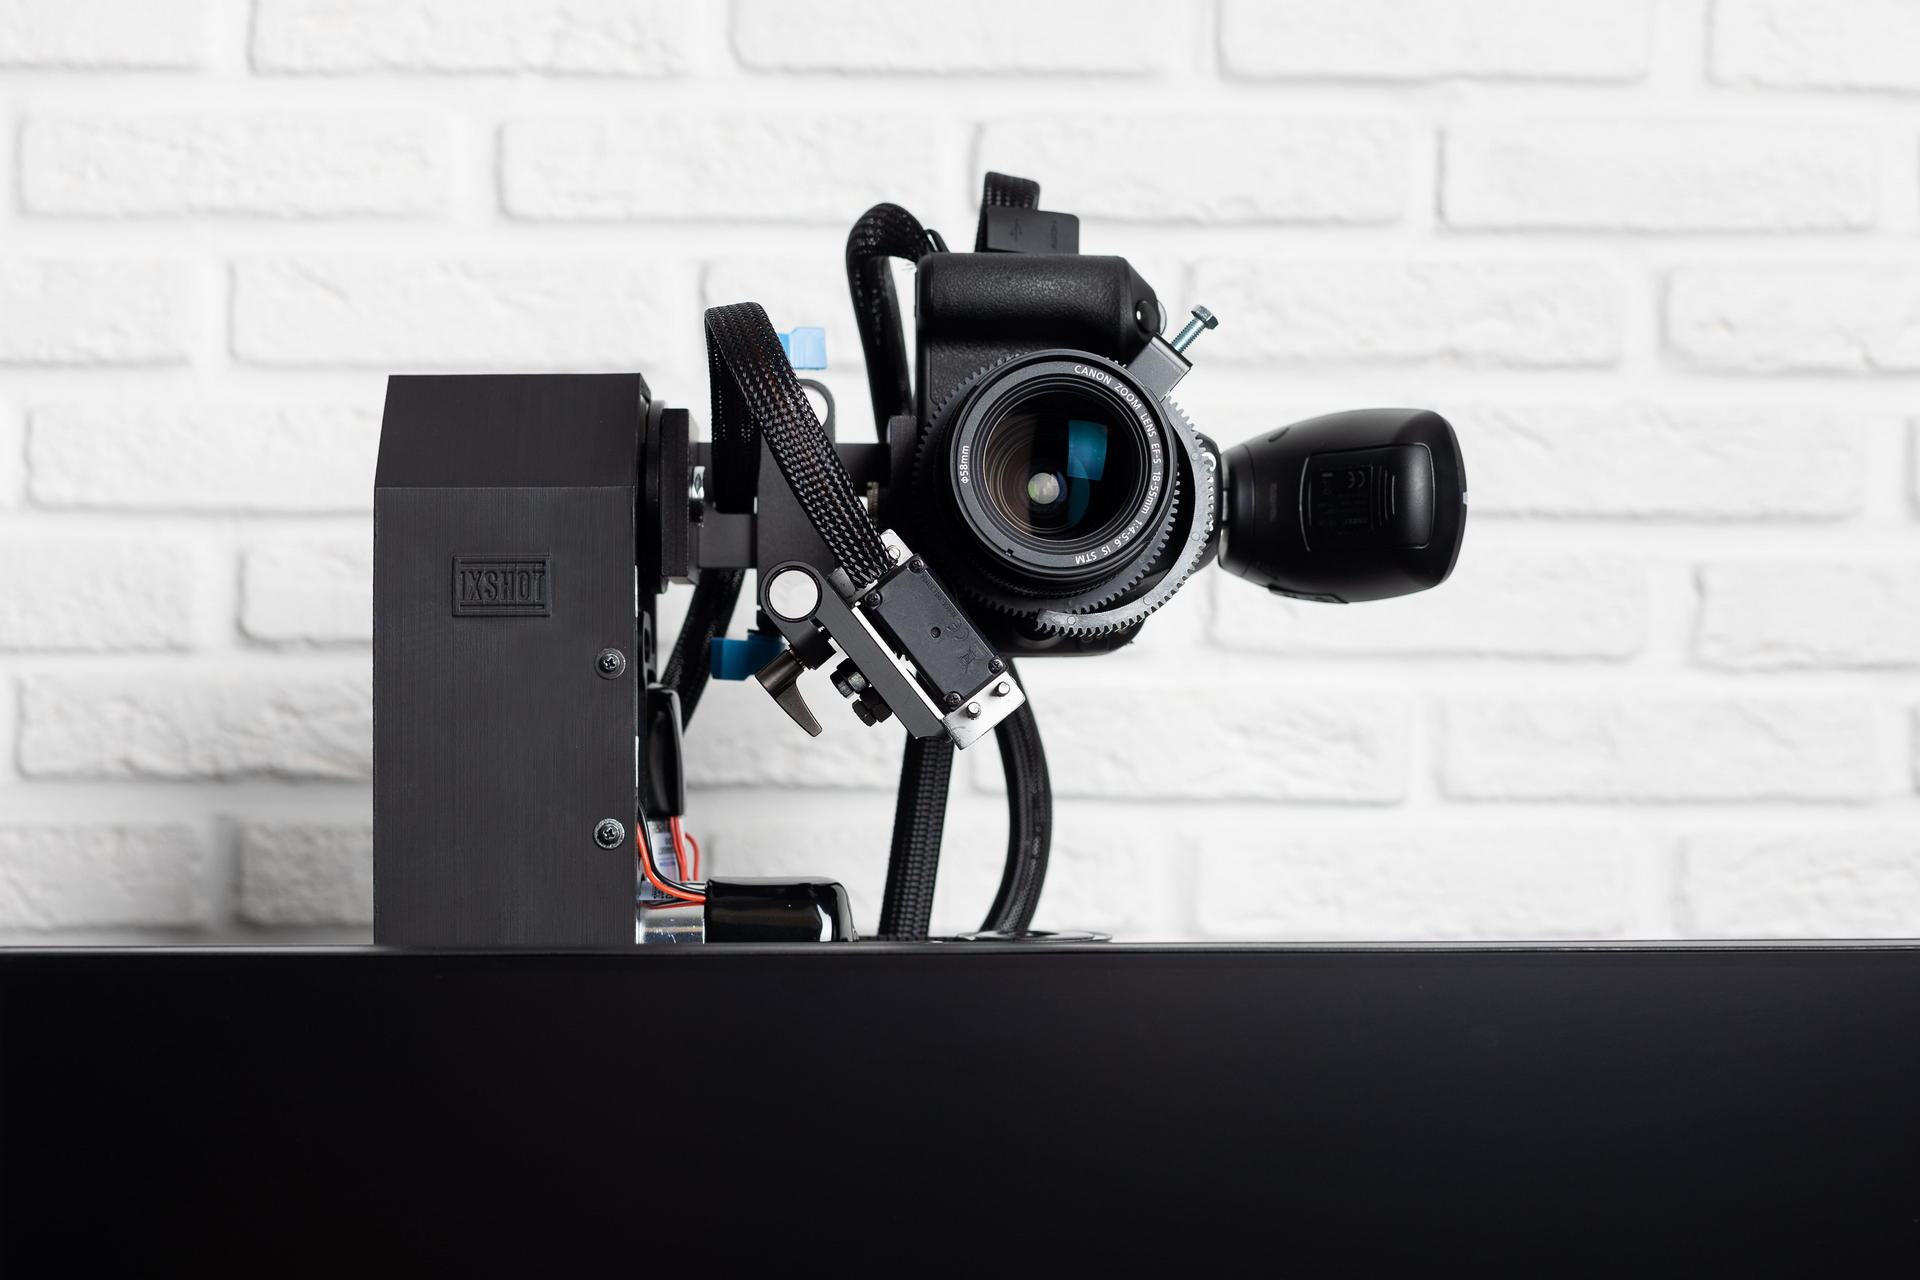
The first thing I was surprised to find when I put the camera on a tripod is that it’s not so easy to get into the frame and even so that there is a good composition. When you move from the camera and to it, then the whole composition also deteriorates, if you put it correctly for a particular person standing at a certain point. Yes, you can put a chair and say that you need to sit on a chair, but it will not be very interesting. You can still crop the photos, but then the quality will deteriorate. Well, the last way I chose was to make the camera automatically steer.
There are also 2 options. The correct one is that the optical axis is always horizontal, the camera is shifted up and down and more simple to implement is to adjust the position of the camera by tilting. In this case, there will be perspective distortions, but they are quite well corrected during processing if you memorize the angle of inclination of the camera.
Since I practically had no experience in manufacturing any iron devices, I tried to find something as ready as possible for use. I found several devices for panoramic shooting in the range of $ 1000, all allowed to manually control the bends and turns, as well as automatically shoot panoramas. But they could not be controlled from the computer. There are also quite a few devices for controlling video cameras, for shooting from camera cranes, for example. Good devices that have hints of digital control are very expensive, and it’s completely unclear if there is any accessible API. In the end, I found this device on a popular site:
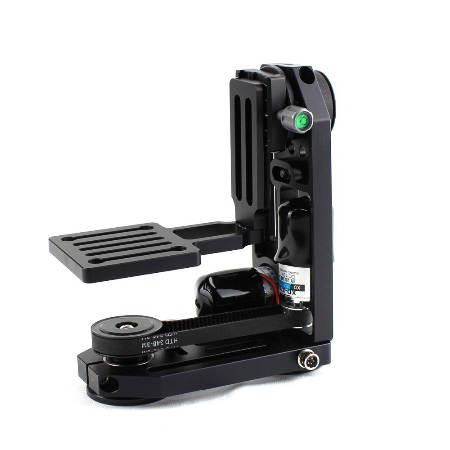
There is nothing from electronics. A year ago, only the version with collector engines (with integrated gearboxes) was available, and I bought it. It was necessary to somehow manage this thing from the computer. At the forum of our institute suggested that the most affordable way - is to use the Arduino. So I did. I bought another motor shield, since the engines there are powered by 12 volts. After I tried to turn it on, I felt all the pain that collector engines could cause a person — not only could they not be turned to a given angle, it was also not easy to just “turn a little”. My first thought was to put a stepping motor there. I have been looking for a stepping motor for a very long time, which will fit into this platform instead of the one that was standing there, but I did not find it. Then he began to think over how to screw the servo there, even bought it, but also could not think of anything reliable. The next thought was to fasten an accelerometer to the platform and gradually rotate the platform to a predetermined angle. I screwed up the accelerometer with a gyroscope and a compass, but it was very buggy and I also refused this idea (a month later I realized that the Chinese power supply for the camera, which was not weak, was to blame for the accelerometer glitches). And then I accidentally read how the servo is arranged. I liked the idea of fastening a resistor to measure the angle, but I had to somehow connect it with a pulley. I had to learn FreeCAD and for the first time in my life use the 3D printing service. In short, after processing with a file, everything was collected.
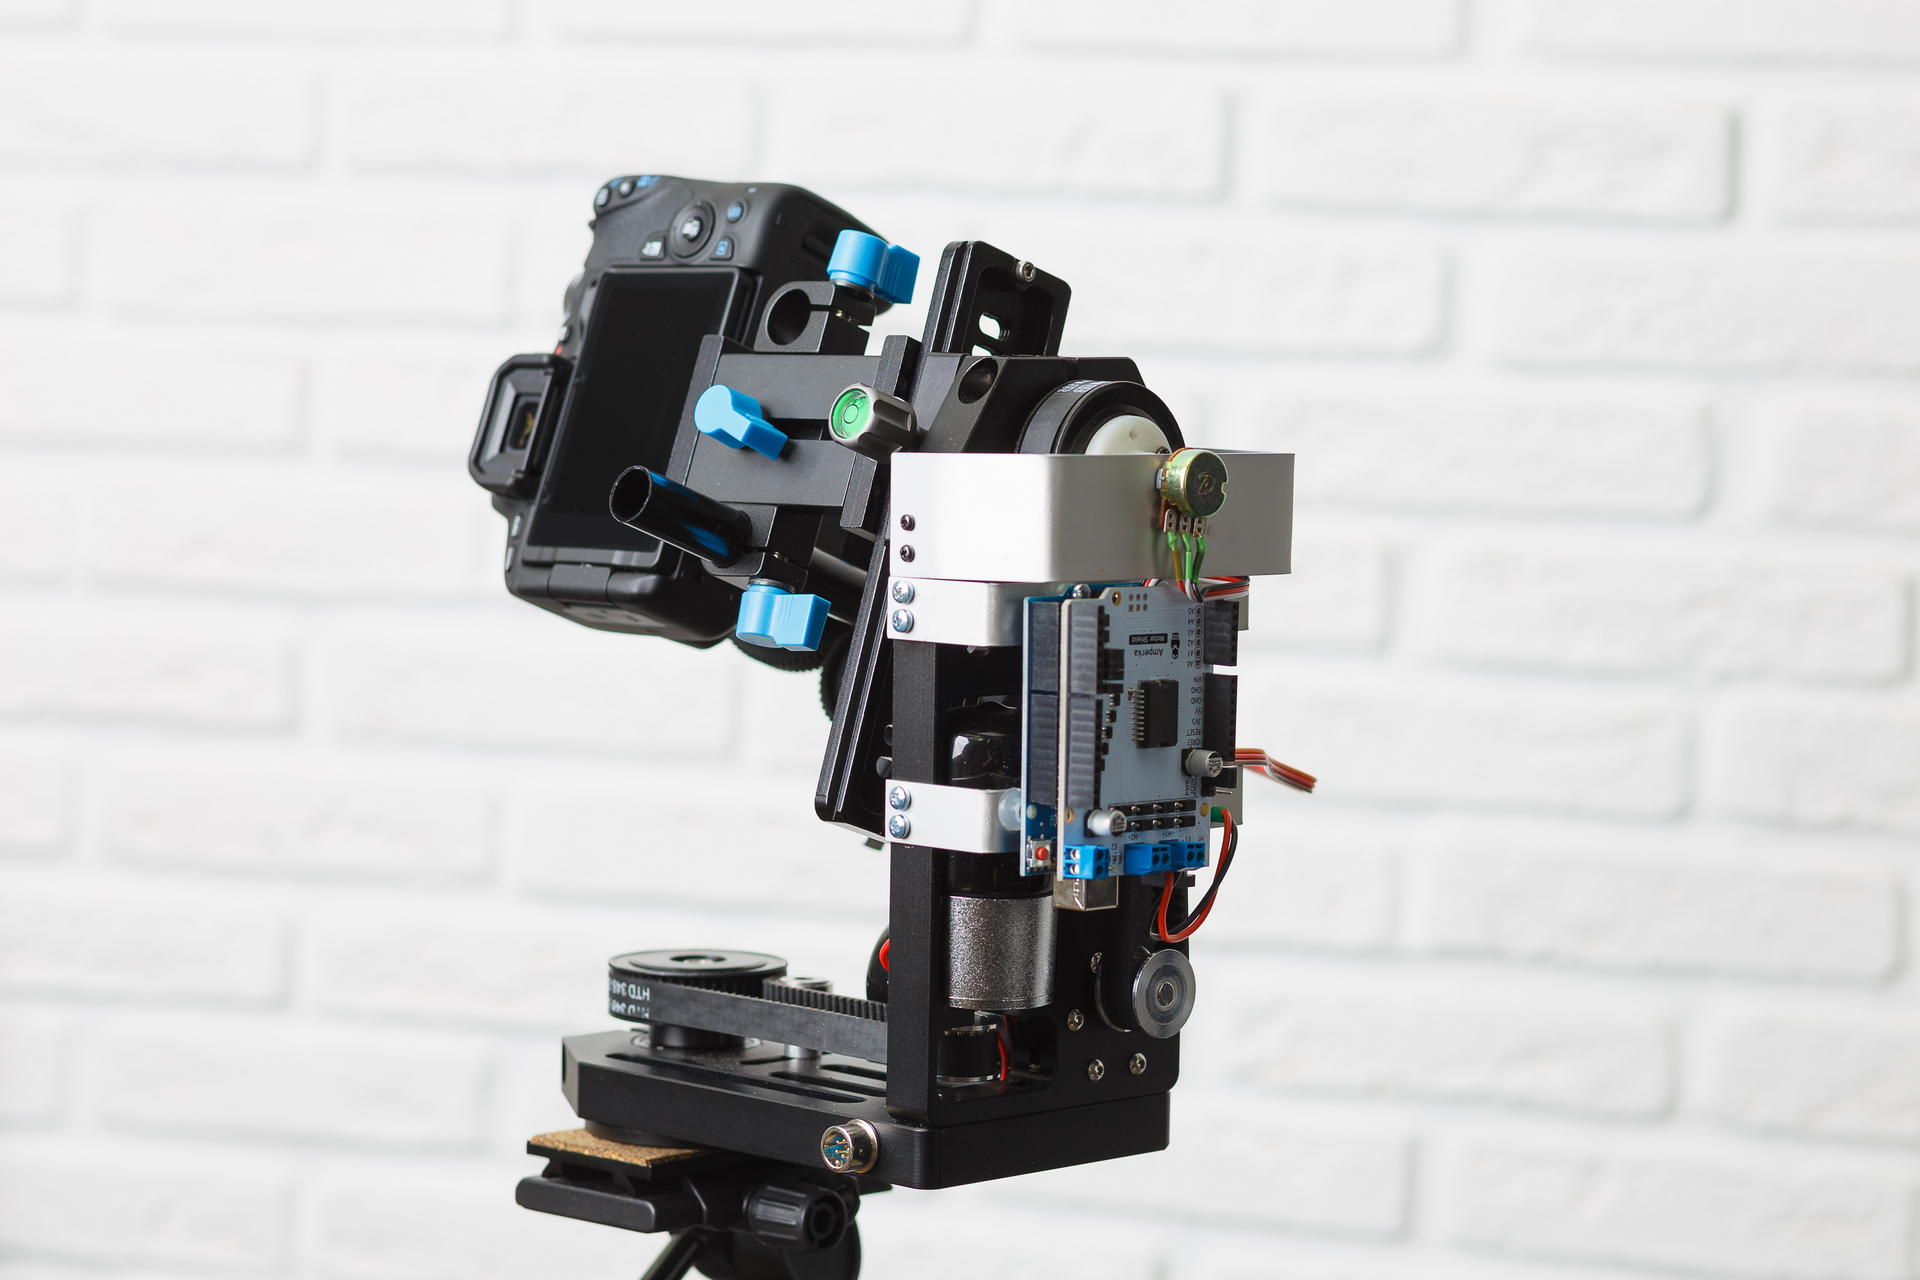
With the program for arduino to install a given angle had to torment, since the camera on the platform has a large moment of inertia and it does not immediately stop. But in the end it turned out to set the angle with an accuracy of about 1 degree.
Now, about automatic guidance - the idea is simple to make the face at the top of the frame. So you just need to find a face on each picture from liveview and adjust the platform. I didn’t know anything about the definition of faces then, so I used the tutorial method using the Haar signs (haar cascades). I found out that this method does not work for individuals. It finds a bunch of garbage on each frame in addition to what it needs and consumes a lot of CPU time. Then I found another example of how to use neural networks through OpenCV. Neural networks work just fine! But I was happy until I started processing photos in parallel. And Linux somehow became ill between the platform management thread and the photo processing processes to allocate processor time. I took the path of least resistance - began to make the definition of persons on a video card. Everything began to work fine.
Despite the fact that I didn’t want to go into details, I still did a little test. And I also bought Intel Neural Compute Stick 2 - I tried to count on it instead of a video card. The results I have about (figures - processing time of one image size of 800x533) -
- Core i5 9400F - 59
- Core i7 7500U - 108
- Core i7 3770 - 110
- GeForce GTX 1060 6Gb - 154
- GeForce GTX 1050 2Gb - 199
- Core i7 3770, ubuntu 18.04 with opencv from OpenVINO - 67
- Intel Neural Compute Stick 2, ubuntu 18.04 with opencv from OpenVINO - 349
It turned out that it is enough to process images with a size of 300 on the smaller side, so that the face of a person standing tall in a frame would be reliably located. On such images works faster. Now I am using GeForce GTX 1050. I am sure that it can be greatly improved, but now there is a much more serious problem.
Exposition
It is no secret that the photo must be properly exposed. In my case, this is even more important, since there is no retouching. To skin defects were less noticeable, the photo should be as bright as possible, on the verge of overexposure, but without overexposure.
The brightness of the final flash image depends on the following parameters:
- Flash power
- The distance from the flash to the subject
- Diaphragm
- ISO value
- Parameters when converting from RAW
After the frame is taken, we can only change the last parameter. But to change it over wide limits is not very good, since with a large positive correction of the exposure of a dark frame there will be noise, and in the opposite case there can be clipping in light areas.
TTL (Through The Lens) is used to automatically determine the exposure during flash photography. Works as follows:
- The flash makes a series of small flashes.
- At this time, the camera measures the exposure, focuses and measures the distance to the object of focus.
- Based on this data, it calculates the required flash output.
- The flash fires again, and at this time the shutter opens, a picture is taken.
This system works great when it is possible to manually correct images after shooting. But to get the finished result, it works unsatisfactory. If that - tried Profoto flashes for> 100t.r.
I have known conditions, flashes should always be in one place. So you can simply calculate the exposure on the position of man in space. There is a problem - how to determine the position of a person?
The first idea was simply to take the distance to the focusing object from EXIF and for the first frame to make a large exposure compensation in the equalizer and for the next one to adjust the flash power or aperture. It is very likely that a person will take a lot of frames, standing in one place. But it turned out that the distance in EXIF is written strongly discretely, the farther the object - the more step. Moreover, for different lenses the distance to the object takes different sets of values, and some do not measure it at all.
The next idea is to use an ultrasonic rangefinder. This device measures the distance fairly accurately, but only up to a meter and only if the person is not wearing something that absorbs sound waves. If you put a range finder on a servo and twist it like a radar, it becomes a little better - it measures already up to 1.5 meters, which is also very small (people are best obtained if you shoot them from a distance of 2 meters).
Of course, I knew that even inexpensive phones already build depth maps and blur the background selectively. But so did not want to get involved in it. Unfortunately, there is no choice left. At first I wanted to buy 2 webcams, merge them and read the displacement map using OpenCV. But, fortunately, I found many depth cameras that already do this within themselves. I chose Intel D435 (if someone wants to buy one, it is not supported in Linux in the main branch of the kernel. There are patches for debian and ubuntu in the librealsense repository. For fedora I had to edit them).

Once everything is connected, I wrote a test program that measures the distance to a small square in the center. So this code still works. And it works pretty well. Of course, it is necessary to search for a face in the picture from the RGB camera and calculate the distance from the flash to this face. But these are plans for the future.
According to the position of the person in space, it is necessary to calculate the correction to the exposure. First, I came up with some kind of formula that worked only for a point source of light in a vacuum (in fact, it was the absence of reflective walls and ceilings that mattered). But then I just made a series of shots with a constant flash output and corrected the exposure by eye in the equalizer converter, it turned out that the correction almost linearly depends on the distance. I use the Rembrandt lighting scheme, the flash with the softbox is in the plane of the camera.
But with the correction of the exposure is also something to do. Ideally, I need to change the flash power, but as long as my aperture and additives are changing <1 / 6Ev - in a RAV converter. The synchronizer of my flashes can be controlled via bluetooth using a phone application. So in the future I plan to figure out how the protocol works there and change the power of the flashes.
Here is a comparison of constant flash power with TTL and my method. TTL works much more stable and more precisely:

Diversity
When a girl (or even a guy) comes to a photo session with a photographer, she (or he) usually wants a photo of a different plan, larger, where there is only a face and more general - in full growth or waist-high. Not everyone knows, but the plan best of all changes by changing the focal length of the lens. That is, a person always stands at a distance of say 2 meters, if we need to shoot to full height - we wind a 35mm lens, if only the face is 135mm, and if it is waist-deep, then 50mm or 85mm. Well, or do not change lenses and set the lens with a zoom. To offer the user to rotate the zoom on the camera, which is on a mobile platform, breaking through a bundle of wires - sounds like something not very good. So I bought a pack of spare parts for aliexpress, picked up a servo which was not useful to me to control the platform and did this:

And this is how it works:
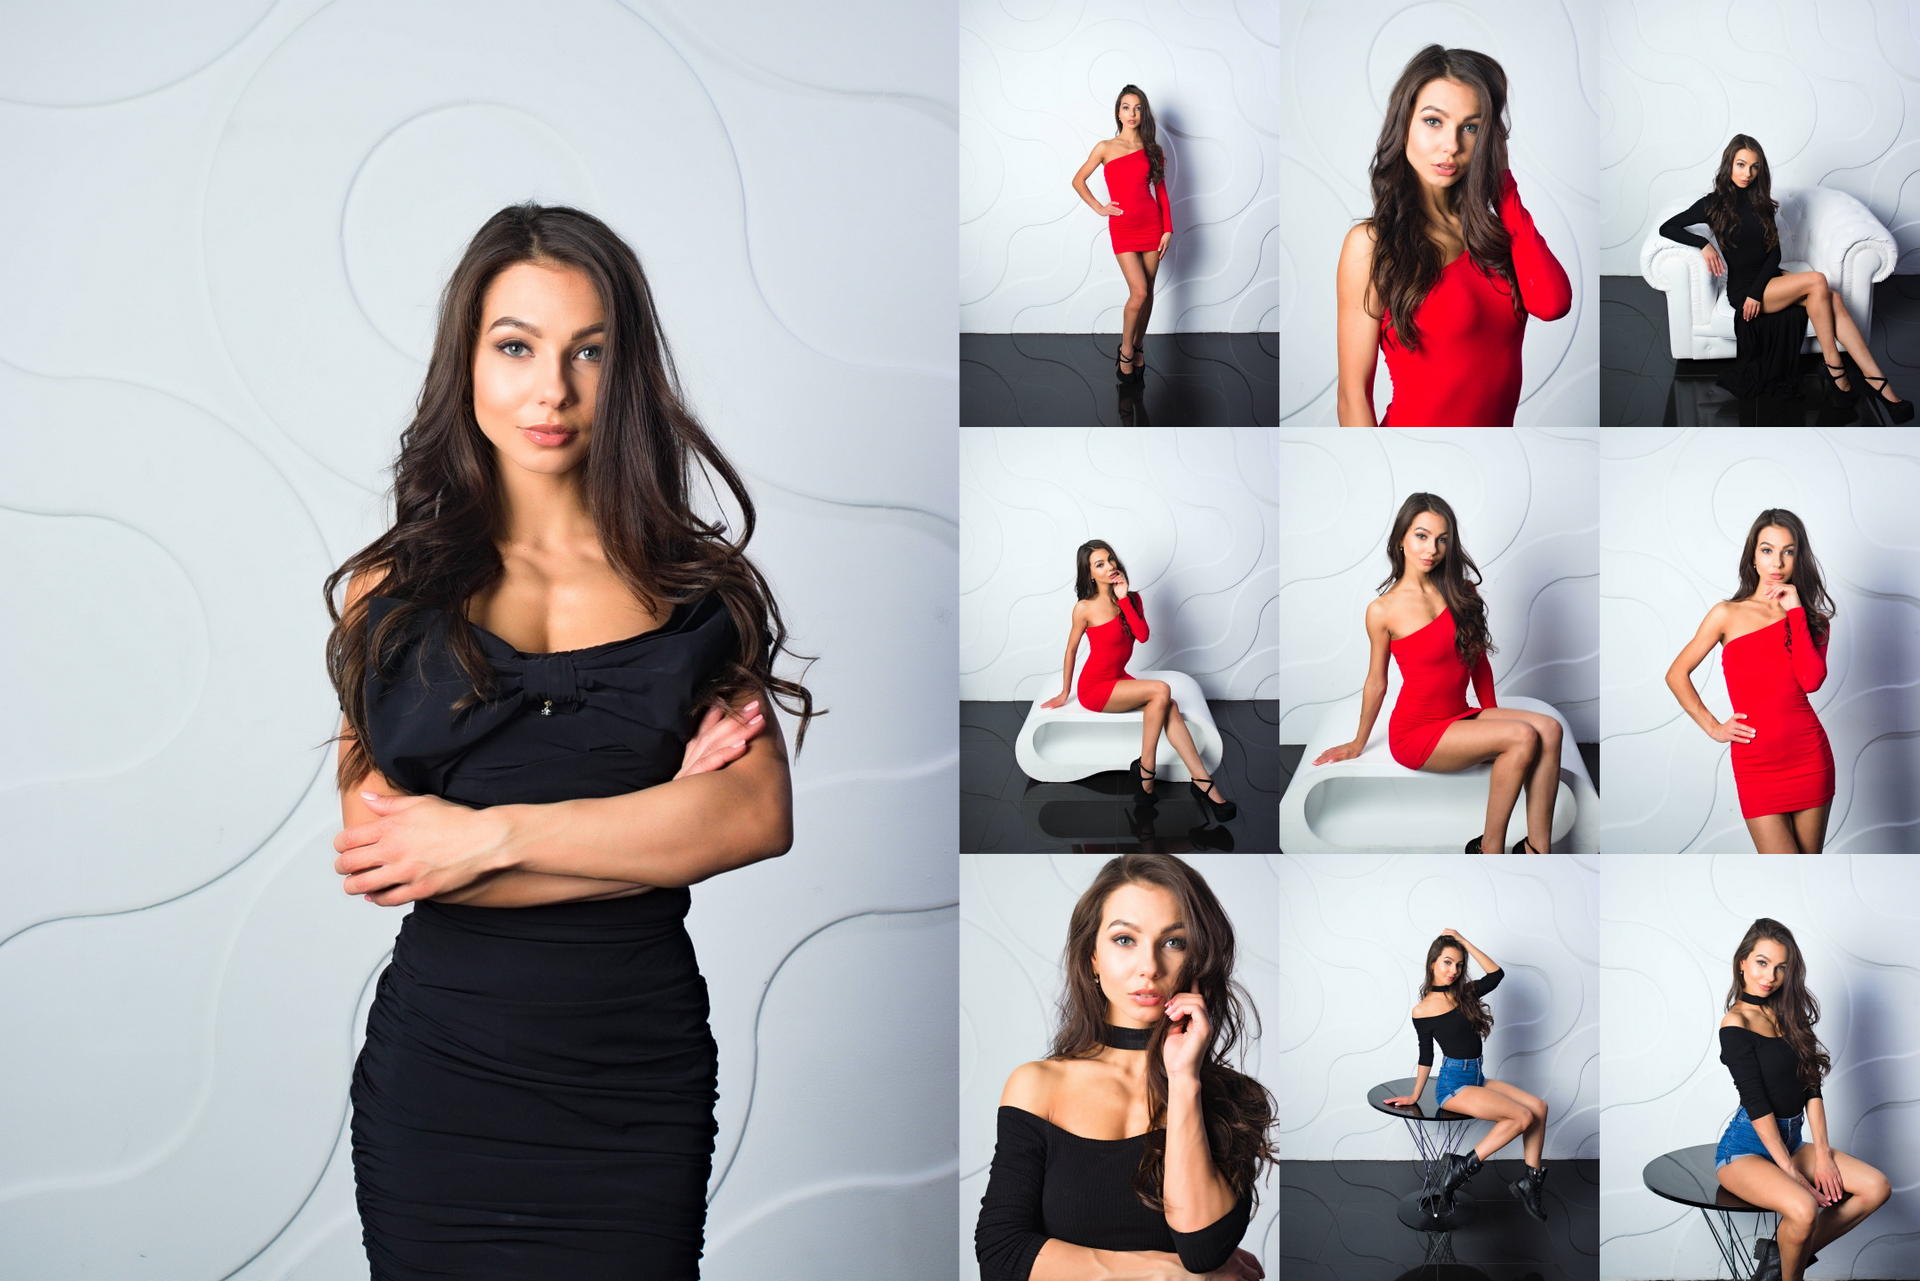
The results of the first test in the photo studio, first of all I wanted to see how diverse it would be to take pictures, did not move anything and did not reconfigure during the shooting:
Process video:
Result
Here are some of the best shots that you can do:

like everyone asked permission to publish, if you know yourself and want to remove the photo - write me
Why did I do this? This is a thing that has not yet been, at least I have not found anything like it. Potentially useful - now there are a lot of specialists, such as psychologists, business coaches, sports coaches, hairdressers sell their services through blogs, they need a lot of photos, and exactly in the form they want, and not the photographer. Some people simply don’t like being seen by a stranger (photographer) when shooting. Well, the simplest is great entertainment for corporate events, exhibitions and other events.
I did not describe the software part, how the photos are processed and about user interaction, since there is already so much text, I will write the second part later. These moments are already pretty well worked out so that the system can be used by people not familiar with programming.
')
Source: https://habr.com/ru/post/460605/
All Articles