Smart printer. Improving Octoprint
In developing the open source project of the 4-extruder Z-Bolt printer, we faced the problem of choosing a screen to control the printer. From the available screens, only the Duet Wifi solution can manage more than 2 extruders. The solution, to put it mildly, is not a budget one, and the interface is an amateur. So we decided to look for an alternative option with preference and courtesans. This story is about him ...

On the Internet there is a lot of information on the use of Octoprint. A little more than half a year ago and we became users of this solution, immediately appreciating its benefits. The ability to control the printer through a web-based person is really hard to overestimate. Octoprint has a lot of plug-ins, and the main thing for us - Octoprint perfectly controls the number of extruders larger than 2. But one more question remained to be resolved.
Many fans of Octoprint confidently say that they no longer need the screen from the word “absolutely”, that this is an absolutely extra part of the printer that only hinders them.
')
However, I am convinced that there is another part of OctoPrint users. Everyone has their own habits and requirements for everyday use of a 3D printer, and there are operations that are more convenient to perform with a screen:
Now the default screen in Z-Bolt printers is MKS TFT. You can put TFT24, TFT32 or TFT35. These are good screens, but they do not know how to integrate with Octoprint. If Octoprint has started printing, the screen will not know anything about it. They use different file storages, etc. And the MKS TFT screens do not want to work with 3x and more -head 3D printers.
Before me was the goal to find / make / adjust the screen for Octoprint, capable of managing more than 2 extruders.
Googling a bit, I came across a TouchUI plugin .

The first impression was: here it is - the solution !!!
I immediately installed the plugin and opened Octoprint from the phone. TouchUI interface is stupid: /. Sometimes the buttons were pressed normally, sometimes braked, and sometimes they were not pressed at all the first time. With the connected screen, the TouchUI behaved as badly as with the phone.
In parallel, another solution was found.
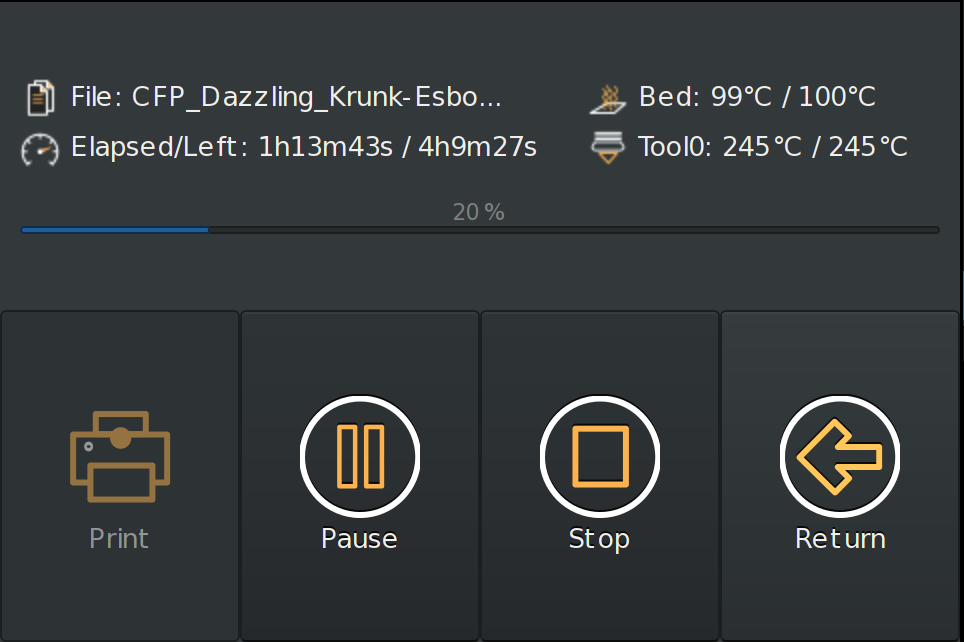
The description was encouraging, unlike TouchUI, it is a standalone application that runs without a browser, and therefore requires much less computing resources.
Installation and configuration problems did not cause. The interface really worked much more predictably and more responsively.
But here, not everything turned out smoothly. The application regularly hung up at the start of printing. On github'e there was an issue on this error , created almost a year ago and actively discussed, but not closed.
The main problem turned out to be that the author of the application, apparently, has lost interest in him and is no longer developing at the moment.
Since, in my opinion, the application is written well enough and has potential, it was decided to make a “hard-fork” and take up the project thoroughly.
Here's what we got:
But first things first…
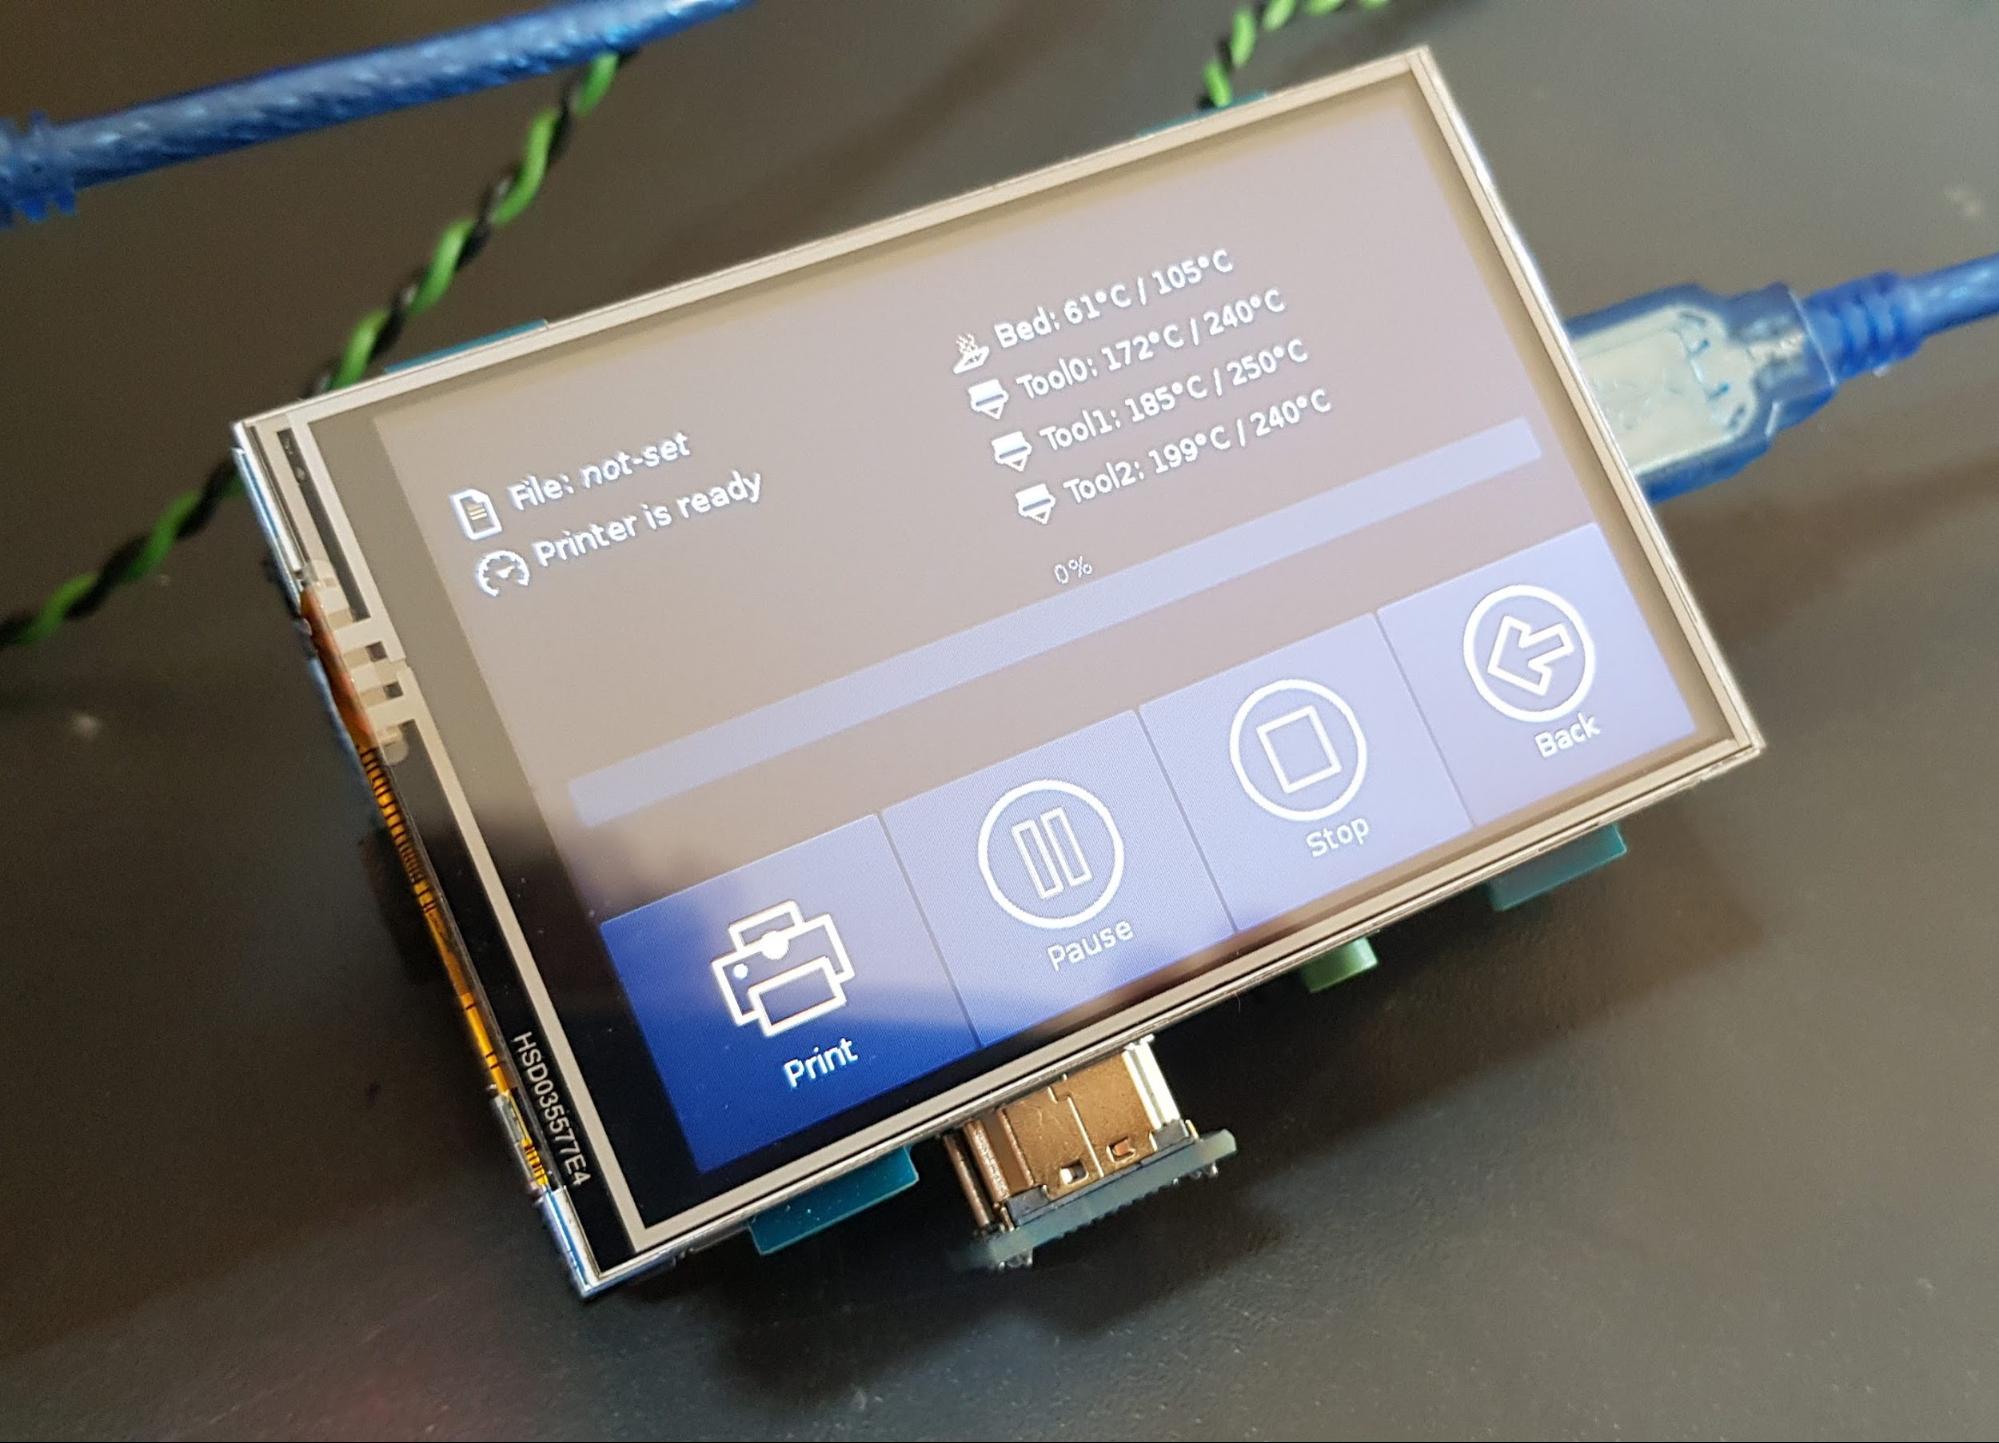
We started with the TFT 3.5 screen, which, to put it mildly, did not withstand any criticism. Viewing angles are none, the picture is faded. Therefore, it was decided to choose a better solution.
The main criteria were:
As a result, we stopped at two options:
1. Option easier. 4 '' IPS Resistive Touchscreen

2. The option is richer. 4.3 '' IPS Capacitive Touchscreen
Both screens have a resolution of 800x400. Both have great picture, color and viewing angle. Their main difference is the capacitive touchscreen. You get used to it very quickly (as well as to everything good) and it is much more pleasant to use it than resistive. However, a screen with a resistive touchscreen is also quite viable.

The application has been seriously finalized. And almost ceased to remind her parent. Therefore (and also because the creator of Octoprint-TFT officially froze the development of his brainchild), it was decided to make a hard-fork and name the new project Octoscreen.
Download the app and find a brief installation guide from our GitHub .
There is also a detailed instruction for screen 3.5 , for which a special thanks to our colleague Denis (@ negativ72rus).

Initially, we planned to use Marlin in our multi-extruder printer, but in the end the choice fell on Klipper. There are several reasons:
1. One of the main reasons for us as developers is the reason for its flexibility. Marlin and its “macaroni” code make a real challenge to the process of making improvements to it, and furthermore their further support.
Klipper in this regard is the complete opposite of Marlin. Firstly, all the configuration of Klipper is rendered from the program code. The code itself is well structured. But most importantly, Klipper provides for modularity !!! You can add your logic to the firmware without making a change to its core, and thus greatly simplify further support for your code.
2. All the firmware settings can be done directly through the OctoPrint web interface. And at the same time the possibility of setting is much more powerful than that of Marlin or Smootheiware.
3. How can one not say anything about the bits that everyone has been chasing lately)). The Klipper architecture itself assumes that the computational load falls on the Raspberry PI. The function of the MKS Gen L control board (in the case of Z-Bolt printers) remains in transmitting signals to / from peripherals (motors, sensors, heaters, controls).
But the Raspberry Pi 3 Model B + is equipped with a 64-bit, 4-core Broadcom BCM2837B0 A53 1.4GHz chip.
In fact, Octoprint + Klipper running on the Raspberry Pi + is the same MKS Gen L -
An order of magnitude more functional and progressive solution than Marlin, running on some 32-bit chip.
Configuration files for Klipper for Z-Bolt printers can also be found here .
We also made our own theme for the Octoprint interface:

The cap can be customized with the native color picker in the Appearance section:

Instructions on how to install a theme can be found on our GitHub .
Write in the comments what functions of the screen you consider most useful and necessary to add.
All good, positive and good blowing overhanging elements!
On the Internet there is a lot of information on the use of Octoprint. A little more than half a year ago and we became users of this solution, immediately appreciating its benefits. The ability to control the printer through a web-based person is really hard to overestimate. Octoprint has a lot of plug-ins, and the main thing for us - Octoprint perfectly controls the number of extruders larger than 2. But one more question remained to be resolved.
Many fans of Octoprint confidently say that they no longer need the screen from the word “absolutely”, that this is an absolutely extra part of the printer that only hinders them.
')
However, I am convinced that there is another part of OctoPrint users. Everyone has their own habits and requirements for everyday use of a 3D printer, and there are operations that are more convenient to perform with a screen:
- Filament replacement
- Table Level Calibration
- Start printing a file that has already been printed before.
- Enable printer preheating
- Ability to see print status
- ...
Now the default screen in Z-Bolt printers is MKS TFT. You can put TFT24, TFT32 or TFT35. These are good screens, but they do not know how to integrate with Octoprint. If Octoprint has started printing, the screen will not know anything about it. They use different file storages, etc. And the MKS TFT screens do not want to work with 3x and more -head 3D printers.
Before me was the goal to find / make / adjust the screen for Octoprint, capable of managing more than 2 extruders.
Googling a bit, I came across a TouchUI plugin .
The first impression was: here it is - the solution !!!
I immediately installed the plugin and opened Octoprint from the phone. TouchUI interface is stupid: /. Sometimes the buttons were pressed normally, sometimes braked, and sometimes they were not pressed at all the first time. With the connected screen, the TouchUI behaved as badly as with the phone.
In parallel, another solution was found.
The description was encouraging, unlike TouchUI, it is a standalone application that runs without a browser, and therefore requires much less computing resources.
Installation and configuration problems did not cause. The interface really worked much more predictably and more responsively.
But here, not everything turned out smoothly. The application regularly hung up at the start of printing. On github'e there was an issue on this error , created almost a year ago and actively discussed, but not closed.
The main problem turned out to be that the author of the application, apparently, has lost interest in him and is no longer developing at the moment.
Since, in my opinion, the application is written well enough and has potential, it was decided to make a “hard-fork” and take up the project thoroughly.
Here's what we got:
- Selected optimal screens for the project
- Made “hard-fork” by Octoprint-TFT
- Revised look at the software and hardware architecture of the printer
- Created its own theme for the interface Octoprint
But first things first…
Screenshots
We started with the TFT 3.5 screen, which, to put it mildly, did not withstand any criticism. Viewing angles are none, the picture is faded. Therefore, it was decided to choose a better solution.
The main criteria were:
- IPS matrix
- size 4 - 5 inches
- capacitive screen (desirable)
- acceptable price
As a result, we stopped at two options:
1. Option easier. 4 '' IPS Resistive Touchscreen
2. The option is richer. 4.3 '' IPS Capacitive Touchscreen
Both screens have a resolution of 800x400. Both have great picture, color and viewing angle. Their main difference is the capacitive touchscreen. You get used to it very quickly (as well as to everything good) and it is much more pleasant to use it than resistive. However, a screen with a resistive touchscreen is also quite viable.
This is Hard-Fork, baby!
The application has been seriously finalized. And almost ceased to remind her parent. Therefore (and also because the creator of Octoprint-TFT officially froze the development of his brainchild), it was decided to make a hard-fork and name the new project Octoscreen.
- First of all, the problem of screen hangup, which Octoprint-TFT suffered, was completely eliminated.
- - Significantly changed the design and layout:
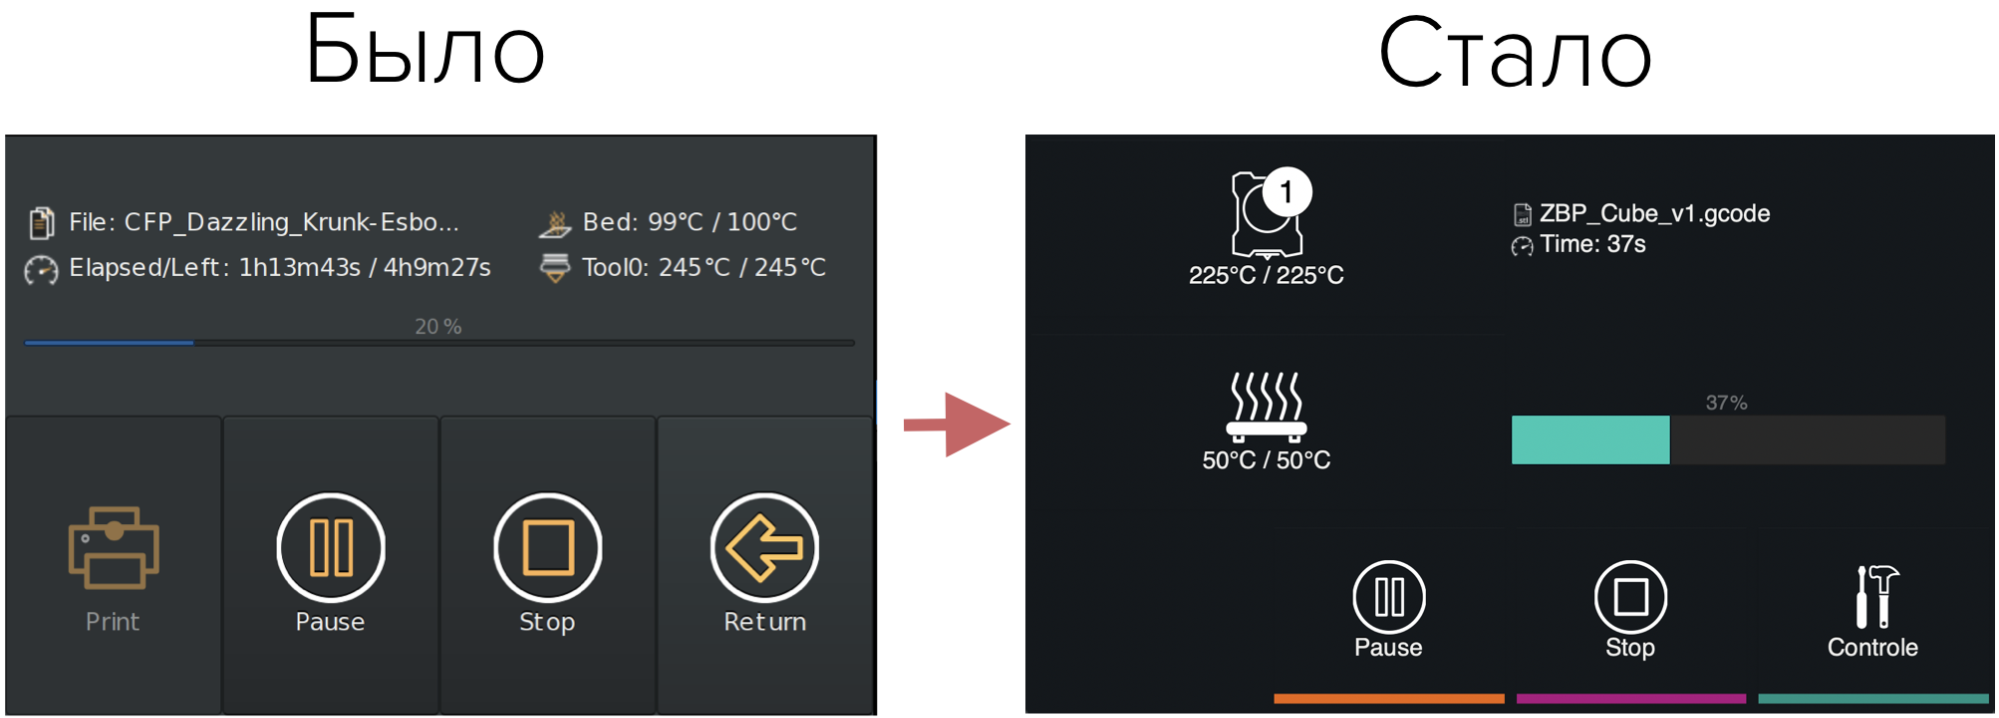
- The screen has learned to understand printer states (idle / print):
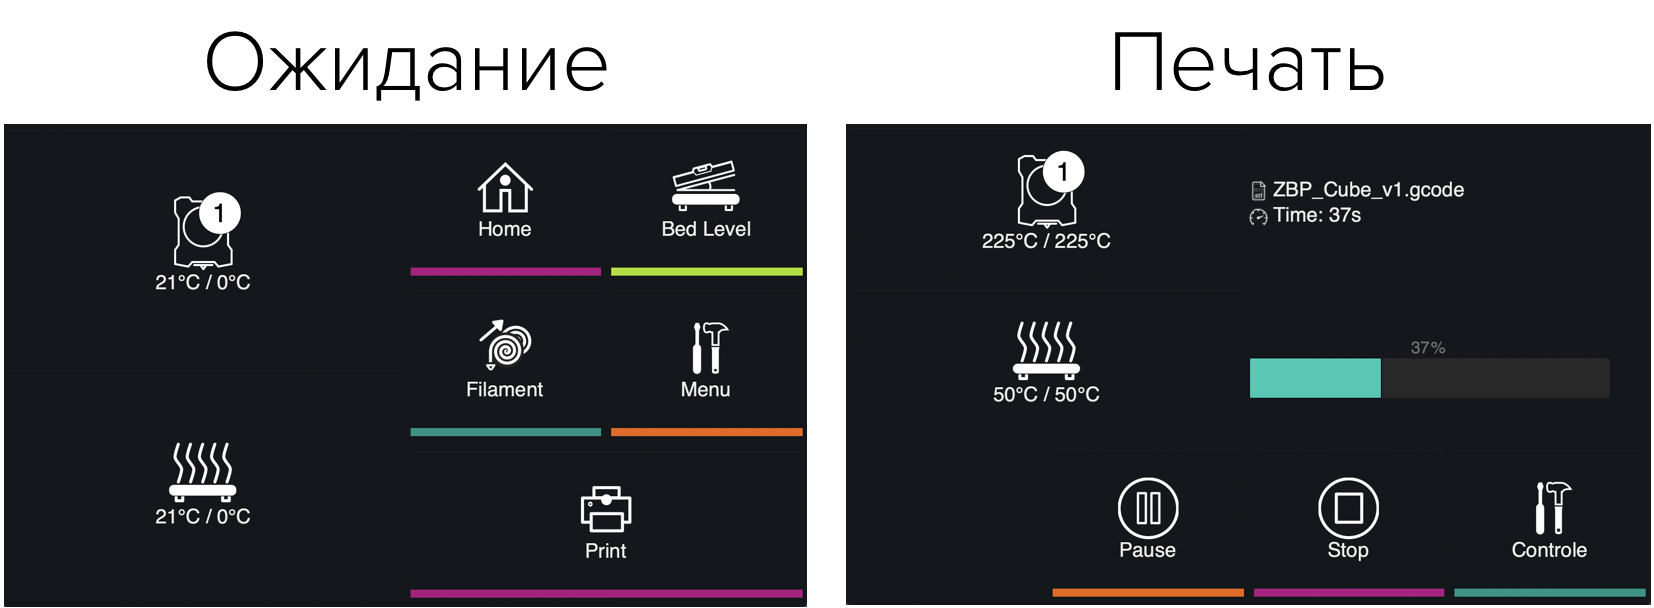
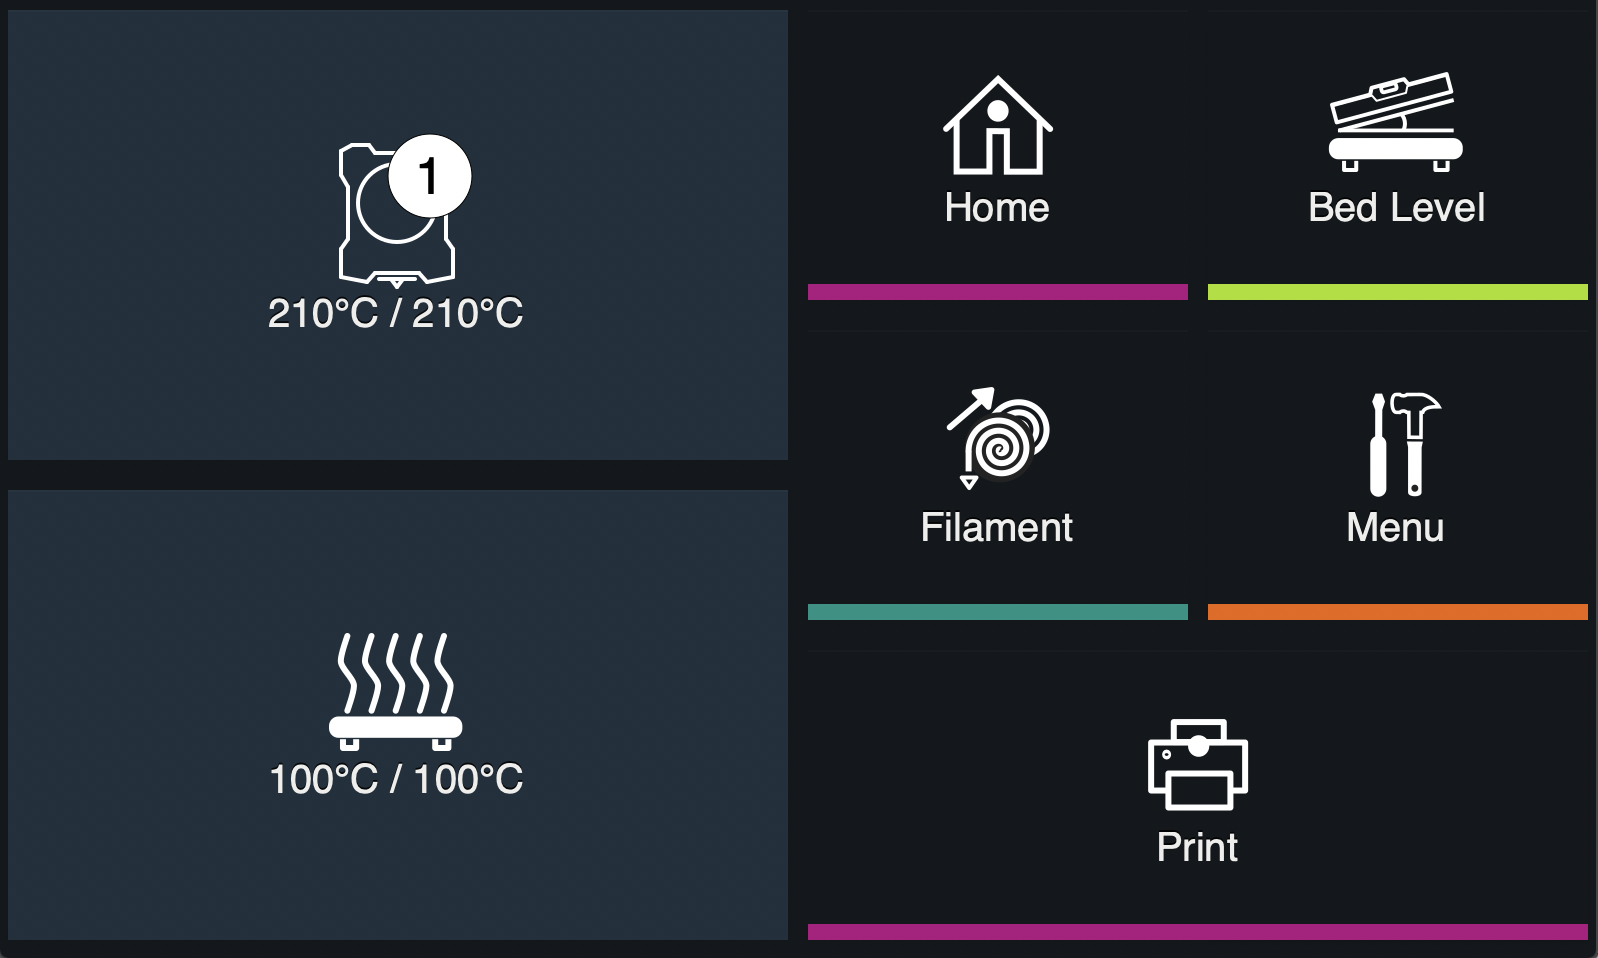
- Added the function of quick preheating / turning off the heating by pressing the icon of an extruder or a table, while the screen highlights the status:
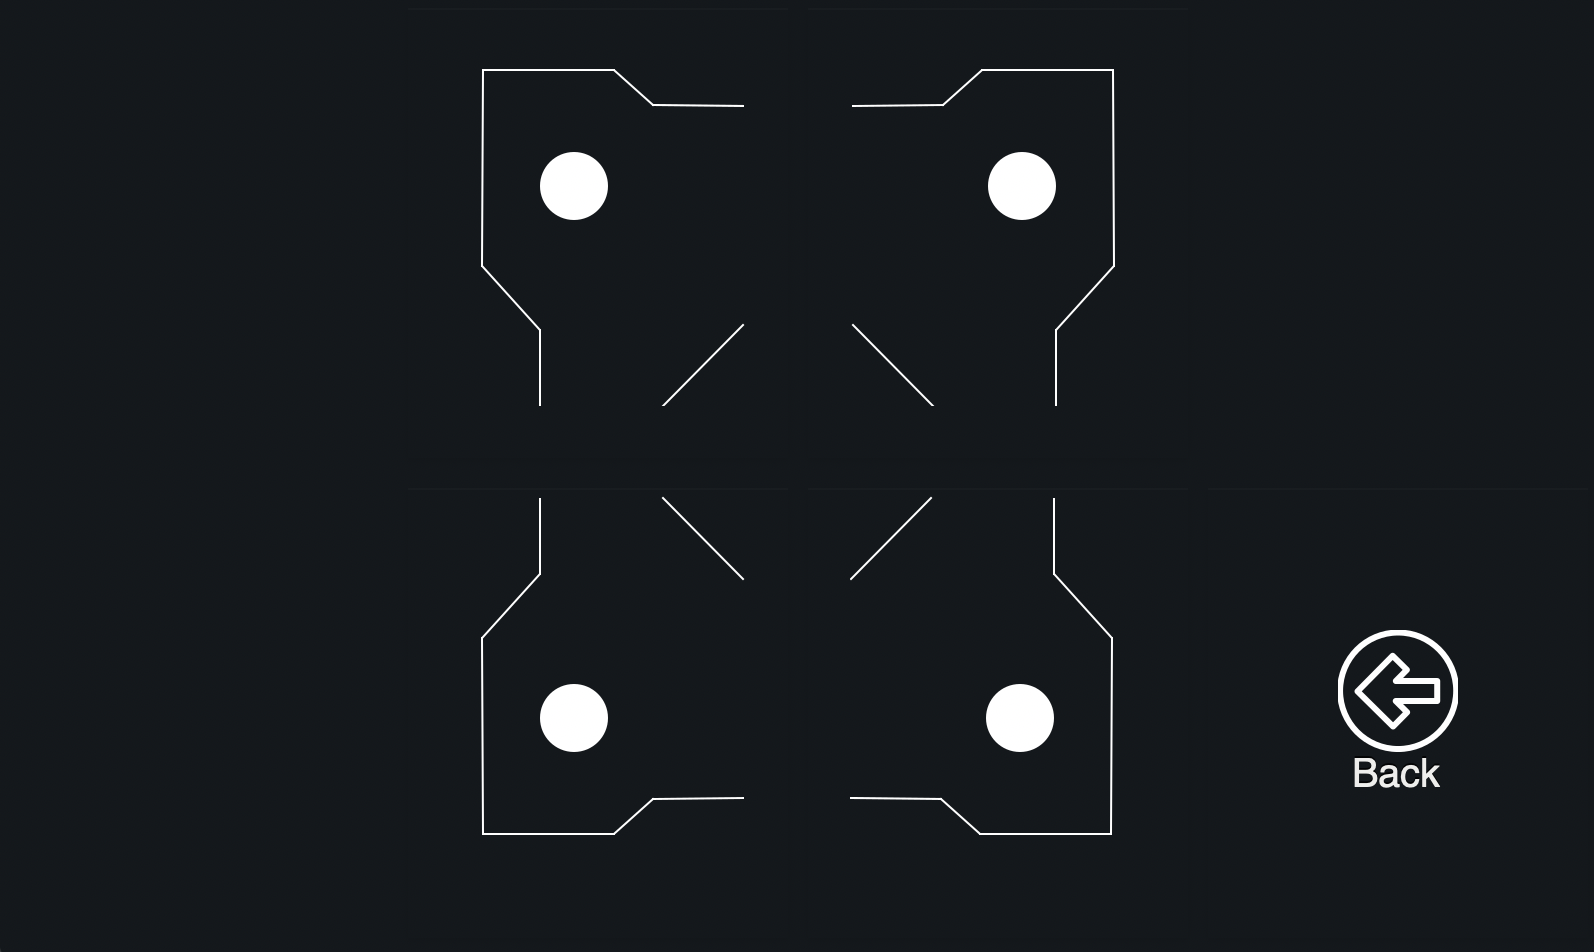
- Added manual table calibration screen:
- The “Menu” item is placed on a separate screen:

- Added WiFi control function:

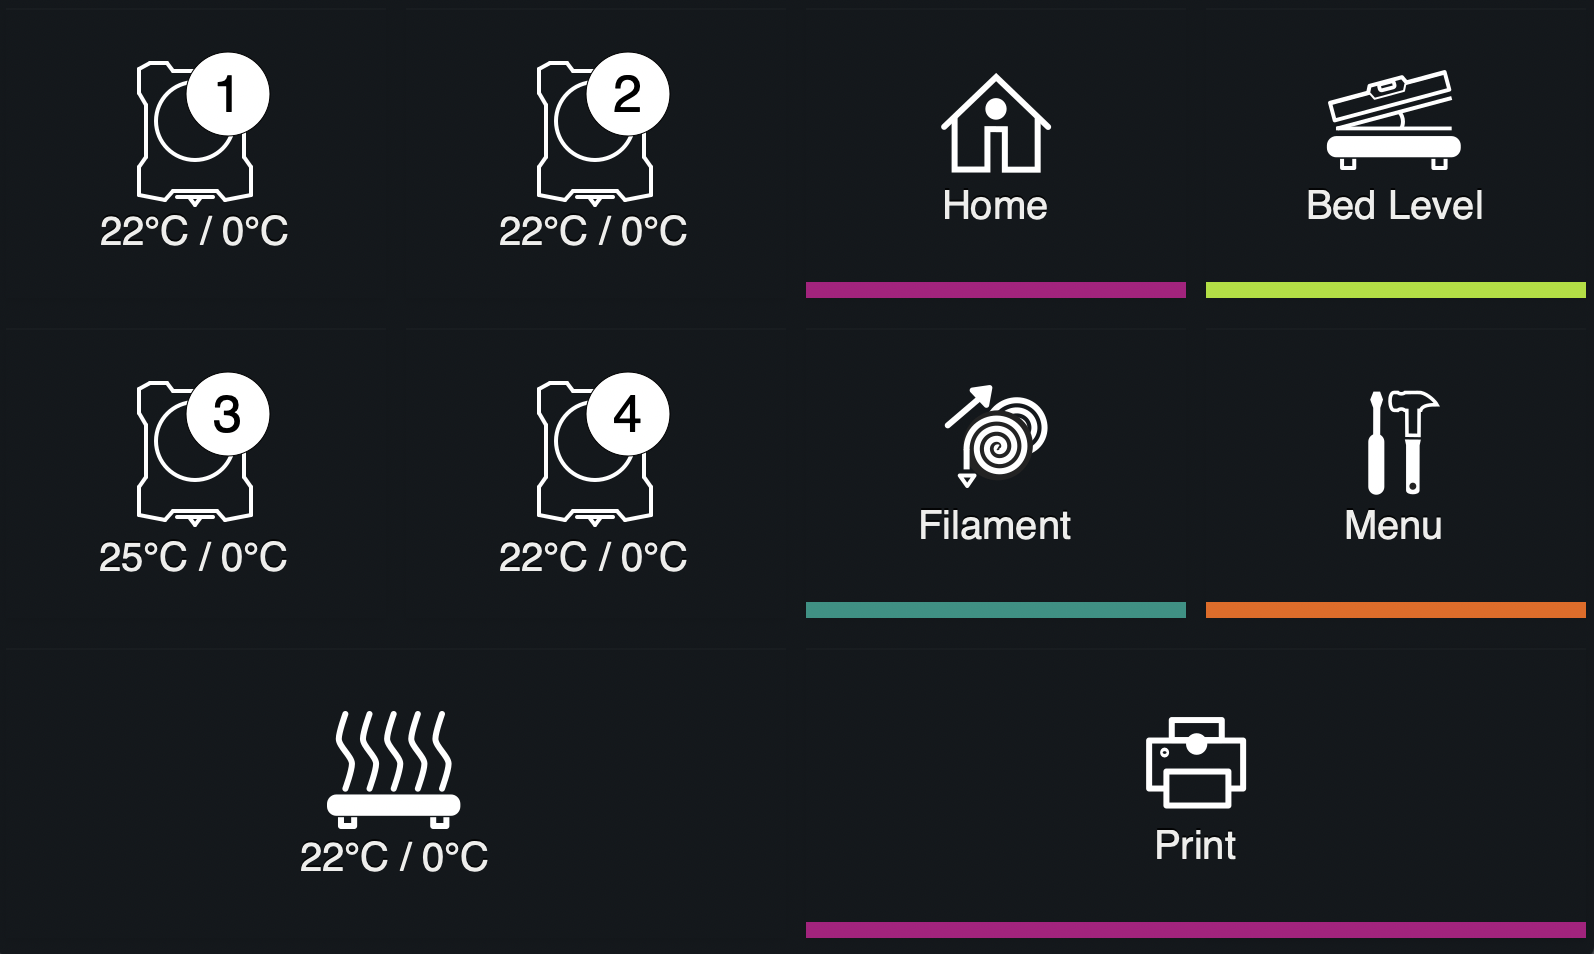
- The application itself now supports up to 4 extruders, which is exactly why it was created:
Download the app and find a brief installation guide from our GitHub .
There is also a detailed instruction for screen 3.5 , for which a special thanks to our colleague Denis (@ negativ72rus).
Revision of views on the software and hardware architecture of the printer or pereobuvanie on the go
Initially, we planned to use Marlin in our multi-extruder printer, but in the end the choice fell on Klipper. There are several reasons:
1. One of the main reasons for us as developers is the reason for its flexibility. Marlin and its “macaroni” code make a real challenge to the process of making improvements to it, and furthermore their further support.
Klipper in this regard is the complete opposite of Marlin. Firstly, all the configuration of Klipper is rendered from the program code. The code itself is well structured. But most importantly, Klipper provides for modularity !!! You can add your logic to the firmware without making a change to its core, and thus greatly simplify further support for your code.
2. All the firmware settings can be done directly through the OctoPrint web interface. And at the same time the possibility of setting is much more powerful than that of Marlin or Smootheiware.
3. How can one not say anything about the bits that everyone has been chasing lately)). The Klipper architecture itself assumes that the computational load falls on the Raspberry PI. The function of the MKS Gen L control board (in the case of Z-Bolt printers) remains in transmitting signals to / from peripherals (motors, sensors, heaters, controls).
But the Raspberry Pi 3 Model B + is equipped with a 64-bit, 4-core Broadcom BCM2837B0 A53 1.4GHz chip.
In fact, Octoprint + Klipper running on the Raspberry Pi + is the same MKS Gen L -
An order of magnitude more functional and progressive solution than Marlin, running on some 32-bit chip.
Configuration files for Klipper for Z-Bolt printers can also be found here .
A small bonus at the end!
We also made our own theme for the Octoprint interface:
The cap can be customized with the native color picker in the Appearance section:
Instructions on how to install a theme can be found on our GitHub .
Write in the comments what functions of the screen you consider most useful and necessary to add.
All good, positive and good blowing overhanging elements!
Source: https://habr.com/ru/post/460453/
All Articles