Building an automated testing pipeline on Azure DevOps
Recently, I encountered a not very popular yet beast in the DevOps world, Azure DevOps pipelines. Immediately I felt the absence of any intelligible instructions or articles on the topic, I don’t know what it is connected with, but Microsoft clearly has something to work on in terms of popularizing the tool. Today we will build a pipeline for automated testing inside the Azure cloud.
So, the task:
There is a software that builds using the same Azure DevOps, collected from the project on WIX. If there is interest, I will write about this tool. In fact, this is a more automated automation method for building installers, replacing the standard InstallShield. So, our software is successfully assembled and generates an artifact, a kind of setup.exe, which puts the application in the Windows system. You need to put this application in a virtual-like virtual machine, copy the automated tests prepared by the testing team, run them, and pick up the results in order to consider the branch good or bad before merjit. Just like in GitLab,only through ...
As a virtualization environment, where we will execute our tests, we obviously use Azure DevTest Labs, an entity in Azure subscriptions, which is designed to twist any test nonsense in it for reasonable money.
')
First we need to integrate our DevTest Labs with Azure DevOps, for which we need a certain Service Principal, essentially a service account that allows you to go to the cloud and create / delete resources for yourself there.
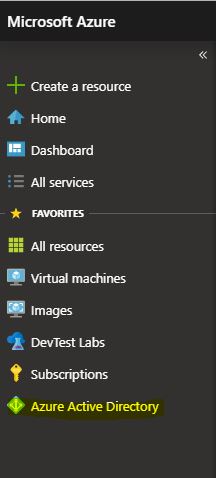
Go to the subscription and find the service Azure Active Directory
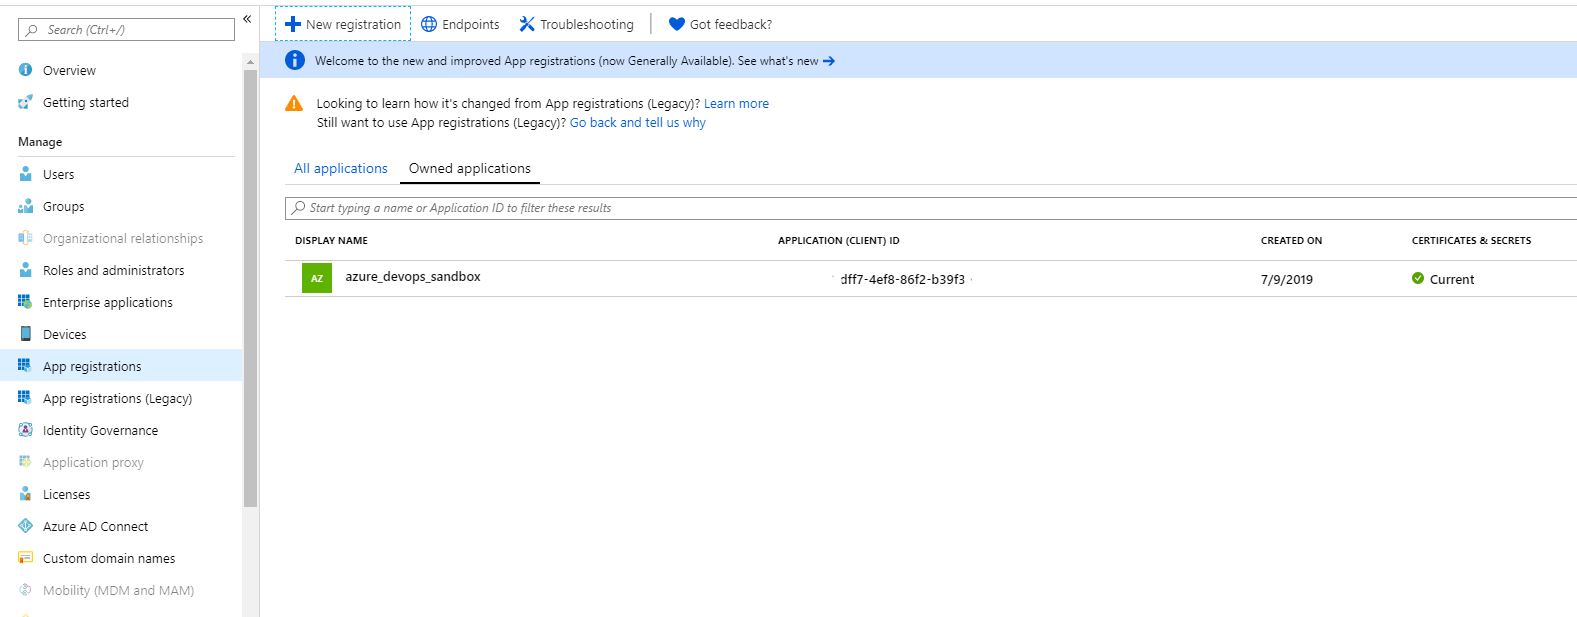
Find App Registrations and click on New Registration, this will create us our service principal. I will not analyze in detail what settings to choose when creating it, it may differ from different subscriptions.
Now we need to give rights to our service director. To do this, go to the subscription icon with the key. Choose our subscription.

Next, in Access Control, click Role Assignment and look for this account in the search for the newly created name. We give the role Contributor, that's enough.

Next, we return to our Service Principal in Azure AD and open its properties. Later, we will need all the IDs that are there, save them.
This completes our portal settings and we are moving to Azure DevOps.
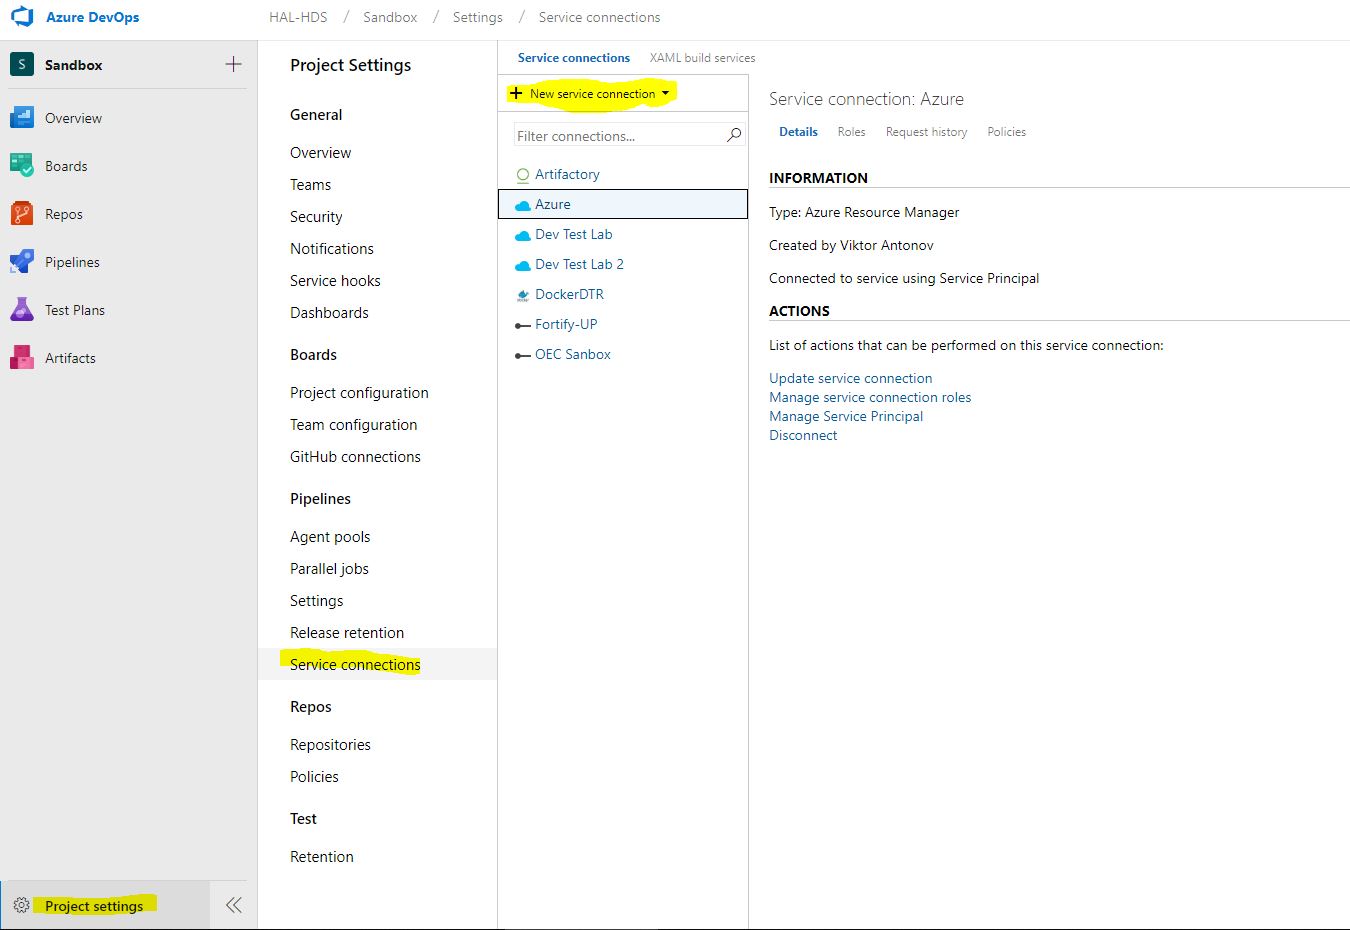
First of all, we’ll go to the project settings and select Service Connections. Create a new item of type Azure Resource Manager.
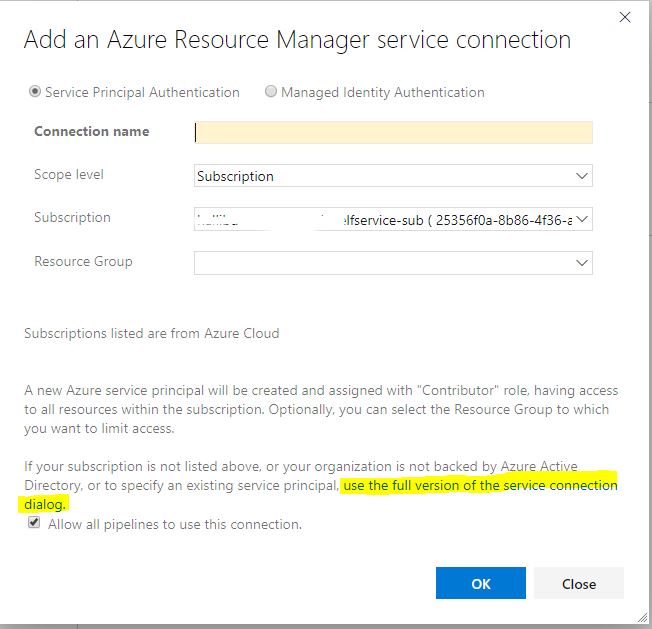
Now we need all the ID that we recorded. We click on it. And we enter all the data that we received from the Service Principal. We press verify and if everything is fine we save the connection. Now our pipelines can use it to connect to the cloud.
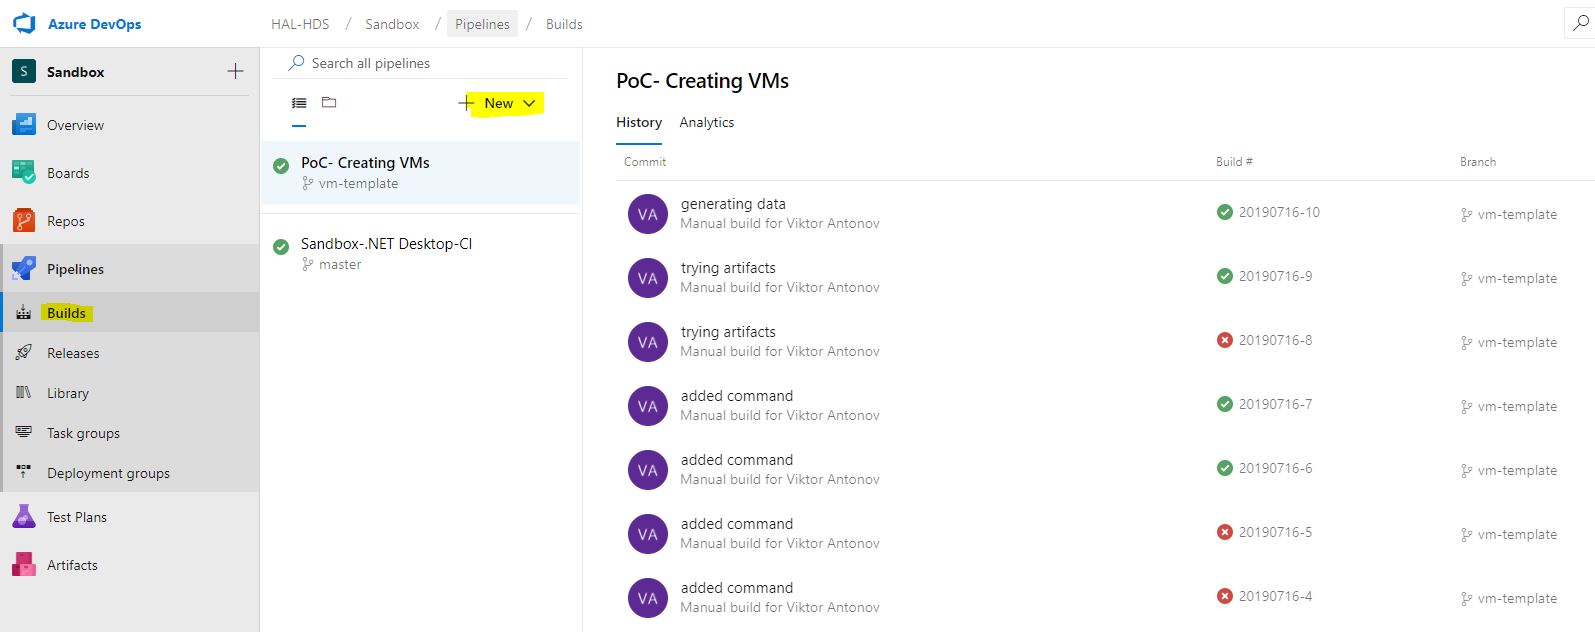
Now we proceed to the most interesting, the construction of the pipeline directly. Open the Pipelines Builds menu.
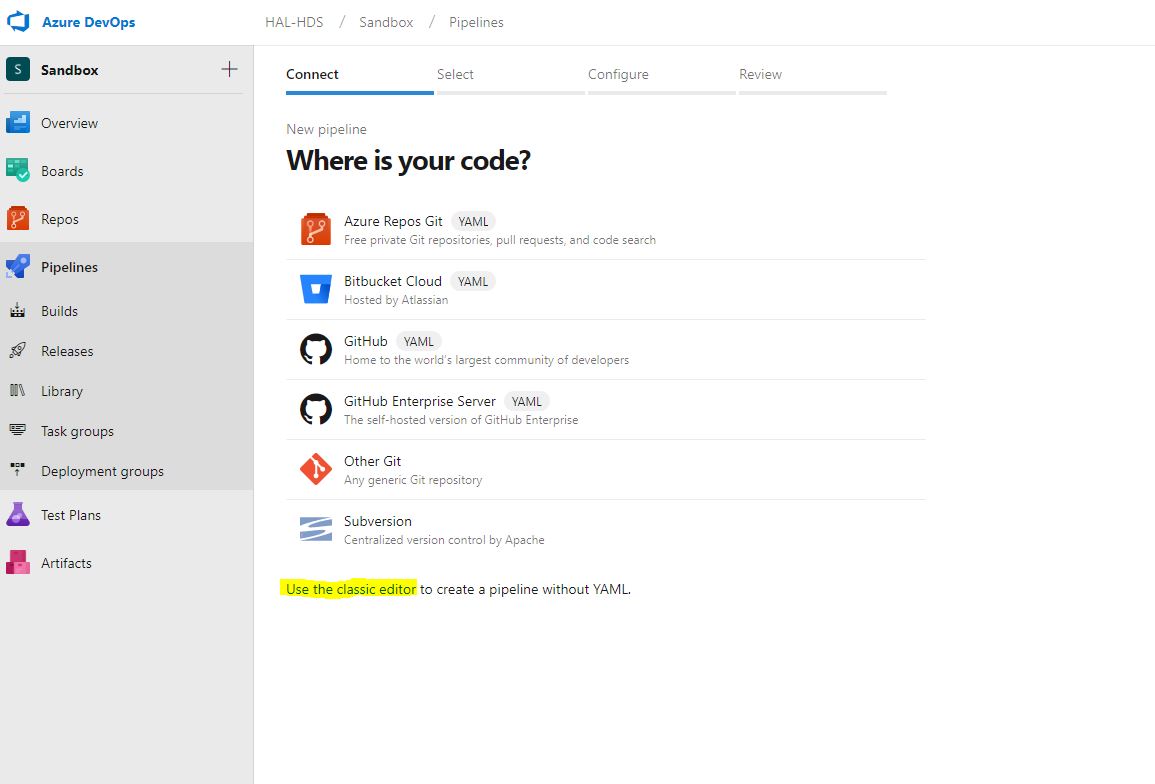
We are met by the menu of creating a new build, which by default will try to create for us a YAML file of a suitable configuration. We politely refuse it and choose the classic version. It is understandable that Microsoft’s desire to do everything like that of people and give the opportunity to customize pipelines as much as possible through YAML, but stingy documentation and just the practical inoperability of many modules tells us that it is too early to use this functionality.
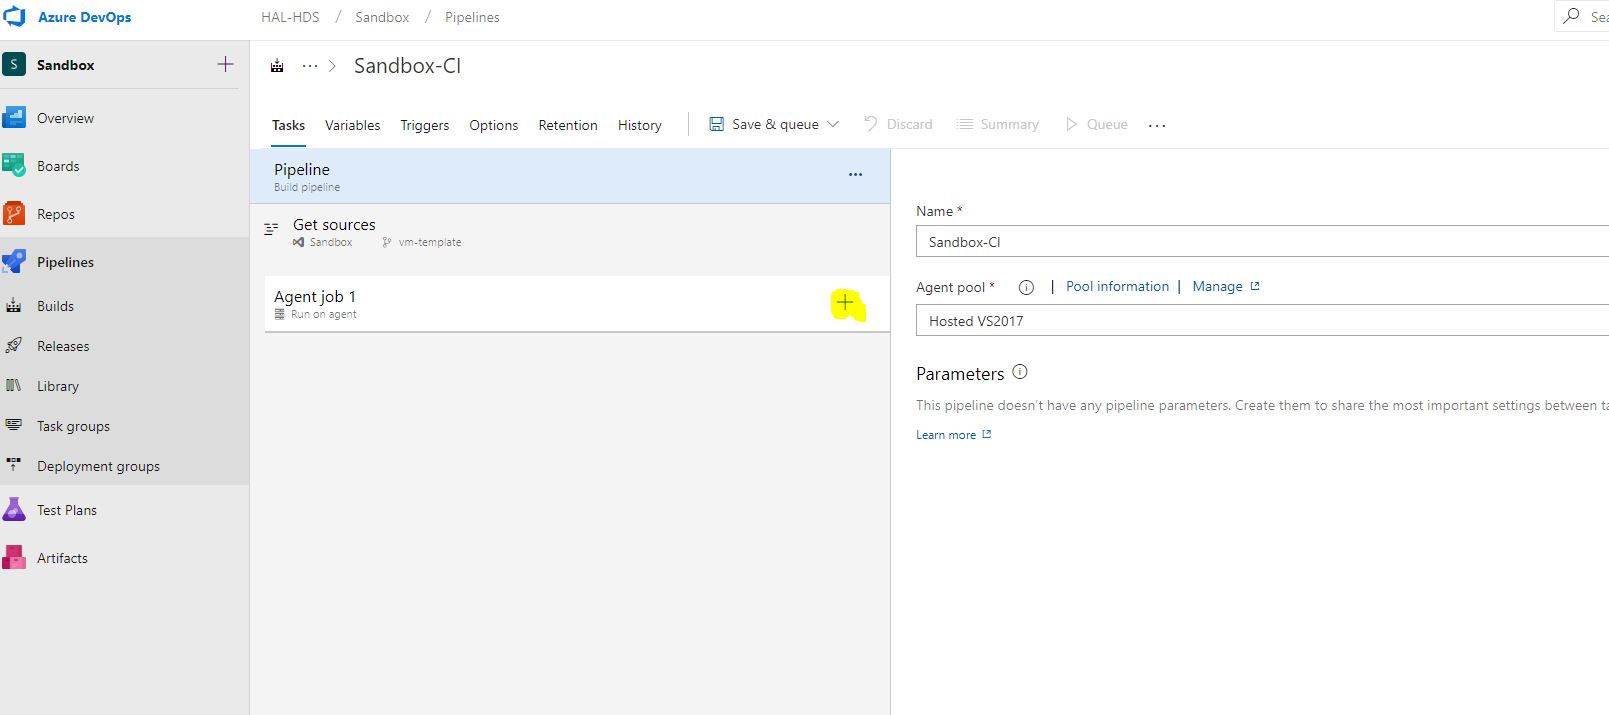
From the variety of templates, we need a simple Empty Pipeline. After its creation, we are greeted by an empty editing window, in which we will continue to spend quite a lot of time.
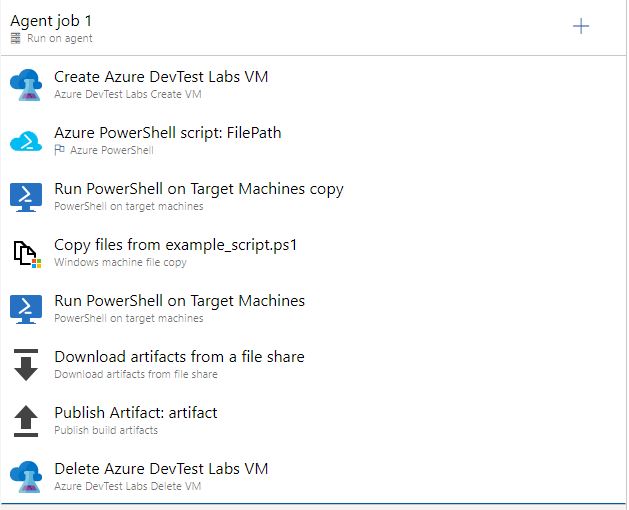
So, click on + and get into a certain store of modules, where we will need the following components from the list.
Before we proceed to the configuration of the taskline pipeline, we need to create and put several files into the project. These will be the ARM Template of our virtual machine, which we will generate in Azure DevTest Labs, the script for retrieving the IP machine after it has been created, and, if desired, the scripts of our tests or what we want to run on the host.
To create a virtual machine, we will first need to generate a template for it, a json file, which we put in the project code so that it can read the pipeline from there.
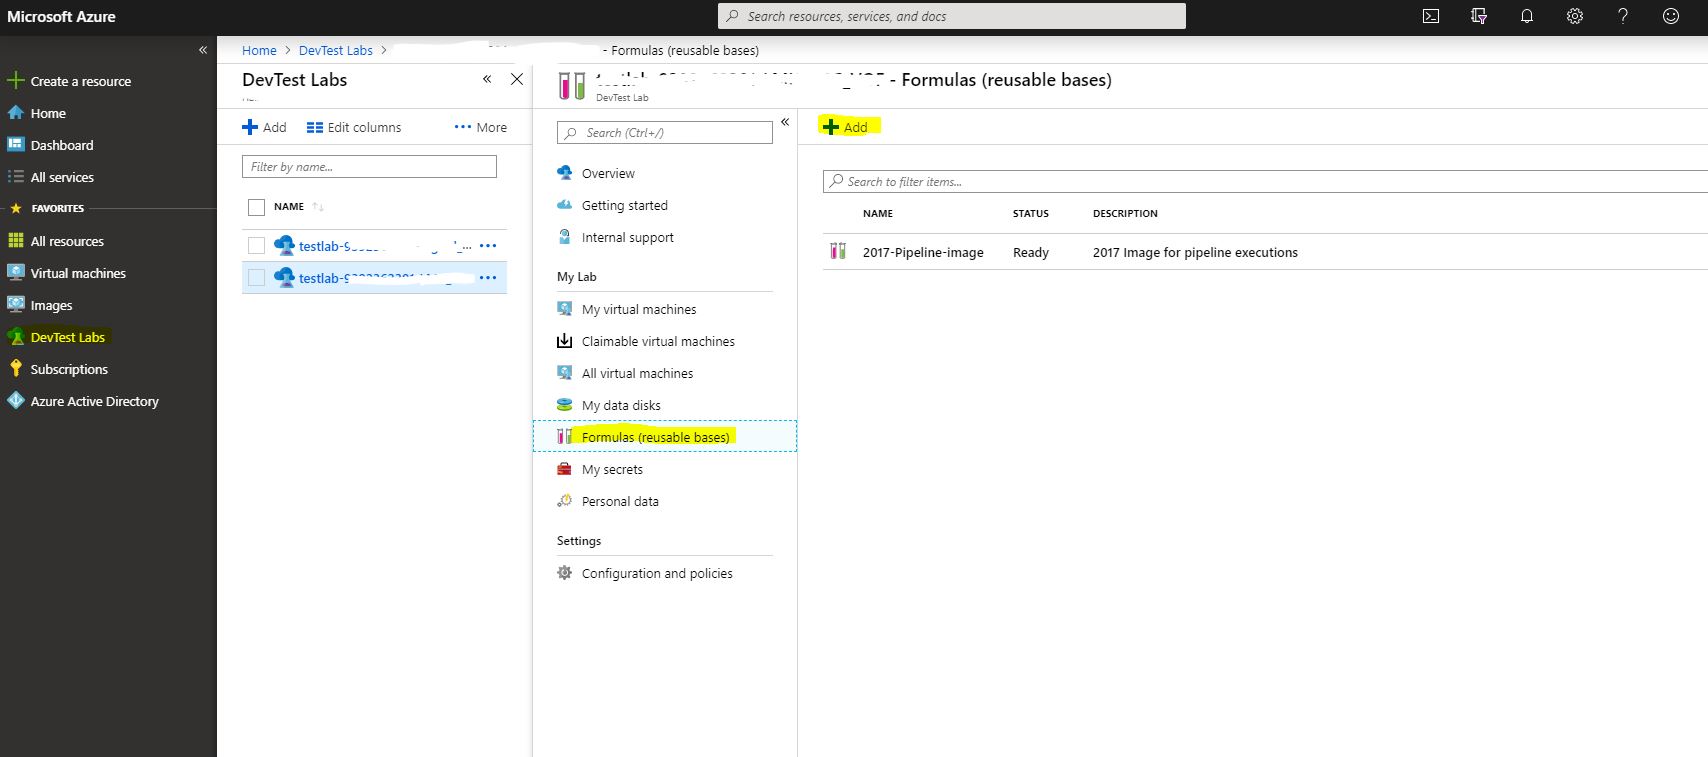
Go to our lab and find the Formulas menu (reusable bases), click on create a new one.
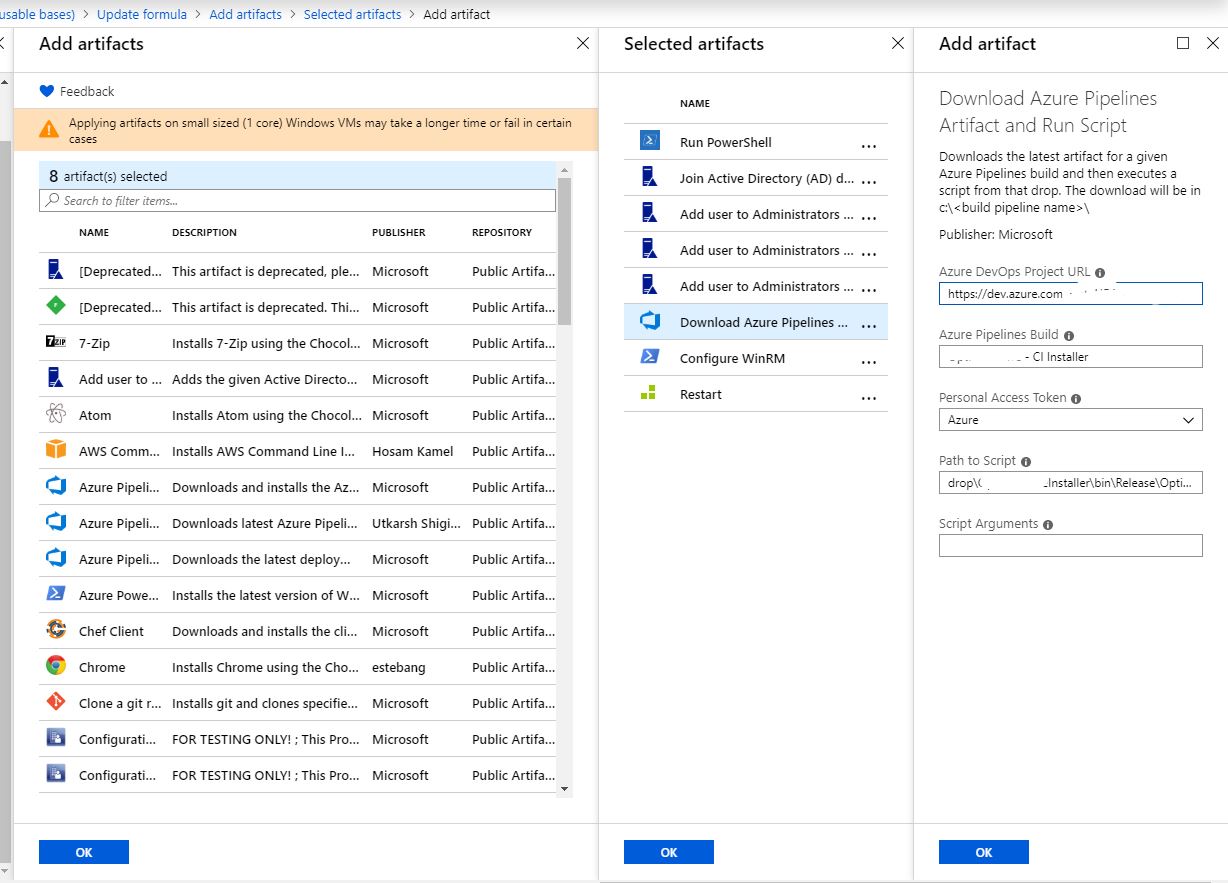
We will be greeted by a long list of imadzhey as a base, the choice of the size of the machine, all the same as when creating a virtual machine. At this stage we will not stop; we will immediately move on to the last item in the properties of the machine, namely artifacts. You can use any configuration that is required for your environment. For example, I add a car to a domain and add a service account to it as an admin so that the pipeline could then go to that car under this account. This all may vary, but for successful testing of the code we need one artifact, which we will discuss in more detail. To put the latest version of the software we are testing on our machine, we will use the Download Azure Pipelines Artifact and Run Script artifact. Remember in the beginning I said that somewhere going to build an installer application? Right now we need to tell the virtual machine, or rather the template, that it go and pick up this artifact. And I didn’t just take it, but I also installed it, for which we fill in special fields indicating the project, the name of the build and the secret key. The secret key, as in all systems of this kind, is generated in the account, in this case in Azure DevOps and stored in Secrets in your lab. There is a small disclaimer, in Secrets we will save it, but the template from this is neither cold nor hot, it will be launched from another user within the pipeline, for this we will have to manually enter the secret key again into the template.
Another artifact that needs to be included is “Configure WinRM”, we will need it for future access to the machine. There is only one parameter, hostname. Since we do not know it in advance, we will use the% COMPUTERNAME% variable.
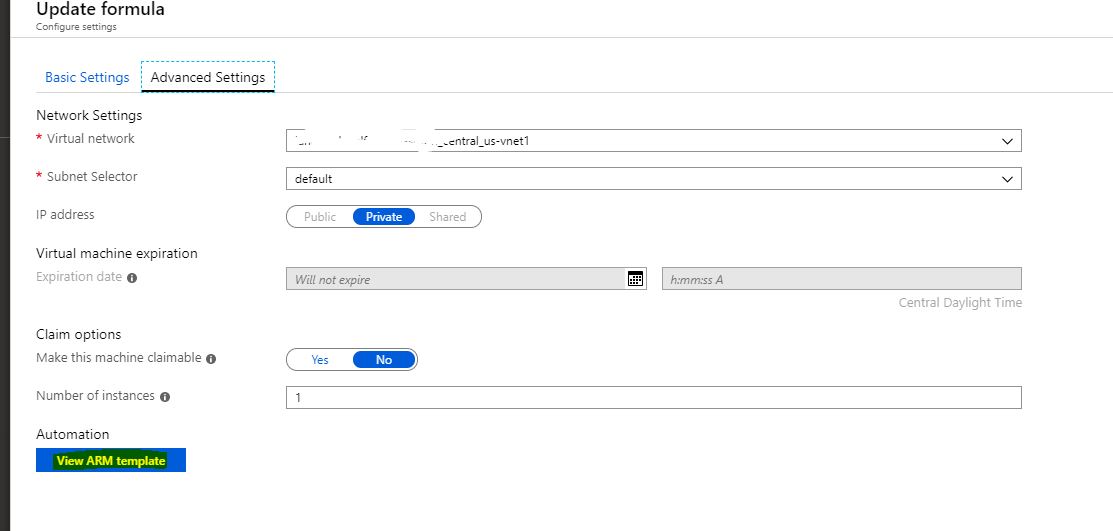
So we added all the necessary artifacts, let's go to why we even came here at all. We get the generated ARM Template in the Advanced tab of the same formula creation window.
Copy the contents of the page in the file VMtemplate.json and put it in the root of the project. We don’t need a cloud anymore, we’ll return to the pipeline.
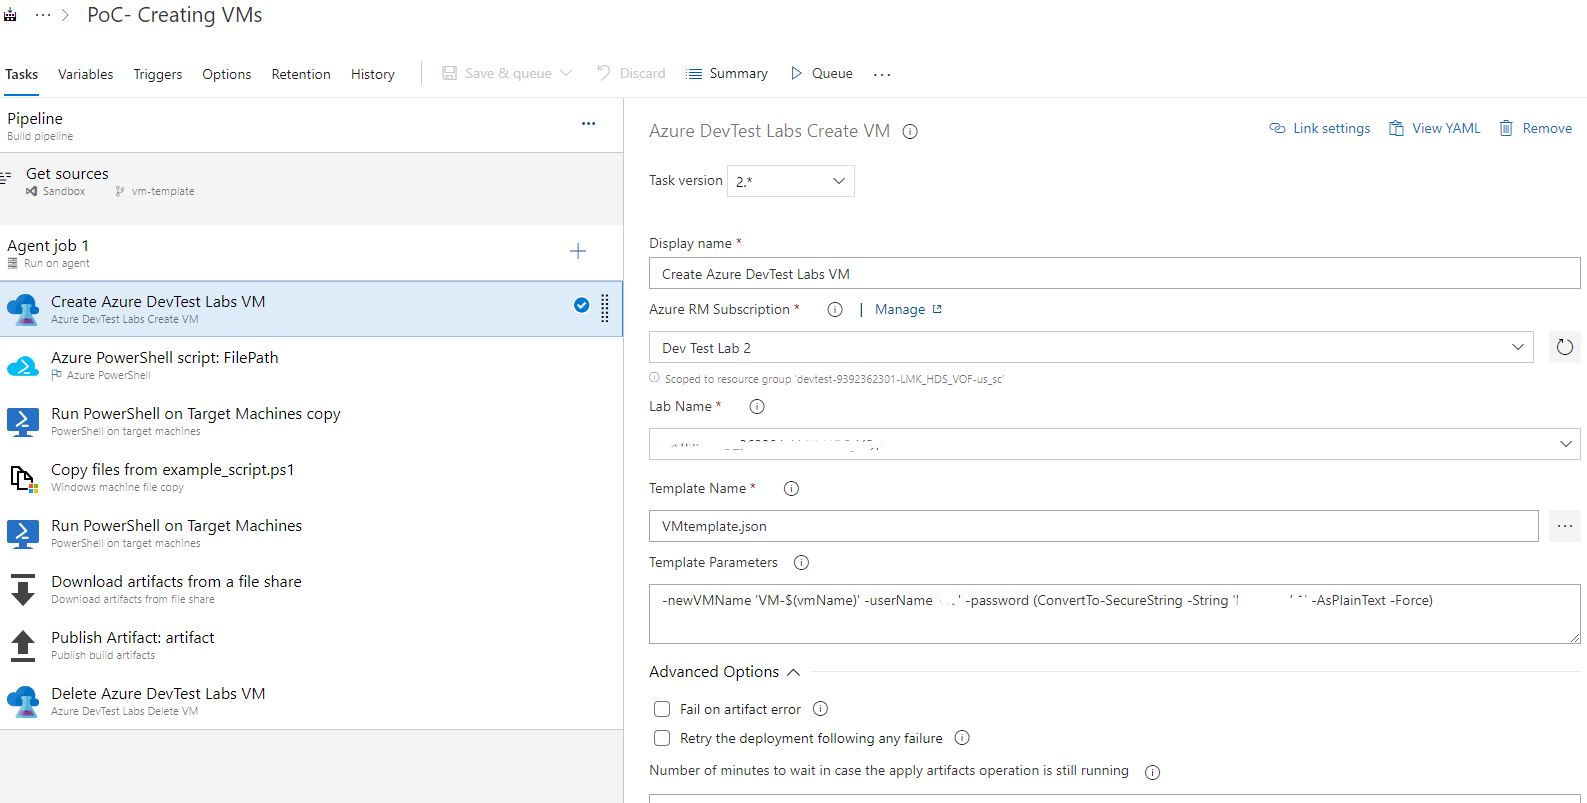
Let's start with the most important and inefficient creation of the virtual machine, for this we have done all these integrations and templates. In the Azure RM Subscription section, we select our Service connection, which we configured in paragraph 2. Next, the lab environment available to us should pop up. Then we select json which we generated and we define some obligatory variables. The login and password from the car can be set either directly or by variables, but I'm not at all sure that it works, no matter what I wrote there, I couldn’t go to the car under these credits, the main thing is to set the name of the car so that it will always be possible unique. For this, I use the build environment variable.
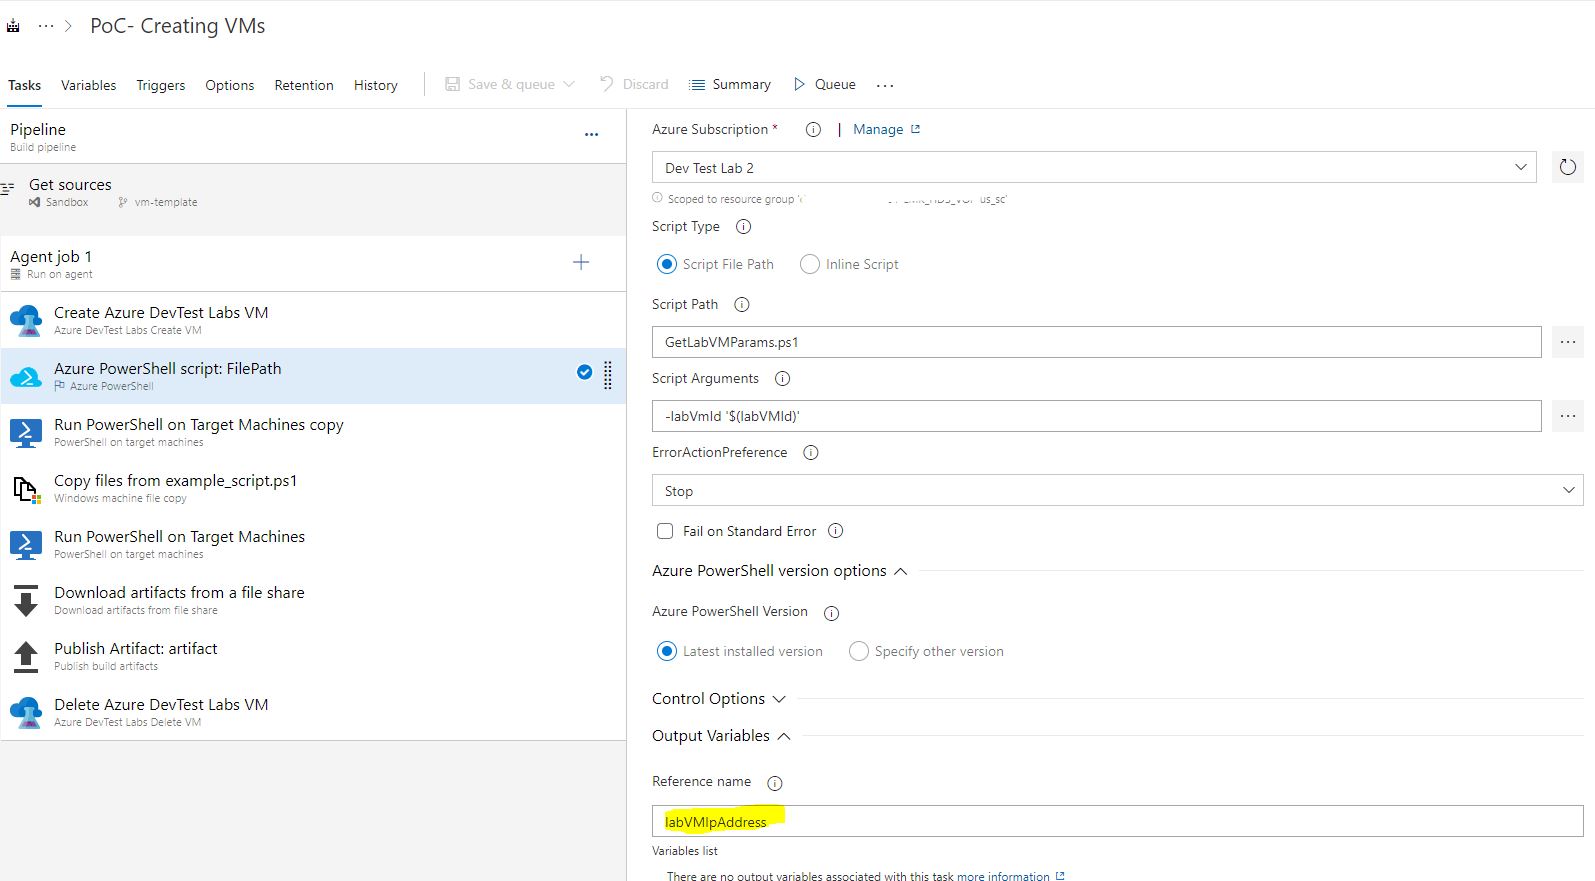
Next, we set up another important point. After the car takes off, we need to somehow know its parameters, and it’s better not for us but for the pipeline. To do this, we make a script, for example GetLabVMParams.ps1 and put it there, in the project. I took the text of the script on the Microsoft website, but slightly corrected it for my environment, because he took the PublicIP and FQDN machines. I have neither this nor that, but there is a PrivateIP which is not so easy to get, so I added a piece.
From all that the script reads, we need only the variable labVMIpAddress. Well, this is for me, maybe you will need something else, so I didn’t delete anything and just commented out the extra.
I will also explain the last line of the script, it allows our build machine access to any host via WinRM.
The next stage, we run our wonderful script. It will need the same connection to the cloud, the input variable with the machine ID, which will already be known from the previous step. How? Here it is necessary to mention such a wonderful thing as the Output Variables. Each step may have a list of variables that are passed on to the next steps of the pipeline. Accordingly, for our super script, this variable will be labVMIpAddress, do not forget to specify this.
Next, I do fairly simple things that, moreover, can vary from case to case. I execute a remote script with the creation of balls, into which I will then upload my scripts.
From the name of the task, it is clear that further we copy some sample script onto the machine and execute it with one more stage. As the address of the remote machine, our $ variable (labVMIpAddress) is useful to us. Next, we use the “pick up artifact from the balls” task and copy the results of the script execution into the build environment, then save these files to the build artifact with the same standard TASK. After the machine is no longer needed, we kill it with the last step. The main difficulty, as can be seen from the volume of the article, is to integrate with the cloud and make contact with the virtual machine you created, then you can have fun as much as you need.
This is my first article, so do not judge strictly, comments are welcome.
So, the task:
There is a software that builds using the same Azure DevOps, collected from the project on WIX. If there is interest, I will write about this tool. In fact, this is a more automated automation method for building installers, replacing the standard InstallShield. So, our software is successfully assembled and generates an artifact, a kind of setup.exe, which puts the application in the Windows system. You need to put this application in a virtual-like virtual machine, copy the automated tests prepared by the testing team, run them, and pick up the results in order to consider the branch good or bad before merjit. Just like in GitLab,
As a virtualization environment, where we will execute our tests, we obviously use Azure DevTest Labs, an entity in Azure subscriptions, which is designed to twist any test nonsense in it for reasonable money.
')
1. Cloud-side integration
First we need to integrate our DevTest Labs with Azure DevOps, for which we need a certain Service Principal, essentially a service account that allows you to go to the cloud and create / delete resources for yourself there.
Go to the subscription and find the service Azure Active Directory
Find App Registrations and click on New Registration, this will create us our service principal. I will not analyze in detail what settings to choose when creating it, it may differ from different subscriptions.
Now we need to give rights to our service director. To do this, go to the subscription icon with the key. Choose our subscription.
Next, in Access Control, click Role Assignment and look for this account in the search for the newly created name. We give the role Contributor, that's enough.
Next, we return to our Service Principal in Azure AD and open its properties. Later, we will need all the IDs that are there, save them.
This completes our portal settings and we are moving to Azure DevOps.
2. Integration on the side of Azure DevOps
First of all, we’ll go to the project settings and select Service Connections. Create a new item of type Azure Resource Manager.
Now we need all the ID that we recorded. We click on it. And we enter all the data that we received from the Service Principal. We press verify and if everything is fine we save the connection. Now our pipelines can use it to connect to the cloud.
3. Create Pipeline
Now we proceed to the most interesting, the construction of the pipeline directly. Open the Pipelines Builds menu.
We are met by the menu of creating a new build, which by default will try to create for us a YAML file of a suitable configuration. We politely refuse it and choose the classic version. It is understandable that Microsoft’s desire to do everything like that of people and give the opportunity to customize pipelines as much as possible through YAML, but stingy documentation and just the practical inoperability of many modules tells us that it is too early to use this functionality.
From the variety of templates, we need a simple Empty Pipeline. After its creation, we are greeted by an empty editing window, in which we will continue to spend quite a lot of time.
So, click on + and get into a certain store of modules, where we will need the following components from the list.
Before we proceed to the configuration of the taskline pipeline, we need to create and put several files into the project. These will be the ARM Template of our virtual machine, which we will generate in Azure DevTest Labs, the script for retrieving the IP machine after it has been created, and, if desired, the scripts of our tests or what we want to run on the host.
4. Generate ARM Template
To create a virtual machine, we will first need to generate a template for it, a json file, which we put in the project code so that it can read the pipeline from there.
Go to our lab and find the Formulas menu (reusable bases), click on create a new one.
We will be greeted by a long list of imadzhey as a base, the choice of the size of the machine, all the same as when creating a virtual machine. At this stage we will not stop; we will immediately move on to the last item in the properties of the machine, namely artifacts. You can use any configuration that is required for your environment. For example, I add a car to a domain and add a service account to it as an admin so that the pipeline could then go to that car under this account. This all may vary, but for successful testing of the code we need one artifact, which we will discuss in more detail. To put the latest version of the software we are testing on our machine, we will use the Download Azure Pipelines Artifact and Run Script artifact. Remember in the beginning I said that somewhere going to build an installer application? Right now we need to tell the virtual machine, or rather the template, that it go and pick up this artifact. And I didn’t just take it, but I also installed it, for which we fill in special fields indicating the project, the name of the build and the secret key. The secret key, as in all systems of this kind, is generated in the account, in this case in Azure DevOps and stored in Secrets in your lab. There is a small disclaimer, in Secrets we will save it, but the template from this is neither cold nor hot, it will be launched from another user within the pipeline, for this we will have to manually enter the secret key again into the template.
Another artifact that needs to be included is “Configure WinRM”, we will need it for future access to the machine. There is only one parameter, hostname. Since we do not know it in advance, we will use the% COMPUTERNAME% variable.
So we added all the necessary artifacts, let's go to why we even came here at all. We get the generated ARM Template in the Advanced tab of the same formula creation window.
Copy the contents of the page in the file VMtemplate.json and put it in the root of the project. We don’t need a cloud anymore, we’ll return to the pipeline.
5. Pipeline configuration
Let's start with the most important and inefficient creation of the virtual machine, for this we have done all these integrations and templates. In the Azure RM Subscription section, we select our Service connection, which we configured in paragraph 2. Next, the lab environment available to us should pop up. Then we select json which we generated and we define some obligatory variables. The login and password from the car can be set either directly or by variables, but I'm not at all sure that it works, no matter what I wrote there, I couldn’t go to the car under these credits, the main thing is to set the name of the car so that it will always be possible unique. For this, I use the build environment variable.
Next, we set up another important point. After the car takes off, we need to somehow know its parameters, and it’s better not for us but for the pipeline. To do this, we make a script, for example GetLabVMParams.ps1 and put it there, in the project. I took the text of the script on the Microsoft website, but slightly corrected it for my environment, because he took the PublicIP and FQDN machines. I have neither this nor that, but there is a PrivateIP which is not so easy to get, so I added a piece.
Param( [string] $labVmId) $labVmComputeId = (Get-AzureRmResource -Id $labVmId).Properties.ComputeId # Get lab VM resource group name $labVmRgName = (Get-AzureRmResource -Id $labVmComputeId).ResourceGroupName # Get the lab VM Name $labVmName = (Get-AzureRmResource -Id $labVmId).Name # Get lab VM public IP address # $labVMIpAddress = (Get-AzureRmPublicIpAddress -ResourceGroupName $labVmRgName -Name $labVmName).IpAddress # Get lab VM FQDN # $labVMFqdn = (Get-AzureRmPublicIpAddress -ResourceGroupName $labVmRgName -Name $labVmName).DnsSettings.Fqdn # Get lab VM private IP address $VmNetworkdetails= (((Get-AzureRmVM -ResourceGroupName $labVmRgName -Name $labVmName).NetworkProfile).NetworkInterfaces).Id $nicname = $VmNetworkdetails.substring($VmNetworkdetails.LastIndexOf("/")+1) $labVMnetwork = (Get-AzureRmNetworkInterface -Name $nicname -ResourceGroupName $labVmRgName)|Select-Object -ExpandProperty IPConfigurations $labVMIpAddress = $labVMnetwork.PrivateIpAddress # Set a variable labVmRgName to store the lab VM resource group name Write-Host "##vso[task.setvariable variable=labVmRgName;]$labVmRgName" # Set a variable labVMIpAddress to store the lab VM Ip address Write-Host "##vso[task.setvariable variable=labVMIpAddress;]$labVMIpAddress" # Set a variable labVMFqdn to store the lab VM FQDN name Write-Host "##vso[task.setvariable variable=labVMFqdn;]$labVMFqdn" Write-Output $labVMIpAddress Set-Item wsman:\localhost\client\trustedhosts * -Force From all that the script reads, we need only the variable labVMIpAddress. Well, this is for me, maybe you will need something else, so I didn’t delete anything and just commented out the extra.
I will also explain the last line of the script, it allows our build machine access to any host via WinRM.
The next stage, we run our wonderful script. It will need the same connection to the cloud, the input variable with the machine ID, which will already be known from the previous step. How? Here it is necessary to mention such a wonderful thing as the Output Variables. Each step may have a list of variables that are passed on to the next steps of the pipeline. Accordingly, for our super script, this variable will be labVMIpAddress, do not forget to specify this.
Next, I do fairly simple things that, moreover, can vary from case to case. I execute a remote script with the creation of balls, into which I will then upload my scripts.
New-Item “C:\test" –type directory New-SMBShare –Name “test” –Path “C:\test” –FullAccess everyone From the name of the task, it is clear that further we copy some sample script onto the machine and execute it with one more stage. As the address of the remote machine, our $ variable (labVMIpAddress) is useful to us. Next, we use the “pick up artifact from the balls” task and copy the results of the script execution into the build environment, then save these files to the build artifact with the same standard TASK. After the machine is no longer needed, we kill it with the last step. The main difficulty, as can be seen from the volume of the article, is to integrate with the cloud and make contact with the virtual machine you created, then you can have fun as much as you need.
This is my first article, so do not judge strictly, comments are welcome.
Source: https://habr.com/ru/post/460431/
All Articles