Quick start with WebComponents
Web components are a set of standards defining software interfaces for organizing the component architecture. All of them are implemented in modern versions of browsers, i.e. Do not require connecting libraries or code transpilers, however, if compatibility with Internet Explorer 11, for example, is needed, then libraries and transpilers will probably still have to be used.
This article focuses on the initial level of training and developers with experience with one or another front-end framework, but perhaps thanks to some tricks, it will be interesting to highly experienced specialists.
All experiments cited below were tested in Chrome and Firefox may not even be the newest version.
So, let's begin.
')
To begin, create a directory for the project and go into it.
Perform:
in this directory, answering all questions by default.
Create a file in the directory index.html with the simplest content.
Add a tag for the element, the name must necessarily contain a hyphen, it is a signal for the CusomElements subsystem to attempt to define this element as an add-on standard.
Add a class handler in the script tag.
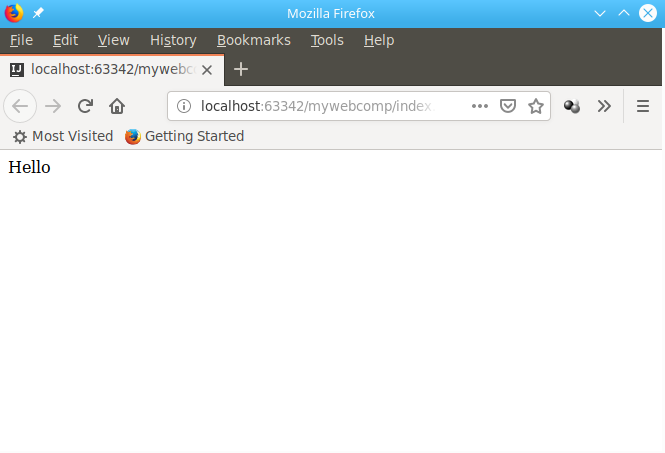
In the modular script tag, we defined a new class that, using the customElements.define () method, was defined behind the my-webcomp tag . And by adding code to the connectedCallback () method, we ensured its call when adding the component implementation to the tree. The result can already be viewed in the browser:
However, to place the html layout directly into the code if it is convenient for small pieces, it is generally not correct, which especially affects when the pieces grow to a decent size. For example, on a form with 20 elements, which may not always be convenient to beat on subcomponents. Therefore, we will first put the layout into the template, which will be located in the same html, although nothing will prevent it from loading us from a separate file if necessary.
In the component code, we replaced the insertion of the string with html with the receipt of the template element by id. Import, i.e. making a copy of this element and linking to the contents of the current one.
The id is named in camelCase notation. all aydish items are proxyed into the global namespace and using hyphens or other specials. characters access to them may be less elegant. Those. we could instead:
write in one line:
and this code would work the same way, but it is considered not very secure. Also, if we assign an id to our element, we can access it from anywhere in the context as an instance from the global namespace by calling methods and getting property values.
For example, like this:
In this scenario, the alert will be displayed immediately when the page loads.
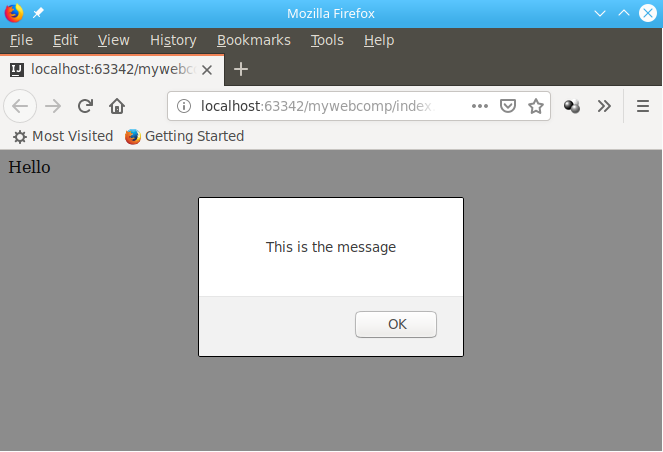
Now let's hang up the mouse click handler for our component that will output an alert message.
Now when you click on the message, we will have a reaction to the user's actions.
The showMessage () method argument also declares an event object that stores event data, such as click coordinates or a link to the item itself.
Often, each specific element must be configured in a unique way, it can be done using attributes.
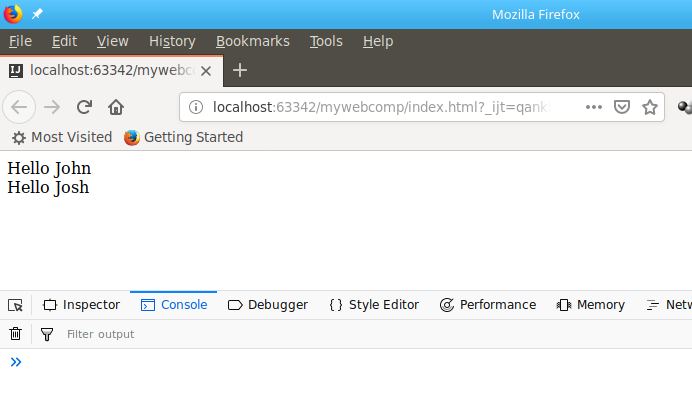
Add a second instance of the element and define for each of them different properties of greet-name whose values will be displayed when you click on the element.
Now when you click on the first one, “This is the message for John” will be displayed, and on the second “This is the message for Josh”.
It may happen that the attribute should be used not in the event handling, but directly rendered to the template, for this we add the id to the target element and substitute the value from the app immediately after rendering the copy of the template object.
It turns out like this:
Instead of .textContent it can be .innerHTML or you can call the same .insertAdjacentHTML () method on the object from the selector at the very beginning.
For a long time, using aydishnikov was considered a bad form, because they could be duplicated on large amounts of code, which led to collisions. However, with the advent of the shadow tree technology, it is possible to isolate the internal contents of an element, using aydshniki, styles and other resources without fear. For web components, the shadow tree is enabled as follows:
Now it's true that all the DOM calls to this will have to be replaced with this.shadowRoot, since there are not so many of them.
Visually, the operation of this code will not change again, but now there will be no helloLabel in the global namespace, and there are already 2 elements on the page with such an identifier. And you can access them for example like this:
and that if you do not close the tree by passing the corresponding attribute in the .attachShadow () method.
We got quite a lot of code and it’s also not very correct to place it directly in the html file. Therefore, we will create the file my-webcomp.js and transfer our class to it with the export instruction, and in the script tag we will add import of this class in order to get this:
This will not affect the performance in any way, but now we have all the business logic separately in .js, the configuration is done in html attributes, and the modular asynchronous initialization is assumed by the mechanisms of the browser's modular and component system.
It’s true that from this moment it’s impossible to open index.html as a local for development, since The browser will block the download of the script from the file system. If you have nodejs you can put a simple web server:
and launch it with the http-server command in the project directory, at startup it will prompt the host and port from which you can open the page
Which will henceforth be the address of the debug page with our element.
Writing tests is important for development, they help to keep the code operable during the development of its components. For testing web components, you can use mocha in launch mode from a browser.
Add packages.
To do this, create the test directory and add the all.html file with this content:
Copy our index.html to test / give it the name my-webcomp.tests.html and add the same head content to all.html .
However, we now need to replace the usual initialization and manipulations with the ones produced during the test run:
Now when entering
A test progress report will be shown.

But it may be necessary to run the tests automatically and in different browsers for this you need to put a special utility:
and run like this:
This line can be added to the test section of the package.json file and run as:

It is recommended to test each significant class method within a separate test. If you need to make a common initialization for each, you should define it in the suiteSetup () method:
inside the suite.
This is probably enough for the first time, we got some minimal project that he would not be ashamed to do a specific task.
or at least
There are not so many books on this topic yet, but all the extended documentation is easily located according to Web Components, CustomElements, ShadowDOM, Native Template Tag, Custom Events.
You can check your code with the repository: https://bitbucket.org/techminded/mywebcomp
This article focuses on the initial level of training and developers with experience with one or another front-end framework, but perhaps thanks to some tricks, it will be interesting to highly experienced specialists.
All experiments cited below were tested in Chrome and Firefox may not even be the newest version.
So, let's begin.
')
To begin, create a directory for the project and go into it.
mkdir mywebcomp cd mywebcomp Perform:
npm init in this directory, answering all questions by default.
Create a file in the directory index.html with the simplest content.
<html lang="en"> <body> </body> </html> Add a tag for the element, the name must necessarily contain a hyphen, it is a signal for the CusomElements subsystem to attempt to define this element as an add-on standard.
<html lang="en"> <body> <my-webcomp></my-webcomp> </body> </html> Add a class handler in the script tag.
<script type="module"> class MyWebComp extends HTMLElement { connectedCallback() { this.insertAdjacentHTML('beforeEnd', `<div>Hello</div>`) } } customElements.define('my-webcomp', MyWebComp); </script> In the modular script tag, we defined a new class that, using the customElements.define () method, was defined behind the my-webcomp tag . And by adding code to the connectedCallback () method, we ensured its call when adding the component implementation to the tree. The result can already be viewed in the browser:
However, to place the html layout directly into the code if it is convenient for small pieces, it is generally not correct, which especially affects when the pieces grow to a decent size. For example, on a form with 20 elements, which may not always be convenient to beat on subcomponents. Therefore, we will first put the layout into the template, which will be located in the same html, although nothing will prevent it from loading us from a separate file if necessary.
<html lang="en"> <body> <template id="myWebCompTemplate"> <div>Hello</div> </template> <my-webcomp></my-webcomp> <script type="module"> class MyWebComp extends HTMLElement { connectedCallback() { let tplEl = document.querySelector('#myWebCompTemplate'); let html = document.importNode(tplEl.content, true); this.appendChild(html); } } customElements.define('my-webcomp', MyWebComp); </script> </body> </html> In the component code, we replaced the insertion of the string with html with the receipt of the template element by id. Import, i.e. making a copy of this element and linking to the contents of the current one.
The id is named in camelCase notation. all aydish items are proxyed into the global namespace and using hyphens or other specials. characters access to them may be less elegant. Those. we could instead:
let tplEl = document.querySelector('#myWebCompTemplate'); let html = document.importNode(tplEl.content, true); write in one line:
let html = document.importNode(myWebCompTemplate.content, true); and this code would work the same way, but it is considered not very secure. Also, if we assign an id to our element, we can access it from anywhere in the context as an instance from the global namespace by calling methods and getting property values.
For example, like this:
<my-webcomp id="myWebComp"></my-webcomp> <script type="module"> class MyWebComp extends HTMLElement { connectedCallback() { let html = document.importNode(myWebCompTemplate.content, true); this.appendChild(html); } } customElements.define('my-webcomp', MyWebComp); </script> <script type="module"> myWebComp.showMessage(); </script> In this scenario, the alert will be displayed immediately when the page loads.
Now let's hang up the mouse click handler for our component that will output an alert message.
<my-webcomp id="myWebComp" onclick="this.showMessage(event)"></my-webcomp> <script type="module"> class MyWebComp extends HTMLElement { connectedCallback() { let html = document.importNode(myWebCompTemplate.content, true); this.appendChild(html); } showMessage(event) { alert("This is the message"); console.log(event); } } customElements.define('my-webcomp', MyWebComp); </script> Now when you click on the message, we will have a reaction to the user's actions.
The showMessage () method argument also declares an event object that stores event data, such as click coordinates or a link to the item itself.
Often, each specific element must be configured in a unique way, it can be done using attributes.
Add a second instance of the element and define for each of them different properties of greet-name whose values will be displayed when you click on the element.
<my-webcomp id="myWebComp" greet-name="John" onclick="this.showMessage(event)"></my-webcomp> <my-webcomp id="myWebComp2" greet-name="Josh" onclick="this.showMessage(event)"></my-webcomp> <script type="module"> class MyWebComp extends HTMLElement { connectedCallback() { let html = document.importNode(myWebCompTemplate.content, true); this.appendChild(html); } showMessage(event) { alert("This is the message " + this.getAttribute('greet-name')); console.log(event); } } customElements.define('my-webcomp', MyWebComp); </script> Now when you click on the first one, “This is the message for John” will be displayed, and on the second “This is the message for Josh”.
It may happen that the attribute should be used not in the event handling, but directly rendered to the template, for this we add the id to the target element and substitute the value from the app immediately after rendering the copy of the template object.
<template id="myWebCompTemplate"> <div id="helloLabel">Hello</div> </template> <my-webcomp id="myWebComp" greet-name="John" onclick="this.showMessage(event)"></my-webcomp> <my-webcomp id="myWebComp2" greet-name="Josh" onclick="this.showMessage(event)"></my-webcomp> <script type="module"> class MyWebComp extends HTMLElement { connectedCallback() { let html = document.importNode(myWebCompTemplate.content, true); this.appendChild(html); this.querySelector('#helloLabel').textContent += ' ' + this.getAttribute('greet-name'); } showMessage(event) { alert("This is the message " + this.getAttribute('greet-name')); console.log(event); } } customElements.define('my-webcomp', MyWebComp); </script> It turns out like this:
Instead of .textContent it can be .innerHTML or you can call the same .insertAdjacentHTML () method on the object from the selector at the very beginning.
For a long time, using aydishnikov was considered a bad form, because they could be duplicated on large amounts of code, which led to collisions. However, with the advent of the shadow tree technology, it is possible to isolate the internal contents of an element, using aydshniki, styles and other resources without fear. For web components, the shadow tree is enabled as follows:
this.attachShadow({mode: 'open'}); Now it's true that all the DOM calls to this will have to be replaced with this.shadowRoot, since there are not so many of them.
<script type="module"> class MyWebComp extends HTMLElement { connectedCallback() { let html = document.importNode(myWebCompTemplate.content, true); this.attachShadow({mode: 'open'}); this.shadowRoot.appendChild(html); this.shadowRoot.querySelector('#helloLabel').textContent += ' ' + this.getAttribute('greet-name'); } showMessage(event) { alert("This is the message " + this.getAttribute('greet-name')); console.log(event); } } customElements.define('my-webcomp', MyWebComp); </script> Visually, the operation of this code will not change again, but now there will be no helloLabel in the global namespace, and there are already 2 elements on the page with such an identifier. And you can access them for example like this:
myWebComp.shadowRoot.getElementById('helloLabel'); and that if you do not close the tree by passing the corresponding attribute in the .attachShadow () method.
We got quite a lot of code and it’s also not very correct to place it directly in the html file. Therefore, we will create the file my-webcomp.js and transfer our class to it with the export instruction, and in the script tag we will add import of this class in order to get this:
<script type="module"> import { MyWebComp } from "./my-webcomp.js"; customElements.define('my-webcomp', MyWebComp); myWebComp.shadowRoot.getElementById('helloLabel'); </script> This will not affect the performance in any way, but now we have all the business logic separately in .js, the configuration is done in html attributes, and the modular asynchronous initialization is assumed by the mechanisms of the browser's modular and component system.
It’s true that from this moment it’s impossible to open index.html as a local for development, since The browser will block the download of the script from the file system. If you have nodejs you can put a simple web server:
npm i http-server -g and launch it with the http-server command in the project directory, at startup it will prompt the host and port from which you can open the page
http://127.0.0.1:8080 Which will henceforth be the address of the debug page with our element.
Writing tests is important for development, they help to keep the code operable during the development of its components. For testing web components, you can use mocha in launch mode from a browser.
Add packages.
npm i mocha chai wct-mocha --save-dev To do this, create the test directory and add the all.html file with this content:
<!doctype html> <html> <head> <meta charset="utf-8"> <script src="../node_modules/mocha/mocha.js"></script> <script src="../node_modules/chai/chai.js"></script> <script src="../node_modules/wct-mocha/wct-mocha.js"></script> </head> <body> <script> WCT.loadSuites([ 'my-webcomp.tests.html', ]); </script> </body> </html> Copy our index.html to test / give it the name my-webcomp.tests.html and add the same head content to all.html .
However, we now need to replace the usual initialization and manipulations with the ones produced during the test run:
<script type="module"> import { MyWebComp } from "../my-webcomp.js"; customElements.define('my-webcomp', MyWebComp); suite('MyWebComp', () => { test('is MyWebComp', () => { const element = document.getElementById('myWebComp'); chai.assert.instanceOf(element, MyWebComp); }); }); </script> Now when entering
http://127.0.0.1:8080/test/all.html A test progress report will be shown.
But it may be necessary to run the tests automatically and in different browsers for this you need to put a special utility:
sudo npm install --global web-component-tester --unsafe-perm and run like this:
wct --npm This line can be added to the test section of the package.json file and run as:
npm test It is recommended to test each significant class method within a separate test. If you need to make a common initialization for each, you should define it in the suiteSetup () method:
suiteSetup(() => { }); inside the suite.
This is probably enough for the first time, we got some minimal project that he would not be ashamed to do a specific task.
npm publish or at least
git push There are not so many books on this topic yet, but all the extended documentation is easily located according to Web Components, CustomElements, ShadowDOM, Native Template Tag, Custom Events.
You can check your code with the repository: https://bitbucket.org/techminded/mywebcomp
Source: https://habr.com/ru/post/460397/
All Articles