Improve your JavaScript knowledge by parsing source code.
When you start a programmer’s career, digging into the source code of open libraries and frameworks may seem like something scary. In this article, Karl Mungazi shares his experience on how he overcome his fear and began to use the source code to acquire knowledge and develop skills. He also uses Redux to show how he "parses" the library.
Do you remember when you first plunged into the library or framework code that you often use? In my life, this moment came at my first job as a front-end developer three years ago.
We have just rewritten the outdated own framework that was used to create interactive learning courses. At the very beginning of the rewriting, we studied some off-the-shelf solutions, including Mithril, Inferno, Angular, React, Aurelia, Vue, and Polymer. Since I was still a young Padawan (who had just moved from journalism to web development), I was terribly frightened by the complexity of each framework and the lack of understanding of how they work.
Understanding began to come when I began to carefully examine the Mithril framework. Since then, my knowledge of JavaScript — and programming in general — has been greatly enhanced by the hours spent digging into the guts of libraries that I used daily at work and in my own projects. In this article I will explain how you can use your favorite library as a training tool.
')
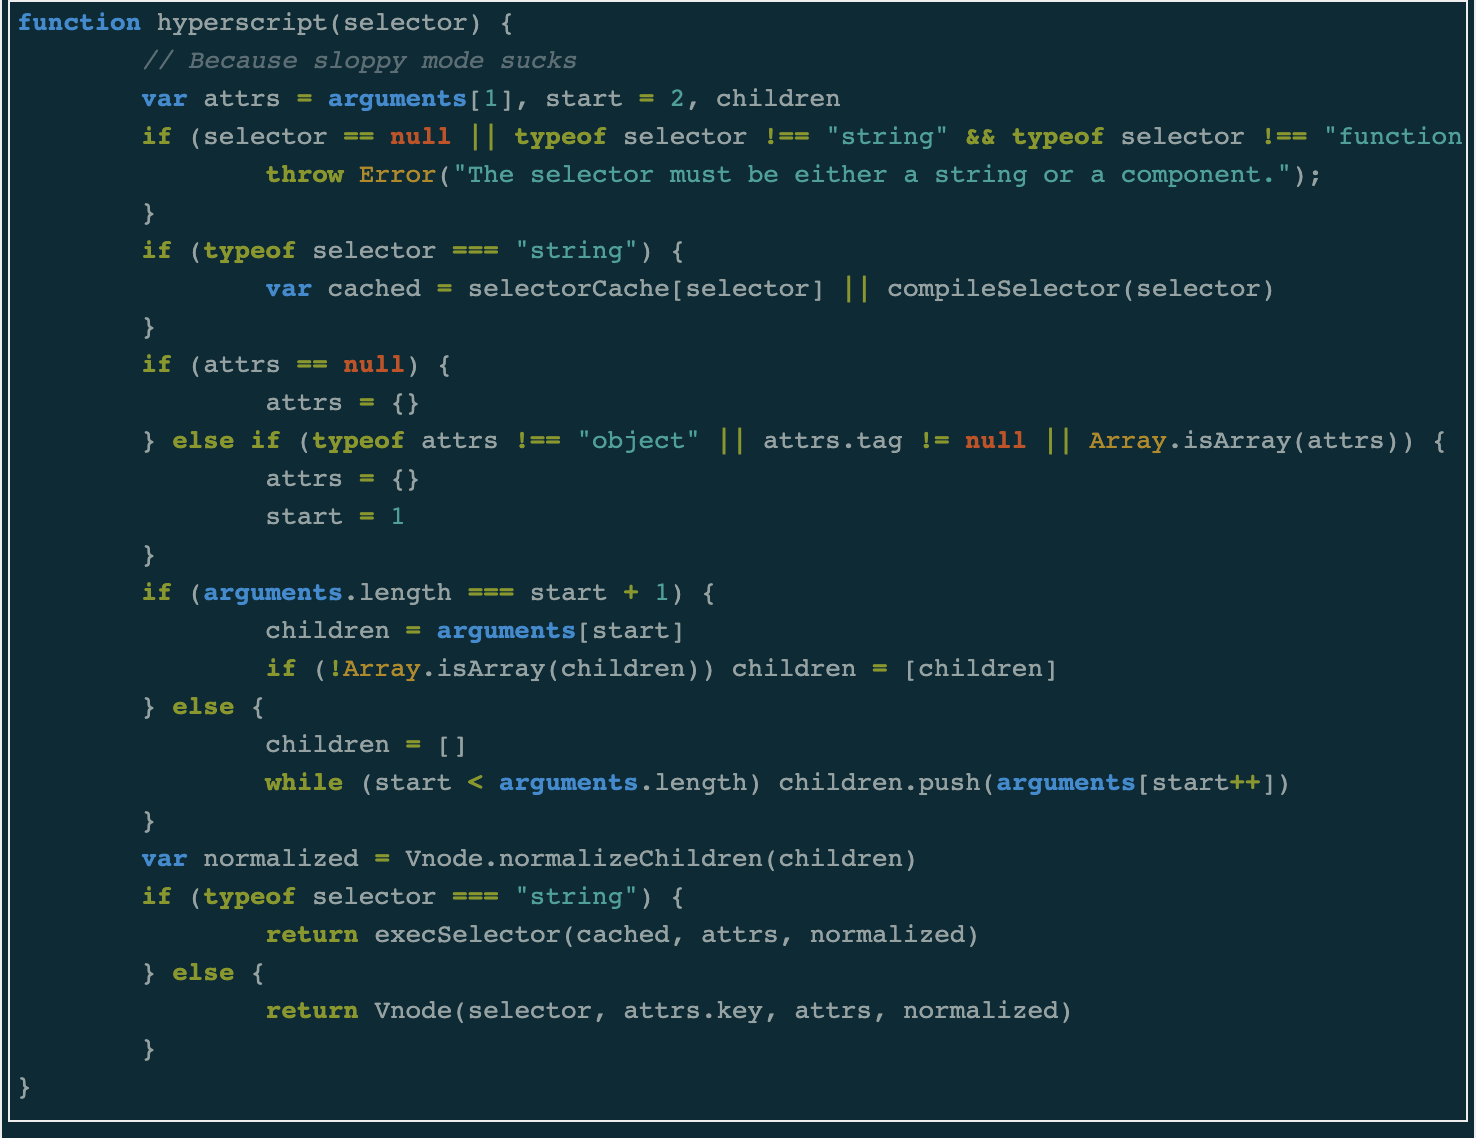
I started reading the source code with the hyperscript function from Mithril
One of the main advantages of source code parsing is that you can learn a lot. When I started to parse the Mithril code, I had little idea what the virtual DOM was. When I finished, I already knew that the virtual DOM is a technique that includes creating a tree of objects describing the user interface. Then this tree can be transformed into DOM elements using the DOM API like document.createElement. To update, a new tree is created, describing the future state of the interface, and then compared with the previous version of this tree itself.
I read about this in many articles and tutorials, but the most instructive one was to watch all this while working on our application. I also learned to ask the right questions when comparing frameworks. Instead of comparing ratings, for example, you can ask the question "How does the way a given framework works with changes affects the performance and convenience of the end user?"
Another advantage is the development of an understanding of a good application architecture. Despite the fact that most open-source projects are in general more or less similar in structure to their repositories, they still have differences. The structure of Mithril is very flat and if you are well versed in its API, you can make quite realistic assumptions about the code in the render, router and request folders. On the other hand, the Reactʻa structure reflects its new architecture. The developers separated the module responsible for updating the UI (react-reconciler) from the module responsible for rendering the DOM elements (react-dom).
One of the advantages of this separation for developers is that they can write their own renderers using react-reconciler hooks. Parcel, the module builder that I recently studied, also has a packages folder, like React. The key module is called parcel-bundler, it contains the code that is responsible for creating the assemblies, the operation of the hot module server and the command line tool.
Parsing the source code will soon lead you to reading the JavaScript specification.
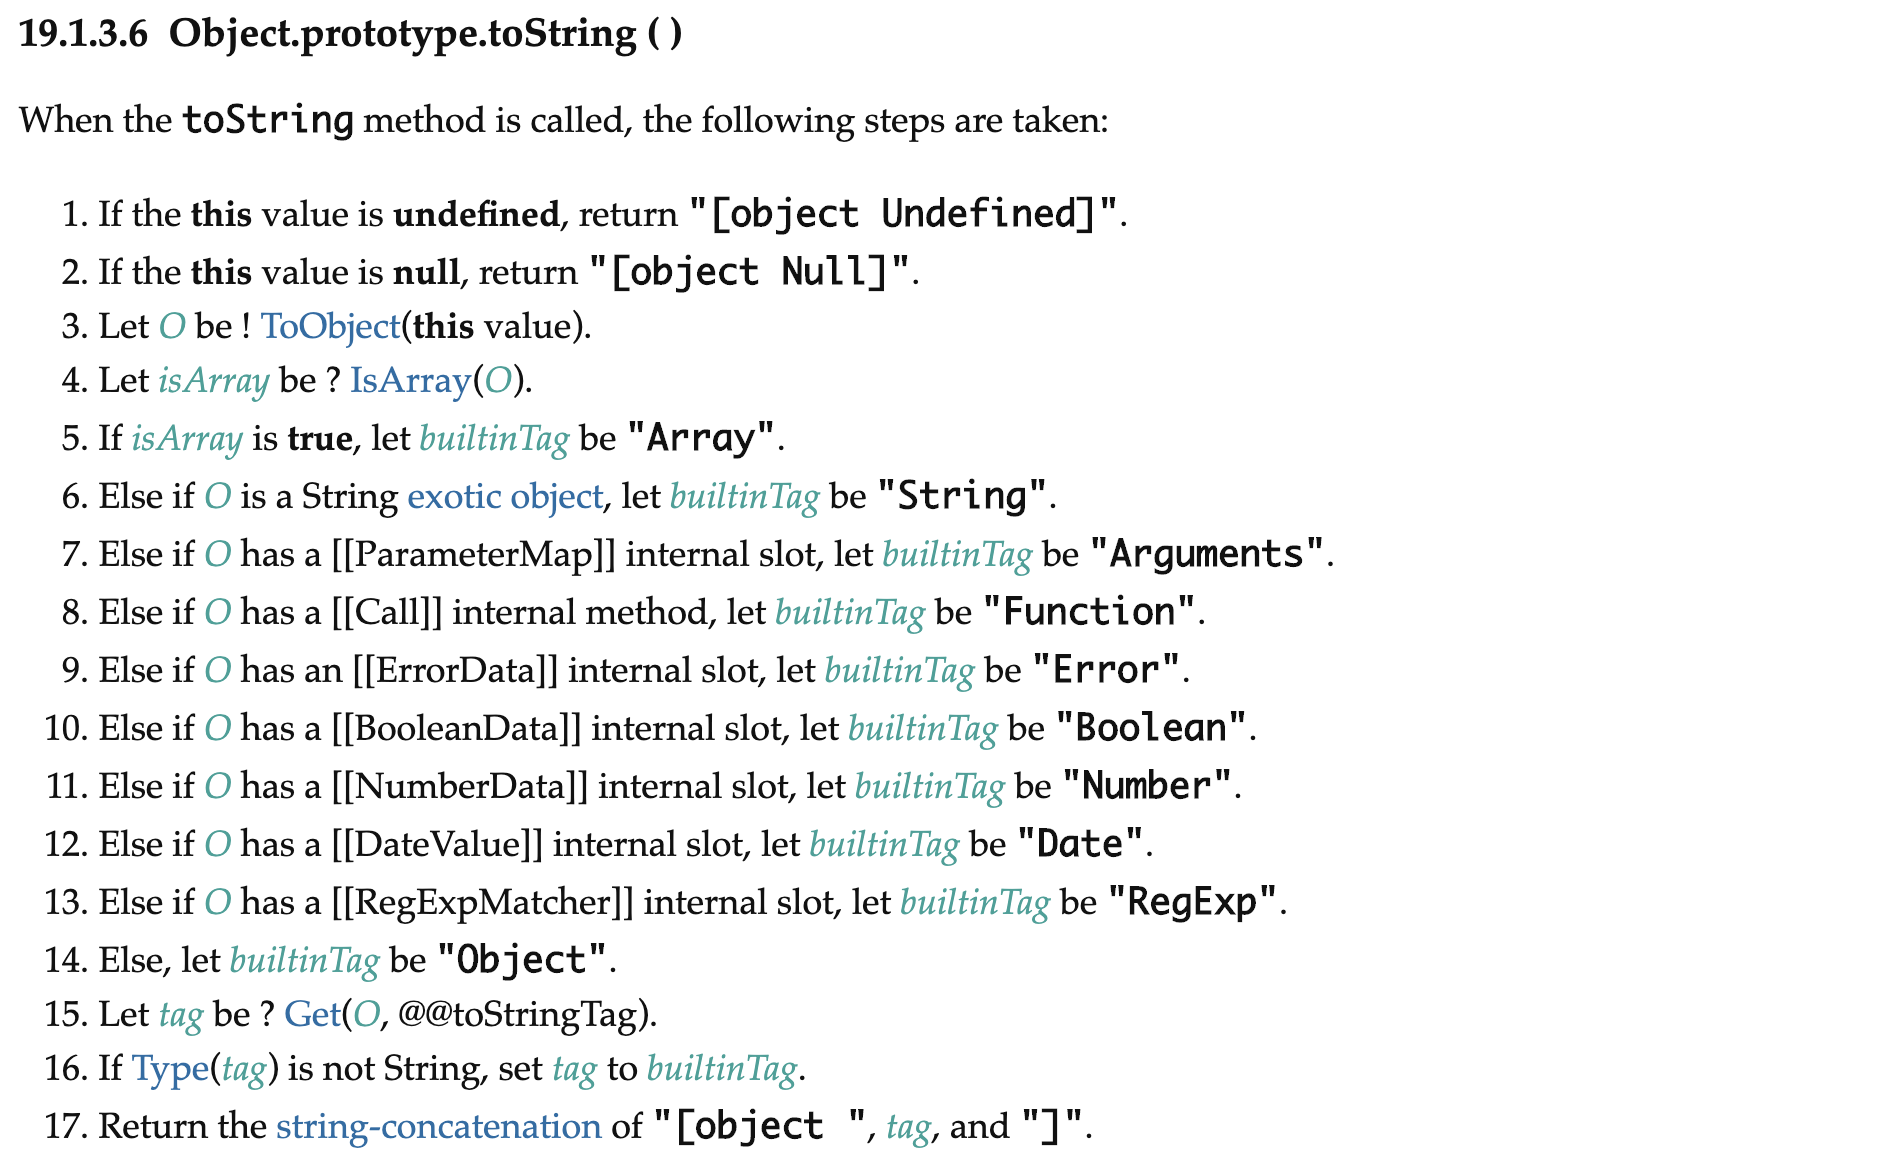
Another plus, which was a big surprise for me, is that it becomes easier for you to read the official JavaScript specification. I first turned to it when I tried to figure out what distinguishes throw Error and throw new Error (the spoiler is nothing ). I asked this question because Mithril used throw Error in the implementation of the function m and it became interesting to me, and why is it better than throw new Error. Then I also learned that the operators && and || do not necessarily return boolean values , found the rules by which the non-strict comparison operator == "resolves" the values and the reason why Object.prototype.toString.call ({}) returns '[object Object]'.
You can parse the source code in different ways. The easiest way seems to me the following: choose a method from your library and describe what happens when you call it. It is not necessary to describe each step, you just need to try to understand its general principles and structure.
Recently, I took apart ReactDOM.render in this way and thus learned a lot about React Fiber and some of the difficulties in its implementation. Fortunately, React is very popular and the presence of a large number of articles on the same topic from other developers has accelerated the process.
This dive into the code also introduced me to the concept of co-operative scheduling , the window.requestIdleCallback method and a living example of a linked list (React processes updates by sending them to a queue, which is a linked list of updates with priorities). In the process it would be nice to create a simple application using the library. This makes debugging easier because you don’t have to deal with the stack trace of other libraries.
If I don’t do a detailed review, I’ll open the node_modules folder in the project I’m working on or look at GitHub. I always do this, bumping into a bug or an interesting feature. When reading the code on GitHub, make sure that this is the latest version. The latest version code can be seen by clicking on the branch change button and selecting “tags”. Changes in libraries and frameworks occur all the time, so it’s unlikely that you will want to parse something that may not be in the next version.
A more superficial way to study source code is what I call a “quick look”. Somehow I installed express.js, opened the node_modules folder and walked through the dependencies. If the README did not give me a satisfactory explanation, I read the source. This led me to interesting discoveries:
Although these discoveries will most likely not be useful right away, a general understanding of the dependencies of your library or framework is very useful.
Browser debugging tools are your best friends when debugging code on the front end. In addition, they allow you to stop the program at any time and check its status, skip the execution of the function, or go inside or exit it. In the minified code, this is impossible - so I unpack this code and put it in the appropriate file in the node_modules folder.

Use debugger as a useful application. Make a guess and then check it out.
React-Redux is a library for managing the state of applications on React. When I work with popular libraries like this, I start by searching for articles about using them. In preparing this example, I read this article . This is another plus of learning source code - it leads you to informative articles like this that improve your thinking and understanding.
Connect is a react-redux function that binds the react component and the application's redux storage. How? According to the documentation, she does the following:
Usually the next step is to create a primitive application using the connect function. Nevertheless, in this situation, I used a new application on React, on which we were working, because I wanted to understand connect in the context of an application that would probably soon fall into production.
The component on which I focused looks like this:
This is a container component that serves as a wrapper for four smaller related components. One of the first things you will find in the file that exports connect is the comment “connect is the facade for connectAdvanced”. Already at this stage we can learn something: we have the opportunity to observe the pattern “facade” in action. At the end of the file, we see that connect exports a call to the createConnect function. Its parameters are a set of defaults, which are structured as follows:
And we have one more instructive moment: exporting the called function and destructuring the arguments of the function by default. Destructuring is instructive for us because the code could be written like this:
As a result, we would get an error - Uncaught TypeError: Cannot destructure property 'connectHOC' of 'undefined' or 'null'. This would happen because the function has no default argument values.
Note: to better understand the argument restructuring, you can read the article by David Walsh . Some moments may seem trivial, depending on your knowledge of the language - then you can focus on those moments with which you are not familiar.
The createConnect function alone does nothing. It simply returns the connect function I used here:
It takes four optional arguments and the first three of them pass through the match function, which helps determine their behavior based on which arguments are passed, as well as their type. It turns out that since the second argument passed in match is one of the three functions imported into connect, I need to choose where to go next.
There is also something to learn from the proxy function used for wrapping the first argument in connect if these arguments are functions; from the isPlainObject utility used to check plain objects or from the warning module, which shows how to make a debugger that will break on all errors. After the match function, we move to connectHOC, the function that takes our react component and associates it with redux. There is another function call that returns wrapWithConnect — the function that actually handles the binding of the component to the repository.
Looking at the connectHOC implementation, I can suggest why the details of the connect implementation should be hidden. This is essentially the heart of react-redux and contains logic that should not be available through connect. Even if we dwell on this, then later, if we need to dig deeper, we will already have the source material with a detailed explanation of the code.
Studying the source code is at first a very complicated thing. But, like everything else, it becomes easier over time. His task is not to understand everything, but to bring something useful for himself - a common understanding and new knowledge. It is very important to be attentive during the whole process and to go into details.
For example, I found the isPlainObject function interesting because it uses this if (typeof obj! == 'object' || obj === null) return false to make sure that the argument passed is a simple object. When I first read this code, I thought, why not just use Object.prototype.toString.call (opts)! == '[object Object]', which would reduce the code and separate objects from their subtypes like Date. But already in the next line you can see that even if suddenly (suddenly!) A developer using connect returns a Date object, for example, checking Object.getPrototypeOf (obj) === null will cope with this.
Another unexpected point in isPlainObject in this place:
Finding the answer in Google led me to this thread on StackOverflow, and to this comment on GitHub `s Redux, which explains how this code handles situations when, for example, an object is transferred from iFrame.
-
First decided to translate the article. I would be grateful for clarifications, advice and recommendations.
Do you remember when you first plunged into the library or framework code that you often use? In my life, this moment came at my first job as a front-end developer three years ago.
We have just rewritten the outdated own framework that was used to create interactive learning courses. At the very beginning of the rewriting, we studied some off-the-shelf solutions, including Mithril, Inferno, Angular, React, Aurelia, Vue, and Polymer. Since I was still a young Padawan (who had just moved from journalism to web development), I was terribly frightened by the complexity of each framework and the lack of understanding of how they work.
Understanding began to come when I began to carefully examine the Mithril framework. Since then, my knowledge of JavaScript — and programming in general — has been greatly enhanced by the hours spent digging into the guts of libraries that I used daily at work and in my own projects. In this article I will explain how you can use your favorite library as a training tool.
')
I started reading the source code with the hyperscript function from Mithril
Pros of source code parsing
One of the main advantages of source code parsing is that you can learn a lot. When I started to parse the Mithril code, I had little idea what the virtual DOM was. When I finished, I already knew that the virtual DOM is a technique that includes creating a tree of objects describing the user interface. Then this tree can be transformed into DOM elements using the DOM API like document.createElement. To update, a new tree is created, describing the future state of the interface, and then compared with the previous version of this tree itself.
I read about this in many articles and tutorials, but the most instructive one was to watch all this while working on our application. I also learned to ask the right questions when comparing frameworks. Instead of comparing ratings, for example, you can ask the question "How does the way a given framework works with changes affects the performance and convenience of the end user?"
Another advantage is the development of an understanding of a good application architecture. Despite the fact that most open-source projects are in general more or less similar in structure to their repositories, they still have differences. The structure of Mithril is very flat and if you are well versed in its API, you can make quite realistic assumptions about the code in the render, router and request folders. On the other hand, the Reactʻa structure reflects its new architecture. The developers separated the module responsible for updating the UI (react-reconciler) from the module responsible for rendering the DOM elements (react-dom).
One of the advantages of this separation for developers is that they can write their own renderers using react-reconciler hooks. Parcel, the module builder that I recently studied, also has a packages folder, like React. The key module is called parcel-bundler, it contains the code that is responsible for creating the assemblies, the operation of the hot module server and the command line tool.
Parsing the source code will soon lead you to reading the JavaScript specification.
Another plus, which was a big surprise for me, is that it becomes easier for you to read the official JavaScript specification. I first turned to it when I tried to figure out what distinguishes throw Error and throw new Error (the spoiler is nothing ). I asked this question because Mithril used throw Error in the implementation of the function m and it became interesting to me, and why is it better than throw new Error. Then I also learned that the operators && and || do not necessarily return boolean values , found the rules by which the non-strict comparison operator == "resolves" the values and the reason why Object.prototype.toString.call ({}) returns '[object Object]'.
How to parse the source code
You can parse the source code in different ways. The easiest way seems to me the following: choose a method from your library and describe what happens when you call it. It is not necessary to describe each step, you just need to try to understand its general principles and structure.
Recently, I took apart ReactDOM.render in this way and thus learned a lot about React Fiber and some of the difficulties in its implementation. Fortunately, React is very popular and the presence of a large number of articles on the same topic from other developers has accelerated the process.
This dive into the code also introduced me to the concept of co-operative scheduling , the window.requestIdleCallback method and a living example of a linked list (React processes updates by sending them to a queue, which is a linked list of updates with priorities). In the process it would be nice to create a simple application using the library. This makes debugging easier because you don’t have to deal with the stack trace of other libraries.
If I don’t do a detailed review, I’ll open the node_modules folder in the project I’m working on or look at GitHub. I always do this, bumping into a bug or an interesting feature. When reading the code on GitHub, make sure that this is the latest version. The latest version code can be seen by clicking on the branch change button and selecting “tags”. Changes in libraries and frameworks occur all the time, so it’s unlikely that you will want to parse something that may not be in the next version.
A more superficial way to study source code is what I call a “quick look”. Somehow I installed express.js, opened the node_modules folder and walked through the dependencies. If the README did not give me a satisfactory explanation, I read the source. This led me to interesting discoveries:
- Express uses two modules to merge objects, and the operation of these modules is very different. merge-descriptors adds only the properties found in the source object, and also adds non-enumerated properties, while utils-merge goes over the enumerated properties of the object and its entire prototype chain. merge-descriptors uses Object.getOwnPropertyNames () and Object.getOwnPropertyDescriptor (), and utils-merge uses for..in;
- The setprototypeof module provides a cross-platform version of defining the prototype of the object being created (instantiated);
- escape-html is a 78-line module for escaping lines, after processing which the content can be inserted into HTML;
Although these discoveries will most likely not be useful right away, a general understanding of the dependencies of your library or framework is very useful.
Browser debugging tools are your best friends when debugging code on the front end. In addition, they allow you to stop the program at any time and check its status, skip the execution of the function, or go inside or exit it. In the minified code, this is impossible - so I unpack this code and put it in the appropriate file in the node_modules folder.
Use debugger as a useful application. Make a guess and then check it out.
A practical example: the connect function in Redux
React-Redux is a library for managing the state of applications on React. When I work with popular libraries like this, I start by searching for articles about using them. In preparing this example, I read this article . This is another plus of learning source code - it leads you to informative articles like this that improve your thinking and understanding.
Connect is a react-redux function that binds the react component and the application's redux storage. How? According to the documentation, she does the following:
“... returns a new, connected component class, which is a wrapper around the component passed into it.”After reading this, I ask myself the following questions:
- Do I know patterns or concepts where functions return incoming parameters wrapped with additional functionality?
- If so, how can I use it based on the description from the documentation?
Usually the next step is to create a primitive application using the connect function. Nevertheless, in this situation, I used a new application on React, on which we were working, because I wanted to understand connect in the context of an application that would probably soon fall into production.
The component on which I focused looks like this:
class MarketContainer extends Component { // code omitted for brevity } const mapDispatchToProps = dispatch => { return { updateSummary: (summary, start, today) => dispatch(updateSummary(summary, start, today)) } } export default connect(null, mapDispatchToProps)(MarketContainer); This is a container component that serves as a wrapper for four smaller related components. One of the first things you will find in the file that exports connect is the comment “connect is the facade for connectAdvanced”. Already at this stage we can learn something: we have the opportunity to observe the pattern “facade” in action. At the end of the file, we see that connect exports a call to the createConnect function. Its parameters are a set of defaults, which are structured as follows:
export function createConnect({ connectHOC = connectAdvanced, mapStateToPropsFactories = defaultMapStateToPropsFactories, mapDispatchToPropsFactories = defaultMapDispatchToPropsFactories, mergePropsFactories = defaultMergePropsFactories, selectorFactory = defaultSelectorFactory } = {}) And we have one more instructive moment: exporting the called function and destructuring the arguments of the function by default. Destructuring is instructive for us because the code could be written like this:
export function createConnect({ connectHOC = connectAdvanced, mapStateToPropsFactories = defaultMapStateToPropsFactories, mapDispatchToPropsFactories = defaultMapDispatchToPropsFactories, mergePropsFactories = defaultMergePropsFactories, selectorFactory = defaultSelectorFactory }) As a result, we would get an error - Uncaught TypeError: Cannot destructure property 'connectHOC' of 'undefined' or 'null'. This would happen because the function has no default argument values.
Note: to better understand the argument restructuring, you can read the article by David Walsh . Some moments may seem trivial, depending on your knowledge of the language - then you can focus on those moments with which you are not familiar.
The createConnect function alone does nothing. It simply returns the connect function I used here:
export default connect(null, mapDispatchToProps)(MarketContainer) It takes four optional arguments and the first three of them pass through the match function, which helps determine their behavior based on which arguments are passed, as well as their type. It turns out that since the second argument passed in match is one of the three functions imported into connect, I need to choose where to go next.
There is also something to learn from the proxy function used for wrapping the first argument in connect if these arguments are functions; from the isPlainObject utility used to check plain objects or from the warning module, which shows how to make a debugger that will break on all errors. After the match function, we move to connectHOC, the function that takes our react component and associates it with redux. There is another function call that returns wrapWithConnect — the function that actually handles the binding of the component to the repository.
Looking at the connectHOC implementation, I can suggest why the details of the connect implementation should be hidden. This is essentially the heart of react-redux and contains logic that should not be available through connect. Even if we dwell on this, then later, if we need to dig deeper, we will already have the source material with a detailed explanation of the code.
We will summarize
Studying the source code is at first a very complicated thing. But, like everything else, it becomes easier over time. His task is not to understand everything, but to bring something useful for himself - a common understanding and new knowledge. It is very important to be attentive during the whole process and to go into details.
For example, I found the isPlainObject function interesting because it uses this if (typeof obj! == 'object' || obj === null) return false to make sure that the argument passed is a simple object. When I first read this code, I thought, why not just use Object.prototype.toString.call (opts)! == '[object Object]', which would reduce the code and separate objects from their subtypes like Date. But already in the next line you can see that even if suddenly (suddenly!) A developer using connect returns a Date object, for example, checking Object.getPrototypeOf (obj) === null will cope with this.
Another unexpected point in isPlainObject in this place:
while (Object.getPrototypeOf(baseProto) !== null) { baseProto = Object.getPrototypeOf(baseProto) } Finding the answer in Google led me to this thread on StackOverflow, and to this comment on GitHub `s Redux, which explains how this code handles situations when, for example, an object is transferred from iFrame.
-
First decided to translate the article. I would be grateful for clarifications, advice and recommendations.
Source: https://habr.com/ru/post/460181/
All Articles