We create infrastructure as code with GitLab and Ansible

All the power of GitLab CI in demonstrating Ansible playbooks with the “infrastructure as a code” approach.
GitLab CI is an effective tool for a wide variety of scenarios, including infrastructure as code. GitLab can be used with different tools, but in this demonstration we will take Ansible, because it is the developers most often use it in the “infrastructure-as-code” approach. Here is a demo with two routers from the Ansible network course .
The beauty of GitLab CI is that the code from the Ansible Playbook can be changed and delivered without installing any dependencies locally. The demo project that causes SNMP strings to be updated on all devices every month in accordance with our security policy can be fully implemented at GitLab.com , our code hosting service.
To get started, open the Ansible playbook, where there are 4 tasks:
- Gather router facts - collecting facts about routers.
- Display version - version display
- Display serial number - display the serial number
- Configure SNMP - SNMP configuration.
In this demo, we will focus on setting up SNMP strings, for which you need to perform a few simple steps.
We start with the task board
Any plan on GitLab starts in the same way: from the task . So, the first step of the GitLab workflow is to check the task board in the ansible-demo project . On the ansible-demo task board, we already see the task: change the SNMP strings on all routers . The task has a link to the GitLab security policy wiki page, which states that the SNMP strings need to be updated every month, and there must be different strings for “read only” and “read and write” operations.

GitLab security policy requires you to update SNMP strings every month.
Then you need to check that the commands to configure the SNMP strings in the demo with two routers do not violate the GitLab security policy described in the task.

Commands for configuring SNMP strings are available in the Ansible playbook.
Then go back to the task, assign it to yourself and change the shortcut from to-do to doing in the right pane or simply drag the task on the board from one column to another.
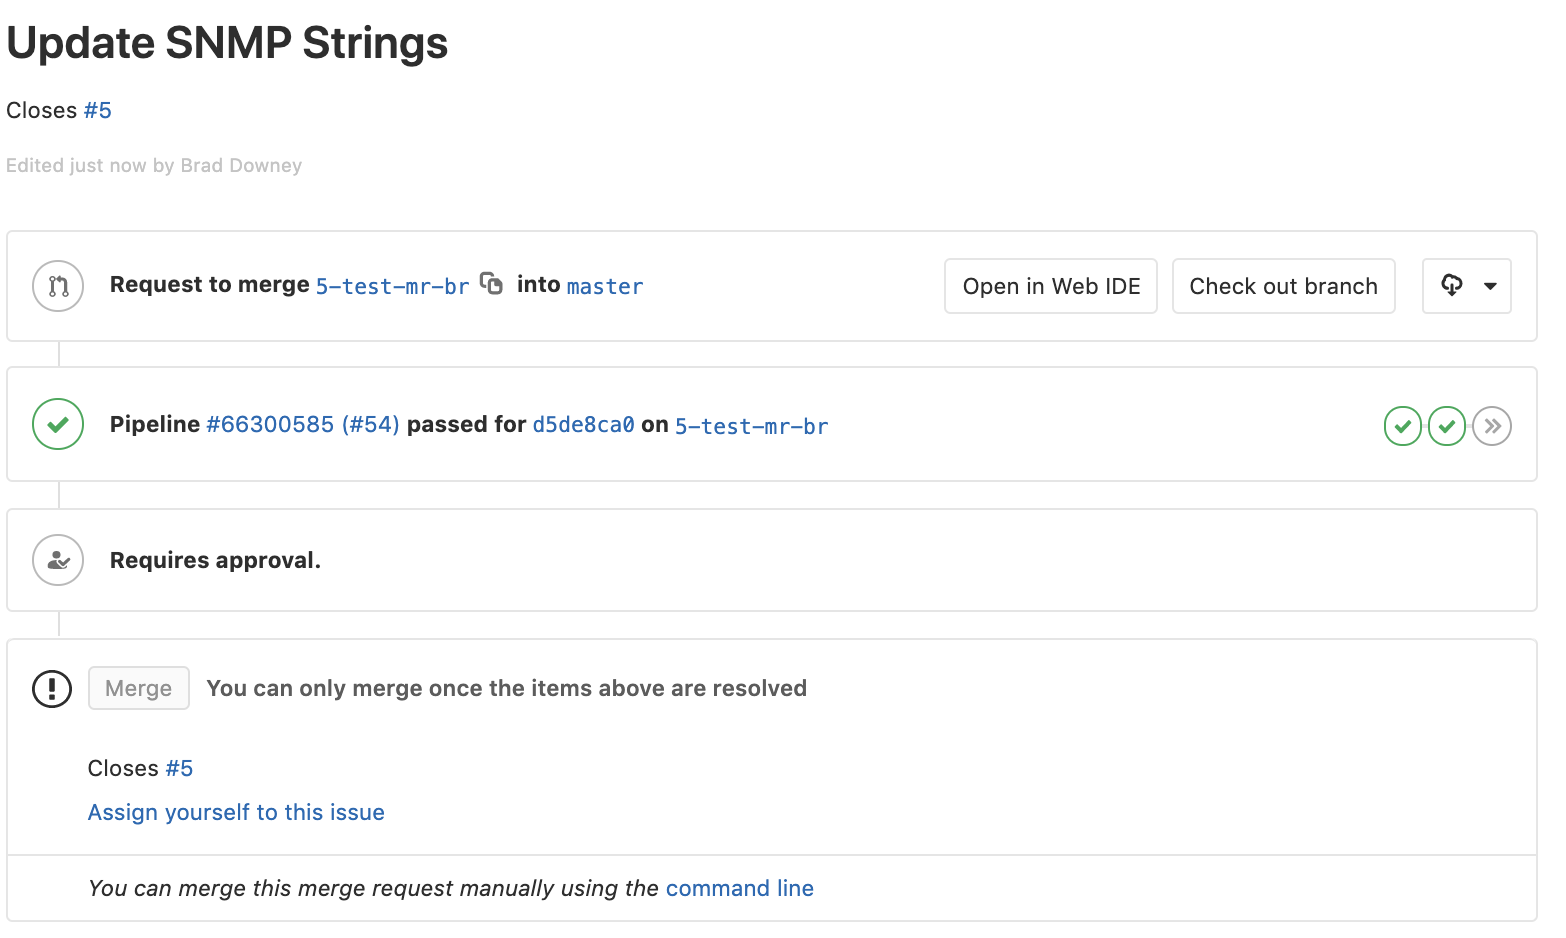
Create a merge request
Now you need to create from the task merge rekvest. Make sure that the merge-request has the Work in Progress (WIP) flag so that it does not get into the master prematurely. Instead of a local connection, we use the GitLab Web IDE , because the changes in the SNMP strings are minor.
- Open the CI / CD demo section.
- Go to the Ansible Playbook.
- Modify the SNMP section as follows:
- Please note that RO and RW are configured with different strings in accordance with the GitLab security policy described in the task .
Commit change
You updated the SNMP string according to the instructions, and now you need to commit the changes. Open a parallel comparison of changes to make sure that the merge request contains the last commit.

The parallel comparison tool clearly shows the changes.
results
Committing changes will automatically launch the GitLab CI pipeline. He will perform the following tasks:
- Syntax check.
- Trial runs.
- Testing for changes in laboratory / artificial environment.
We see the progress and output of each job in the GitLab CI pipeline, which updates the SNMP.
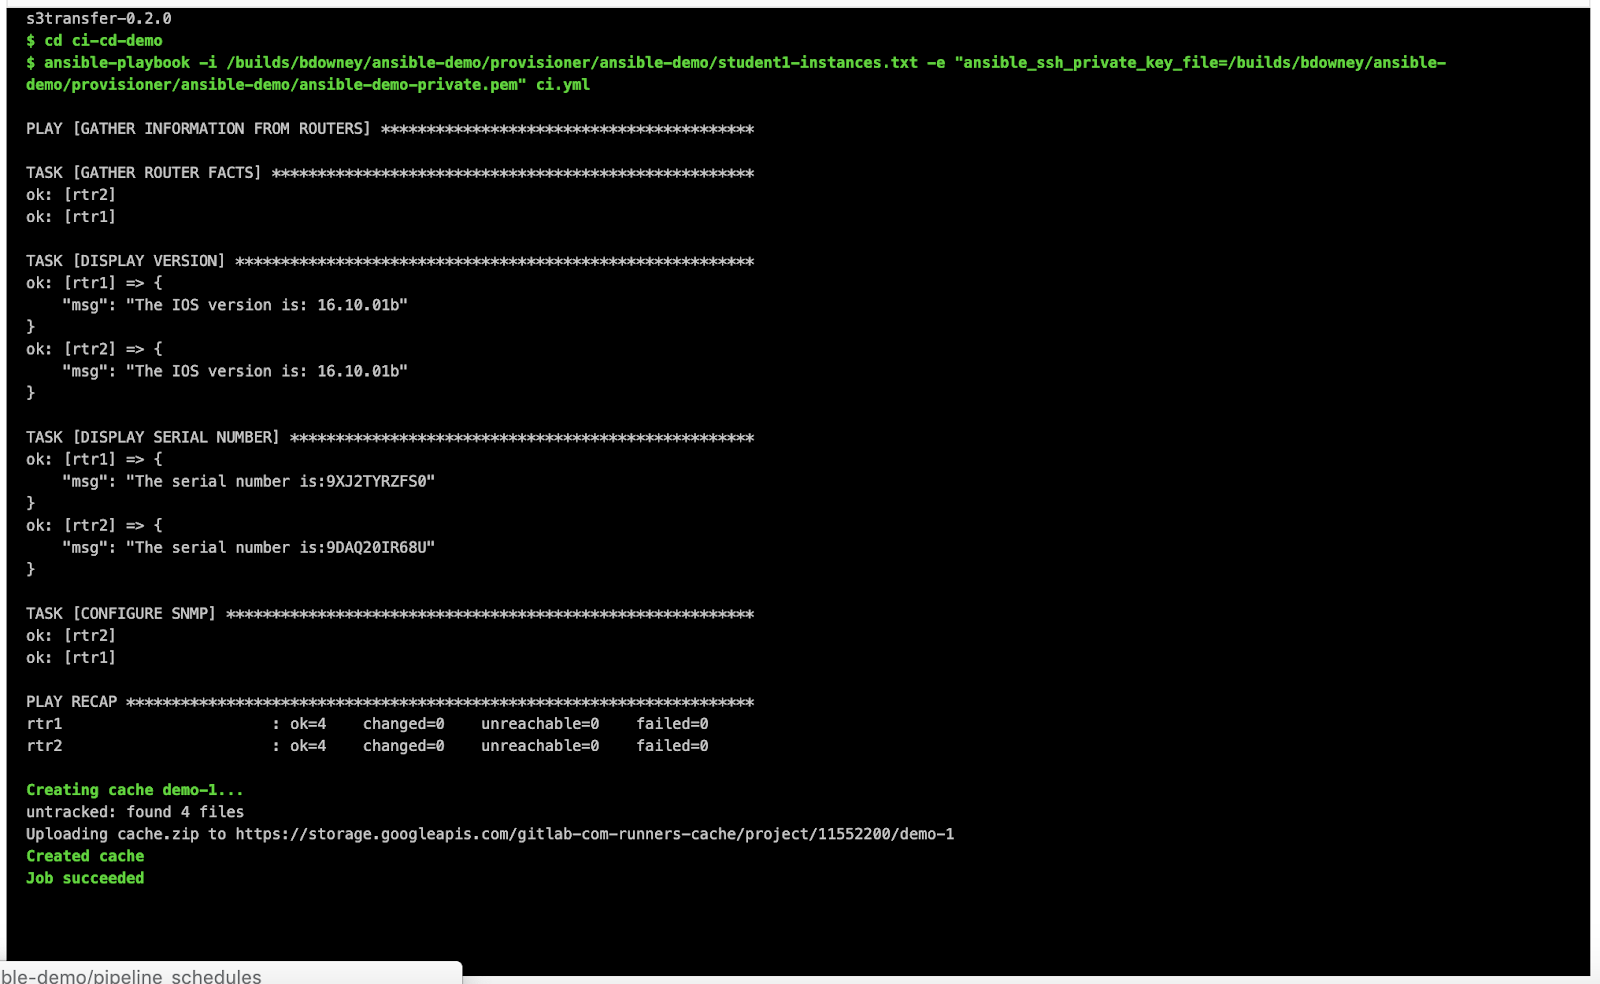
The output of your task indicates that the SNMP updates in the built environment were successful.
All of these tasks will be launched and documented in the merge request.

Checkboxes indicate that the task in the GitLab CI pipeline is complete.
Then log into the routers for a demo and see the changes.
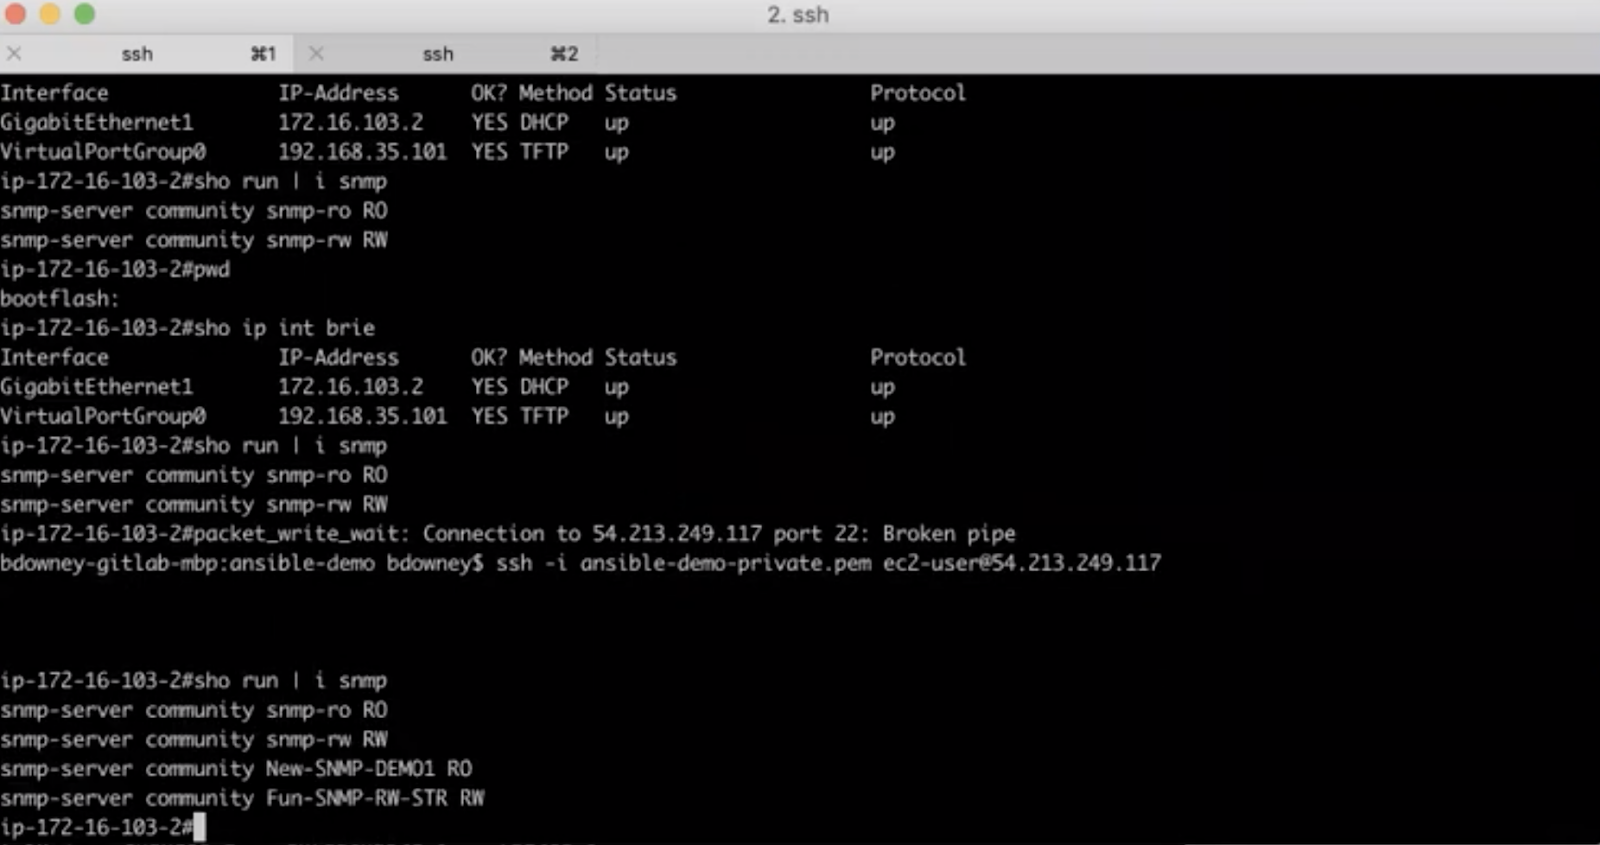
Changes to the SNMP RO and RW strings are reflected in the routers.
Merge Request Review
You can perform an additional step - approval of the merge requisition . If you set up approval, several users will be able to check the changes before they get into production.
Merge-request can be configured so that another user checks your work before they are in the wizard.
Transfer to master
Changes can be sent to the wizard immediately after testing. The master is the main branch that contains the code for the work environment.
When ready, click the Resolve Work In Progress button. Then click Merge .
When you enable the WIP status, the merge-request can be sent to the master, and the task can be closed.
The new pipeline will run all the tests that you performed in the additional step of launching the playbook in production.
Follow the progress and logs on the pipeline. When the process is complete, log into the working routers and verify that the SNMP strings have changed.
Magic GitLab CI
All this is possible thanks to the magic of GitLab CI. GitLab CI pipelines are series of sequential tasks that perform everything you need to test and implement Ansible code.
The entire GitLab CI configuration fits in a simple YAML file that is stored in the .gitlab-ci.yml .
In this demonstration, the .gitlab-ci.yml contains 3 steps.
- Deploy: creates a network with two routers in AWS using Ansible.
- Demo (demo): performs a playbook that changes SNMP strings.
- Destroy: Destroys a network simulation with two routers.
GitLab CI runs in a basic way. In this case, we use the Docker image, which contains all the necessary code and Ansible dependencies. Specify the commands to be executed at each stage and the dependencies.

A simple YAML file contains three GitLab CI steps.
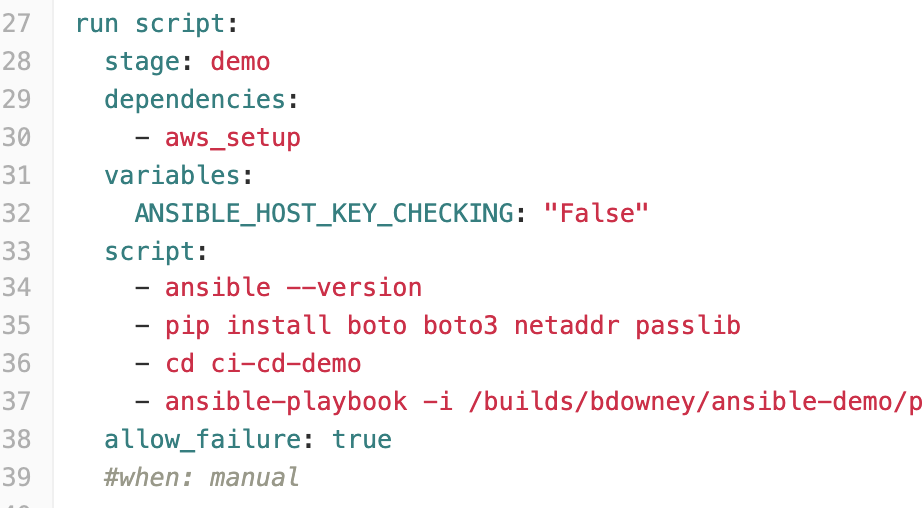
The demonstration stage of GitLab CI, on which the Ansible playbook is performed.
We looked inside the pipeline and saw how GitLab CI can be used to create the infrastructure as a code, even without installing the Ansible dependencies on the computer. This is just one example of how GitLab CI can be used to implement infrastructure as code. See the full guide in the video:
')
Source: https://habr.com/ru/post/459984/
All Articles