Full cycle of testing React-applications. Report Avto.ru
The desire to get away from manual regression testing is a good reason to implement autotests. The question is which ones? Interface developers Natalya Stus and Alexey Androsov recalled how their team went through several iterations and built testing frontend in Avto.ru on the basis of Jest and Puppeteer: unit tests, tests for individual React components, integration tests. The most interesting thing about this experience is isolated testing of React components in a browser without Selenium Grid, Java and others.
Alexey:
- First you need to tell a little about what Avto.ru is. This is a website for selling cars. There is a search, personal account, car services, spare parts, reviews, dealers' offices and much more. Avto.ru - a very big project, a lot of code. All the code we write in a big monorep, because it's all mixed up. The same people do similar tasks, for example, for mobile and desktop. It turns out a lot of code, and we are vital mono. The question is how to test it?
')

We have React and Node.js, which performs server-side rendering and requests data from the backend. Small pieces on the BEM also remained.

Natalia:
- We started thinking towards automation. The release cycle of our individual applications included several steps. First, the feature is developed by the programmer in a separate branch. After that, in the same separate branch, the feature is tested by manual testers. If all is well, the task falls into the release candidate. If not, then we return to the development iteration, test it again. Until the tester says that everything is OK in this feature, it will not get into the release candidate.
After assembling the candidate release, there is a manual regression - not just Avto.ru, but only the package that we are going to roll. For example, if we are going to roll the desktop web, then there is a manual regression of the desktop web. This is a lot of test cases that are carried out manually. Such a regression took about one working day per manual tester.
When regression is completed, release occurs. After this release branch merges into the master. At this point, we can just infuse the master code, which we tested only for the desktop web, and this code can break the mobile web, for example. This is not checked immediately, but only on the next manual regression - the mobile web.
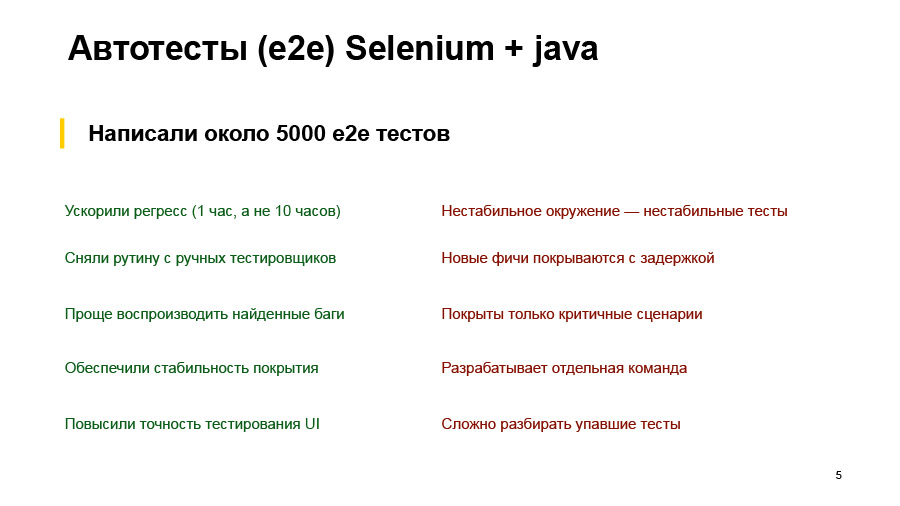
Naturally, the most painful place in this process was manual regression, which took a very long time. All manual testers are naturally tired of going through the same thing every day. Therefore, we decided to automate everything. The first solution that was executed was the autotest of Selenium and Java, written by a separate command. These were the end-to-end tests, e2e, which tested the entire application. They wrote about 5 thousand such tests. What have we achieved in the end?
Naturally, we accelerated regress. Auto tests are much faster than a manual tester does, about 10 times faster. Accordingly, routine testers that they performed every day were removed from manual testers. Found bugs from auto tests easier to play. Just restart this test or look at the steps, what it does - unlike the manual tester, who will say: “I clicked something, and everything broke.”
Ensure the stability of the coating. We always run the same run of tests - in contrast, again, from manual testing, when the tester may find that we did not touch this place, and I will not check it this time. We added tests for comparison of screenshots, increased the accuracy of testing UI - now we check the discrepancy in a couple of pixels, which the tester will not see with his eyes. All thanks to the screenshots.
But there were also disadvantages. The biggest one is that for e2e tests we need a test environment that fully complies with the products. It must always be kept up to date and in working condition. To do this, you need almost as much strength as to support stability of the sale. Naturally, we can not always afford it. Therefore, we often had situations where the test environment is lying or something is broken somewhere, and tests are falling - although there were no problems in the front-end package.
Also, these tests are developed by a separate team, which has its own tasks, its own line in the task tracker, and new features are covered with some delay. Immediately after the release of a new feature, they cannot come and immediately write autotests to it. Since tests are expensive and difficult to write and maintain, we do not cover all the scenarios with them, but only the most critical ones. At the same time, a separate team is needed, and it will have separate tools, a separate infrastructure, all its own. And analyzing dropped tests is also not a trivial task for manual testers or for developers. I will show a couple of examples.
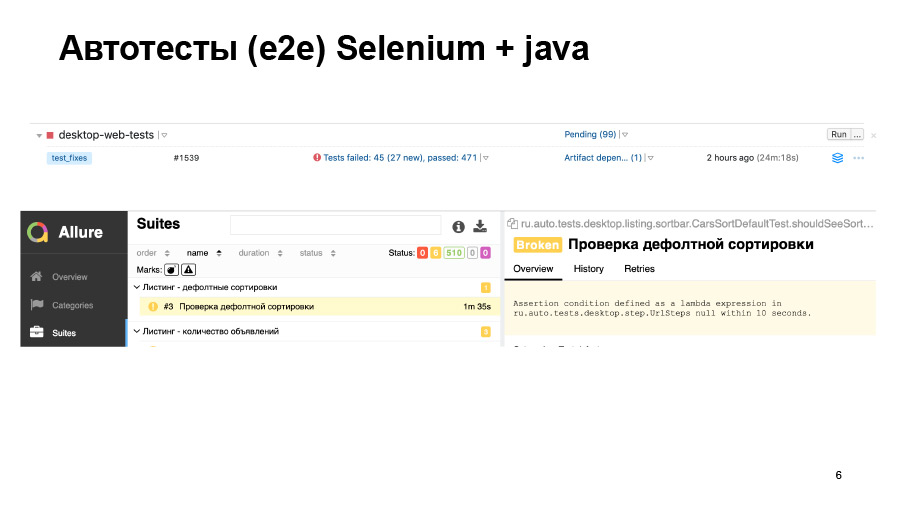
We have run tests. 500 tests passed, some of them fell. We can see such a thing in the report. Here the test simply did not start, and it is not clear whether everything is good there or not.
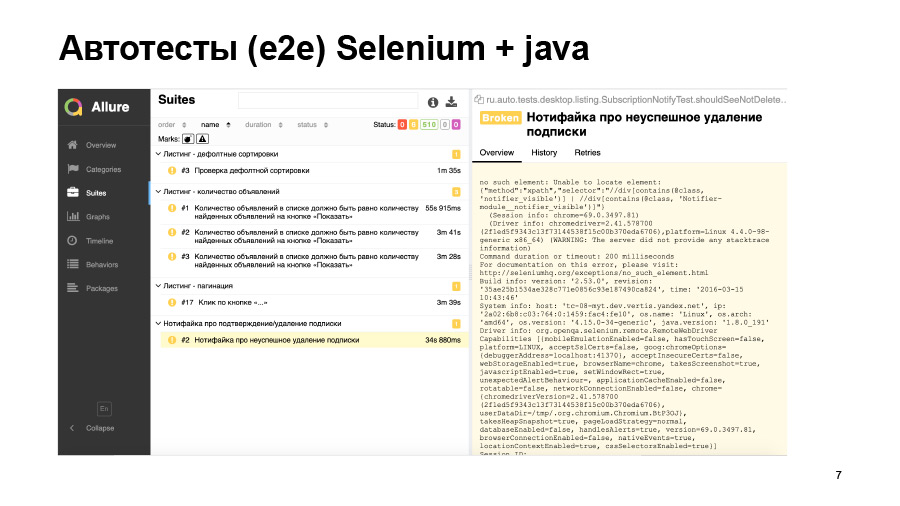
Another example - the test was launched, but it fell with such an error. He could not find any element on the page, but why - we do not know. Either this element simply did not appear, either turned out to be on the wrong page, or the locator changed. This is all you need to go and debug hands.
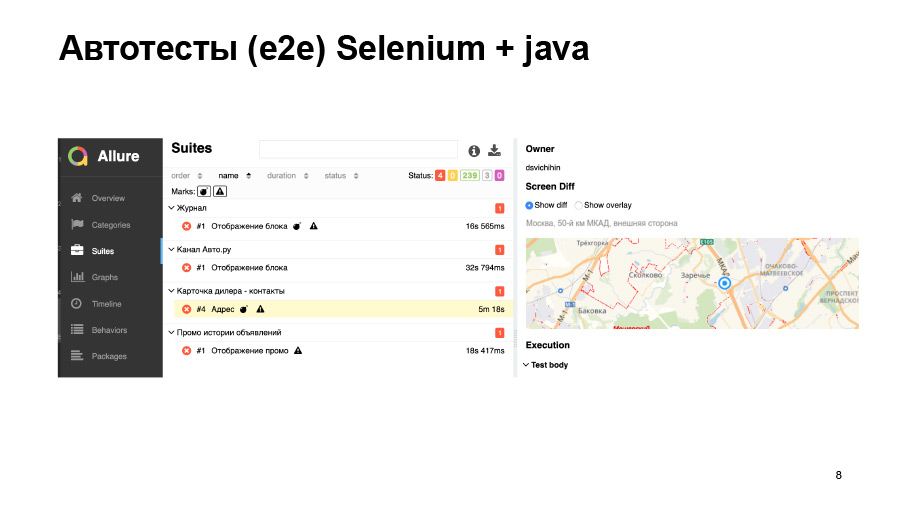
Screenshot tests also do not always give us good accuracy. Here we load some kind of map, it moved a little bit, our test dropped.

We tried to solve a number of these problems. We began to run part of the tests on products that do not touch the user data, do not change anything in the database. That is, we have made a separate machine on the sale, which looks into the food environment. We simply install a new frontend package and run tests there. Prod is at least stable.
We transferred part of the tests to moki, but we have a lot of different backends, different APIs, and it’s very difficult to fix all this, especially for 5 thousand tests. For this, a special service called mockritsa was written, it helps quite easily make the necessary mocks for the frontend and it is quite easy to get proxied into them.
We also had to buy a bunch of hardware so that our Selenium grid devices from which these tests are run were larger so that they did not fall because they could not lift the browser, and, accordingly, passed quickly. Even after we tried to solve these problems, we still came to the conclusion that such tests are not suitable for CI, they go for a very long time. We cannot run them on every pull request. We simply never in our lives will then analyze these reports, which will be generated for each pool-request.

Accordingly, for CI we need fast and stable tests that will not fall for any random reasons. We want to run tests on a pool-request without any test benches, backends, databases, without any complicated user cases.
We want these tests to be written at the same time as the code, and according to the test results it was immediately clear which file went wrong.
Alexey:
- Yes, and we decided to try everything we want, right from the beginning to the end, to lift everything in the same infrastructure of Jest. Why did we choose Jest? We already wrote unit tests on Jest, we liked it. This is a popular, supported tool, it already has a bunch of ready-made integrations there: React test render, Enzyme. Everything works out of the box, do not build anything, everything is simple.

And for me personally, Jest won by the fact that, unlike some moki, it is difficult to shoot myself with a side effect from some third-party dough, if I forgot to clean it or something else. In mock, this is done once or twice, but in Jest it is difficult to do: it is constantly running in separate threads. It is possible, but difficult. And for e2e Puppeteer was released, we also decided to try it. That's what we did.

Natalia:
- I will also start with an example of unit tests. When we write tests just for some function, there are no special problems. We call this function, pass some arguments, compare what happened with what should have happened.
If we are talking about React-components, then everything becomes a little more complicated. We need to render them somehow. There is a React test renderer, but it is not very convenient for unit tests, because it will not allow us to test components in isolation. It will render the component completely to the end, to the layout.
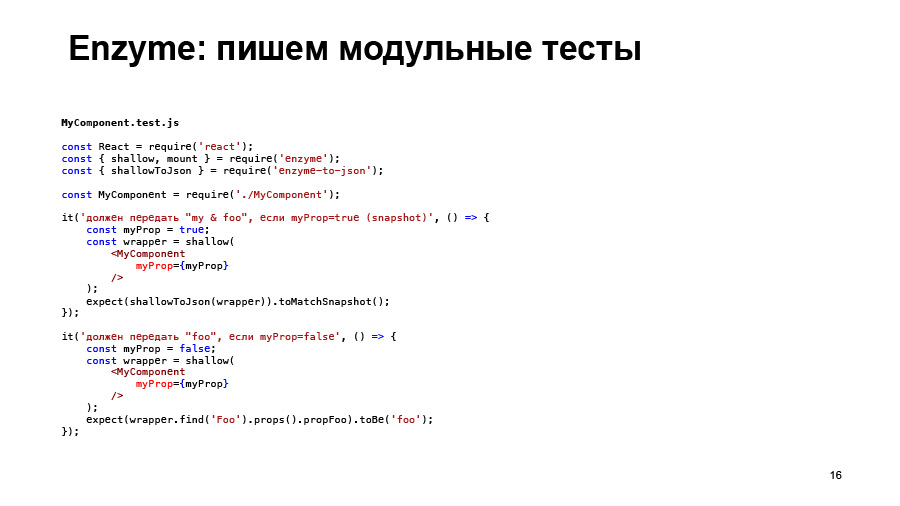
And I want to show how using Enzyme to write unit tests for React-components on the example of such a component, where we have a certain MyComponent. He gets some props, there is some logic in him. Then it returns the Foo component, which, in turn, will return the bar component, which, in fact, returns the layout to the bar component.

We can use a tool from Enzyme like shallow rendering. This is exactly what we need to test the MyComponent component in isolation. And these tests will not depend on the fact that the components foo and bar inside will contain them. We will simply test the logic of the MyComponent component.
There is such a thing as a Snapshot in Jest, and they can help us here too. “Expect something toMatchSnapshot” will create such a structure for us, just a text file, which actually stores what we passed to expect, what we get, and when you first run such tests, this file is written. With further runs of tests, what is obtained will be compared with the standard contained in the file MyComponent.test.js.snap.
Here we see just that the whole rendering, it returns exactly what the render method from MyComponent returns, and what foo is, to him, in general, do not care. We can write these two tests for our two cases, for our two cases on the MyComponent component.

In principle, we can test the same thing without a Snapshot, simply by checking the scripts we need, for example, checking which props are passed to the foo component. But this approach has one drawback. If we add some more element to MyComponent, our new test, it doesn’t display anything.
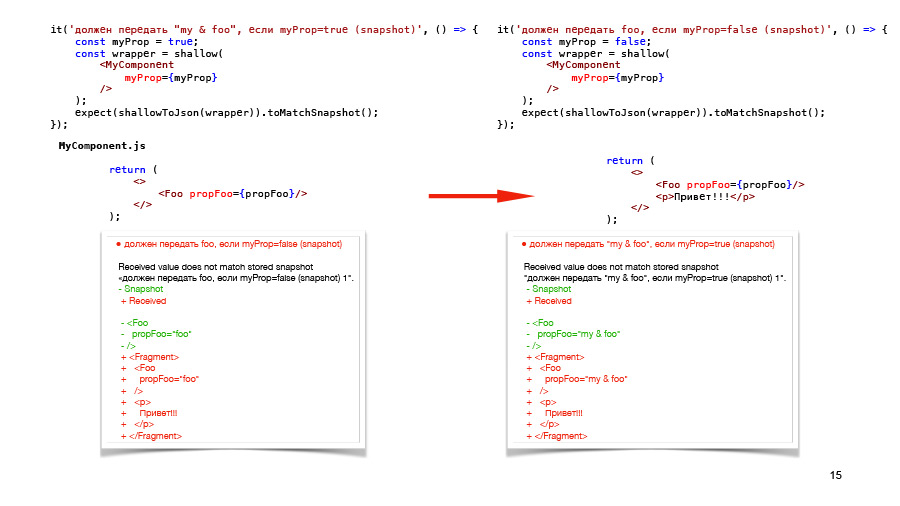
Therefore, all the same, Snapshot tests are those that will show us practically any changes inside the component. But if we write both tests on Snapshot, and then we make the same changes in the component, then we will see that both tests fall. In principle, the results of these dropped tests will tell us about the same thing, that we have added some “hello” there.
And this is also redundant, therefore, I believe that it is better to use one Snapshot test for the same structure. The rest of the logic to check something else, without a Snapshot, because Snapshot, they are not very revealing. When you see a Snapshot, you simply see that something has been rendered, but it is not clear what kind of logic you are testing here. This is completely inappropriate for TDD if you want to use it. And do not go as documentation. That is, then, when you go to look at this component, you will see that yes, the Snapshot corresponds to something, but what logic was there is not very clear.

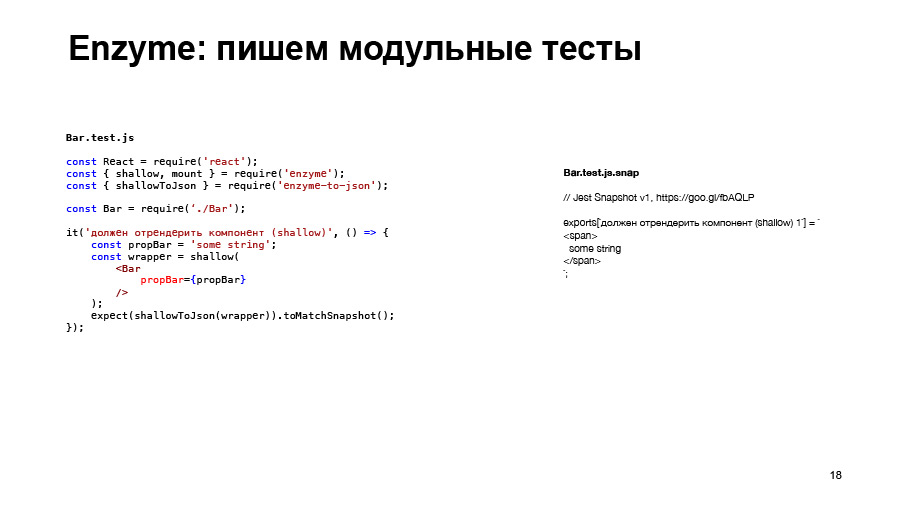
In the same way, we will write unit tests on the foo component, on the bar component, say, Snapshot.
We will get one hundred percent coverage for these three components. We think that we have checked everything, we are great.
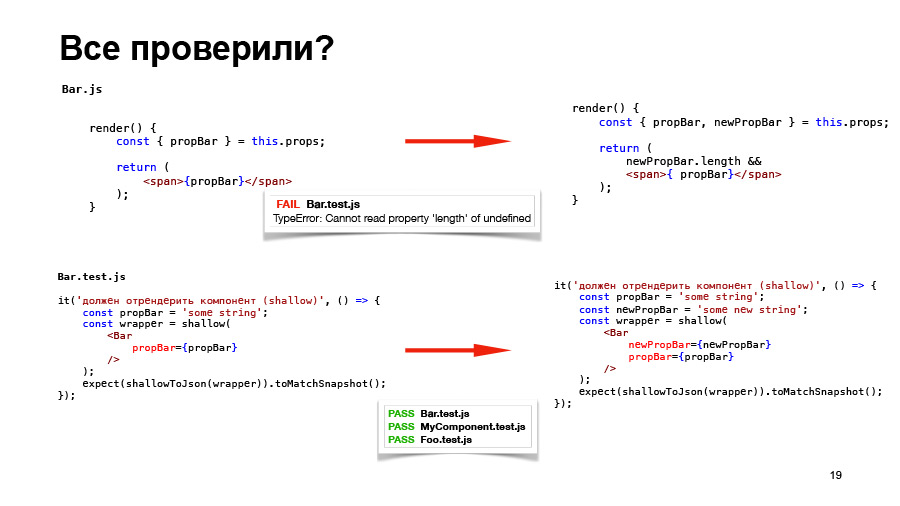
But let's say we changed something in the bar component, added some new prop to it, and we dropped the test for the bar component, obviously. We corrected the test, and we pass all three tests.
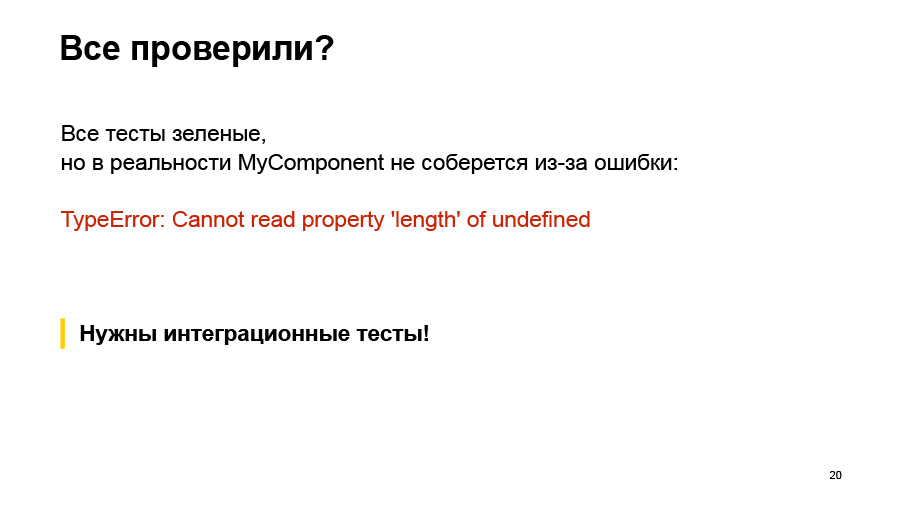
But in fact, if we collect this whole story, then nothing will work, because MyComponent does not collect this error. We do not, in fact, pass the prop that it expects to the bar component. Therefore, we say that in this case we also need integration tests that will check, including whether we correctly call its child component from our component.
Having such components and changing one of them, you immediately see what the changes in this component have affected.
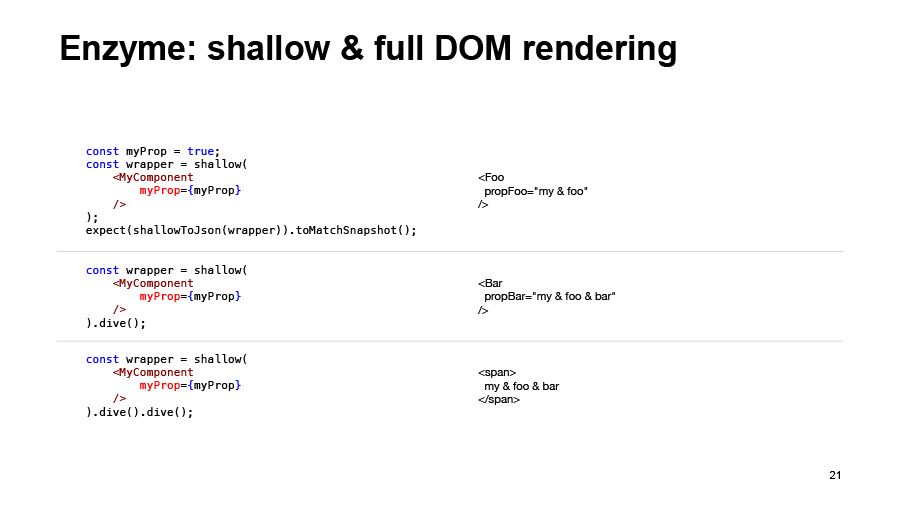
What opportunities do we have in Enzyme to do integration testing? Shallow rendering itself returns just such a structure. It has a dive method, if it is called on some React component, it will fail in it. Accordingly, by calling it on the foo component, we get what the foo component renders, bar, if we make a dive again, we will get, in fact, the layout that the bar component returns to us. This will be an integration test.
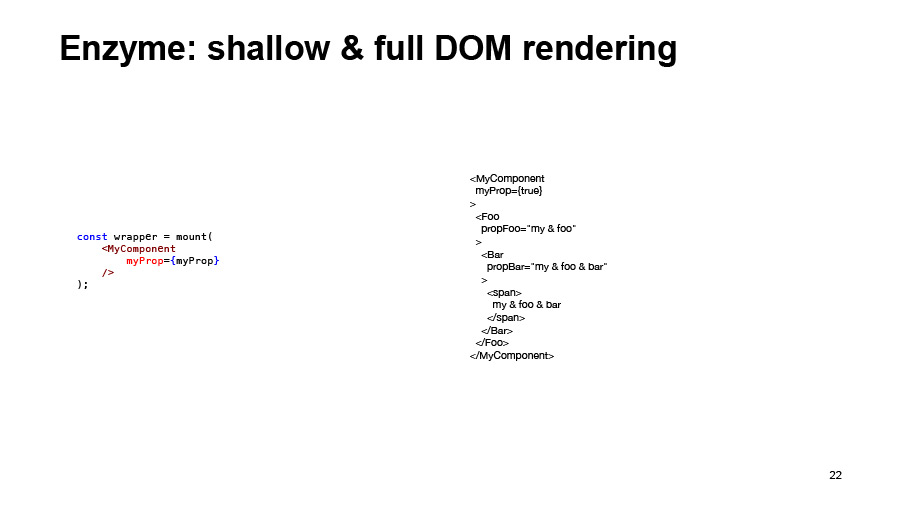
Or you can render everything at once using the mount method, which performs full DOM rendering. But I do not advise doing this, because it will be a very heavy Snapshot. And, as a rule, you do not need to check the entire structure. You only need to check the integration between the parent and child components in each case.

And for MyComponent, we add an integration test, so in the first test I add just dive, and it turns out that we tested not only the logic of the component itself, but also its integration with the foo component. The same thing, we add the integration test for the foo component, that it correctly calls the bar component, and then we check the whole chain and be sure that no changes will break us, in fact, the rendering of MyComponent
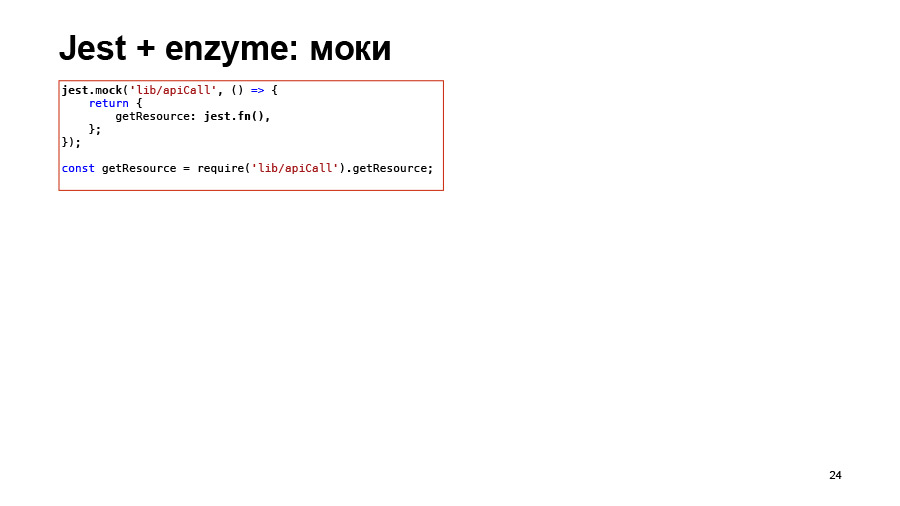
Another example, already from a real project. Just briefly about what Jest and Enzyme can do. Jest can moki. You can, if you use some external function in your component, you can lock it. For example, in this example we call some kind of api, we naturally don’t want to go into any api in modular tests, so we simply moka the geiResource function with a certain jest.fn object. In fact, the IC function. Then we can check whether it was called or not, how many times it was called, with which arguments. This all allows you to do jest.
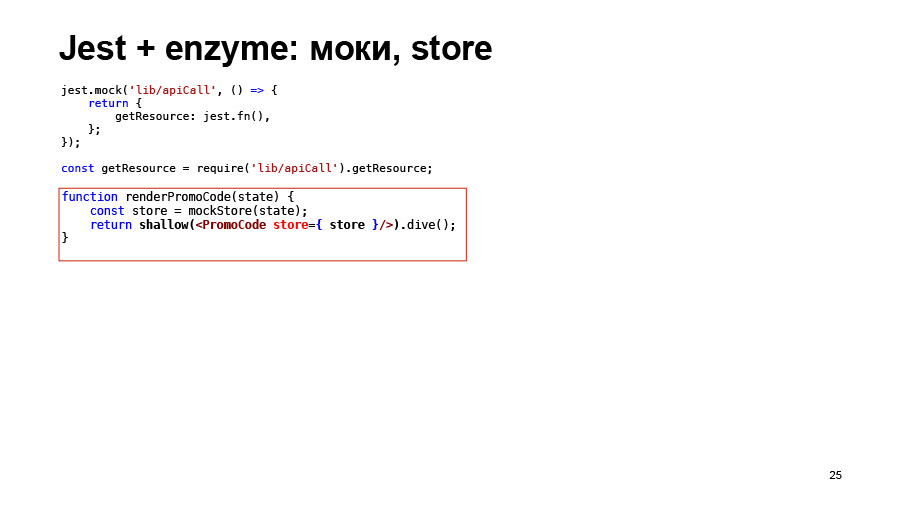
In shallow-rendering, you can pass a store to a component. If you need a store, you can simply transfer it there, and it will work.

Also in the already rendered component, you can change the State and prop.

You can call the simulate method on some component. It will simply call the handler. For example, if you do simulate click, it will call onClick for the button component here. All this can be read, of course, in the documentation for Enzyme, a lot of useful pieces. These are just a few examples from a real project.

Alexey:
- We come to the most interesting question. We are able to check Jest, we can write unit tests, check components, check which elements react incorrectly to a click. We are able to check their html. Now we need to check the layout of the component, css.
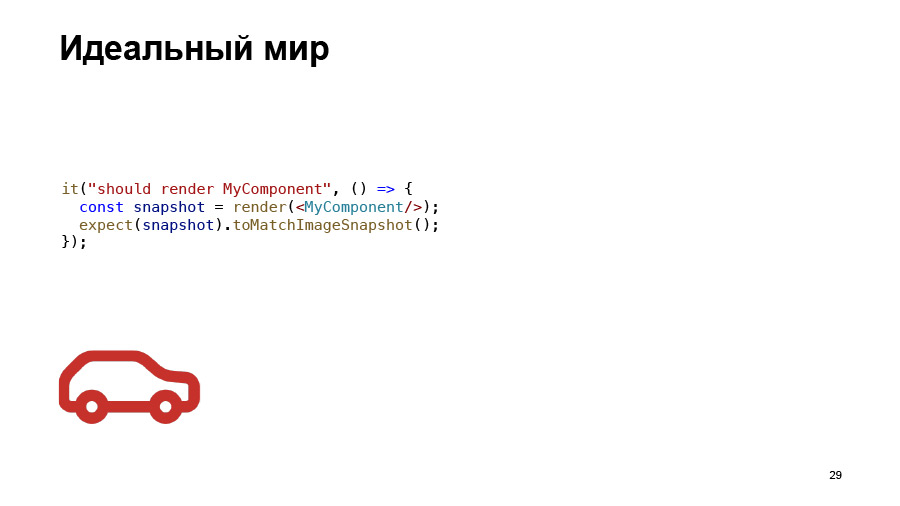
And it is desirable to do this so that the principle of testing does not differ in any way from the one I described earlier. If I check html, then I called shallow rendering, it took me and rendered html. I want to check css, just call some kind of render and just check - without lifting anything, without setting up any tools.
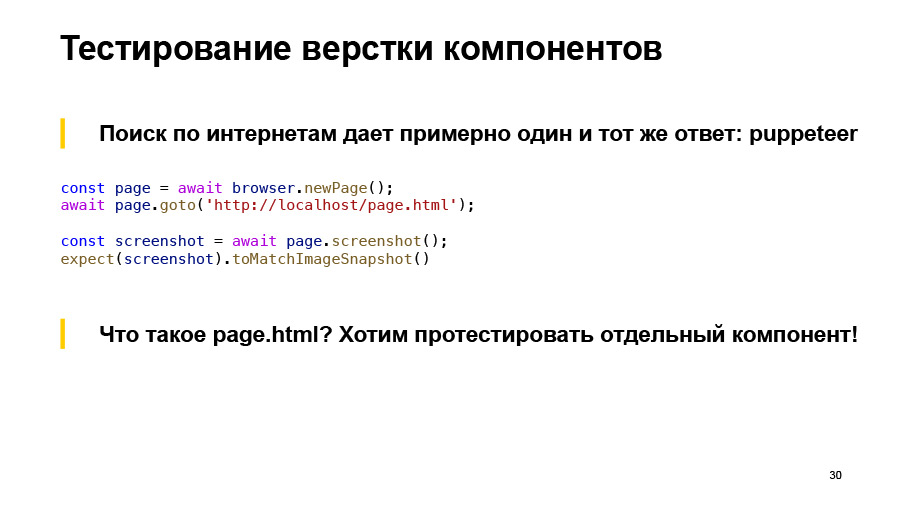
I began to look for it, and about the same answer was given everywhere to all this piece, which is called Puppeteer, or Selenium grid. You open some tab, you go to some page html, take a screenshot and compare it with the previous version. If not changed, then all is well.
The question is, what is page html if I just want to check one component in isolation? Desirable - in different states.

I do not want to write a bunch of these page html for each component, for each state. Avito has a good run. Roma Dvornov published an article on Habré, and, by the way, he had a speech. What did they do? They take components, through a standard render collect html. Then with the help of plug-ins and all sorts of tricks they collect all the assets that they have - pictures, css. They put it all in html, and they just get the right html.

And then they raised a special server, send html there, it renders it, and returns some result. Very interesting article, read, however, you can draw a lot of interesting ideas from there.
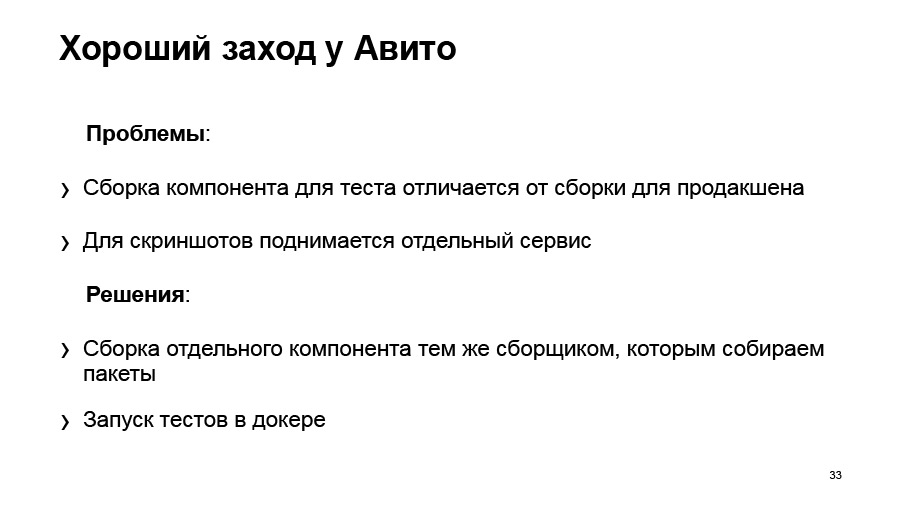
What I don't like there. Component assembly is different from how it goes to production. We have, for example, a webpack, and some babel assets are going there, it is pulled out differently. I can not guarantee that I have tested what I am about to shake.
And again, a separate service for screenshots. I want to do something simpler. And there was, in fact, the idea that, let us collect it exactly the same way as we collect it. And we will try to use something like Docker, because it is such a thing, it can be put on the computer, locally, it will be simple, isolated, nothing touches, everything is fine.

But this problem with page html, it remains all the same, what it is, in fact. And the idea was born. You have such a simplified webpack.conf, and it has some EntryPoint for client js. The modules are described, how to build them, the output file, all the plugins you have described, everything is set up, everything is fine.
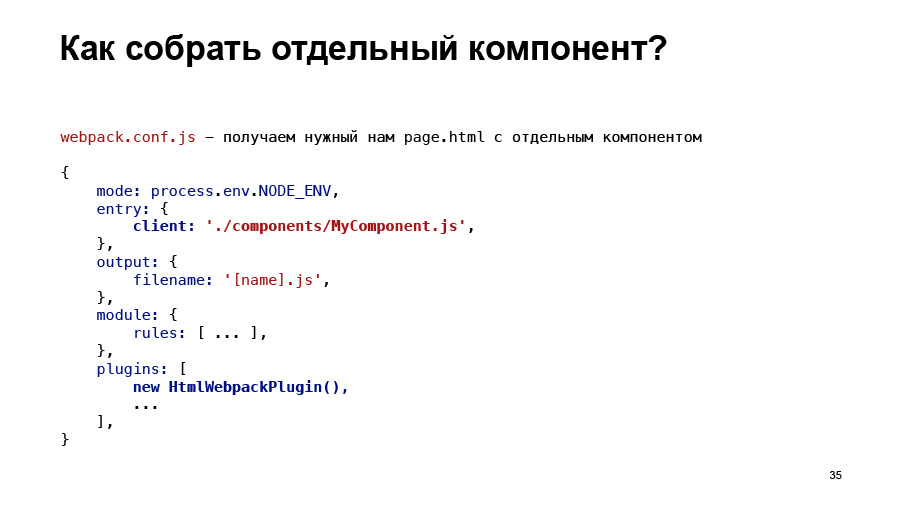
And what if I do like this? It will go to my component and assemble it in isolation. And there will be exactly one component. If I add another html webpack there, then it will give me an output also html, and these assets will be collected there, and this thing, however, can already be tested automatically.
And I was about to write all this, but then I found this.
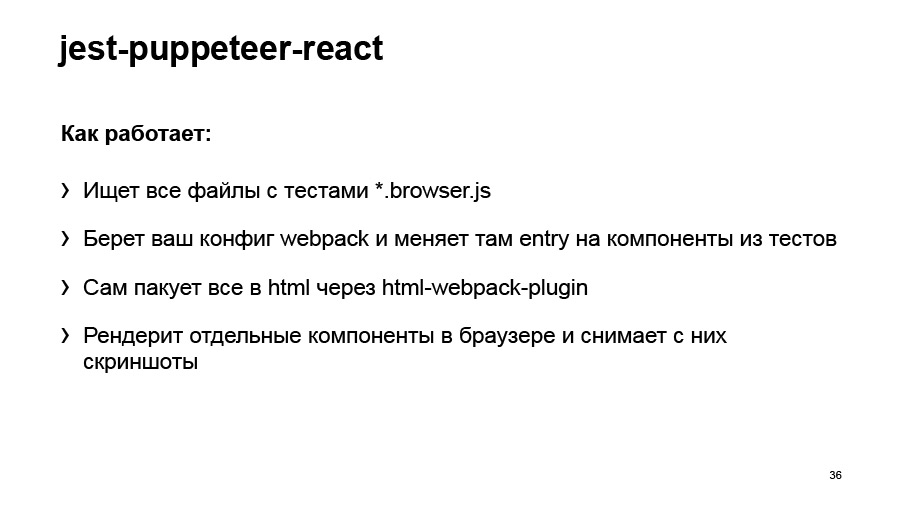
Jest-puppeteer-React, a young plugin. And I started actively contributing to it. If you suddenly want to try it, you can, for example, come to me, I somehow can help. The project is not really mine.
You write a regular file as test.js, and these files need to be written a little separately to help them find, so as not to compile the entire project for you, but to compile only the necessary components. In fact, you take a webpack config. And the input points change to these browser.js files, that is, in this way, exactly what we want to test is going to, pack everything in html, and with the help of Puppeteer it will give you screenshots.

What does he do?He can take screenshots, he can save them using another jest-image-snapshot plugin. And can compare them. You can do everything in it that you can do in a browser, execute js, you can test media-query, for example, right away.
If you don’t like the headless mode, it’s difficult there, we can’t debug, we don’t understand what the problem is, turn off the headless mode and you’ll see the usual Chrome with a regular debager. An ordinary web console, and you sit right there, debug, you understand what is wrong.
Docker. . . , Docker, . . Docker , , , Linux, - , - . Docker , .

? , . , . before-after, , . , . , Chrome, Firefox. .
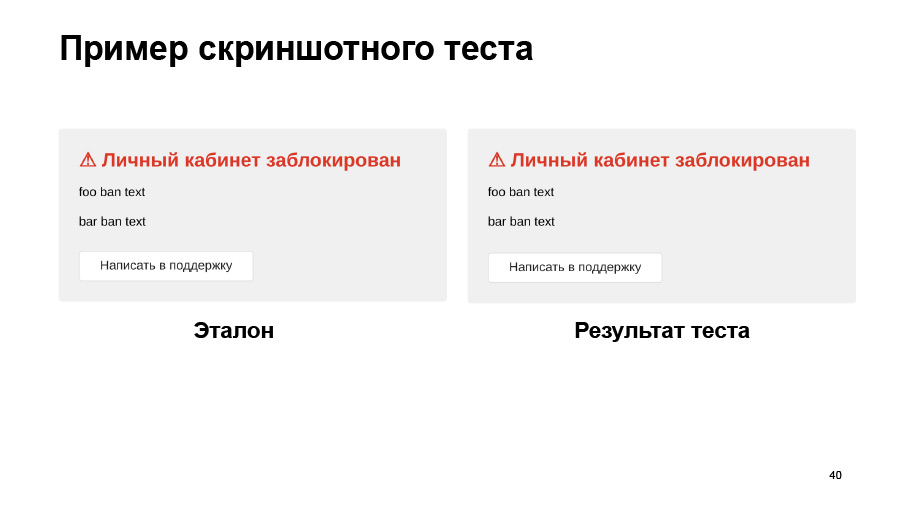
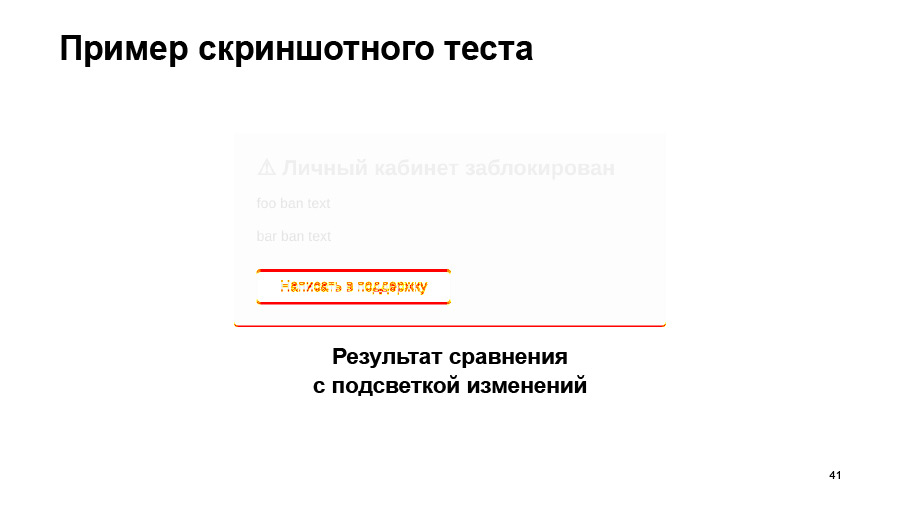
. pixelmatch. , looksame, «», . , .

— . , , . , : - , — Enzyme. Redux store . . viewport, , . , , .
. , . ? , .
: 5-10 . Selenium . , , , . .

Puppeteer, e2e-. , e2e- — , Selenium.
:
— , Selenium Java , . - JS Puppeteer, , .
, . , , .

— Selenium Java, — JS Puppeteer. . 18 . , , Java. , , Java Selenium.

:
— ? . , html-, css . e2e. . , .

, , . . , , — , . , . - , , : , .
, , . git hook, -, . green master — , , , . Thank.
Alexey:
- First you need to tell a little about what Avto.ru is. This is a website for selling cars. There is a search, personal account, car services, spare parts, reviews, dealers' offices and much more. Avto.ru - a very big project, a lot of code. All the code we write in a big monorep, because it's all mixed up. The same people do similar tasks, for example, for mobile and desktop. It turns out a lot of code, and we are vital mono. The question is how to test it?
')
We have React and Node.js, which performs server-side rendering and requests data from the backend. Small pieces on the BEM also remained.
Natalia:
- We started thinking towards automation. The release cycle of our individual applications included several steps. First, the feature is developed by the programmer in a separate branch. After that, in the same separate branch, the feature is tested by manual testers. If all is well, the task falls into the release candidate. If not, then we return to the development iteration, test it again. Until the tester says that everything is OK in this feature, it will not get into the release candidate.
After assembling the candidate release, there is a manual regression - not just Avto.ru, but only the package that we are going to roll. For example, if we are going to roll the desktop web, then there is a manual regression of the desktop web. This is a lot of test cases that are carried out manually. Such a regression took about one working day per manual tester.
When regression is completed, release occurs. After this release branch merges into the master. At this point, we can just infuse the master code, which we tested only for the desktop web, and this code can break the mobile web, for example. This is not checked immediately, but only on the next manual regression - the mobile web.
Naturally, the most painful place in this process was manual regression, which took a very long time. All manual testers are naturally tired of going through the same thing every day. Therefore, we decided to automate everything. The first solution that was executed was the autotest of Selenium and Java, written by a separate command. These were the end-to-end tests, e2e, which tested the entire application. They wrote about 5 thousand such tests. What have we achieved in the end?
Naturally, we accelerated regress. Auto tests are much faster than a manual tester does, about 10 times faster. Accordingly, routine testers that they performed every day were removed from manual testers. Found bugs from auto tests easier to play. Just restart this test or look at the steps, what it does - unlike the manual tester, who will say: “I clicked something, and everything broke.”
Ensure the stability of the coating. We always run the same run of tests - in contrast, again, from manual testing, when the tester may find that we did not touch this place, and I will not check it this time. We added tests for comparison of screenshots, increased the accuracy of testing UI - now we check the discrepancy in a couple of pixels, which the tester will not see with his eyes. All thanks to the screenshots.
But there were also disadvantages. The biggest one is that for e2e tests we need a test environment that fully complies with the products. It must always be kept up to date and in working condition. To do this, you need almost as much strength as to support stability of the sale. Naturally, we can not always afford it. Therefore, we often had situations where the test environment is lying or something is broken somewhere, and tests are falling - although there were no problems in the front-end package.
Also, these tests are developed by a separate team, which has its own tasks, its own line in the task tracker, and new features are covered with some delay. Immediately after the release of a new feature, they cannot come and immediately write autotests to it. Since tests are expensive and difficult to write and maintain, we do not cover all the scenarios with them, but only the most critical ones. At the same time, a separate team is needed, and it will have separate tools, a separate infrastructure, all its own. And analyzing dropped tests is also not a trivial task for manual testers or for developers. I will show a couple of examples.
We have run tests. 500 tests passed, some of them fell. We can see such a thing in the report. Here the test simply did not start, and it is not clear whether everything is good there or not.
Another example - the test was launched, but it fell with such an error. He could not find any element on the page, but why - we do not know. Either this element simply did not appear, either turned out to be on the wrong page, or the locator changed. This is all you need to go and debug hands.
Screenshot tests also do not always give us good accuracy. Here we load some kind of map, it moved a little bit, our test dropped.
We tried to solve a number of these problems. We began to run part of the tests on products that do not touch the user data, do not change anything in the database. That is, we have made a separate machine on the sale, which looks into the food environment. We simply install a new frontend package and run tests there. Prod is at least stable.
We transferred part of the tests to moki, but we have a lot of different backends, different APIs, and it’s very difficult to fix all this, especially for 5 thousand tests. For this, a special service called mockritsa was written, it helps quite easily make the necessary mocks for the frontend and it is quite easy to get proxied into them.
We also had to buy a bunch of hardware so that our Selenium grid devices from which these tests are run were larger so that they did not fall because they could not lift the browser, and, accordingly, passed quickly. Even after we tried to solve these problems, we still came to the conclusion that such tests are not suitable for CI, they go for a very long time. We cannot run them on every pull request. We simply never in our lives will then analyze these reports, which will be generated for each pool-request.
Accordingly, for CI we need fast and stable tests that will not fall for any random reasons. We want to run tests on a pool-request without any test benches, backends, databases, without any complicated user cases.
We want these tests to be written at the same time as the code, and according to the test results it was immediately clear which file went wrong.
Alexey:
- Yes, and we decided to try everything we want, right from the beginning to the end, to lift everything in the same infrastructure of Jest. Why did we choose Jest? We already wrote unit tests on Jest, we liked it. This is a popular, supported tool, it already has a bunch of ready-made integrations there: React test render, Enzyme. Everything works out of the box, do not build anything, everything is simple.
And for me personally, Jest won by the fact that, unlike some moki, it is difficult to shoot myself with a side effect from some third-party dough, if I forgot to clean it or something else. In mock, this is done once or twice, but in Jest it is difficult to do: it is constantly running in separate threads. It is possible, but difficult. And for e2e Puppeteer was released, we also decided to try it. That's what we did.
Natalia:
- I will also start with an example of unit tests. When we write tests just for some function, there are no special problems. We call this function, pass some arguments, compare what happened with what should have happened.
If we are talking about React-components, then everything becomes a little more complicated. We need to render them somehow. There is a React test renderer, but it is not very convenient for unit tests, because it will not allow us to test components in isolation. It will render the component completely to the end, to the layout.
And I want to show how using Enzyme to write unit tests for React-components on the example of such a component, where we have a certain MyComponent. He gets some props, there is some logic in him. Then it returns the Foo component, which, in turn, will return the bar component, which, in fact, returns the layout to the bar component.
We can use a tool from Enzyme like shallow rendering. This is exactly what we need to test the MyComponent component in isolation. And these tests will not depend on the fact that the components foo and bar inside will contain them. We will simply test the logic of the MyComponent component.
There is such a thing as a Snapshot in Jest, and they can help us here too. “Expect something toMatchSnapshot” will create such a structure for us, just a text file, which actually stores what we passed to expect, what we get, and when you first run such tests, this file is written. With further runs of tests, what is obtained will be compared with the standard contained in the file MyComponent.test.js.snap.
Here we see just that the whole rendering, it returns exactly what the render method from MyComponent returns, and what foo is, to him, in general, do not care. We can write these two tests for our two cases, for our two cases on the MyComponent component.
In principle, we can test the same thing without a Snapshot, simply by checking the scripts we need, for example, checking which props are passed to the foo component. But this approach has one drawback. If we add some more element to MyComponent, our new test, it doesn’t display anything.
Therefore, all the same, Snapshot tests are those that will show us practically any changes inside the component. But if we write both tests on Snapshot, and then we make the same changes in the component, then we will see that both tests fall. In principle, the results of these dropped tests will tell us about the same thing, that we have added some “hello” there.
And this is also redundant, therefore, I believe that it is better to use one Snapshot test for the same structure. The rest of the logic to check something else, without a Snapshot, because Snapshot, they are not very revealing. When you see a Snapshot, you simply see that something has been rendered, but it is not clear what kind of logic you are testing here. This is completely inappropriate for TDD if you want to use it. And do not go as documentation. That is, then, when you go to look at this component, you will see that yes, the Snapshot corresponds to something, but what logic was there is not very clear.
In the same way, we will write unit tests on the foo component, on the bar component, say, Snapshot.
We will get one hundred percent coverage for these three components. We think that we have checked everything, we are great.
But let's say we changed something in the bar component, added some new prop to it, and we dropped the test for the bar component, obviously. We corrected the test, and we pass all three tests.
But in fact, if we collect this whole story, then nothing will work, because MyComponent does not collect this error. We do not, in fact, pass the prop that it expects to the bar component. Therefore, we say that in this case we also need integration tests that will check, including whether we correctly call its child component from our component.
Having such components and changing one of them, you immediately see what the changes in this component have affected.
What opportunities do we have in Enzyme to do integration testing? Shallow rendering itself returns just such a structure. It has a dive method, if it is called on some React component, it will fail in it. Accordingly, by calling it on the foo component, we get what the foo component renders, bar, if we make a dive again, we will get, in fact, the layout that the bar component returns to us. This will be an integration test.
Or you can render everything at once using the mount method, which performs full DOM rendering. But I do not advise doing this, because it will be a very heavy Snapshot. And, as a rule, you do not need to check the entire structure. You only need to check the integration between the parent and child components in each case.
And for MyComponent, we add an integration test, so in the first test I add just dive, and it turns out that we tested not only the logic of the component itself, but also its integration with the foo component. The same thing, we add the integration test for the foo component, that it correctly calls the bar component, and then we check the whole chain and be sure that no changes will break us, in fact, the rendering of MyComponent
Another example, already from a real project. Just briefly about what Jest and Enzyme can do. Jest can moki. You can, if you use some external function in your component, you can lock it. For example, in this example we call some kind of api, we naturally don’t want to go into any api in modular tests, so we simply moka the geiResource function with a certain jest.fn object. In fact, the IC function. Then we can check whether it was called or not, how many times it was called, with which arguments. This all allows you to do jest.
In shallow-rendering, you can pass a store to a component. If you need a store, you can simply transfer it there, and it will work.
Also in the already rendered component, you can change the State and prop.
You can call the simulate method on some component. It will simply call the handler. For example, if you do simulate click, it will call onClick for the button component here. All this can be read, of course, in the documentation for Enzyme, a lot of useful pieces. These are just a few examples from a real project.
Alexey:
- We come to the most interesting question. We are able to check Jest, we can write unit tests, check components, check which elements react incorrectly to a click. We are able to check their html. Now we need to check the layout of the component, css.
And it is desirable to do this so that the principle of testing does not differ in any way from the one I described earlier. If I check html, then I called shallow rendering, it took me and rendered html. I want to check css, just call some kind of render and just check - without lifting anything, without setting up any tools.
I began to look for it, and about the same answer was given everywhere to all this piece, which is called Puppeteer, or Selenium grid. You open some tab, you go to some page html, take a screenshot and compare it with the previous version. If not changed, then all is well.
The question is, what is page html if I just want to check one component in isolation? Desirable - in different states.
Link from the slide
I do not want to write a bunch of these page html for each component, for each state. Avito has a good run. Roma Dvornov published an article on Habré, and, by the way, he had a speech. What did they do? They take components, through a standard render collect html. Then with the help of plug-ins and all sorts of tricks they collect all the assets that they have - pictures, css. They put it all in html, and they just get the right html.
Link from the slide
And then they raised a special server, send html there, it renders it, and returns some result. Very interesting article, read, however, you can draw a lot of interesting ideas from there.
What I don't like there. Component assembly is different from how it goes to production. We have, for example, a webpack, and some babel assets are going there, it is pulled out differently. I can not guarantee that I have tested what I am about to shake.
And again, a separate service for screenshots. I want to do something simpler. And there was, in fact, the idea that, let us collect it exactly the same way as we collect it. And we will try to use something like Docker, because it is such a thing, it can be put on the computer, locally, it will be simple, isolated, nothing touches, everything is fine.
But this problem with page html, it remains all the same, what it is, in fact. And the idea was born. You have such a simplified webpack.conf, and it has some EntryPoint for client js. The modules are described, how to build them, the output file, all the plugins you have described, everything is set up, everything is fine.
And what if I do like this? It will go to my component and assemble it in isolation. And there will be exactly one component. If I add another html webpack there, then it will give me an output also html, and these assets will be collected there, and this thing, however, can already be tested automatically.
And I was about to write all this, but then I found this.
Jest-puppeteer-React, a young plugin. And I started actively contributing to it. If you suddenly want to try it, you can, for example, come to me, I somehow can help. The project is not really mine.
You write a regular file as test.js, and these files need to be written a little separately to help them find, so as not to compile the entire project for you, but to compile only the necessary components. In fact, you take a webpack config. And the input points change to these browser.js files, that is, in this way, exactly what we want to test is going to, pack everything in html, and with the help of Puppeteer it will give you screenshots.
What does he do?He can take screenshots, he can save them using another jest-image-snapshot plugin. And can compare them. You can do everything in it that you can do in a browser, execute js, you can test media-query, for example, right away.
If you don’t like the headless mode, it’s difficult there, we can’t debug, we don’t understand what the problem is, turn off the headless mode and you’ll see the usual Chrome with a regular debager. An ordinary web console, and you sit right there, debug, you understand what is wrong.
Docker. . . , Docker, . . Docker , , , Linux, - , - . Docker , .
? , . , . before-after, , . , . , Chrome, Firefox. .
. pixelmatch. , looksame, «», . , .
— . , , . , : - , — Enzyme. Redux store . . viewport, , . , , .
. , . ? , .
: 5-10 . Selenium . , , , . .
Puppeteer, e2e-. , e2e- — , Selenium.
:
— , Selenium Java , . - JS Puppeteer, , .
, . , , .
— Selenium Java, — JS Puppeteer. . 18 . , , Java. , , Java Selenium.
:
— ? . , html-, css . e2e. . , .
, , . . , , — , . , . - , , : , .
, , . git hook, -, . green master — , , , . Thank.
Source: https://habr.com/ru/post/459924/
All Articles