Docs as Code. Part 1: Automate the Update
In large projects consisting of tens and hundreds of interacting services, it is increasingly becoming necessary to treat documentation as a code - docs as code .
I will show how you can apply this philosophy in the realities of a classified service, or rather, I will start with the first stage of its implementation: automating the updating of data in the documentation.
Set of tools
The principle of “documentation as code” implies the use of the same tools when writing documentation as when creating code: text markup languages, version control systems, code review and auto tests. The main goal is to create conditions for the team to work together on the final result - a complete knowledge base and instructions for using individual product services. Next, I will talk about the specific tools we have chosen to solve this problem.
As a markup language, we decided to use the most universal - reStructuredText . In addition to the large number of directives that provide all the basic functions for text structuring, this language supports key end-points, including the HTML required for our project.
Files are converted from .rst to .html using the Sphinx documentation generator. It allows you to create static sites for which you can create your own or use ready-made themes . Our project uses two ready-made themes - stanford-theme and bootstrap-theme . The second contains subtopics that allow you to specify different color schemes for key interface elements.
For convenient and quick access to the current version of the documentation, we use a static site hosted by a virtual machine accessible from the local network of the development team.
The project source files are stored in Bitbucket repositories, and the site is generated only from files contained in the master branch. You can update the data in it only through a pull-request, which allows you to check all new sections of the documentation before they are publicly available.
Since between completing the new section of the documentation and sending it to the site, you need to check its content, the key in the whole chain is the process of assembling the site and updating the data on the host. This procedure should be repeated every time after the pull-request with the update merges with the main branch of the project.
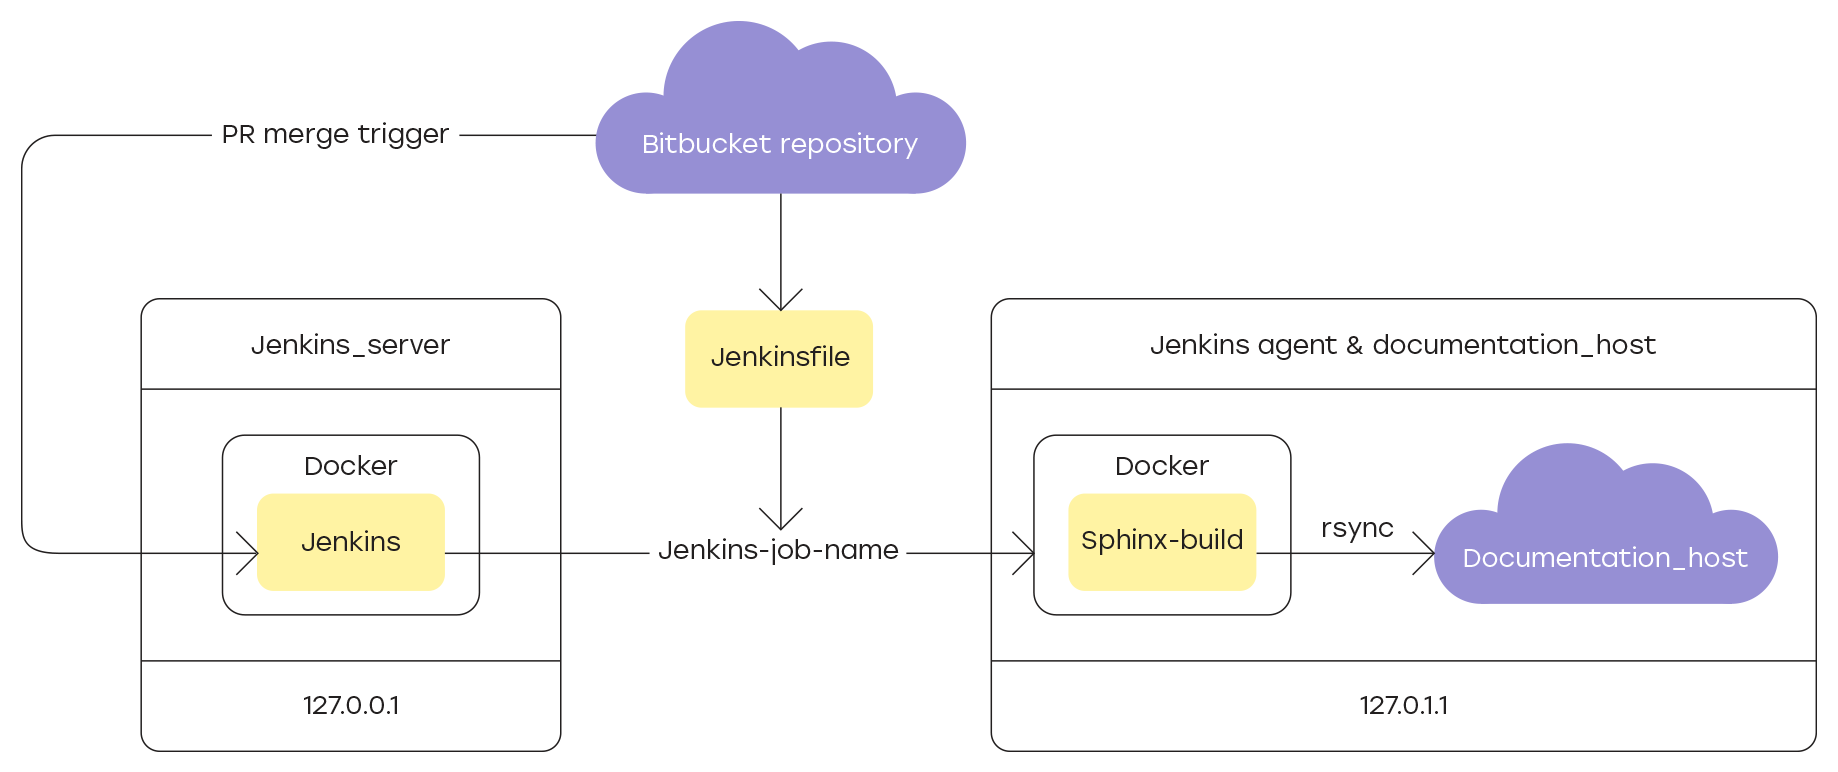
Jenkins , a system for continuous integration of development, in our case, documentation, allows implementing such logic. In more detail about setup I will tell in sections:
Adding a new node to Jenkins
To assemble and update the documentation on the site, you need to register as a Jenkins agent a machine prepared in advance for this.
Machine preparation
According to Jenkins requirements , all components included in the system, including the master machine and all registered agent nodes, must have JDK or JRE installed. In our case, the JDK 8 will be used, to install which, just run the command:
sudo apt-get -y install java-1.8.0-openjdk git The master machine will connect to the agent to perform assigned tasks on it. To do this, an agent must create a user under which all operations will be performed, and in the home folder of which all generated Jenkins files will be stored. On Linux systems, just run the command:
sudo adduser jenkins \--shell /bin/bash su jenkins To establish a connection between the master machine and the agent, you must configure SSH and add the necessary authorization keys. Generate keys on the agent, then for the jenkins user , add the public key to the authorized_keys file.
We will assemble the documentation site in a Docker container using a ready python image : 3.7 . To install Docker on the agent, follow the instructions of the official documentation . To complete the installation process, you need to reconnect to the agent. Verify the installation by running the command that loads the test image:
docker run hello-world In order not to have to run Docker commands on behalf of the superuser (sudo), it’s enough to add to the user’s docker group created at the installation stage the user on whose behalf the commands will be executed.
sudo usermod -aG docker $USER New node configuration in Jenkins
Since the connection to the agent requires authorization, you need to add the appropriate credentials in the Jenkins settings. Detailed instructions on how to do this on Windows machines are provided in the official Jenkins documentation .
IMPORTANT: The identifier, which is specified in Configure Jenkins -> Manage assembly environments -> Node name -> Configure in the Tags parameter, is later used in Jenkinsfile to specify the agent on which all operations will be performed.
Jenkinsfile Description
At the root of the project repository is stored Jenkinsfile , which contains instructions for:
- preparing the build environment and installing dependencies;
- building site using Sphinx ;
- update information on the host.
The instructions are set using special directives, the application of which we will consider next in the example of the file used in the project.
Agent Specification
At the beginning of the Jenkinsfile, we specify the agent label in Jenkins , on which all operations will be performed. To do this, use the directive agent :
agent { label '-' } Environment preparation
To execute the sphinx-build site build command, you need to set the environment variables in which the actual data paths will be stored. Also, to update the information on the host, you must specify in advance the paths where the site data with the documentation is stored. The environment directive allows you to assign these values to variables:
environment { SPHINX_DIR = '.' //, Sphinx BUILD_DIR = 'project_home_built' // SOURCE_DIR = 'project_home_source' // .rst .md DEPLOY_HOST = 'username@127.1.1.0:/var/www/html/' //@IP__:__ } Basic actions
The main instructions that will be executed in Jenkinsfile are contained within the stages directive , which consists of various steps described by stage directives . A simple example of a three-stage CI pipeline:
pipeline { agent any stages { stage('Build') { steps { echo 'Building..' } } stage('Test') { steps { echo 'Testing..' } } stage('Deploy') { steps { echo 'Deploying....' } } } } Running a Docker Container and Installing Dependencies
First, run the Docker container with the ready python image : 3.7 . To do this, use the docker run command with the - rm and -i flags. Then do the following one by one:
- install python virtualenv ;
- create and activate a new virtual environment;
- install in it all the necessary dependencies listed in the file
requirements.txt, which is stored in the project's repository root.
stage('Install Dependencies') { steps { sh ''' docker run --rm -i python:3.7 python3 -m pip install --user --upgrade pip python3 -m pip install --user virtualenv python3 -m virtualenv pyenv . pyenv/bin/activate pip install -r \${SPHINX\_DIR}/requirements.txt ''' } } Building a site with documentation
Now we will collect the site. To do this, you must run the sphinx-build command with the following flags:
-q : log warnings and errors only;-w : write the log to the file specified after the flag;-b : site collector name;-d : specify the directory to store cached files - doctree pickles.
Before running the assembly, use the rm -rf remove the previous site assembly and logs. In case of an error, sphinx-build log will appear at one of the stages in the Jenkins console.
stage('Build') { steps { // clear out old files sh 'rm -rf ${BUILD_DIR}' sh 'rm -f ${SPHINX_DIR}/sphinx-build.log' sh ''' ${WORKSPACE}/pyenv/bin/sphinx-build -q -w ${SPHINX_DIR}/sphinx-build.log \ -b html \ -d ${BUILD_DIR}/doctrees ${SOURCE\_DIR} ${BUILD\_DIR} ''' } post { failure { sh 'cat ${SPHINX_DIR}sphinx-build.log' } } } Update site on host
And finally, we will update the information on the host, which serves the product documentation site available in the local environment. In the current implementation, the host is the same virtual machine that is registered as a Jenkins agent to perform the tasks of building and updating documentation.
As a synchronization tool, we use the rsync utility. For it to work correctly, you need to configure an SSH connection between the Docker container in which the documentation site was created and the host.
To be able to configure an SSH connection using Jenkinsfile , the following plug-ins must be installed in Jenkins :
- SSH Agent Plugin - allows using the
sshagentstep in scripts to provide credentials of the form username / key . - SSH Credentials Plugin - allows you to save in the settings Jenkins accounting data type username / key .
After installing the plugins, you must specify the current credentials to connect to the host by filling out the form in the Credentials section:
- ID : identifier that will be used in Jenkinsfile at the sshagent step to specify specific credentials (
docs-deployer); - Username : the user name under which the site data update operations will be performed (the user must have write access to the host’s
/var/htmlfolder); - Private Key : private key for access to the host;
- Passphrase : password for the key, if it was set at the generation stage.
Below is the script code that connects via SSH and updates information on the host using the system variables specified during the preparation stage of the environment with the paths to the required data. The result of the rsync command is written to the log, which will be displayed in the Jenkins console in case of synchronization errors.
stage('Deploy') { steps { sshagent(credentials: ['docs-deployer']) { sh ''' #!/bin/bash rm -f ${SPHINX_DIR}/rsync.log RSYNCOPT=(-aze 'ssh -o StrictHostKeyChecking=no') rsync "${RSYNCOPT[@]}" \ --delete \ ${BUILD_DIR_CI} ${DEPLOY_HOST}/ ''' } } post { failure { sh 'cat ${SPHINX_DIR}/rsync.log' } } } Jenkins and Bitbucket integration
There are many ways to organize the interaction between Jenkins and Bitbucket , but in our project we decided to use the Parameterized Builds for Jenkins plugin. The official documentation has detailed instructions for installing the plugin, as well as settings that must be set for both systems. To work with this plugin, you need to create a Jenkins user and generate a special token for it that will allow this user to log in to the system.
Create user and API token
To create a new user in Jenkins , go to the Jenkins Settings -> User Management -> Create User section, and fill in all the necessary credentials in the form.
An authentication mechanism that allows third-party scripts or applications to use the Jenkins API without actually transferring the user's password is a special API token that can be generated for each Jenkins user. For this:
- Log in to the management console using the credentials of the user created earlier;
- go to Configure Jenkins -> User Management ;
- click on the gear icon to the right of the user name under which logged in to the system;
- in the list of parameters, find the API Token and click on the Add new Token button;
- in the field that appears, specify the identifier of the API token and click the Generate button;
- Following the on-screen hint, copy and save the generated API token.
Now in the settings of the Bitbucket server, you can specify the default user to connect to Jenkins .
Conclusion
If earlier the process consisted of several steps:
- download the update to the repository;
- wait for confirmation of correctness;
- to collect the site with the documentation;
- update information on the host;
now it is enough to press one Merge button in Bitbucket. If, after verification, you do not need to make changes to the source files, the current version of the documentation is updated immediately after confirming the correctness of the data.
This greatly facilitates the task of a technical writer, saving him from a large number of manual actions, and project managers get a handy tool for tracking documentation additions and feedback.
Automating this process is the first step in building a document management infrastructure. In the future, we plan to add automated tests that will check the correctness of external links used in the documentation, and also want to create interactive interface objects embedded in ready-made themes for Sphinx .
Thank you for reading, we will soon continue to share the details of creating documentation in our project!
')
Source: https://habr.com/ru/post/459640/
All Articles