Poppy. Survival Guide. Part 2
Here is the second part of a large translated article by Michelle Delio. If you have not read it yet, you can familiarize yourself with the first part of the Survival Guide on these scary apple computers.
The article contains many links to paid programs that many will regard as advertising. I thought for a long time what to do with them, and decided to leave, but I also tried to tell about possible free alternatives. Here and below, my comments are in italics. So let's get down to our disasters.
')
TACTICS OF SURVIVAL: Over time, white makbuki tend to get dirty (especially in the area under the wrists), and on the black case you can see every touch, which is very suitable for fingerprinting, but does not look attractive. However, you can restore your MacBook to its original appearance with the help of Mr. Clean Magic Eraser’s magic sponge. You need a simple sponge, and not one that foams when wetted. In the US, they can be found in almost any grocery store or pharmacy for about $ 3.50 per pair.
To start, wipe your MacBook with a clean, lint-free cloth or microfiber cloth. Wet the Magic Eraser sponge under a thin tap from a tap and squeeze it until it is slightly damp. Wipe your macbook with a sponge, moving it in one direction, not in different directions. Stay away from the keyboard and all ports or other openings. When finished, wipe the computer dry with any other lint-free cloth. If there is even the slightest chance that at least a drop of water has penetrated the machine, leave it in the off state, unplugged from the power supply for six hours before you turn it on again.
All this is too complicated. For example, I would not at all want to be left without a laptop for six hours just because it was so dirty that I had to wash it first and then dry it. Therefore, it is better to turn it off once a week or as it is polluted, wipe off dust and prevent it from getting dirty. In addition, there are wonderful remedies: you can stick a wonderful GelaSkin ($ 29.95) to any taste on the top cover, and the area under your wrists can be protected with the help of Moshi Palmguard (costs from $ 20.00 to $ 28.00 depending on the laptop model). At the same time, the laptop looks beautiful and unusual, the case is protected from dirt, and the plastic is intact. I myself have been using both for several months now, and I am very pleased.

TACTICS OF SURVIVAL: If you somehow managed to shift the key from its place on the keyboard, be it the old keyboard from Apple, the keyboard from third-party manufacturers or the new aluminum keyboard that now comes with the new iMac and Mac Pro, you cannot simply insert her back. Turn the key over and see if a small plastic leg is attached to it. If the leg is attached and not broken, carefully remove this plastic tip from the key and attach it back to the keyboard. To do this, fasten it under the “ear” on the right, and then insert the two small plastic hooks into the connectors on the left. Now you will need to insert the key cap on the stand's upper ears; you may want to use a toothpick or other small object so that the pad does not move when you attach the key back.
It is difficult to describe this with words, therefore I advise you to watch a detailed video on YouTube on how to do it correctly.
Note for users of the new aluminum keyboard: non-letter keys and keys with numbers to insert back is more difficult, since the loop that stabilizes them is made of soft metal, which is very easy to bend incorrectly if you do not handle it very carefully.
If you break the plastic leg on the key cap, you can almost always find people online who sell key caps and replacement feet.
TACTICS OF SURVIVAL: If you suddenly start to hear the ominous sounds coming from your Mac, it can be anything from high-frequency sobbing to rare deaf sounds like from a blow coming from the hard drive area, you can assume that your hard the disc got on the death trail. Among other symptoms, it is worth noting the frequent freezing of applications, regular freezing of the system when loading, files that disappear in a mysterious way, slowing down of saving or opening files. A dying hard drive can only be replaced. There is no other way to repair it, so as soon as you notice these symptoms, immediately backup your files, even if the Disk Utility (Apple Disk Utility) reports that the hard disk is OK.
You can assume that you were lucky if your hard disk was so kind that it warned you about the impending demise. In some cases, the only warning you will receive is when the machine simply refuses to work, after which you will see a folder icon with a question mark at the next reboot. All hard drives die sooner or later, so do not be lazy and make backup copies.

TACTICS OF SURVIVAL: Some people strongly advise to use toothpaste to remove scratches from the tempered glass touchscreen of your iPod or iPhone. Soft abrasive in the paste, designed to whiten your teeth, can also remove scratches from iPod / iPhone screens. While toothpaste is generally very suitable for cleaning jewelry, some brands of toothpaste may still be too hard for iPod / iPhone screens. It is safer to use products that are designed to do this work: Applesauce polish ($ 19.95) or RadTech Ice Creme ($ 20.95 - $ 25.95). With these products and some effort you can remove small scratches and scuffs from the face of your devices. Just do not forget to carefully follow the recommendations of the manufacturer, especially with regard to movements in different directions: you can add new ones instead of removing scratches.

TACTICS OF SURVIVAL: If the screen of your MacBook is scratched, do not try to repair it yourself. Any tool that is strong enough to remove scratches will also remove the upper protective coating of the screen. We heard that some people took the screen to a jeweler to remove scratches or put some Vaseline on a crack to disguise it, but we cannot recommend you to do this. If the scratch seriously bothers you or prevents you from working with most of the display, the best option would be to replace the entire screen. Probably, a standard warranty or AppleCare will not cover this repair, since scratches are most likely classified as accidental damage due to the owner’s fault. In the Apple service center you will be replaced not only the screen, but the entire upper part of the laptop (the screen itself, the edging, the top cover), which will cost about $ 800. In addition, in the US there are companies that are engaged in the replacement of displays on MacBooks, make it somewhat cheaper than at the Apple service center, and provide a 1-year warranty. Their services will cost you less because they replace only the screen itself. Border and top cover remain from your MacBook. The cost of repair without shipping is $ 350 - $ 500 depending on the size of the display. Nevertheless, I heard not very flattering reviews about their work, for example, from Paul Stamatiou ( Paul Stamatiou ), who thus replaced the screen in the MacBook Air.
If you are a jack of all trades and are not afraid to make a replacement yourself, you can order a new screen, for example, in the PowerBook Medic , and install it yourself. Excluding delivery, a spare part costs $ 198.95 - $ 299.95, depending on the screen size. You are also provided with a one year warranty. Delivery to Russia or Ukraine will cost $ 28.00 - $ 87.79 depending on the postal service.
If you make repairs at a service center in Russia, a spare part will cost $ 750 - $ 800, plus about 2,000 rubles for the work of technicians. So it is better not to scratch the display, although repairs will be cheaper than buying a new macbook.

TACTICS OF SURVIVAL: So, you dropped your iPod or iPhone in water or a container with water (bathroom, toilet, deep puddle, ocean). If the gods of technology are favorable to you, you can fix it. Get your wretched device out of the water and turn it off immediately if it was turned on during the dive. Although in this case we offer our condolences, as most likely your iPod or iPhone has already died. If the device got into the water in the off state, your primary goal is to completely dry it. To simplify the task, it can be positioned near the fan of the cable box or air conditioner. Or you can immerse it in a deep bowl with dry rice or in a container with several sachets of silicon dioxide (these are such small moisture-absorbing sachets that can usually be found in the packages of bags, shoes and other products, on which it is also written: “Warning: you can’t there is!").
If the device has absorbed a lot of liquid, place it vertically so that as the water flows, it will not be lying in a puddle. In addition, a bathed iPod or iPhone can be put on any surface that absorbs moisture, such as a stack of paper napkins or cloth towels. Do not forget to wipe out leaked water and change towels as needed. If you know how to open the case of the device (this will help you with a pick / plectrum - a small plate that is used to pick up the strings on the guitar), open it and take out the battery to simplify the drying process. This, of course, voids the warranty, but in such a critical situation all means are good for saving the device. Although if you drop your iPod or iPhone in water, it will not be repaired under warranty in any case. It is impossible to hide this fact, as they have built-in immersion sensors that change color when in contact with water. Let the device dry for three days, then try to turn it on. If it doesn't work, let it dry for two more days. Depending on which liquid your iPod or iPhone has fallen into, you may need to open and clean it with denatured alcohol to remove any residue that may cause problems later.

TACTICS OF SURVIVAL: So that you don’t have to read too much text in italics, I’ll just note that this paragraph has been largely corrected, added and almost completely rewritten. Therefore, do not be surprised that it is a little inconsistent with what is written in the original article.
Tiny font files can cause great trouble. Damaged fonts can cause problems with printing or displaying information on the display, and even cause applications to fall. The mess in the font caches can also cause all sorts of problems with the reproduction of information on the screen. Therefore, with the fonts on the Mac should be treated very delicately. In no case can you touch the system fonts. If you accidentally delete Lucida Grande, Mac OS will not boot at all.
Use T2 blog tips to solve the problem.
1. Check the fonts. In Mac OS X (Tiger or Leopard), damaged fonts can be detected by going to the Applications folder and running Font Book . Hold down the Command (⌘) key and select the fonts that are at risk. It may include fonts that you recently bought or downloaded for free from unreliable sites. The first time, you can select all fonts by pressing Command + A or (⌘ + A) . Next, select File> Validate Fonts . If the font is damaged, you will see a round red icon with a cross inside. Check the boxes for bad fonts (click on the checkboxes next to their names) and click the Remove Checked button to eliminate your system from evil. If you see a yellow warning icon near the font, it may also cause trouble, so remove it from the font folder. At the end of the procedure, restart your computer and see if the problem is solved in this way. If you are using a previous version of Mac OS X (10.3 and below), you will have to manually test groups of font pieces 5 at a time to determine which one is causing the problem.
2. Clear the font caches. Font caches can be a real problem for Mac OS X users. When activated, fonts are cached for use. Some of the font caches are handled by the OS itself; other font caches are managed by applications. In any case, it is very easy to damage individual cache files, as a result of which the fonts are distorted, and the information on the screen is displayed incorrectly. The FontNuke free application (3.8 MB) will help you cope with the problem. It removes font system caches (Mac OS X font cache files), as well as Adobe, Microsoft Office, and Quark Express application font caches. Before starting this utility, save all documents and exit all programs, since after clearing the font cache you will need to reboot the system.
If you have extra $ 100, and you don’t know how to spend it , you can purchase one of the paid font ordering apps: Extensis Suitcase Fusion 2 ($ 99.95, 31.3 MB) or Insider Software's FontAgent Pro 4 ($ 99.95, 15.1 MB). Both applications offer many options for how to organize and work with fonts, and both applications have a 30-day free demo version. Extensis also offers paid solutions to font problems for both Mac and Windows. Slightly cheaper (for $ 69.95 or free with the purchase of Extensis Suitcase Fusion 2) you can buy the FontDoctor application (7 MB), which will help fix problems with fonts and font caches.
3. Move the fonts of your account to a temporary directory. Go to the paku / ~ / Libraries / Fonts (/ ~ / Library / Fonts) , where ~ is the name of your account, and move the files from there to a temporary folder on your desktop. Do not remove these fonts, just move. Make sure that there are no fonts in the / ~ / Libraries / Fonts folder and reload the system.
4. Move the fonts that came with your OS to this directory. After the restart, the problems with the fonts should disappear. However, on your desktop there is still a folder with the fonts that have been installed in your account. Move them one by one to the folder / ~ / Libraries / Fonts to find out which font is causing the problems. First move important fonts to you.
5. If all else fails , you can read Kurt Lang’s long article “Font Management in OS X” (PDF) in the search for good advice.
TACTICS OF SURVIVAL: If Safari does not move at the speed of a swift-footed fallow deer, save it from all the data with which it is burdened by clicking Safari> Reset Safari (Reset Safari) . This will allow you to delete saved logins and passwords, favicons, clear the cache, history and cookies. If you do a full reset, there is a chance that the performance of the browser will increase significantly. However, you will have to enter your username and password on all sites that usually “remember” you. Therefore, if you are in doubt that you can remember all your usernames and passwords for accessing web resources, try deleting everything first, except for stored login info and cookies (cookies), to see if it speeds up the work. Safari.

TACTICS OF SURVIVAL: MobileMe is experiencing a lot of trouble, including interruptions in work, problems with synchronization, and so on (as proof that even Apple can release products with serious flaws). Suppose you want to continue to use a service that Apple itself recognized as defective. In this case, back up all the data that you are going to synchronize with the "cloud", and then try to reset iSync. Go to System Preferences> MobileMe and click Reset Sync Data . Select All data from the pop-up menu, unless you are experiencing problems with a particular type of information. If so, select only the data that you are having problems synchronizing. By clicking on the right arrow, you should see the following text: “On MobileMe when syncing with this computer” (“On MobileMe with sync info from this computer”) .

SURVIVAL TACTICS: If tip # 16 does not fix the problem, or if you receive error notifications that are related to data inconsistency (inconsistencies in data), reset the Sync Services folder. To do this, go to Settings in the iSync menu and click Reset Sync History . If you have multiple Macs, you may need to do this on all computers that sync with MobileMe. Start with the machine with the latest information. It is likely that you will need to reset the synchronization service folders on each computer. Just remember to make sure that you have backed up the data before you reset the sync, as there is a possibility that it will be overwritten or deleted.
God saves man, who save himself. It is much easier to prevent problems before they appear than to fix them when they happen. Here are five ways to reduce the chances of collapsing one of 17 disasters on you.
1. Avoid liquids. Keep beverages away from electrical appliances. Make it a rule not to drink at the computer and never break it. The same applies to any water-related activity: better leave the device at home, or buy a waterproof case for it.
2. Update software regularly. Mac owners can get tired of updating software, as they are not affected by many PC viruses / spyware / hacker attacks. However, there are security holes in Apple’s software, so it’s very important to put patches on your machine. The same applies to solving problems from third-party suppliers. Even if patches are not focused on security issues, they still make programs more stable and effective. To make sure your Mac has the most up-to-date software, go to the Apple menu (), select Software Update , click the Check now button, select the names you want to download, and click Install (Install) In my case, simply click on Software Update, and the scan will start automatically. Restart your computer and repeat this procedure, as some software updates will be available only if other updates are already installed. For your other applications to be in shape, look at the manufacturer’s website once a month to check for updates.
The advice is good, but obviously not our way. Firstly, when installing new programs, there is usually a Check for updates item in the settings. Moreover, you can select the option so that the program automatically checks for updates at startup or at a certain frequency (once a day or a week). Secondly, there is a wonderful free app AppFresh (1.6 MB), which will follow itself so that you have the latest versions of programs, widgets, settings panels and application plugins installed.
3. Comply with safety requirements. Security always requires concessions from usability, but it’s worth protecting your data from prying eyes. Do not allow to log in to your account automatically and set password protection for key files by changing the Accounts settings in the System Preferences .
4. Keep clean. Please your Mac with a monthly cleaning inside and out. This is not difficult: blow dirt from its guts (see item # 5), restore disk permissions for disk, delete or archive old files. The less cluttered your hard drive is, the more efficient it is. Do not forget to clean your desktop from everything that is not there, and run those UNIX scripts (see item # 4).
5. Make a backup. Just do it, okay? We will buy you a pony (always wanted a little horse :-)). Backing up your data is the single most important thing you can do so that you and your invaluable files can survive any technological trauma.
The article contains many links to paid programs that many will regard as advertising. I thought for a long time what to do with them, and decided to leave, but I also tried to tell about possible free alternatives. Here and below, my comments are in italics. So let's get down to our disasters.
')
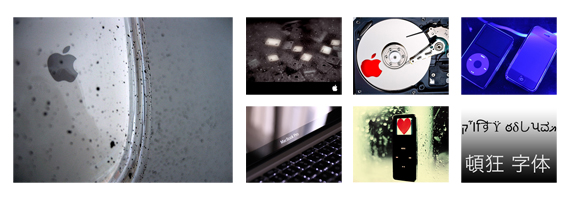
Disaster 8: MacBook Blurred
TACTICS OF SURVIVAL: Over time, white makbuki tend to get dirty (especially in the area under the wrists), and on the black case you can see every touch, which is very suitable for fingerprinting, but does not look attractive. However, you can restore your MacBook to its original appearance with the help of Mr. Clean Magic Eraser’s magic sponge. You need a simple sponge, and not one that foams when wetted. In the US, they can be found in almost any grocery store or pharmacy for about $ 3.50 per pair.
To start, wipe your MacBook with a clean, lint-free cloth or microfiber cloth. Wet the Magic Eraser sponge under a thin tap from a tap and squeeze it until it is slightly damp. Wipe your macbook with a sponge, moving it in one direction, not in different directions. Stay away from the keyboard and all ports or other openings. When finished, wipe the computer dry with any other lint-free cloth. If there is even the slightest chance that at least a drop of water has penetrated the machine, leave it in the off state, unplugged from the power supply for six hours before you turn it on again.
All this is too complicated. For example, I would not at all want to be left without a laptop for six hours just because it was so dirty that I had to wash it first and then dry it. Therefore, it is better to turn it off once a week or as it is polluted, wipe off dust and prevent it from getting dirty. In addition, there are wonderful remedies: you can stick a wonderful GelaSkin ($ 29.95) to any taste on the top cover, and the area under your wrists can be protected with the help of Moshi Palmguard (costs from $ 20.00 to $ 28.00 depending on the laptop model). At the same time, the laptop looks beautiful and unusual, the case is protected from dirt, and the plastic is intact. I myself have been using both for several months now, and I am very pleased.
Disaster 9: Keys break free
TACTICS OF SURVIVAL: If you somehow managed to shift the key from its place on the keyboard, be it the old keyboard from Apple, the keyboard from third-party manufacturers or the new aluminum keyboard that now comes with the new iMac and Mac Pro, you cannot simply insert her back. Turn the key over and see if a small plastic leg is attached to it. If the leg is attached and not broken, carefully remove this plastic tip from the key and attach it back to the keyboard. To do this, fasten it under the “ear” on the right, and then insert the two small plastic hooks into the connectors on the left. Now you will need to insert the key cap on the stand's upper ears; you may want to use a toothpick or other small object so that the pad does not move when you attach the key back.
It is difficult to describe this with words, therefore I advise you to watch a detailed video on YouTube on how to do it correctly.
Note for users of the new aluminum keyboard: non-letter keys and keys with numbers to insert back is more difficult, since the loop that stabilizes them is made of soft metal, which is very easy to bend incorrectly if you do not handle it very carefully.
If you break the plastic leg on the key cap, you can almost always find people online who sell key caps and replacement feet.
Disaster 10: A crack, a crack ... strange sounds
TACTICS OF SURVIVAL: If you suddenly start to hear the ominous sounds coming from your Mac, it can be anything from high-frequency sobbing to rare deaf sounds like from a blow coming from the hard drive area, you can assume that your hard the disc got on the death trail. Among other symptoms, it is worth noting the frequent freezing of applications, regular freezing of the system when loading, files that disappear in a mysterious way, slowing down of saving or opening files. A dying hard drive can only be replaced. There is no other way to repair it, so as soon as you notice these symptoms, immediately backup your files, even if the Disk Utility (Apple Disk Utility) reports that the hard disk is OK.
You can assume that you were lucky if your hard disk was so kind that it warned you about the impending demise. In some cases, the only warning you will receive is when the machine simply refuses to work, after which you will see a folder icon with a question mark at the next reboot. All hard drives die sooner or later, so do not be lazy and make backup copies.
Disaster 11: iPod or iPhone screen scratched
TACTICS OF SURVIVAL: Some people strongly advise to use toothpaste to remove scratches from the tempered glass touchscreen of your iPod or iPhone. Soft abrasive in the paste, designed to whiten your teeth, can also remove scratches from iPod / iPhone screens. While toothpaste is generally very suitable for cleaning jewelry, some brands of toothpaste may still be too hard for iPod / iPhone screens. It is safer to use products that are designed to do this work: Applesauce polish ($ 19.95) or RadTech Ice Creme ($ 20.95 - $ 25.95). With these products and some effort you can remove small scratches and scuffs from the face of your devices. Just do not forget to carefully follow the recommendations of the manufacturer, especially with regard to movements in different directions: you can add new ones instead of removing scratches.
Disaster 12: This time your macbook was scratched
TACTICS OF SURVIVAL: If the screen of your MacBook is scratched, do not try to repair it yourself. Any tool that is strong enough to remove scratches will also remove the upper protective coating of the screen. We heard that some people took the screen to a jeweler to remove scratches or put some Vaseline on a crack to disguise it, but we cannot recommend you to do this. If the scratch seriously bothers you or prevents you from working with most of the display, the best option would be to replace the entire screen. Probably, a standard warranty or AppleCare will not cover this repair, since scratches are most likely classified as accidental damage due to the owner’s fault. In the Apple service center you will be replaced not only the screen, but the entire upper part of the laptop (the screen itself, the edging, the top cover), which will cost about $ 800. In addition, in the US there are companies that are engaged in the replacement of displays on MacBooks, make it somewhat cheaper than at the Apple service center, and provide a 1-year warranty. Their services will cost you less because they replace only the screen itself. Border and top cover remain from your MacBook. The cost of repair without shipping is $ 350 - $ 500 depending on the size of the display. Nevertheless, I heard not very flattering reviews about their work, for example, from Paul Stamatiou ( Paul Stamatiou ), who thus replaced the screen in the MacBook Air.
If you are a jack of all trades and are not afraid to make a replacement yourself, you can order a new screen, for example, in the PowerBook Medic , and install it yourself. Excluding delivery, a spare part costs $ 198.95 - $ 299.95, depending on the screen size. You are also provided with a one year warranty. Delivery to Russia or Ukraine will cost $ 28.00 - $ 87.79 depending on the postal service.
If you make repairs at a service center in Russia, a spare part will cost $ 750 - $ 800, plus about 2,000 rubles for the work of technicians. So it is better not to scratch the display, although repairs will be cheaper than buying a new macbook.
Disaster 13: iPod or iPhone bathed
TACTICS OF SURVIVAL: So, you dropped your iPod or iPhone in water or a container with water (bathroom, toilet, deep puddle, ocean). If the gods of technology are favorable to you, you can fix it. Get your wretched device out of the water and turn it off immediately if it was turned on during the dive. Although in this case we offer our condolences, as most likely your iPod or iPhone has already died. If the device got into the water in the off state, your primary goal is to completely dry it. To simplify the task, it can be positioned near the fan of the cable box or air conditioner. Or you can immerse it in a deep bowl with dry rice or in a container with several sachets of silicon dioxide (these are such small moisture-absorbing sachets that can usually be found in the packages of bags, shoes and other products, on which it is also written: “Warning: you can’t there is!").
If the device has absorbed a lot of liquid, place it vertically so that as the water flows, it will not be lying in a puddle. In addition, a bathed iPod or iPhone can be put on any surface that absorbs moisture, such as a stack of paper napkins or cloth towels. Do not forget to wipe out leaked water and change towels as needed. If you know how to open the case of the device (this will help you with a pick / plectrum - a small plate that is used to pick up the strings on the guitar), open it and take out the battery to simplify the drying process. This, of course, voids the warranty, but in such a critical situation all means are good for saving the device. Although if you drop your iPod or iPhone in water, it will not be repaired under warranty in any case. It is impossible to hide this fact, as they have built-in immersion sensors that change color when in contact with water. Let the device dry for three days, then try to turn it on. If it doesn't work, let it dry for two more days. Depending on which liquid your iPod or iPhone has fallen into, you may need to open and clean it with denatured alcohol to remove any residue that may cause problems later.
Disaster 14: Fonts run wild
TACTICS OF SURVIVAL: So that you don’t have to read too much text in italics, I’ll just note that this paragraph has been largely corrected, added and almost completely rewritten. Therefore, do not be surprised that it is a little inconsistent with what is written in the original article.
Tiny font files can cause great trouble. Damaged fonts can cause problems with printing or displaying information on the display, and even cause applications to fall. The mess in the font caches can also cause all sorts of problems with the reproduction of information on the screen. Therefore, with the fonts on the Mac should be treated very delicately. In no case can you touch the system fonts. If you accidentally delete Lucida Grande, Mac OS will not boot at all.
Use T2 blog tips to solve the problem.
1. Check the fonts. In Mac OS X (Tiger or Leopard), damaged fonts can be detected by going to the Applications folder and running Font Book . Hold down the Command (⌘) key and select the fonts that are at risk. It may include fonts that you recently bought or downloaded for free from unreliable sites. The first time, you can select all fonts by pressing Command + A or (⌘ + A) . Next, select File> Validate Fonts . If the font is damaged, you will see a round red icon with a cross inside. Check the boxes for bad fonts (click on the checkboxes next to their names) and click the Remove Checked button to eliminate your system from evil. If you see a yellow warning icon near the font, it may also cause trouble, so remove it from the font folder. At the end of the procedure, restart your computer and see if the problem is solved in this way. If you are using a previous version of Mac OS X (10.3 and below), you will have to manually test groups of font pieces 5 at a time to determine which one is causing the problem.
2. Clear the font caches. Font caches can be a real problem for Mac OS X users. When activated, fonts are cached for use. Some of the font caches are handled by the OS itself; other font caches are managed by applications. In any case, it is very easy to damage individual cache files, as a result of which the fonts are distorted, and the information on the screen is displayed incorrectly. The FontNuke free application (3.8 MB) will help you cope with the problem. It removes font system caches (Mac OS X font cache files), as well as Adobe, Microsoft Office, and Quark Express application font caches. Before starting this utility, save all documents and exit all programs, since after clearing the font cache you will need to reboot the system.
If you have extra $ 100, and you don’t know how to spend it , you can purchase one of the paid font ordering apps: Extensis Suitcase Fusion 2 ($ 99.95, 31.3 MB) or Insider Software's FontAgent Pro 4 ($ 99.95, 15.1 MB). Both applications offer many options for how to organize and work with fonts, and both applications have a 30-day free demo version. Extensis also offers paid solutions to font problems for both Mac and Windows. Slightly cheaper (for $ 69.95 or free with the purchase of Extensis Suitcase Fusion 2) you can buy the FontDoctor application (7 MB), which will help fix problems with fonts and font caches.
3. Move the fonts of your account to a temporary directory. Go to the paku / ~ / Libraries / Fonts (/ ~ / Library / Fonts) , where ~ is the name of your account, and move the files from there to a temporary folder on your desktop. Do not remove these fonts, just move. Make sure that there are no fonts in the / ~ / Libraries / Fonts folder and reload the system.
4. Move the fonts that came with your OS to this directory. After the restart, the problems with the fonts should disappear. However, on your desktop there is still a folder with the fonts that have been installed in your account. Move them one by one to the folder / ~ / Libraries / Fonts to find out which font is causing the problems. First move important fonts to you.
5. If all else fails , you can read Kurt Lang’s long article “Font Management in OS X” (PDF) in the search for good advice.
Disaster 15: Safari crawls like a turtle
TACTICS OF SURVIVAL: If Safari does not move at the speed of a swift-footed fallow deer, save it from all the data with which it is burdened by clicking Safari> Reset Safari (Reset Safari) . This will allow you to delete saved logins and passwords, favicons, clear the cache, history and cookies. If you do a full reset, there is a chance that the performance of the browser will increase significantly. However, you will have to enter your username and password on all sites that usually “remember” you. Therefore, if you are in doubt that you can remember all your usernames and passwords for accessing web resources, try deleting everything first, except for stored login info and cookies (cookies), to see if it speeds up the work. Safari.
Disaster 16: Distressed MobileMe
TACTICS OF SURVIVAL: MobileMe is experiencing a lot of trouble, including interruptions in work, problems with synchronization, and so on (as proof that even Apple can release products with serious flaws). Suppose you want to continue to use a service that Apple itself recognized as defective. In this case, back up all the data that you are going to synchronize with the "cloud", and then try to reset iSync. Go to System Preferences> MobileMe and click Reset Sync Data . Select All data from the pop-up menu, unless you are experiencing problems with a particular type of information. If so, select only the data that you are having problems synchronizing. By clicking on the right arrow, you should see the following text: “On MobileMe when syncing with this computer” (“On MobileMe with sync info from this computer”) .
Disaster 17: A little more about MobileMe issues
SURVIVAL TACTICS: If tip # 16 does not fix the problem, or if you receive error notifications that are related to data inconsistency (inconsistencies in data), reset the Sync Services folder. To do this, go to Settings in the iSync menu and click Reset Sync History . If you have multiple Macs, you may need to do this on all computers that sync with MobileMe. Start with the machine with the latest information. It is likely that you will need to reset the synchronization service folders on each computer. Just remember to make sure that you have backed up the data before you reset the sync, as there is a possibility that it will be overwritten or deleted.
5 ways to prevent disasters on the Mac
God saves man, who save himself. It is much easier to prevent problems before they appear than to fix them when they happen. Here are five ways to reduce the chances of collapsing one of 17 disasters on you.
1. Avoid liquids. Keep beverages away from electrical appliances. Make it a rule not to drink at the computer and never break it. The same applies to any water-related activity: better leave the device at home, or buy a waterproof case for it.
2. Update software regularly. Mac owners can get tired of updating software, as they are not affected by many PC viruses / spyware / hacker attacks. However, there are security holes in Apple’s software, so it’s very important to put patches on your machine. The same applies to solving problems from third-party suppliers. Even if patches are not focused on security issues, they still make programs more stable and effective. To make sure your Mac has the most up-to-date software, go to the Apple menu (), select Software Update , click the Check now button, select the names you want to download, and click Install (Install) In my case, simply click on Software Update, and the scan will start automatically. Restart your computer and repeat this procedure, as some software updates will be available only if other updates are already installed. For your other applications to be in shape, look at the manufacturer’s website once a month to check for updates.
The advice is good, but obviously not our way. Firstly, when installing new programs, there is usually a Check for updates item in the settings. Moreover, you can select the option so that the program automatically checks for updates at startup or at a certain frequency (once a day or a week). Secondly, there is a wonderful free app AppFresh (1.6 MB), which will follow itself so that you have the latest versions of programs, widgets, settings panels and application plugins installed.
3. Comply with safety requirements. Security always requires concessions from usability, but it’s worth protecting your data from prying eyes. Do not allow to log in to your account automatically and set password protection for key files by changing the Accounts settings in the System Preferences .
4. Keep clean. Please your Mac with a monthly cleaning inside and out. This is not difficult: blow dirt from its guts (see item # 5), restore disk permissions for disk, delete or archive old files. The less cluttered your hard drive is, the more efficient it is. Do not forget to clean your desktop from everything that is not there, and run those UNIX scripts (see item # 4).
5. Make a backup. Just do it, okay? We will buy you a pony (always wanted a little horse :-)). Backing up your data is the single most important thing you can do so that you and your invaluable files can survive any technological trauma.
Source: https://habr.com/ru/post/45944/
All Articles