We organize ML-project with the help of Ocean
Introduction
Over the years of developing ML and DL projects, our studio has accumulated a large code base, a lot of experience, and interesting insights and conclusions. When you start a new project, this useful knowledge helps you more confidently start research, reuse useful methods and get first results faster.
It is very important that all these materials are not only in the heads of the developers, but also in a readable form on the disk. This will allow more effectively train new employees, bring them up to date and immerse them in the project.
Of course, this was not always the case. We faced a lot of problems in the early stages.
- Each project was organized differently, especially if they were initiated by different people.
- It was not enough to track what the code is doing, how to run it, and who its author is.
- They did not use virtualization to the proper degree, often making it difficult for their colleagues to install existing libraries of another version.
- The conclusions drawn from the charts that had settled and died in the mountain jupyter notebooks were forgotten.
- Losing reports on the results and progress in the project.
In order to solve these problems once and for all, we decided that we need to work both on a single and correct project organization, and on virtualization, the abstraction of individual components and the re-use of useful code. Gradually, all our progress in this area has become an independent framework - Ocean.
The cherry on the cake is the project logs, which are aggregated and turned into a beautiful website, automatically assembled with the help of a single command.
In the article we will tell on a small artificial example of what parts Ocean consists of and how to use it.
Why Ocean
In the ML world there are other options that we considered. First of all, we need to mention cookiecutter-data-science (hereinafter CDS) as the ideological mastermind. Let's start with a good one: CDS not only offers a convenient project structure, but also tells how to manage a project so that everything is good - so here we recommend digressing and see the main key ideas of this approach in the original CDS article .
Armed with CDS in the working draft, we immediately introduced several improvements to it: we added a convenient file logger, a coordinating class responsible for project navigation and an automatic generator of Sphinx documentation. In addition, they brought out several commands in the Makefile, so that even the uninitiated in the details of the project manager would be comfortable with them.
However, in the process of work, the disadvantages of the CDS approach began to emerge:
- The data folder can grow, but which of the scripts or notebooks gives rise to the next file is not completely clear. A large number of files is easy to get confused. It is not clear whether, within the framework of the implementation of the new functionality, it is necessary to use some of the existing files, since the description or documentation on their intended purpose is not stored anywhere.
- In data, there is a lack of a features subfolder into which attributes can be stored: counted statistics, vectors, and other characteristics from which different final representations of data would be collected. This is already wonderfully written in a blog post.
- src is another problem folder. It has functions that are relevant to the entire project, for example, the preparation and cleaning of the src.data module data . But there is also the src.models module, which contains all the models from all experiments, and there may be dozens of them. As a result, src is updated very often, expanding with very minor changes, and according to the CDS philosophy, after each update, you need to recompile the project, and this is also time ... - well, you understand.
- references is submitted, but there is still an open question: who, when and in what form should the materials be entered there. And you can tell a lot in the course of the project: what work has been done, what is the result, what are the future plans.
To solve the above problems in the Ocean presents the following entity: an experiment . The experiment is the repository of all the data that participated in the testing of some hypothesis. This could include: what data was used, what data (artifacts) were obtained as a result, the version of the code, the start and end time of the experiment, the executable file, parameters, metrics and logs. Some of this information can be tracked using special utilities, for example, MLFlow. However, the structure of the experiments, which is presented in the Ocean, is richer and more flexible.
The module of one experiment is as follows:
<project_root> └── experiments ├── exp-001-Tree-models │ ├── config <- yaml- │ ├── models <- │ ├── notebooks <- │ ├── scripts <- , , train.py predict.py │ ├── Makefile <- │ ├── requirements.txt <- │ └── log.md <- │ ├── exp-002-Gradient-boosting ... We share the code base: reusable good code that is relevant to the entire project remains in the src- module of the project level. It is rarely updated, so you rarely have to build a project. And the scripts module of one experiment should contain code that is relevant only for the current experiment. Thus, it can be changed often: it does not affect the work of colleagues in other experiments.
Consider the possibilities of our framework for example of an abstract ML / DL-project.
Project workflow
Initialization
So, the client, the Chicago police, unloaded us with the data and the task: analyze the crimes committed in the city during 2011-2017 and draw conclusions.
Getting started! Go to the terminal and execute the command:
ocean project new -n Crimes
The framework has created the corresponding project folder. We look at its structure:
crimes ├── crimes <- src- , ├── config <- , ├── data <- ├── demos <- ├── docs <- Sphinx- ├── experiments <- ├── notebooks <- EDA ├── Makefile <- ├── log.md <- ├── README.md └── setup.py The Coordinator from the module of the same name, which is already written and ready, helps to navigate through all these folders. To use it, you need to build a project:
make package
This is a bug : if make commands do not want to be executed, then add the -B flag to them, for example, “make -B package”. This also applies to all further examples.
Logs and experiments
Getting started with the fact that the data of the client - in our case, the file of crimes.csv , - we put in the data / raw folder.
The Chicago site has maps of city divisions into posts (“beats” - the smallest location, with one patrol vehicle assigned), sectors (“sectors”, consist of 3-5 posts), sections (“districts”, consist of 3 sectors), administrative districts (“wards”) and, finally, public areas (“community area”). This data can be used for visualization. At the same time, json-files with coordinates of polygons-sections of each type are not data sent by the customer, so we put them in data / external .
Next you need to enter the concept of the experiment. It's simple: we consider a separate task as a separate experiment. Need to parse / dump data and prepare it for future use? It is worth putting into the experiment. Prepare a lot of visualization and reports? Separate experiment. Test the hypothesis by preparing the model? Well, you understand.
To create our first experiment from the project folder, do the following:
ocean exp new -n Parsing -a ivanov
Now a new folder named exp-001-Parsing has appeared in the crimes / experiments folder, its structure is shown above.
After that, you need to look at the data. To do this, create a laptop in the appropriate folder notebooks . In Surf, we stick to the name “laptop number - name”, and the created laptop will be called 001-Parse-data.ipynb . Inside, we will prepare the data for future work.
import numpy as np import pandas as pd pd.options.display.max_columns = 100 # : from crimes.coordinator import Coordinator coord = Coordinator() coord.data_raw.contents() > ['/opt/jupyterhub/notebooks/aolferuk/crimes/data/raw/crimes.csv'] # : df = coord.data_raw.join('crimes.csv').load() df['Date'] = pd.to_datetime(df['Date']) df['Updated On'] = pd.to_datetime(df['Updated On']) df['Location X'] = np.nan df['Location Y'] = np.nan df.loc[df.Location.notnull(), 'Location X'] = df.loc[df.Location.notnull(), 'Location'].apply(lambda x: eval(x)[0]) df.loc[df.Location.notnull(), 'Location Y'] = df.loc[df.Location.notnull(), 'Location'].apply(lambda x: eval(x)[1]) df.drop('Location', axis=1, inplace=True) df['month'] = df.Date.apply(lambda x: x.month) df['day'] = df.Date.apply(lambda x: x.day) df['hour'] = df.Date.apply(lambda x: x.hour) # : coord.data_interim.join('crimes.pkl').save(df) In order for your colleagues to be aware of what you have done and whether your results can be used by them, you need to comment in the log: log.md file. The log structure (which is essentially a familiar markdown file) looks like this:
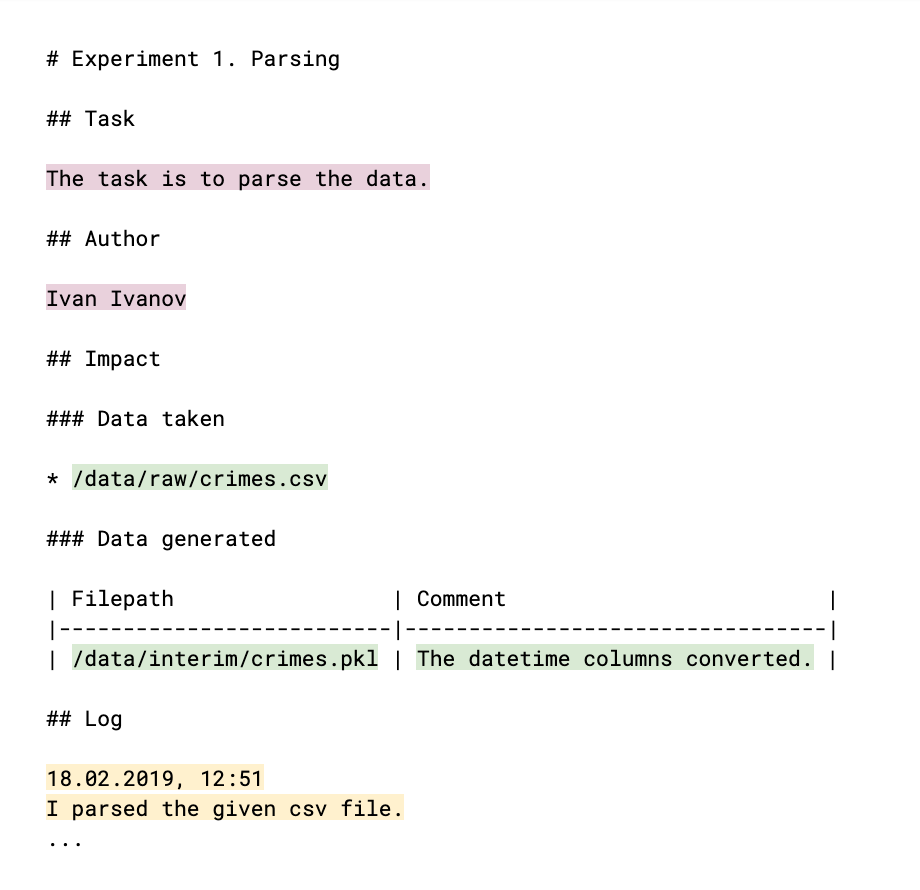
Color highlighted parts that are filled by hand. The main meta of the experiment (light plum color) is the author and the explanation of his task, the result to which the experiment goes. References to data, both taken and generated in the process (green), help to monitor data files and to understand who uses what and why. In the log itself (yellow color) the result of the work, conclusions and reasoning is described. All this data will later become the content of the project log site.
Next is the EDA ( Exploratory Data Analysis ) phase. Perhaps it will be carried out by different people, and, of course, we will need the results in the form of reports and graphs in consequence. These arguments are a reason to create a new experiment. We carry out:
ocean exp new -n Eda -a ivanov
In the experiment notebooks folder, create notebook 001-EDA.ipynb . The full code does not make sense, but it is not needed, for example, by your colleagues. But we need graphics and conclusions. There is a lot of code in the notebook, and it is not in itself something that I want to show to the client. Therefore, we will write our findings and insights into the log.md file, and save the graph images in the references .
Here, for example, a map of the safe areas of Chicago, if fate brings you there:
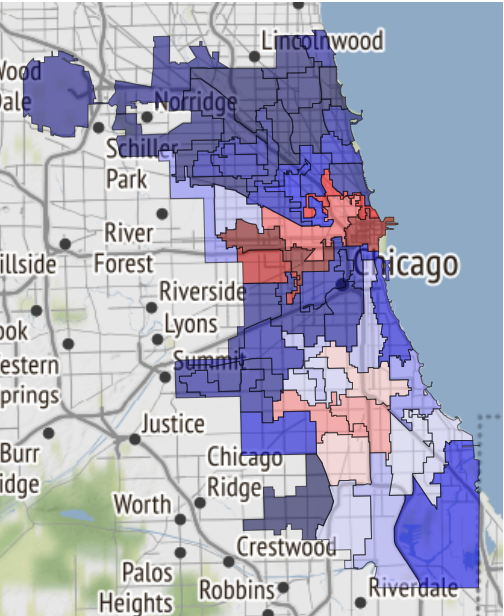
It was just received in a notebook and transferred to references .
The following entry has been added to the log:
19.02.2019, 18:15 EDA conclusion: * The most common and widely spread crimes are theft (including burglary), battery and criminal damage done with firearms. * In 1 case out of 4 the suspect will be set free after detention. [!Criminal activity in different beats of the city](references/beats_activity.jpg) Actual exploration you can check in [the notebook](notebooks/001-Eda.ipynb) Please note: the graph is designed simply as inserting an image into an md file. And if you leave a link to the notebook, then it will be converted into html-format and saved as a separate page of the site.
To collect it from the logs of experiments, we execute the following command at the project level:
ocean log new
After that a folder of crimes / project_log is created , and index.html in it is the project log.
This is a bug : when displayed in Jupyter, the site is implemented as an iframe for greater security, and therefore the fonts are not displayed correctly. Therefore, using Ocean, you can immediately make an archive with a copy of the site, so that it is convenient to download and open it on your local computer or send it by mail. Like this:ocean log archive [-n NAME] [-p PASSWORD]
Documentation
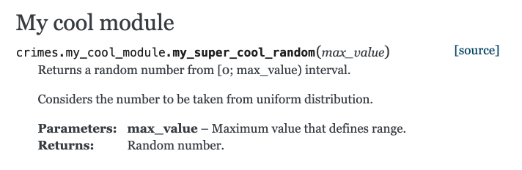
Let's look at the formation of documentation using Sphinx. Create a function in the file death / my_cool_module.py and document it. Please note that Sphinx uses the reStructured Text Format (RST):
def my_super_cool_random(max_value): ''' Returns a random number from [0; max_value) interval. Considers the number to be taken from uniform distribution. :param max_value: Maximum value that defines range. :returns: Random number. ''' return 4 # Good enough to begin with And then everything is very simple: at the project level, we execute the documentation generation team, and it’s ready:
ocean docs new
Question from the audience : Why, if we compiled a project throughmake, do you have to collect documentation through theocean?
Answer : the process of generating documentation is not only the execution of a Sphinx command that can be placed inmake. Ocean takes on a scan of your source code directory, builds an index for Sphinx on them, and only then does Sphinx get to work.
Ready html documentation is waiting for you along the path of death / docs / _build / html / index.html . And our module with comments already appeared there:
Models
The next step is to build a model. We carry out:
ocean exp new -n Model -a ivanov
And this time, take a look at what is in the scripts folder inside the experiment. The train.py file is a template for the future of the learning process. The file already shows the boilerplate-code, which does several things at once.
- The learning function accepts several file paths:
- To the configuration file, in which it is reasonable to take out the model parameters, the learning parameters and other options that are conveniently controlled outside, without delving into the code.
- To the data file.
- Path to the directory in which you need to save the final dump of the model.
- Tracks metrics obtained in the learning process in mlflow . You can see everything that has been replayed via mlflow UI by executing the command
make dashboardin the experiment folder. - Sends an alert to your Telegram that the learning process has been completed. To implement this mechanism, the Alarmerbot bot is used . For this to work, you need to do quite a bit: send the / start command to the bot, and then transfer the token issued by the bot to the file crimes / config / alarm_config.yml . The string can have the following form:
ivanov: a5081d-1b6de6-5f2762 - Managed from the console.
Why manage our script from the console? Everything is organized so that the process of learning or obtaining predictions of any model is easily organized by a third-party developer who is not familiar with the details of the implementation of your experiment. In order for all the pieces of the puzzle to come together, after designing train.py, you need to issue a Makefile . It contains the train command stub , and all you have to do is set the paths to the required configuration files listed above, and in the value of the username parameter, list everyone who wants to receive Telegram notifications. In particular, the all alias works, which will send an alert to all team members.
Once everything is ready, our experiment starts using the make train , simple and elegant.
In case you want to use other people's neural networks, virtual environments ( venv ) will help. Creating and deleting them as part of an experiment is very easy:
ocean env newwill create a new environment. It is not only active by default, but also creates an additional kernel (notebook) for notebooks and further research. It will be called the same as the name of the experiment.ocean env listdisplays a list of cores.ocean env deletewillocean env deleteenvironment created in the experiment.
What is missing?
- Ocean is not friendly with conda (
because we don't use it). - The project template is in English only.
- The problem of localization still applies to the site: building a project log assumes that all logs are in English.
Conclusion
The source code of the project is here .
If you are interested - great! More information can be found in the README in the Ocean repository .
And as they usually say in such cases, contributions are welcome, we will only be happy if you participate in improving the project.
')
Source: https://habr.com/ru/post/459340/
All Articles