Basic skills for working with Unity

Good day, dear Khabarovsk!
Every developer wants to quickly create their own game, but how to do it? This article describes the basic skills to reduce development time in the Unity environment.
Skill # 1 - Working with the project structure
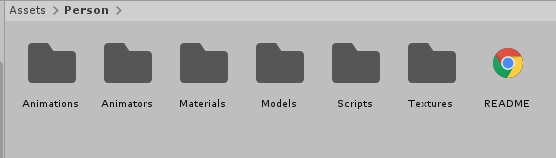
To maintain order in the project requires to deal with its structure. It can be represented as follows:
')
- Models - stores all models used in the project
- Prefabs - stores all model templates
- Textures - stores all textures
- Materials - stores all materials
- Scripts - stores all scripts
- Sounds - keeps all sounds
- Animations - stores all animations.
If you have complex objects, for example, a character, a separate folder is created for it, where the above structure is repeated.
Character folder structure
Another approach would be to create the folders described above, and to place the parts of the object in each folder, that is, to animate the character will be the following structure.
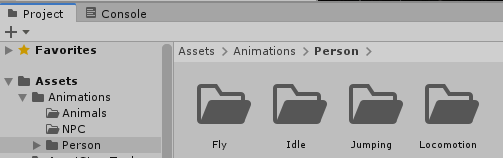
Animations folder structure
Skill # 2 - Working with the hierarchy of objects on the stage
To simplify working with sets of identical objects, they can be combined into groups, where an empty object acts as a parent.
This will help to easily turn off the light on the entire location or indoors. Find out the location of all objects.
Each element is called according to what it is, at the end of the postfix of the parent object is added. For example, a gold bar in the cave will be called “goldBar_cv1”, where cv1 means cave1, and a tree in the forest is “tree_frt1”, where frt1 means forest1. For postfix, the first letter of the word, the first letter of the second syllable, and the last letter of the word are taken.
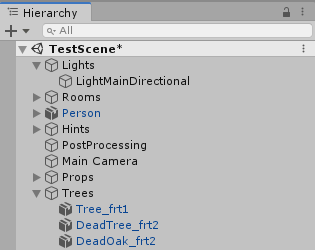
An example of the hierarchy of objects on the scene
Skill # 3 - Working with Visual Presentation
Unity has 3 main sources of light:
- Natural Light (Directional Light) - Analogue of the Sun
- Point Light (Point Light) - analog light bulbs
- Spotlight (Spotlight) - analog flashlight
If there is light, then there must be a source of light. For example, in a cave there can be no light if the character does not have a torch (for a torch a point light will do).
Use PostProcessing to apply effects.
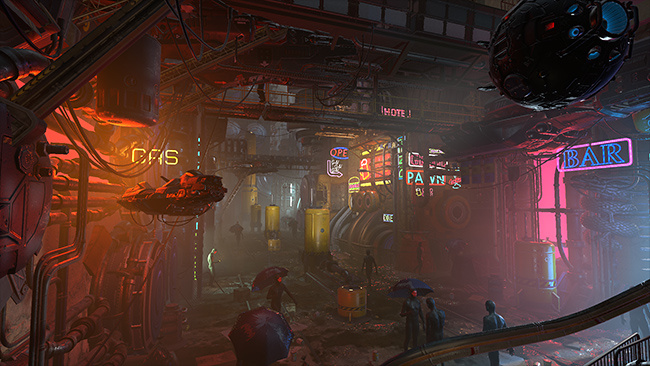
Scene without post processing
Post-processing scene
UPD from thenonsense :
In addition to the visually presented light sources, there are also global settings for the light: the tab at the top of the Window , the Lighting item, the Settings sub-item. There you can, for example, twist the lighting environment, set the skybox, add fog. Actually, it is here that you need to look, if you asked the question "removed all sources of light, and on stage it is as bright as day." By the way, you can climb into these settings already while the game is running in the editor, so that you can immediately see the changes on the fly. However, after closing the game mode, the settings will return to the state they were before the game test was launched. So you have to climb into this window again and adjust the values. Useful detail - if you, for example, wanted to change the lighting color (Ambient color in the Environment Lighting group), then on the panel with the palette pay attention to the Hexadecimal item - there the number of the current color is indicated in the window, you can copy it and later paste it into the same field when the game mode is turned off. The same trick is useful for adjusting the color of fog and so on.
Similarly, being in the running mode in the game mode, you can change some parameters of the objects through the editor - the values of the variable scripts made into the visibility zone, enable / disable the render of the object grid, and so on. The main thing is not to get involved in, so as not to break something. After turning off the game mode, the changed values will be restored. This does not apply to some individual elements, for example, if you edited a terrayna texture in the included game mode, its changes will be preserved.
Skill # 4 - Work with the camera
Need to find an object on the scene? Click 2 times on the object name in the hierarchy.
Want to fly across the stage from 1 person? Hold RMB and use the WASD keys to shift to accelerate.
Want to see the scene from different angles? Use the Gizmo.
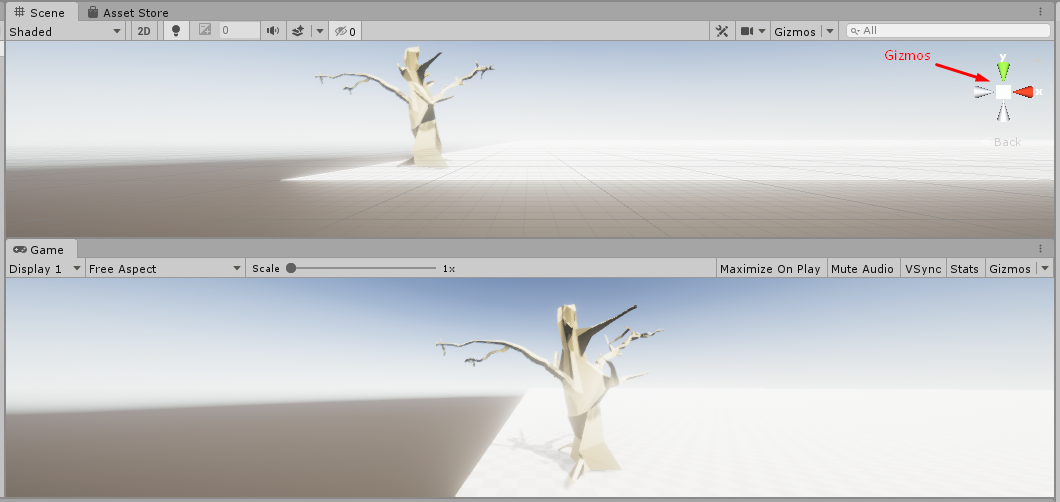
Location of Gizmo
Skill # 5 - Working with Objects
Want to add a character to the scene? Add RigidBody and CapsuleCollaider components. RigidBody tells the engine that solid state physics should be applied to this object.
Want to check the character's collision with the object? Add the MeshCollaider component to the object and in the character script in the OnCollisionEnter function, check the tag of the object encountered by the character.
An example of the implementation of checking the collision of a character with an object
private void OnCollisionEnter(Collision collision) { switch (collision.gameObject.tag) { case "Moneys": Destroy(collision.gameObject); // Do something break; case "TrapSpikes": hitPoints -= 5.5; break; } } UPD from thenonsense :
It is not always necessary for a character to use a rigidbody, control methods may be different. But the character collider is almost always required, unless you are going to calculate collisions in a more cunning way. Also in Unity there are several specific controllers / colliders - it is better to read the documentation in order to understand them in more detail. But it's better to start with simple examples on YouTube.
As for those objects with which the character faces. Mesh Collider should usually be hung on objects whose complex shape is somehow important to you to account for collisions. If it's just a button, then it's better to get by colliders easier, like Box Collider. In addition, you may have to make a more simple, invisible, collision grid and hang Mesh Collider on it, and not on the visible object itself, for particularly complex 3D objects.
About the button-colliders it is worth remembering that in their component of the collider you need to check the checkbox Is Trigger so that the script just can handle the click event. Any barrels, boxes and other objects that just need to physically respond beautifully to collisions and fall under the action of gravity should be assigned a rigidbody component.
Skill # 6 - Import models
Consider the procedure for example of importing a model from Blender. It is assumed that you have already scanned, struck a texture or selected materials.
- Position the model in zero coordinates (center relative to the axes)
- Set the scale (Scale) to unity
- Remove unnecessary objects (camera, light source)
- Save model in .fbx format
- Transfer file to Unity
- Trash by folders - Model to Models, Material to Materials, etc.
- Create a prefab model
- Work further with prefabs
UPD from thenonsense :
Blender
Please note that if the blender materials are assigned to the model, they will be transferred in a simplified form too and will clutter up the list of materials.
It is possible not to do complex scans and texturing in Blender at all - the easier way is to go through all the elements of the model and select Data in the window on the right for each. This is an icon in the form of a three-point looking down triangle between the Modifiers (wrench) and Material (pink ball) points. In it, click on + next to the column UV Maps - there appears an automatic scan with the icon of a chess ball. This must be done for each element of the model and only after that do the export. Then, in Unity, this part will be able to overlay material with a tile texture, and if this is not done, then the material will only paint the part in a solid color. (If you later deform an element of the model, then reset the unfolding and reassign again so that it is not stretched).
If your model consists of different elements, then already in Unity you can move individual elements of your model or turn them off. This can be useful in various situations.How to texture a model in a simple way.
For a start, you have enough of some tiling textures of 512 to 512. Add it the same way as the 3D model through the Import New Asset (remember that a suitable folder should be selected). In this case, on the right, in the inspector, the added texture in the Default window set the Max Size parameter to 512. And then click Apply . Now the texture is ready to add it to the material or, for example, it can now be painted terrayn. Pay attention to the very first item - Texture Type, now it is in default mode, but when you need to load a normal map, an image for a translucent sprite, and so on, you will need to set the appropriate setting there.
Next we need to create the material. Go back to the menu at the top - Assets , drop-down list Create , Material (again, do not forget that the material will be created in the folder that is selected now). You drive in the name of the material and in the inspector you open the Albedo point (we will not stop on other parameters yet, but the principle is similar), where you search and assign your previously loaded texture. Nearby there is a window of color that can additionally tint your texture, as well as Metalic and Smoothness sliders to add highlights or haze. The Tiling tile size parameter is also useful, it is a few lines down.
After the material is created, you can grab it and throw it directly onto the model or its elements, just do not overshoot, and then paint is not what you need.
Do not forget that the same texture can be used in different materials. For example, with impurities of different colors and / or different size of tiles.Prefabs.
Usually a prefab is done something like this - dragging an object onto the stage, then hooking its name into the hierarchy window and dragging it inside the folder. Then a prefab based on the object will appear there, in the prefab inspector there will be an icon of the blue cube and below the tag it will be signed by Prefab.
However, you do not need to immediately do everything prefabs. You can throw an object onto the stage, then copy it with copy-paste and test it right there. If you are satisfied with everything, then transfer the object to the prefab, if not, for example, a bug has been revealed in the model, then delete its copies from the scene, the model itself from the folder, fix it in the 3D package and import it again.
You can also put some new children inside the prefab on the stage. However, they will not become a full part of it, that is, they will not affect other copies of this prefab until you click the Apply button in the inspector on the line with the name Prefab.
Skill # 7 - Logic Implementation
Avoid performing expensive operations. An example is the determination of the distance to an object.
Example with expensive operation
using UnityEngine; using System.Collections; public class ExampleClass : MonoBehaviour { public Transform other; void Example() { if (other) { // // float dist = Vector3.Distance(other.position, transform.position); print("Distance to other: " + dist); } } } Faster implementation example
using UnityEngine; using System.Collections; public class ExampleClass : MonoBehaviour { public Transform other; public float closeDistance = 5.0f; void Update() { if (other) { Vector3 offset = other.position - transform.position; // float sqrLen = offset.sqrMagnitude; // , if (sqrLen < closeDistance * closeDistance) { print("The other transform is close to me!"); } } } } Read more about expensive transactions here .
Conclusion
The above skills will significantly reduce the time during development and during project support.
If you think that some topics are revealed superficially, please write in comments about them in more detail.
Source: https://habr.com/ru/post/459184/
All Articles