Writing a bot for fishing in the game Albion Online in Python

Hello everyone, I am a happy user of the GNU / Linux operating system. And as many know, toys going to Linux without additional dances with a tambourine are much less than in Windows.
And even fewer games in the MMORPG genre.
')
However, about half a year or a year ago, I found out that the Albion Online game was ported to Linux.
The game is very entertaining, but takes a fairly large amount of time. And in order not to waste my precious hours of life in vain, I decided to write a bot. Which will farm me resources while I go about my business.
The game has many types of crafts, you can chop wood, dig stones, even grow gardens, but my choice was made in favor of fishing.
So, the essence of fishing in Albion online is simple, take the bait, go to the pond, press the button in order to throw the bait, wait for a certain time to bite.
When bite, you have to press the buttons again and play a mini-game.
Here you will need to alternately pull, then do not pull the bait, depending on the movements of the float. The float always moves randomly, with different sequences and speeds. And if you do everything right and the float does not go beyond the limits of the allowable zone, then you will catch a fish.
So, we will automate all this business. By means of the computer language python. I decided to start with the most difficult, namely from the moment where the game starts with a float. Here again my favorite library with computer vision OpenCV came to the rescue. Running it, we can detect objects for example in the pictures. However, the library itself does not know what exactly we need to discover. Of course there are many templates where various items are presented for their definition. However, there are definitely no floats for Albion Online.
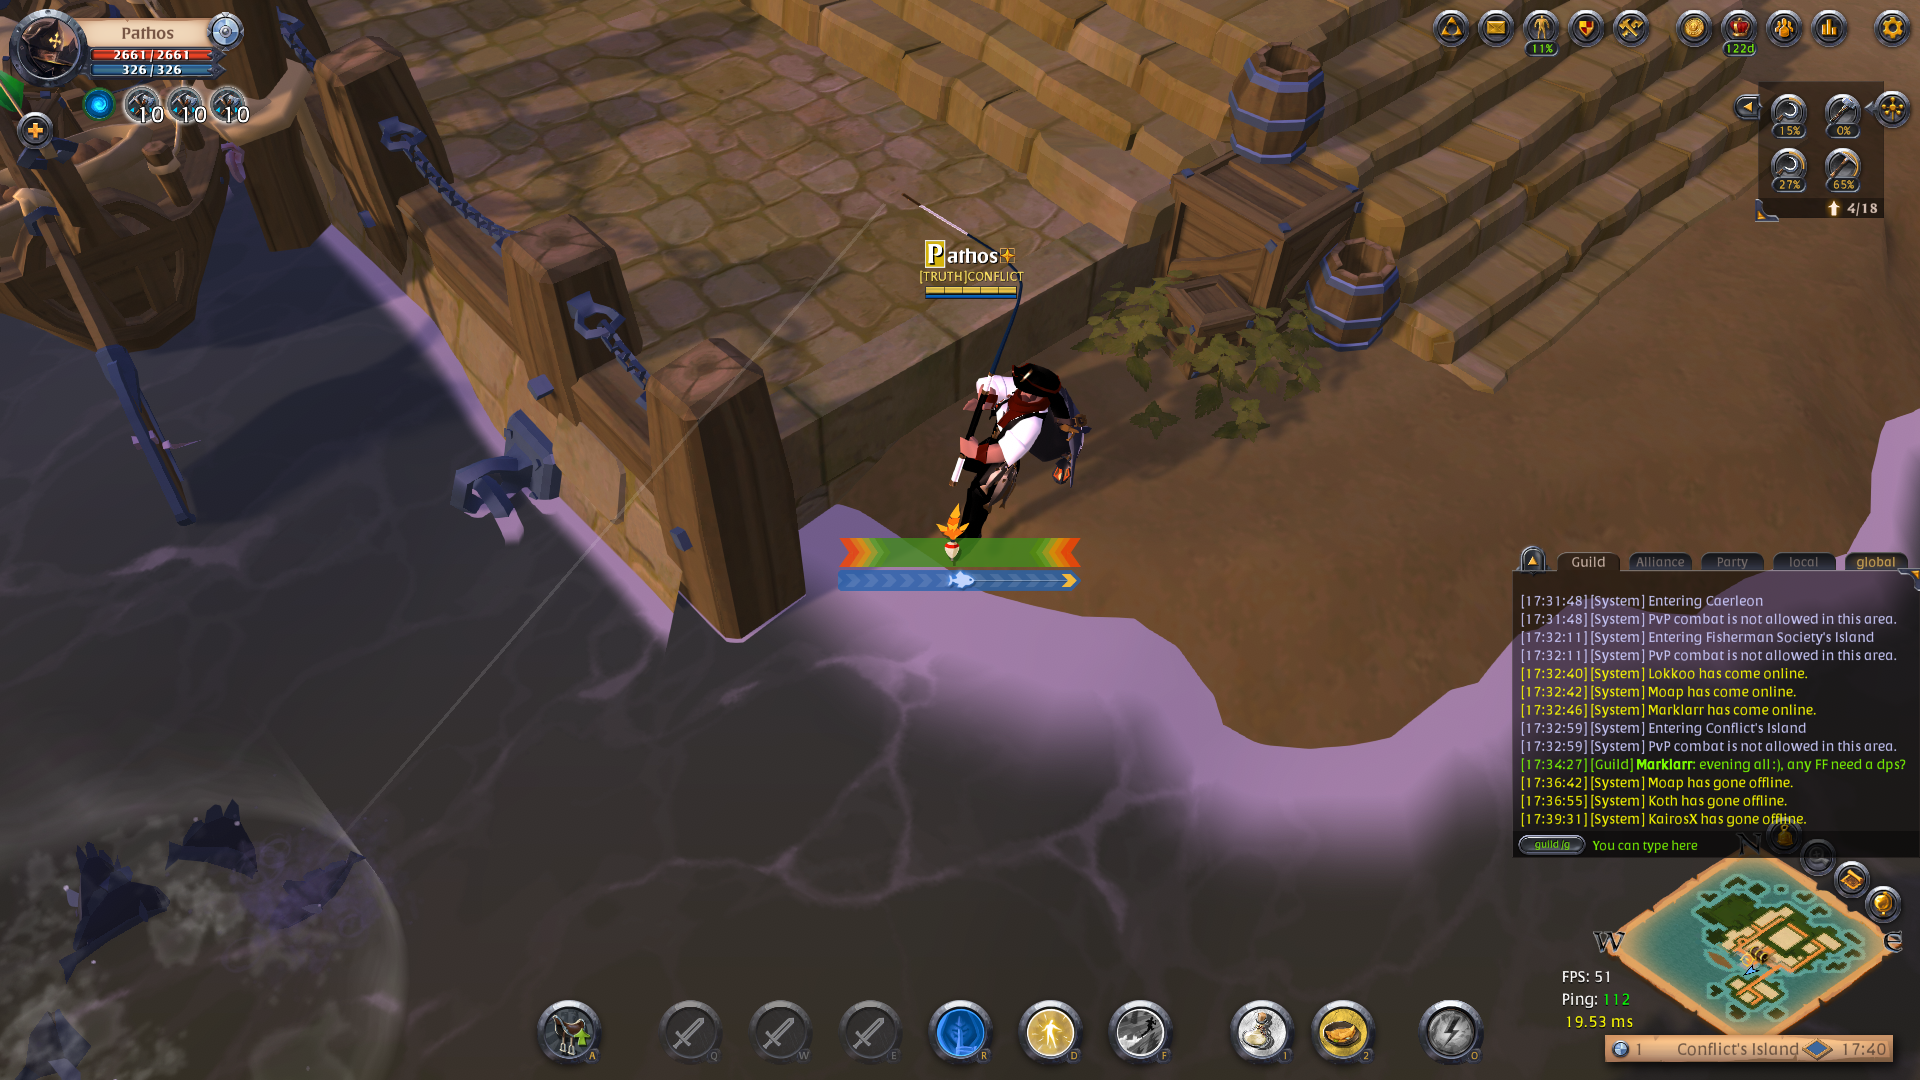
But in this library there is a great search function for a given pattern. And as a template, I just took a screenshot of our float.
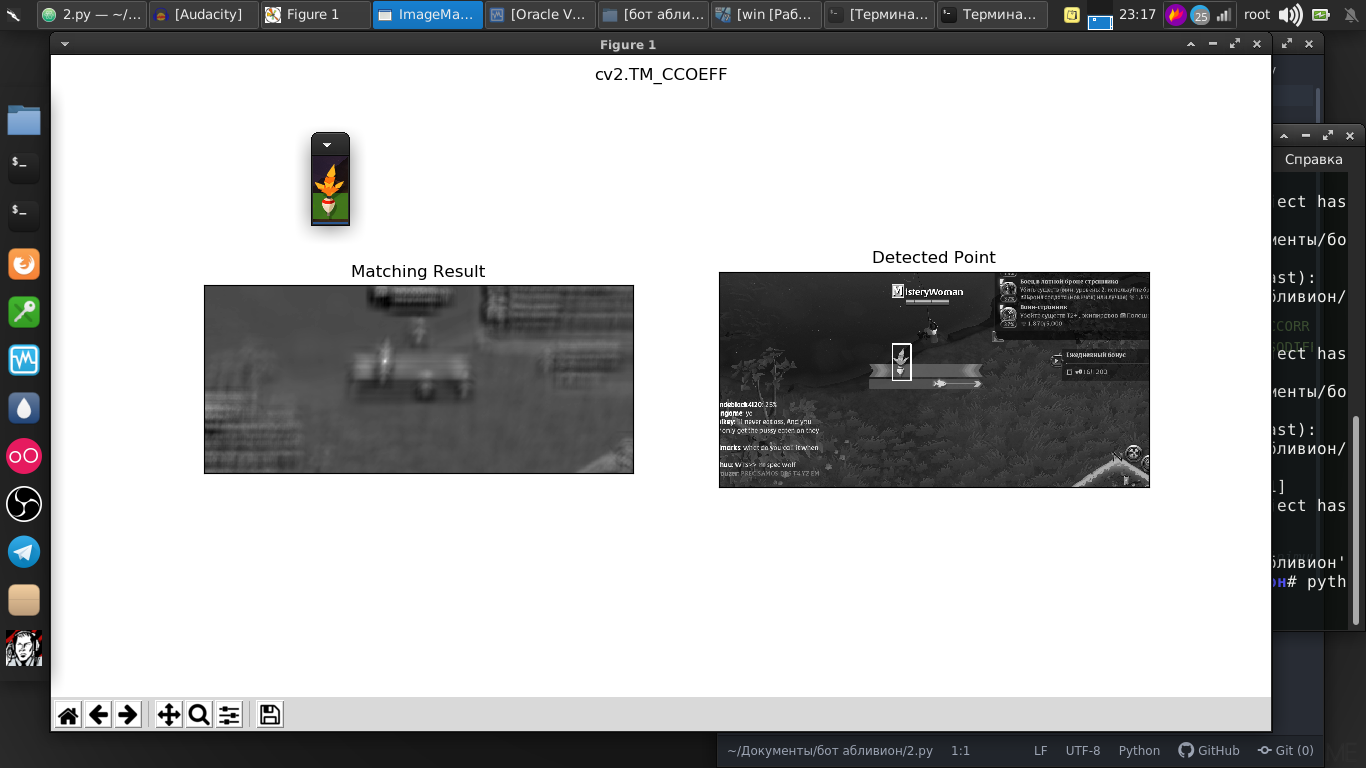
And as we see, everything was perfectly in the picture.
And the difference between a picture and streaming video is not great, because in fact it’s just a stream of pictures at a very fast speed, and a few lines of code. And now we can already find a float on streaming video.
Code
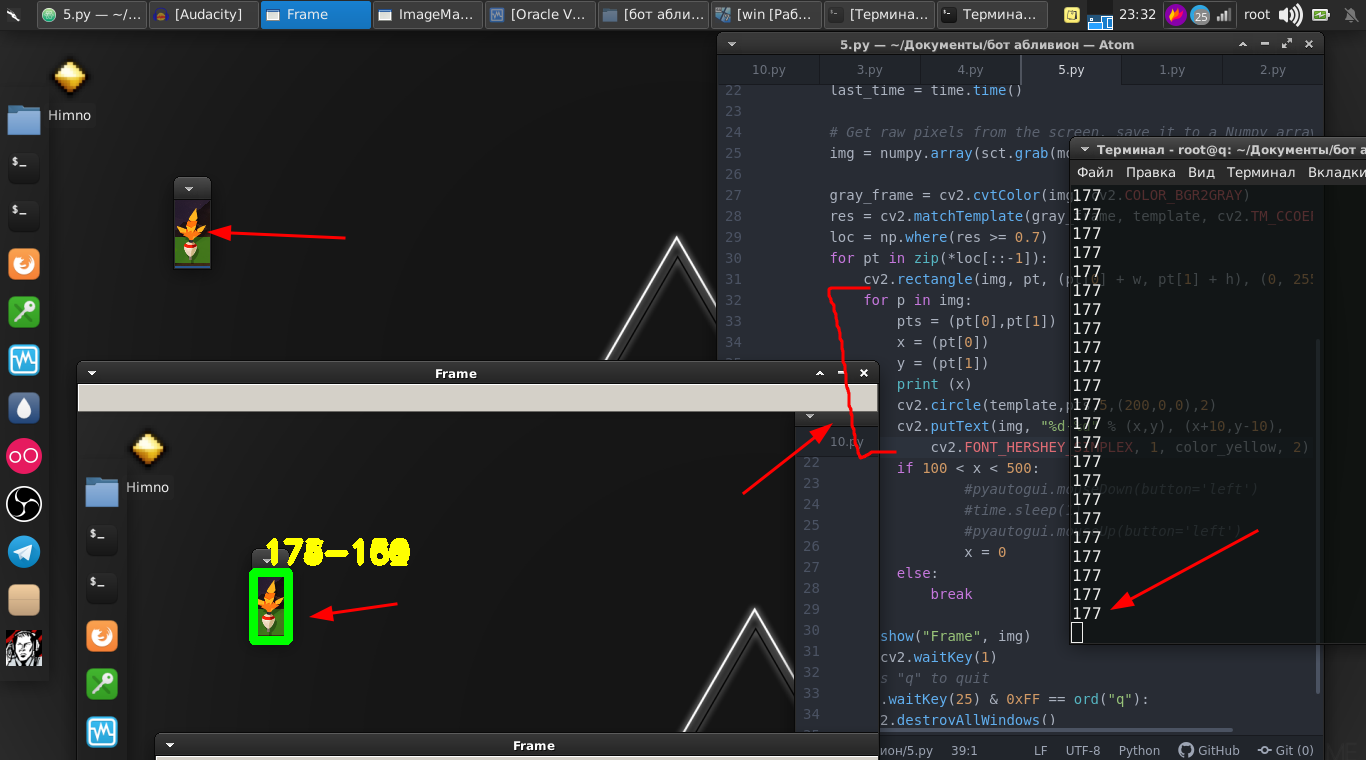
import numpy as np import cv2 from mss.linux import MSS as mss from PIL import Image import time import pyautogui as pg import cv2 import mss import numpy template = cv2.imread("2019-07-02_06-55_1.png", cv2.IMREAD_GRAYSCALE) w, h = template.shape[::-1] with mss.mss() as sct: monitor = {"top": 40, "left": 0, "width": 800, "height": 640} while "Screen capturing": last_time = time.time() img = numpy.array(sct.grab(monitor)) cv2.imshow("OpenCV/Numpy normal", img) print("fps: {}".format(1 / (time.time() - last_time))) gray_frame = cv2.cvtColor(img, cv2.COLOR_BGR2GRAY) res = cv2.matchTemplate(gray_frame, template, cv2.TM_CCOEFF_NORMED) loc = np.where(res >= 0.7) for pt in zip(*loc[::-1]): cv2.rectangle(img, pt, (pt[0] + w, pt[1] + h), (0, 255, 0), 3) cv2.imshow("Frame", img) key = cv2.waitKey(1) if cv2.waitKey(25) & 0xFF == ord("q"): cv2.destroyAllWindows() break We go further. The float itself moves back and forth and we also need to move it by pressing the button on the mouse.
And therefore, we need his coordinates. And for this we are rescued by these lines.
for p in img: pts = (pt[0],pt[1]) x = (pt[0]) y = (pt[1]) print (x) cv2.circle(template,pts,5,(200,0,0),2) cv2.putText(img, "%d-%d" % (x,y), (x+10,y-10), cv2.FONT_HERSHEY_SIMPLEX, 1, color_yellow, 2) Then we will simply use the PyAutoGUI library, which will hold down the mouse button and press it at a certain frequency.
if 100 < x < 500: pyautogui.mouseDown(button='left') time.sleep(1) pyautogui.mouseUp(button='left') x = 0 And the mini game itself is successfully won.
Let us put the whole thing into a function and leave it for now.
Then go back to the original part, where we have to watch the float.
It's all a little different, let's say we can determine where the float will go, and try to analyze that part of the screen for the presence of a float. However, the float thrown into the water appears at different angles and constantly sways.
In this case, we take that slightly different method. Its essence is that we analyze, let's say, the difference in pixels within the monitored fragment. Which, if the float does not approach zero.
As a result, it was found the optimal value at which when the float disappears, we can perform actions.
Code
def screen_record(): sct = mss.mss() last_time = time.time() while(True): img = sct.grab(mon) print('loop took {} seconds'.format(time.time() - last_time)) last_time = time.time() img = np.array(img) processed_image = process_image(img) mean = np.mean(processed_image) print('mean = ', mean) if mean <= float(0.11): print('SSSSSSSS ') pyautogui.click(button='left') break return else: time.sleep(0.01) continue return if cv2.waitKey(25) & 0xFF == ord('q'): cv2.destroyAllWindows() break And we produce them, namely, click on the mouse button. Also thrust it into the function.
Finally, in conclusion, we simply write a script where, in an infinite loop, we throw the bait and perform the first and second functions alternately.
while "": time.sleep(1) pyautogui.moveTo(431,175,duration=1) pyautogui.mouseDown(button='left') pyautogui.moveTo(450.200,duration=1) pyautogui.mouseUp(button='left') time.sleep(2) screen_record() time.sleep(0.01) ss() Here is the full video instruction and an example of the operation of this bot:
There are some nuances in the fact that there must be a shaman with numbers, as these numbers are chosen for my monitor, location, character and equipment. But I think for a competent pitonist this is not a problem.
The whole script:
Code
import numpy as np import cv2 from mss.linux import MSS as mss from PIL import Image import time import pyautogui as pg import imutils import mss import numpy import pyautogui template = cv2.imread("2019-07-02_06-55_1.png", cv2.IMREAD_GRAYSCALE) w, h = template.shape[::-1] color_yellow = (0,255,255) mon = {'top': 80, 'left': 350, 'width': 100, 'height': 100} def process_image(original_image): processed_image = cv2.cvtColor(original_image, cv2.COLOR_BGR2GRAY) processed_image = cv2.Canny(processed_image, threshold1=200, threshold2=300) return processed_image def ss(): op = 1 with mss.mss() as sct: monitor = {"top": 40, "left": 0, "width": 800, "height": 640} while "Screen capturing": last_time = time.time() img = numpy.array(sct.grab(monitor)) gray_frame = cv2.cvtColor(img, cv2.COLOR_BGR2GRAY) res = cv2.matchTemplate(gray_frame, template, cv2.TM_CCOEFF_NORMED) loc = np.where(res >= 0.7) op += 1 print (op) for pt in zip(*loc[::-1]): cv2.rectangle(img, pt, (pt[0] + w, pt[1] + h), (0, 255, 0), 3) for p in img: pts = (pt[0],pt[1]) x = (pt[0]) y = (pt[1]) print (x) if 100 < x < 490: pyautogui.mouseDown(button='left') time.sleep(2) pyautogui.mouseUp(button='left') x = 0 break else: continue break else: continue break key = cv2.waitKey(1) if cv2.waitKey(25) & 0xFF == ord("q"): cv2.destroyAllWindows() if op > 35: return def screen_record(): sct = mss.mss() last_time = time.time() while(True): img = sct.grab(mon) print('loop took {} seconds'.format(time.time() - last_time)) last_time = time.time() img = np.array(img) processed_image = process_image(img) mean = np.mean(processed_image) print('mean = ', mean) if mean <= float(0.11): print('SSSSSSSS ') pyautogui.click(button='left') break return else: time.sleep(0.01) continue return if cv2.waitKey(25) & 0xFF == ord('q'): cv2.destroyAllWindows() break while "": time.sleep(1) pyautogui.moveTo(431,175,duration=1) pyautogui.mouseDown(button='left') pyautogui.moveTo(450.200,duration=1) pyautogui.mouseUp(button='left') time.sleep(2) screen_record() time.sleep(0.01) ss() Those who like to say that this is a waste of time, I will note that this is just a tool, you can use these libraries in other projects. Computer vision itself is used both when hovering ballistic missiles and in programs to help people with disabilities. Where you decide to apply them, only your desire.
Thank you all for your attention.
Source: https://habr.com/ru/post/459110/
All Articles