Creating a Tower Defense game in Unity: turrets and shooting at enemies
[ The first and second parts of the tutorial]
This is the third part of the tutorial series on creating a simple tower defense game. It considered the creation of towers, aiming and shooting at enemies.
Tutorial was created in Unity 2018.3.0f2.
')

Let's set enemies to heat.
The walls only slow down the enemies, increasing the length of the path that they need to pass. But the goal of the game is to destroy the enemies before they reach the end point. This task is solved by placing on the field towers that will shoot at them.
Towers are another type of tile content, so we add an entry for them to the
In this tutorial, we will only support one type of towers, which can be implemented by providing
But the towers have to shoot, so their condition will need to be updated and they need their own code. For this purpose, we will create the
You can make the tower prefab have its own component by changing the factory field type to
Create a prefab for the tower. You can start by duplicating the prefab wall and replacing its

Three cubes forming a tower.
The turret will rotate, and since it has a collider, it will be monitored by a physics engine. But we do not need to be so accurate, because we only use tower colliders to select cells. It is quite possible to do approximately. Remove the turret cube collider and change the tower cube collider to cover both cubes.
Collider cube towers.
The turret will fire a laser beam. It can be visualized in many ways, but we simply use a translucent cube, which we will stretch to form a beam. Each tower should have its own beam, so add it to the tower prefab. Place it inside the turret so that it is hidden by default and give it a smaller scale, for example 0.2. Let's make it a child of the prefab root, not the turret cube.
Hidden cube laser beam.
Create a suitable material for the laser beam. I just used the standard translucent black material and turned off all the reflections, and also gave it a red emitted color.


The material of the laser beam.
Check that the laser beam doesn’t have a collider, and also disable the drop and receive shadows from it.
The laser beam does not interact with the shadows.
After completing the creation of the prefab tower, add it to the factory.
Factory with a tower.
We will add and remove towers using another switching method. You can simply duplicate the
In
Towers on the field.
For now, only walls can block the search for a path, so the enemies move through the towers. Let's add a helper property in
Use this property in
Now the path is blocked and the walls and towers.
Most likely, the player will often replace walls with towers. It will be inconvenient for him to first clean the wall, and besides, enemies will be able to penetrate this temporary gap. You can implement a direct replacement by forcing the
The tower can perform its task only when it finds an enemy. After finding the enemy, she must decide in which part of it to aim.
To detect targets, we will use a physics engine. As in the case with the tower collider, we do not need the enemy collider to necessarily coincide with its shape. You can choose the simplest collider, that is, the sphere. After detecting the enemy, we will use the position of the game object with the collider attached to it as a point for aiming.
We cannot attach the collider to the enemy's root object, because it does not always coincide with the model's position and will force the tower to aim at the ground. That is, you need to place the collider somewhere on the model. The physics engine will give us a link to this object, which we can use to aim, but we also need access to the
Give it the
In addition, the collider must be attached to the same game object to which
Add to the cube of the enemy prefab component and collider. This will force the towers to aim at the center of the cube. We use a spherical collider with a radius of 0.25. The cube has a scale of 0.5, so the true radius of the collider will be equal to 0.125. Due to this, the enemy will have to visually cross the range circle of the tower, and only after some time become a real target. The size of the collider is also affected by the random scale of the enemy, so its size in the game will also vary slightly.
The enemy with a point for aiming and a collider on the cube.
Towers are only disturbed by enemies, and they aim at nothing else, so we will place all enemies in a separate layer. Use layer 9. Change its name to Enemy in the Layers & Tags window, which can be opened via the Edit Layers option in the Layers drop-down menu in the upper right corner of the editor.
Layer 9 will be used for enemies.
This layer is needed only to recognize enemies, and not for physical interactions. Let's point this out by turning them off in the Layer Collision Matrix , which is located in the Physics panel of the project settings.
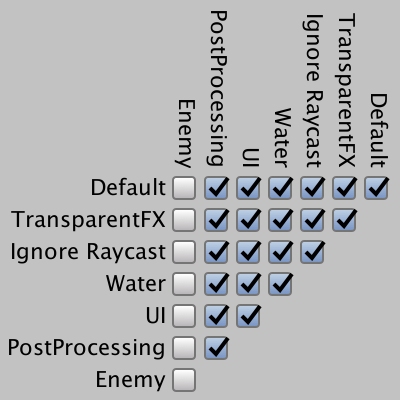
Layer collision matrix.
Make sure that the game object of the aiming point is on the right layer. The rest of the enemy prefab may be on other layers, but it will be easier to arrange everything and place the entire prefab on the Enemy layer. If you change the root object layer, you will be prompted to change the layer for all its child objects.

The enemy on the right layer.
Let's add the statement that
In addition, player actions should ignore enemy colliders. This can be done by adding the layer mask argument to
Towers can perform their task only when their status is updated. The same applies to the content of tiles in general, although the rest of the content does nothing. Therefore,
Let's make
In our tutorial you only need to update the tower.
To make it work, now we just need to update the field in
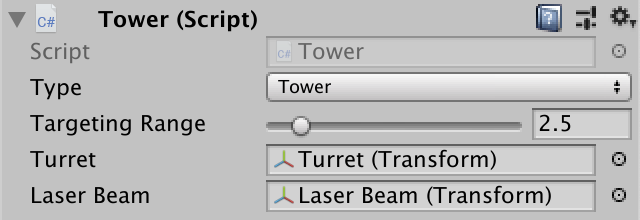
The towers have a limited radius of aiming. Let's make it customizable by adding a field to the
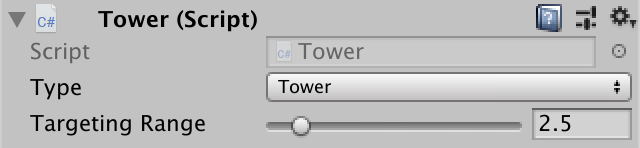
Targeting range 2.5.
Let's visualize the range with a gizmo. We do not need to see it all the time, so we will create the
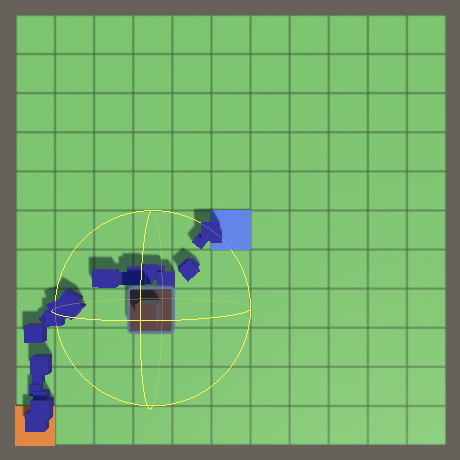
Gizmo aiming range.
Now we can see which of the enemies is an accessible target for each of the towers. But choosing towers in the scene window is inconvenient, because we have to choose one of the child cubes, and then switch to the root object of the tower. Other types of tile content also suffer from the same problem. We can force the selection of the
Add a
In
We are guaranteed to get the correct aiming points, if we consider the colliders only on the layer of enemies. This is layer 9, so we will transfer the corresponding layer mask.
You can visualize a captured target by drawing a line-gizmo between the positions of the tower and the target.
Visualization of goals.
The target chosen for capture depends on the order in which the physics engine represents them, that is, in fact it is arbitrary. Therefore, it will seem that the captured target is changing for no reason. After the tower receives the target, it is more logical for it to track it one, and not to switch to another. Add a
Call this method in
Tracking goals.
As a result, the towers are fixed on the target until it reaches the end point and is destroyed. If you use enemies repeatedly, you need to check the correctness of the link instead, as is done with the links to the figures processed in the Object Management tutorial series.
To track targets only when they are within range,
However, this code does not take into account the radius of the collider. Therefore, as a result, the tower may lose the target, then capture it again, only to stop tracking it in the next frame, and so on. We can avoid this by adding the radius of the collider to the range.
This gives us the right results, but only if the scale of the enemy is not changed. Since we give each enemy a random scale, we must take it into account when changing the range. To do this, we must memorize the scale given by
Now we can check in
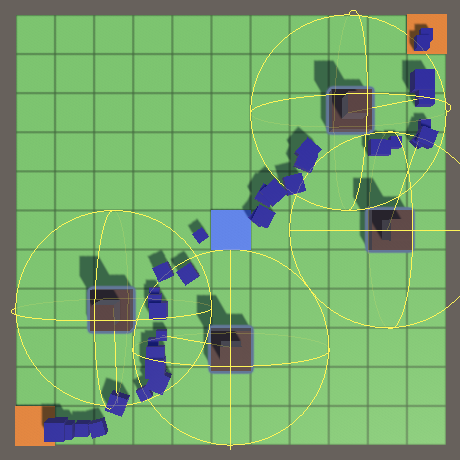
It seems that everything works well, but towers that can aim at the center of the field are capable of capturing targets that should be out of range. They will not be able to track these goals, so they are fixed on them only for one frame.
Improper aiming.
This happens because the state of the physics engine is not perfectly synchronized with the state of the game. Copies of all enemies are created at the origin of the world, which coincides with the center of the field. Then we move them to the point of creation, but the physics engine does not immediately know about it.
You can enable instant synchronization when changing object transformations by setting the
In fact, our gameplay takes place in 2D. Therefore, let's change the
Need to also change
The disadvantage of use
Instead of an array,
Now that we have a real goal, it's time to shoot it. Shooting includes aiming, laser shot and damage.
To direct the turret to the target, the class
Attached turret.
If
Just aiming.
To position a laser beam, a class
We connected a laser beam.
To turn a cube into a real laser beam, you need to take three steps. Firstly, its orientation must correspond to the orientation of the turret. This can be done by copying its rotation.
Second, we scale the laser beam so that its length is equal to the distance between the local point of origin of the turret and the aiming point. We scale it along the Z axis, that is, the local axis directed toward the target. To preserve the original XY scale, we write down the initial scale on waking up (Awake) turrets.
Third, place the laser beam in the middle between the turret and the aiming point.
Shooting laser beams.
This works as long as the turret is fixed on the target. But when there is no goal, the laser remains active. We can turn off the laser display by
Idle towers do not shoot.
So far our laser beams just touch the enemies and have no effect on them anymore. It is necessary to make the laser cause damage to enemies. We do not want to destroy enemies instantly, so we give the
To add support for damage, add a public method
We will not immediately get rid of the enemy as soon as his health reaches zero. Health exhaustion checks and destruction of the enemy will be performed at the beginning
Thanks to this, all the towers will in fact shoot at the same time, rather than in turns, which will allow them to switch to other targets if the previous tower destroyed the enemy, which they also aimed at.
Now we need to determine how much damage the laser will do. To do this, add to
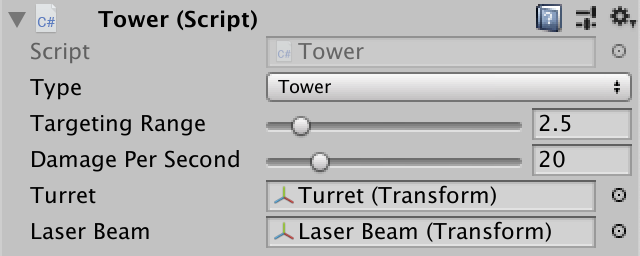

The damage of each tower is 20 units per second.
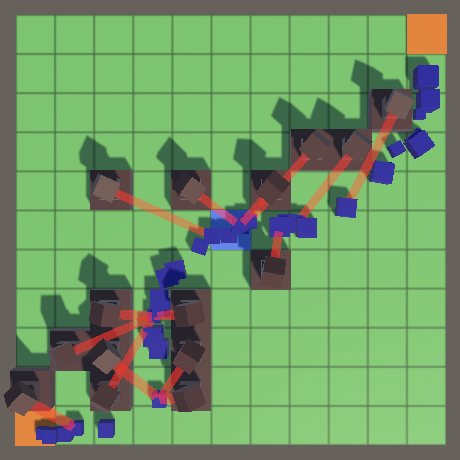
Since we always choose the first available target, the aiming behavior depends on the order in which the physics engine checks intersecting colliders. This relationship is not very good, because we do not know the details, we can not manage it, besides it will look strange and inconsistent. Often this behavior leads to concentrated fire, but this is not always the case.
Instead of relying entirely on the physics engine, let's add some randomness. This can be done by increasing the number of intersections obtained by colliders, for example, to 100. Perhaps this will not be enough to obtain all possible targets on a field densely filled with enemies, but this will be enough to improve aiming.
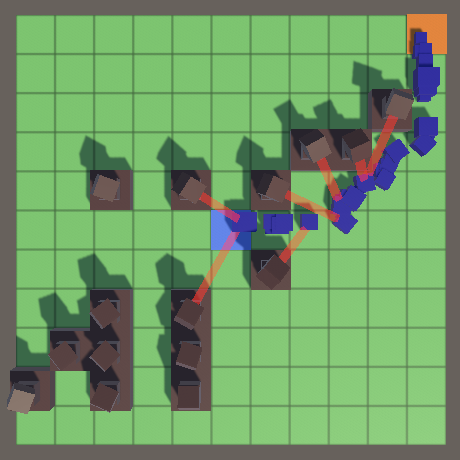
Now, instead of selecting the first potential target, we will select a random element from the array.
Random aiming.
So, in our game of the tower defense genre, towers finally appeared. In the next part, the game will take its final shape even more.
- We place on the field of the tower.
- We aim at enemies with the help of physics.
- We track them while it is possible.
- We shoot at them with a laser beam.
This is the third part of the tutorial series on creating a simple tower defense game. It considered the creation of towers, aiming and shooting at enemies.
Tutorial was created in Unity 2018.3.0f2.
')
Let's set enemies to heat.
Creating a tower
The walls only slow down the enemies, increasing the length of the path that they need to pass. But the goal of the game is to destroy the enemies before they reach the end point. This task is solved by placing on the field towers that will shoot at them.
Tile content
Towers are another type of tile content, so we add an entry for them to the
GameTileContent . public enum GameTileContentType { Empty, Destination, Wall, SpawnPoint, Tower€ } In this tutorial, we will only support one type of towers, which can be implemented by providing
GameTileContentFactory one link to the tower prefab, an instance of which can also be created via Get . [SerializeField] GameTileContent towerPrefab = default; public GameTileContent Get (GameTileContentType type) { switch (type) { … case GameTileContentType.Tower€: return Get(towerPrefab); } … } But the towers have to shoot, so their condition will need to be updated and they need their own code. For this purpose, we will create the
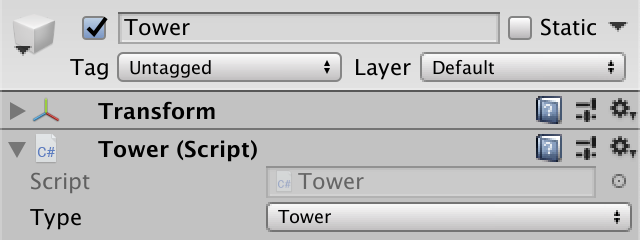
Tower class, which extends the GameTileContent class. using UnityEngine; public class Tower : GameTileContent {} You can make the tower prefab have its own component by changing the factory field type to
Tower . Since the class is still considered GameTileContent , nothing else needs to be changed. Tower towerPrefab = default; Prefab
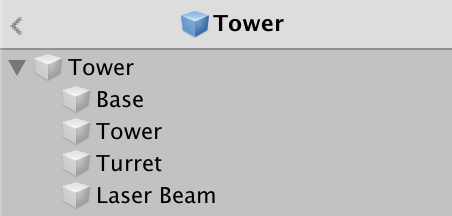
Create a prefab for the tower. You can start by duplicating the prefab wall and replacing its
GameTileContent component with a Tower component, and then changing its type to Tower . To make the tower fit the walls, save the cube of the wall as the base of the tower. Then place another cube on top of it. I gave him a scale of 0.5. Put another cube on it, indicating the turret, this part will aim and shoot at enemies.Three cubes forming a tower.
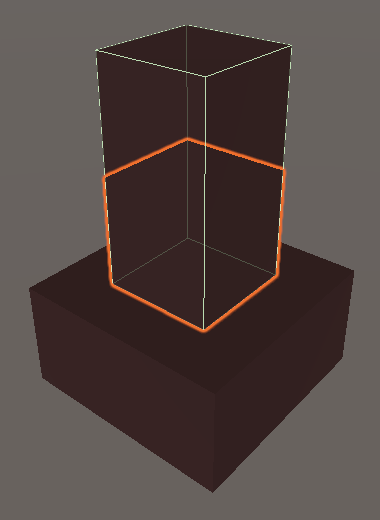
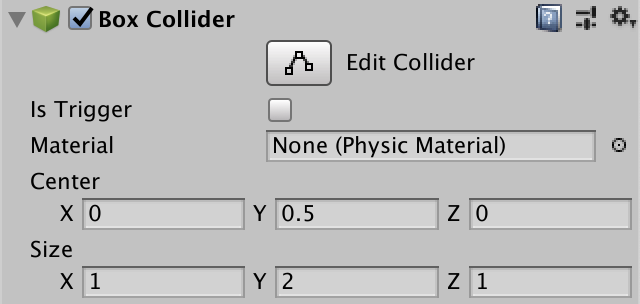
The turret will rotate, and since it has a collider, it will be monitored by a physics engine. But we do not need to be so accurate, because we only use tower colliders to select cells. It is quite possible to do approximately. Remove the turret cube collider and change the tower cube collider to cover both cubes.
Collider cube towers.
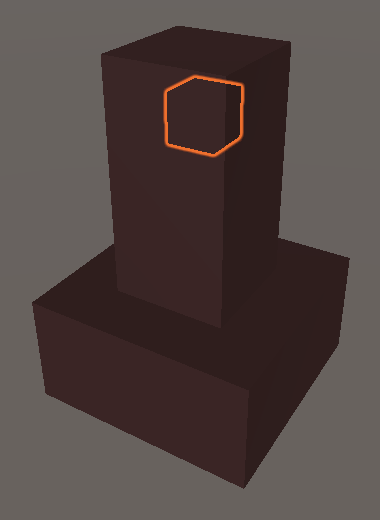
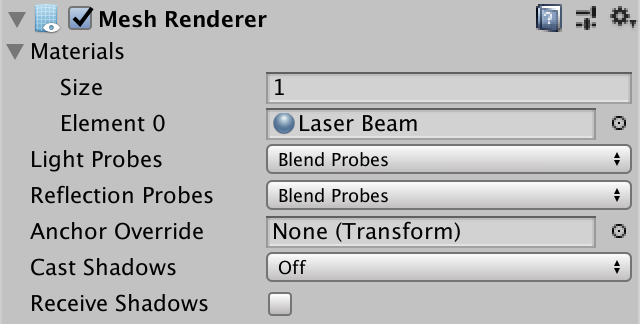
The turret will fire a laser beam. It can be visualized in many ways, but we simply use a translucent cube, which we will stretch to form a beam. Each tower should have its own beam, so add it to the tower prefab. Place it inside the turret so that it is hidden by default and give it a smaller scale, for example 0.2. Let's make it a child of the prefab root, not the turret cube.
Hidden cube laser beam.
Create a suitable material for the laser beam. I just used the standard translucent black material and turned off all the reflections, and also gave it a red emitted color.
The material of the laser beam.
Check that the laser beam doesn’t have a collider, and also disable the drop and receive shadows from it.
The laser beam does not interact with the shadows.
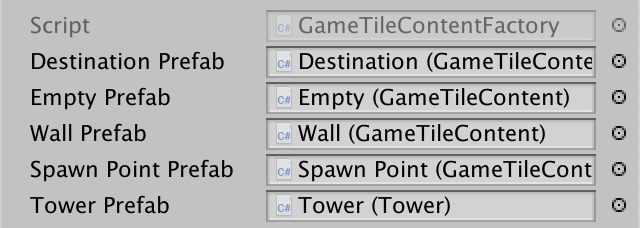
After completing the creation of the prefab tower, add it to the factory.
Factory with a tower.
Placement of towers
We will add and remove towers using another switching method. You can simply duplicate the
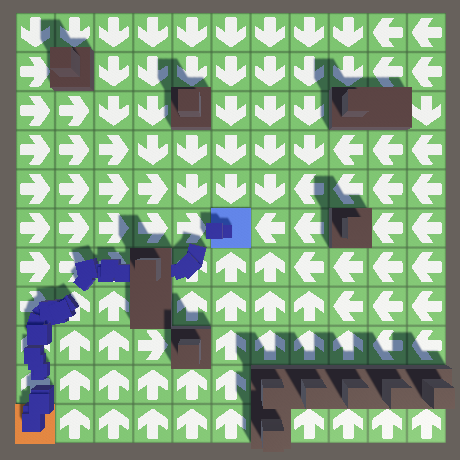
GameBoard.ToggleWall by changing the method name and content type. public void ToggleTower (GameTile tile) { if (tile.Content.Type == GameTileContentType.Tower€) { tile.Content = contentFactory.Get(GameTileContentType.Empty); FindPaths(); } else if (tile.Content.Type == GameTileContentType.Empty) { tile.Content = contentFactory.Get(GameTileContentType.Tower€); if (!FindPaths()) { tile.Content = contentFactory.Get(GameTileContentType.Empty); FindPaths(); } } } In
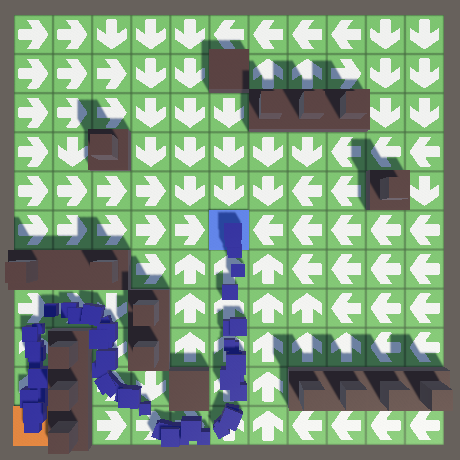
Game.HandleTouch if you hold down the shift key, the walls will not switch, but the towers. void HandleTouch () { GameTile tile = board.GetTile(TouchRay); if (tile != null) { if (Input.GetKey(KeyCode.LeftShift)) { board.ToggleTower(tile); } else { board.ToggleWall(tile); } } } Towers on the field.
Blocking the path
For now, only walls can block the search for a path, so the enemies move through the towers. Let's add a helper property in
GameTileContent indicate whether the content is blocking the path. The path is blocked if it is a wall or a tower. public bool BlocksPath => Type == GameTileContentType.Wall || Type == GameTileContentType.Tower€; Use this property in
GameTile.GrowPathTo instead of checking the content type. GameTile GrowPathTo (GameTile neighbor, Direction direction) { … return //neighbor.Content.Type != GameTileContentType.Wall ? neighbor : null; neighbor.Content.BlocksPath ? null : neighbor; } Now the path is blocked and the walls and towers.
Replace the walls
Most likely, the player will often replace walls with towers. It will be inconvenient for him to first clean the wall, and besides, enemies will be able to penetrate this temporary gap. You can implement a direct replacement by forcing the
GameBoard.ToggleTower to check if the wall is currently on the tile. If yes, then you need to immediately replace it with a tower. In this case, we will not have to look for other ways, because the tile still blocks them. public void ToggleTower (GameTile tile) { if (tile.Content.Type == GameTileContentType.Tower) { tile.Content = contentFactory.Get(GameTileContentType.Empty); FindPaths(); } else if (tile.Content.Type == GameTileContentType.Empty) { … } else if (tile.Content.Type == GameTileContentType.Wall) { tile.Content = contentFactory.Get(GameTileContentType.Tower); } } Aiming at enemies
The tower can perform its task only when it finds an enemy. After finding the enemy, she must decide in which part of it to aim.
Aiming point
To detect targets, we will use a physics engine. As in the case with the tower collider, we do not need the enemy collider to necessarily coincide with its shape. You can choose the simplest collider, that is, the sphere. After detecting the enemy, we will use the position of the game object with the collider attached to it as a point for aiming.
We cannot attach the collider to the enemy's root object, because it does not always coincide with the model's position and will force the tower to aim at the ground. That is, you need to place the collider somewhere on the model. The physics engine will give us a link to this object, which we can use to aim, but we also need access to the
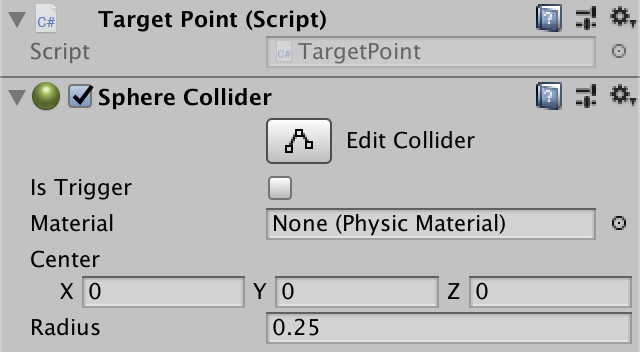
Enemy component of the root object. To simplify the task, let's create a TargetPoint component. We give it a property for a private task and a public receiving component Enemy , and another property for getting its position in the world. using UnityEngine; public class TargetPoint : MonoBehaviour { public Enemy Enemy€ { get; private set; } public Vector3 Position => transform.position; } Give it the
Awake method, which sets a link to its Enemy component. You can go directly to the root object using transform.root . If the Enemy component does not exist, then we made a mistake in creating the enemy, so let's add a statement for this. void Awake () { Enemy€ = transform.root.GetComponent<Enemy>(); Debug.Assert(Enemy€ != null, "Target point without Enemy root!", this); } In addition, the collider must be attached to the same game object to which
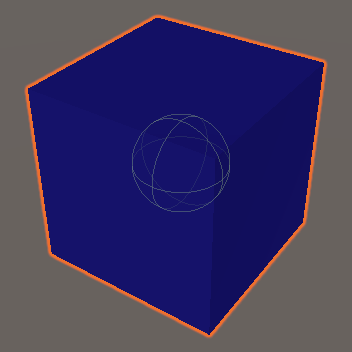
TargetPoint attached. Debug.Assert(Enemy€ != null, "Target point without Enemy root!", this); Debug.Assert( GetComponent<SphereCollider>() != null, "Target point without sphere collider!", this ); Add to the cube of the enemy prefab component and collider. This will force the towers to aim at the center of the cube. We use a spherical collider with a radius of 0.25. The cube has a scale of 0.5, so the true radius of the collider will be equal to 0.125. Due to this, the enemy will have to visually cross the range circle of the tower, and only after some time become a real target. The size of the collider is also affected by the random scale of the enemy, so its size in the game will also vary slightly.
The enemy with a point for aiming and a collider on the cube.
Layer of enemies
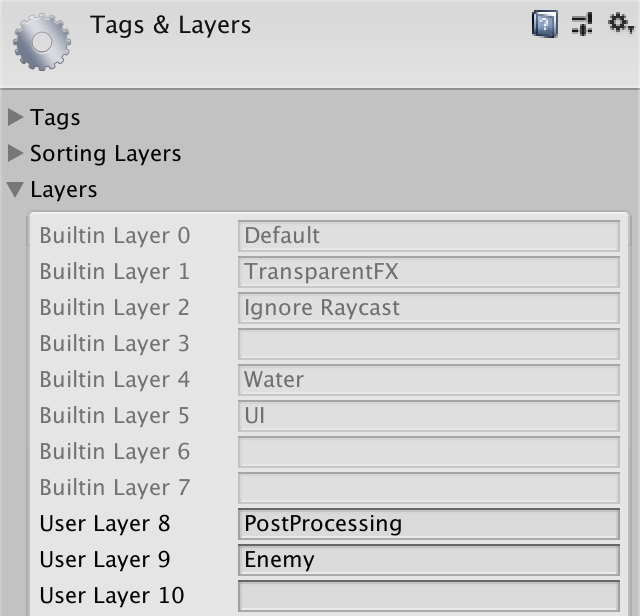
Towers are only disturbed by enemies, and they aim at nothing else, so we will place all enemies in a separate layer. Use layer 9. Change its name to Enemy in the Layers & Tags window, which can be opened via the Edit Layers option in the Layers drop-down menu in the upper right corner of the editor.
Layer 9 will be used for enemies.
This layer is needed only to recognize enemies, and not for physical interactions. Let's point this out by turning them off in the Layer Collision Matrix , which is located in the Physics panel of the project settings.
Layer collision matrix.
Make sure that the game object of the aiming point is on the right layer. The rest of the enemy prefab may be on other layers, but it will be easier to arrange everything and place the entire prefab on the Enemy layer. If you change the root object layer, you will be prompted to change the layer for all its child objects.
The enemy on the right layer.
Let's add the statement that
TargetPoint really is on the right layer. void Awake () { … Debug.Assert(gameObject.layer == 9, "Target point on wrong layer!", this); } In addition, player actions should ignore enemy colliders. This can be done by adding the layer mask argument to
Physics.Raycast in the GameBoard.GetTile . This method has a form that takes as an additional argument the distance to the beam and the layer mask. Give it the maximum distance and the default layer mask, that is, 1. public GameTile GetTile (Ray ray) { if (Physics.Raycast(ray, out RaycastHit hit, float.MaxValue, 1)) { … } return null; } Shouldn't a layer mask be 0?
The layer index defaults to zero, but we pass the layer mask. The mask changes the individual bits of an integer to 1 if the layer needs to be included. In this case, you need to set only the first bit, that is, the youngest, which means 2 0 , which equals 1.
Update Tile Content
Towers can perform their task only when their status is updated. The same applies to the content of tiles in general, although the rest of the content does nothing. Therefore,
GameTileContent add a virtual GameTileContent method to GameUpdate , which by default does nothing. public virtual void GameUpdate () {} Let's make
Tower redefine it, even if for now it just displays to the console what the target is looking for. public override void GameUpdate () { Debug.Log("Searching for target..."); } GameBoard deals with tiles and their contents, so it will also keep track of which content needs to be updated. To do this, add a list to it and a public GameUpdate method that updates everything in the list. List<GameTileContent> updatingContent = new List<GameTileContent>(); … public void GameUpdate () { for (int i = 0; i < updatingContent.Count; i++) { updatingContent[i].GameUpdate(); } } In our tutorial you only need to update the tower.
ToggleTower so that it adds and deletes content if necessary. If the update is required and other content, then we need a more general approach, but for now this is enough. public void ToggleTower (GameTile tile) { if (tile.Content.Type == GameTileContentType.Tower) { updatingContent.Remove(tile.Content); tile.Content = contentFactory.Get(GameTileContentType.Empty); FindPaths(); } else if (tile.Content.Type == GameTileContentType.Empty) { tile.Content = contentFactory.Get(GameTileContentType.Tower); //if (!FindPaths()) { if (FindPaths()) { updatingContent.Add(tile.Content); } else { tile.Content = contentFactory.Get(GameTileContentType.Empty); FindPaths(); } } else if (tile.Content.Type == GameTileContentType.Wall) { tile.Content = contentFactory.Get(GameTileContentType.Tower); updatingContent.Add(tile.Content); } } To make it work, now we just need to update the field in
Game.Update . We will update the field after the enemies. Thanks to this, the towers will be able to aim exactly where the enemies are. If we did otherwise, the towers would aim at where the enemies in the last frame were. void Update () { … enemies.GameUpdate(); board.GameUpdate(); } Aiming range
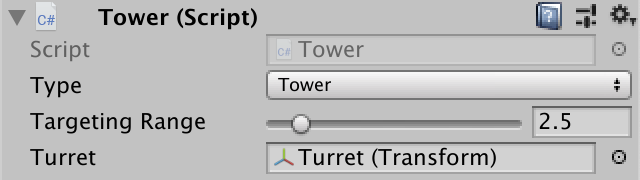
The towers have a limited radius of aiming. Let's make it customizable by adding a field to the
Tower class. The distance is measured from the center of the tower tile, so at a distance of 0.5 it will cover only its own tile. Therefore, a reasonable minimum and standard range will be 1.5, covering most of the adjacent tiles. [SerializeField, Range(1.5f, 10.5f)] float targetingRange = 1.5f; Targeting range 2.5.
Let's visualize the range with a gizmo. We do not need to see it all the time, so we will create the
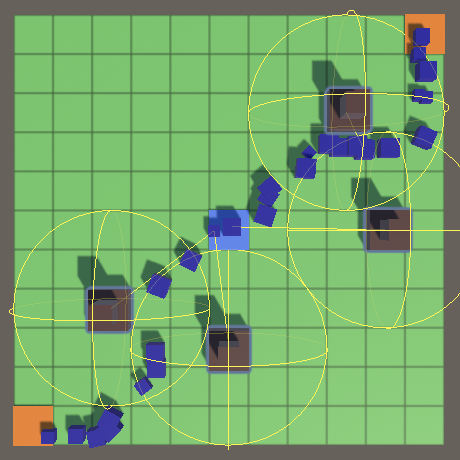
OnDrawGizmosSelected method, which is called only for selected objects. Draw the yellow frame of the sphere with a radius equal to the distance and centered relative to the tower. Place it a little above the ground so that it can always be clearly seen. void OnDrawGizmosSelected () { Gizmos.color = Color.yellow; Vector3 position = transform.localPosition; position.y += 0.01f; Gizmos.DrawWireSphere(position, targetingRange); } Gizmo aiming range.
Now we can see which of the enemies is an accessible target for each of the towers. But choosing towers in the scene window is inconvenient, because we have to choose one of the child cubes, and then switch to the root object of the tower. Other types of tile content also suffer from the same problem. We can force the selection of the
GameTileContent content in the scene window by adding the SelectionBase attribute to the GameTileContent . [SelectionBase] public class GameTileContent : MonoBehaviour { … } Capture Target
Add a
TargetPoint field to the Tower class so that it can track its captured target. Then we change GameUpdate to call the new AquireTarget method, which returns information about whether it found the target. Upon detection, it will display a message in the console. TargetPoint target; public override void GameUpdate () { if (AcquireTarget()) { Debug.Log("Acquired target!"); } } In
AcquireTarget we get all available targets by calling Physics.OverlapSphere with the position of the tower and the range as arguments. The result is a Collider array containing all the colliders that are in contact with the sphere. If the array length is positive, then there is at least one aiming point, and we simply choose the first one. Take its TargetPoint component, which should always exist, assign it to the target field and report success. Otherwise, clear the target and report the failure. bool AcquireTarget () { Collider[] targets = Physics.OverlapSphere( transform.localPosition, targetingRange ); if (targets.Length > 0) { target = targets[0].GetComponent<TargetPoint>(); Debug.Assert(target != null, "Targeted non-enemy!", targets[0]); return true; } target = null; return false; } We are guaranteed to get the correct aiming points, if we consider the colliders only on the layer of enemies. This is layer 9, so we will transfer the corresponding layer mask.
const int enemyLayerMask = 1 << 9; … bool AcquireTarget () { Collider[] targets = Physics.OverlapSphere( transform.localPosition, targetingRange, enemyLayerMask ); … } How does this bit mask work?
Since the enemy layer has an index of 9, the tenth bit of the bitmask should be set to 1. This corresponds to the integer 2 9 , that is, 512. But such a recording of the bit mask is unintuitive. We can also write a binary literal, for example
0b10_0000_0000 , but then we have to count to zero. In this case, the most convenient entry would be to use the left shift << operator, shifting the bits to the left. which corresponds to a number in the power of two.You can visualize a captured target by drawing a line-gizmo between the positions of the tower and the target.
void OnDrawGizmosSelected () { … if (target != null) { Gizmos.DrawLine(position, target.Position); } } Visualization of goals.
Why not use methods like OnTriggerEnter?
The advantage of manual verification of cross-cutting targets is that we can only do this when necessary. There is no reason to check for targets if the tower already has them. In addition, thanks to getting all the potential targets at once, we don’t have to process a list of potential targets for each tower that is constantly changing.
Target fixation
The target chosen for capture depends on the order in which the physics engine represents them, that is, in fact it is arbitrary. Therefore, it will seem that the captured target is changing for no reason. After the tower receives the target, it is more logical for it to track it one, and not to switch to another. Add a
TrackTarget method that implements such tracking and returns information on whether it was successful. At first, let's just say if the target is captured. bool TrackTarget () { if (target == null) { return false; } return true; } Call this method in
GameUpdate and only when returning false will we call AcquireTarget . If the method returns true, then we have a goal. This can be done by placing both method calls in an if check with the OR operator, because if the first operand returns true , then the second will not be checked and the call will be skipped. The AND operator acts in a similar way. public override void GameUpdate () { if (TrackTarget() || AcquireTarget()) { Debug.Log("Locked on target!"); } } Tracking goals.
As a result, the towers are fixed on the target until it reaches the end point and is destroyed. If you use enemies repeatedly, you need to check the correctness of the link instead, as is done with the links to the figures processed in the Object Management tutorial series.
To track targets only when they are within range,
TrackTarget must track the distance between the tower and the target. If it exceeds the range value, the target needs to be reset and return false. For this check, you can use the Vector3.Distance method. bool TrackTarget () { if (target == null) { return false; } Vector3 a = transform.localPosition; Vector3 b = target.Position; if (Vector3.Distance(a, b) > targetingRange) { target = null; return false; } return true; } However, this code does not take into account the radius of the collider. Therefore, as a result, the tower may lose the target, then capture it again, only to stop tracking it in the next frame, and so on. We can avoid this by adding the radius of the collider to the range.
if (Vector3.Distance(a, b) > targetingRange + 0.125f) { … } This gives us the right results, but only if the scale of the enemy is not changed. Since we give each enemy a random scale, we must take it into account when changing the range. To do this, we must memorize the scale given by
Enemy and open it with the getter property. public float Scale { get; private set; } … public void Initialize (float scale, float speed, float pathOffset) { Scale = scale; … } Now we can check in
Tower.TrackTarget correct range. if (Vector3.Distance(a, b) > targetingRange + 0.125f * target.Enemy€.Scale) { … } Sync physics
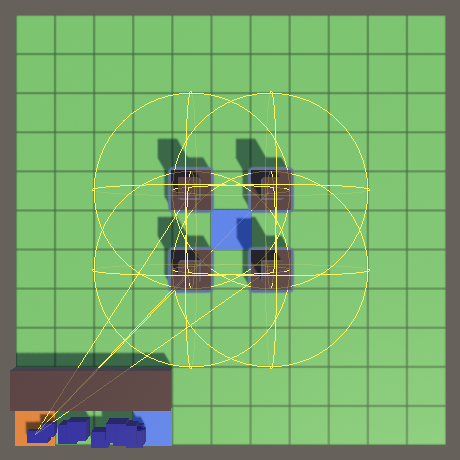
It seems that everything works well, but towers that can aim at the center of the field are capable of capturing targets that should be out of range. They will not be able to track these goals, so they are fixed on them only for one frame.
Improper aiming.
This happens because the state of the physics engine is not perfectly synchronized with the state of the game. Copies of all enemies are created at the origin of the world, which coincides with the center of the field. Then we move them to the point of creation, but the physics engine does not immediately know about it.
You can enable instant synchronization when changing object transformations by setting the
Physics.autoSyncTransforms value to true . But by default it is disabled, because it is much more efficient to synchronize everything together and, if necessary. In our case, synchronization is required only when the state of the towers is updated. We can perform it by calling Physics.SyncTransforms between updates of enemies and the field in Game.Update . void Update () { … enemies.GameUpdate(); Physics.SyncTransforms(); board.GameUpdate(); } Ignore the height
In fact, our gameplay takes place in 2D. Therefore, let's change the
Tower so that when aiming and tracking it takes into account only the X and Z coordinates. The physics engine works in 3D space, but in fact we can perform AcquireTarget verification in 2D: stretch the sphere upward so that it covers all colliders, regardless from their vertical position. This can be done by using a capsule instead of a sphere, the second point of which will be in several units above the ground (say, in three). bool AcquireTarget () { Vector3 a = transform.localPosition; Vector3 b = a; by += 3f; Collider[] targets = Physics.OverlapCapsule( a, b, targetingRange, enemyLayerMask ); … } Is it not possible to use a physical 2D engine?
, XZ, 2D- XY. , , 2D- . 3D-.
Need to also change
TrackTarget. Of course, we can use 2D vectors and Vector2.Distance, but let's do the calculations ourselves and instead we will compare the squares of distances, this will be enough. So we will get rid of the square root operation. bool TrackTarget () { if (target == null) { return false; } Vector3 a = transform.localPosition; Vector3 b = target.Position; float x = ax - bx; float z = az - bz; float r = targetingRange + 0.125f * target.Enemy€.Scale; if (x * x + z * z > r * r) { target = null; return false; } return true; } How do these mathematical calculations work?
2D- , . , . , , .
Avoid memory allocation
The disadvantage of use
Physics.OverlapCapsuleis that for each call it allocates a new array. This can be avoided by selecting the array once and calling the alternative method OverlapCapsuleNonAllocwith the array as an additional argument. The length of the transmitted array determines the number of results obtained. All potential targets outside the array are discarded. We will still use only the first element, so we have enough of an array of length 1.Instead of an array,
OverlapCapsuleNonAllocreturns the number of collisions, up to the maximum permissible, and we will check this number instead of the array length. static Collider[] targetsBuffer = new Collider[1]; … bool AcquireTarget () { Vector3 a = transform.localPosition; Vector3 b = a; by += 2f; int hits = Physics.OverlapCapsuleNonAlloc( a, b, targetingRange, targetsBuffer, enemyLayerMask ); if (hits > 0) { target = targetsBuffer[0].GetComponent<TargetPoint>(); Debug.Assert(target != null, "Targeted non-enemy!", targetsBuffer[0]); return true; } target = null; return false; } We shoot at enemies
Now that we have a real goal, it's time to shoot it. Shooting includes aiming, laser shot and damage.
Aiming turret
To direct the turret to the target, the class
Towerneeds to have a reference to the Transformturret component . Add a configuration field for this and connect it to the tower prefab. [SerializeField] Transform turret = default; Attached turret.
If
GameUpdatethere is a real goal, then we must shoot it. Put the firing code in a separate method. Let's make him rotate the turret towards the target, calling his method Transform.LookAtwith an aiming point as an argument. public override void GameUpdate () { if (TrackTarget() || AcquireTarget()) { //Debug.Log("Locked on target!"); Shoot(); } } void Shoot () { Vector3 point = target.Position; turret.LookAt(point); } Just aiming.
We shoot laser
To position a laser beam, a class
Toweralso needs a reference to it. [SerializeField] Transform turret = default, laserBeam = default; We connected a laser beam.
To turn a cube into a real laser beam, you need to take three steps. Firstly, its orientation must correspond to the orientation of the turret. This can be done by copying its rotation.
void Shoot () { Vector3 point = target.Position; turret.LookAt(point); laserBeam.localRotation = turret.localRotation; } Second, we scale the laser beam so that its length is equal to the distance between the local point of origin of the turret and the aiming point. We scale it along the Z axis, that is, the local axis directed toward the target. To preserve the original XY scale, we write down the initial scale on waking up (Awake) turrets.
Vector3 laserBeamScale; void Awake () { laserBeamScale = laserBeam.localScale; } … void Shoot () { Vector3 point = target.Position; turret.LookAt(point); laserBeam.localRotation = turret.localRotation; float d = Vector3.Distance(turret.position, point); laserBeamScale.z = d; laserBeam.localScale = laserBeamScale; } Third, place the laser beam in the middle between the turret and the aiming point.
laserBeam.localScale = laserBeamScale; laserBeam.localPosition = turret.localPosition + 0.5f * d * laserBeam.forward; Shooting laser beams.
Isn't it possible to make a laser beam a child of a turret?
, , forward. , . .
This works as long as the turret is fixed on the target. But when there is no goal, the laser remains active. We can turn off the laser display by
GameUpdatesetting its scale to 0. public override void GameUpdate () { if (TrackTarget() || AcquireTarget()) { Shoot(); } else { laserBeam.localScale = Vector3.zero; } } Idle towers do not shoot.
Enemy health
So far our laser beams just touch the enemies and have no effect on them anymore. It is necessary to make the laser cause damage to enemies. We do not want to destroy enemies instantly, so we give the
Enemyproperty of health. As health, you can choose any value, so let's take 100. But it will be more logical for large enemies to have more health, so we will introduce a factor for this. float Health { get; set; } … public void Initialize (float scale, float speed, float pathOffset) { … Health = 100f * scale; } To add support for damage, add a public method
ApplyDamagethat subtracts its parameter from health. We will assume that the damage is non-negative, so we add a statement about it. public void ApplyDamage (float damage) { Debug.Assert(damage >= 0f, "Negative damage applied."); Health -= damage; } We will not immediately get rid of the enemy as soon as his health reaches zero. Health exhaustion checks and destruction of the enemy will be performed at the beginning
GameUpdate. public bool GameUpdate () { if (Health <= 0f) { OriginFactory.Reclaim(this); return false; } … } Thanks to this, all the towers will in fact shoot at the same time, rather than in turns, which will allow them to switch to other targets if the previous tower destroyed the enemy, which they also aimed at.
Damage per second
Now we need to determine how much damage the laser will do. To do this, add to
Towerthe configuration field. Since the laser beam does continuous damage, we express it as damage per second. We Shootapply it to the Enemytarget component multiplied by the time delta. [SerializeField, Range(1f, 100f)] float damagePerSecond = 10f; … void Shoot () { … target.Enemy.ApplyDamage(damagePerSecond * Time.deltaTime); } The damage of each tower is 20 units per second.
Aiming randomly
Since we always choose the first available target, the aiming behavior depends on the order in which the physics engine checks intersecting colliders. This relationship is not very good, because we do not know the details, we can not manage it, besides it will look strange and inconsistent. Often this behavior leads to concentrated fire, but this is not always the case.
Instead of relying entirely on the physics engine, let's add some randomness. This can be done by increasing the number of intersections obtained by colliders, for example, to 100. Perhaps this will not be enough to obtain all possible targets on a field densely filled with enemies, but this will be enough to improve aiming.
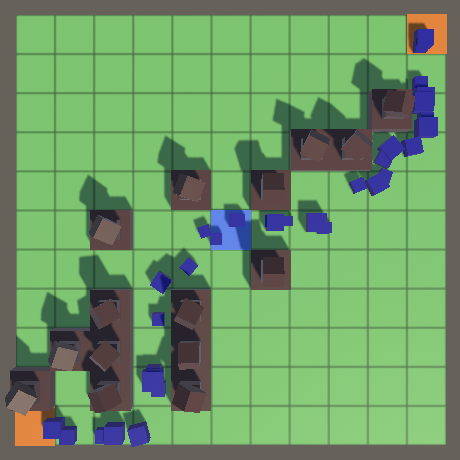
static Collider[] targetsBuffer = new Collider[100]; Now, instead of selecting the first potential target, we will select a random element from the array.
bool AcquireTarget () { … if (hits > 0) { target = targetsBuffer[Random.Range(0, hits)].GetComponent<TargetPoint>(); … } target = null; return false; } Random aiming.
Can other criteria be used to select targets?
, , . , , . . .
So, in our game of the tower defense genre, towers finally appeared. In the next part, the game will take its final shape even more.
Source: https://habr.com/ru/post/459070/
All Articles