How to independently implement (Proof of Existence) in 2 steps
Hello! My name is Ararat and I work for QuantNet, which holds contests for algorithmic strategies. Recently, an important task has arisen before me - to guarantee the integrity of the users' dates (this is extremely important, as it is necessary to use real-time data from world financial markets to correctly verify the effectiveness of strategies).
It was here that I came across the concept of PoE (Proof of Existence). It’s written enough on the Internet, but the specifics of the platform made me think a bit over my head. That's why I decided to write this article and share my experience in the architecture and implementation of PoE. I think it will be especially important for guys from Fintech.
I divided my article into 3 main blocks:
')
Proof of Existence helps to prove that a document, file, or data was created at a specific date and time. The largest application is the patent registration. But from what I've seen, this is most often used in areas at the junction of finance and IT.
An example from my algo trading sphere: you have an algorithm that gives about 70% of the correct stock predictions for the next 2 weeks. You decide to sell your predictions to other market players. Things are easy - to convince the buyer that your predictions are correct and were made before the results of the auction, i.e. guarantee their implementation at a specific time.
How can this be guaranteed? Right, implement PoE.
First you need to:
Just in case, the hash is an individual “fingerprint” of the file, which guarantees the (almost complete) lack of coincidence with the hash of another file. When you get the hash from the file, you will need to generate a transaction in the blockchain network, specifying the hash of the document in the body of the transaction.
Everything. With the intro part finished. Now we come to the most interesting.
(For greater clarity, I created a special code (only for demonstration.) You can see a demo of the service here .)
Let's take a closer look at how the demo works.
I propose to divide the implementation into 2 parts:
Let's take it in order:
Part 1: Preparation of a smart contract and Ethereum wallet
PoE itself was first associated with the bitcoin blockchain. But I chose the blockchain ether and smart contracts for implementation. Smart contracts give us flexibility, modularity and scalability in the future, acting as a repository for hashes in the blockchain.
I chose a simple smart contract that can take a hash and with the corresponding date, hash format => date, it would also be super to have a method that returns the hash date when called. In addition, it would be nice to take care that only the contract owner could add new hashes.
Smart contract code:
As you have noticed, we used 2 separate contracts: Ownable and HashStore.
The HashStore contract is responsible for storing hashes and issuing a hash date on request. The Ownable contract is responsible for verifying that the new hash was added solely by the owner of the contract.
To add a hash you need to call the addHash method, passing the value of sha256 as an argument to our file. If the hashes within the contract match, the transaction will be rejected. This is how unwanted duplication of values with different dates is filtered. It is checked here:
We can get the hash transaction date using the getHashTimestamp method, passing as a hash argument with the transaction date we need. The getHashTimestamp method returns the time in UNIX format. You can translate into any more readable format.
So, we have dealt with the contract, now we need to plug it into the network. For this we need two things:
In order not to waste air on tests, we can use the ropsten test network. More details can be found here. This address is the owner of the contract, as he was the initiator of the deployment and may add new hashes in the future. After that, you must keep this address in a safe place, as well as the private key of your wallet and the address of the contract. We will need all this in the future.
Part 2: Generating a transaction in Node.js and a private key
So, by this time, we already have the ether purse, its secret key, the contract in the test network and the data hash. It remains to configure the interaction with the blockchain.
For this, we will use the web3.js library and create a token for our node. I created my own using the infura.io service and it looks like this:
For hashing, use the sha256 package. The data format can be any, but in the example we use the data in JSON.
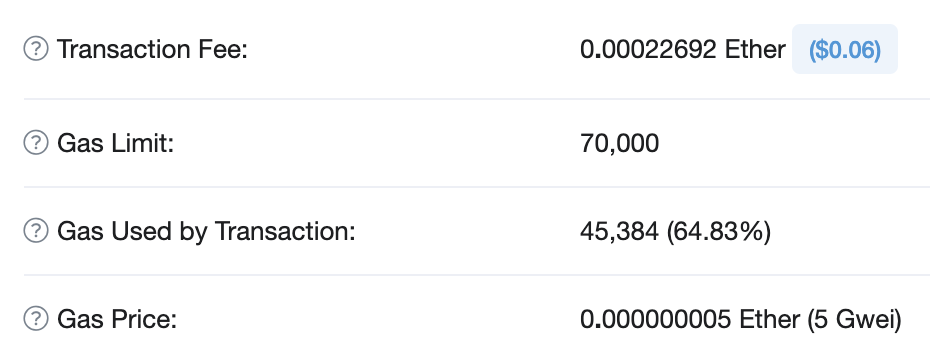
Besides the very presence of PoE, it was important for me not to overload users with the blockchain and transaction fees. For example, calling the addHash method (bytes32 rootHash) costs 0.2 finney (0.0002 ETH or $ 0.06 at the June 2019 rate).
About 30 conclusions of the strategy position came out per day, that is, it costs us $ 2.1. If the number of users will increase by 100 times, and the course of the Ether will go up, the cost will naturally go to the top.
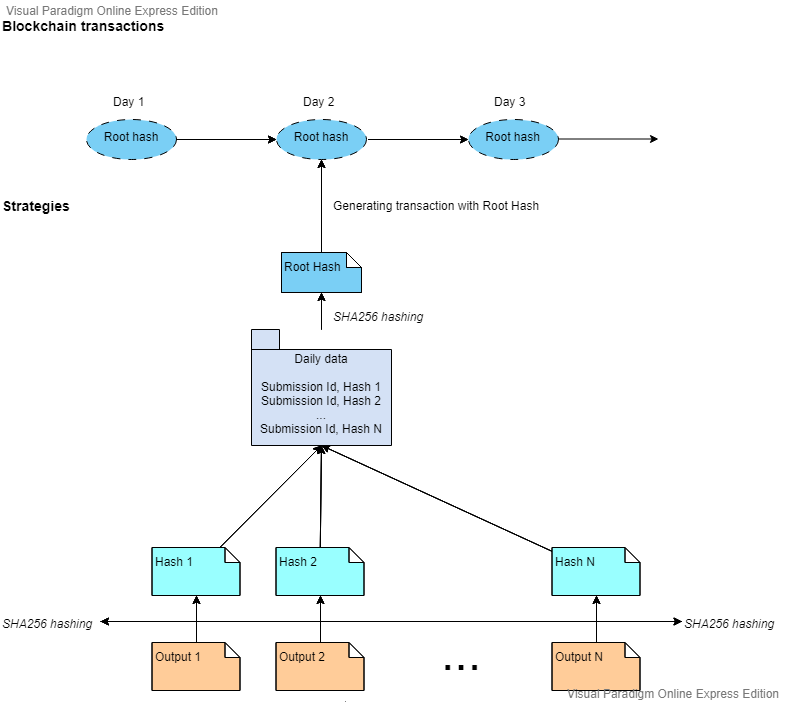
I decided to store one hash in the blockchain for a day. This hash will be generated from the hashes of the daily conclusions of the strategies and their internal identifiers.
We get a solution that is not inferior in functionality, however, much cheaper. We see no problems with scalability, however, it is always possible to divide the output of the position of strategies into several blocks and save several hashes to the blockchain network. A participant can easily verify a single hash using other neighboring hashes.
For verification, we created a special template that is available as a Jupyter notebook. At any time, the user can load a template, re-generate everything and check that all items are really those that were created and saved in the past.
It was here that I came across the concept of PoE (Proof of Existence). It’s written enough on the Internet, but the specifics of the platform made me think a bit over my head. That's why I decided to write this article and share my experience in the architecture and implementation of PoE. I think it will be especially important for guys from Fintech.
I divided my article into 3 main blocks:
')
- What is PoE and when it may be needed
- Implementation algorithm
- Solution of my particular case
So what is Proof of Existence?
Proof of Existence helps to prove that a document, file, or data was created at a specific date and time. The largest application is the patent registration. But from what I've seen, this is most often used in areas at the junction of finance and IT.
An example from my algo trading sphere: you have an algorithm that gives about 70% of the correct stock predictions for the next 2 weeks. You decide to sell your predictions to other market players. Things are easy - to convince the buyer that your predictions are correct and were made before the results of the auction, i.e. guarantee their implementation at a specific time.
How can this be guaranteed? Right, implement PoE.
PoE implementation algorithm
First you need to:
- Prepare the file you want to patent. (I made a PDF, but you can use any other container).
- Get the hash of this file (I used sha256 format).
Just in case, the hash is an individual “fingerprint” of the file, which guarantees the (almost complete) lack of coincidence with the hash of another file. When you get the hash from the file, you will need to generate a transaction in the blockchain network, specifying the hash of the document in the body of the transaction.
Everything. With the intro part finished. Now we come to the most interesting.
(For greater clarity, I created a special code (only for demonstration.) You can see a demo of the service here .)
Let's take a closer look at how the demo works.
I propose to divide the implementation into 2 parts:
- Preparation of a smart contract and an ether purse.
- Generation of transaction in the code on Node.js and the private key.
Let's take it in order:
Part 1: Preparation of a smart contract and Ethereum wallet
PoE itself was first associated with the bitcoin blockchain. But I chose the blockchain ether and smart contracts for implementation. Smart contracts give us flexibility, modularity and scalability in the future, acting as a repository for hashes in the blockchain.
I chose a simple smart contract that can take a hash and with the corresponding date, hash format => date, it would also be super to have a method that returns the hash date when called. In addition, it would be nice to take care that only the contract owner could add new hashes.
Smart contract code:
``` pragma solidity 0.5.9; /** * @title Ownable * @dev The Ownable contract has an owner address, and provides basic authorization control * functions, this simplifies the implementation of "user permissions". */ contract Ownable { address private _owner; event OwnershipTransferred(address indexed previousOwner, address indexed newOwner); /** * @dev The Ownable constructor sets the original `owner` of the contract to the sender * account. */ constructor () internal { _owner = msg.sender; emit OwnershipTransferred(address(0), _owner); } /** * @return the address of the owner. */ function owner() public view returns (address) { return _owner; } /** * @dev Throws if called by any account other than the owner. */ modifier onlyOwner() { require(isOwner()); _; } /** * @return true if `msg.sender` is the owner of the contract. */ function isOwner() public view returns (bool) { return msg.sender == _owner; } /** * @dev Allows the current owner to transfer control of the contract to a newOwner. * @param newOwner The address to transfer ownership to. */ function transferOwnership(address newOwner) public onlyOwner { _transferOwnership(newOwner); } /** * @dev Transfers control of the contract to a newOwner. * @param newOwner The address to transfer ownership to. */ function _transferOwnership(address newOwner) internal { require(newOwner != address(0)); emit OwnershipTransferred(_owner, newOwner); _owner = newOwner; } } /** * @title HashStore * @dev The contract store the hashes and returns date by hash * Only the owner can add new hashes */ contract HashStore is Ownable { mapping(bytes32 => uint256) private _hashes; event HashAdded(bytes32 hash); function addHash(bytes32 rootHash) external onlyOwner { require(_hashes[rootHash] == 0, "addHash: this hash was already deployed"); _hashes[rootHash] = block.timestamp; emit HashAdded(rootHash); } function getHashTimestamp(bytes32 rootHash) external view returns (uint256) { return _hashes[rootHash]; } } ``` As you have noticed, we used 2 separate contracts: Ownable and HashStore.
The HashStore contract is responsible for storing hashes and issuing a hash date on request. The Ownable contract is responsible for verifying that the new hash was added solely by the owner of the contract.
To add a hash you need to call the addHash method, passing the value of sha256 as an argument to our file. If the hashes within the contract match, the transaction will be rejected. This is how unwanted duplication of values with different dates is filtered. It is checked here:
require(_hashes[rootHash] == 0, "addHash: this hash was already deployed"); We can get the hash transaction date using the getHashTimestamp method, passing as a hash argument with the transaction date we need. The getHashTimestamp method returns the time in UNIX format. You can translate into any more readable format.
So, we have dealt with the contract, now we need to plug it into the network. For this we need two things:
- broadcast address for interaction with blockchain
- some amount of air to invoke methods and deploy contracts.
In order not to waste air on tests, we can use the ropsten test network. More details can be found here. This address is the owner of the contract, as he was the initiator of the deployment and may add new hashes in the future. After that, you must keep this address in a safe place, as well as the private key of your wallet and the address of the contract. We will need all this in the future.
Part 2: Generating a transaction in Node.js and a private key
So, by this time, we already have the ether purse, its secret key, the contract in the test network and the data hash. It remains to configure the interaction with the blockchain.
For this, we will use the web3.js library and create a token for our node. I created my own using the infura.io service and it looks like this:
ropsten.infura.io/v3/YOUR_TOKEN_HERE For hashing, use the sha256 package. The data format can be any, but in the example we use the data in JSON.
How did I solve my case using PoE?
Besides the very presence of PoE, it was important for me not to overload users with the blockchain and transaction fees. For example, calling the addHash method (bytes32 rootHash) costs 0.2 finney (0.0002 ETH or $ 0.06 at the June 2019 rate).
About 30 conclusions of the strategy position came out per day, that is, it costs us $ 2.1. If the number of users will increase by 100 times, and the course of the Ether will go up, the cost will naturally go to the top.
I decided to store one hash in the blockchain for a day. This hash will be generated from the hashes of the daily conclusions of the strategies and their internal identifiers.
We get a solution that is not inferior in functionality, however, much cheaper. We see no problems with scalability, however, it is always possible to divide the output of the position of strategies into several blocks and save several hashes to the blockchain network. A participant can easily verify a single hash using other neighboring hashes.
Eventually
For verification, we created a special template that is available as a Jupyter notebook. At any time, the user can load a template, re-generate everything and check that all items are really those that were created and saved in the past.
``` : 1. API 1. 2. API , 3. , . . ``` Source: https://habr.com/ru/post/459046/
All Articles