TestMace. Fast start

Hello. We slowly step out of the shadows and continue the series of articles about our product. After the previous review article we received a lot of feedback (mostly positive), suggestions and bug reports. Today we will show TestMace in action and you will be able to appreciate some of the features of our application. For a more complete immersion, I advise you to refer to our documentation at http://docs-ru.testmace.com . So, let's go!
Installation
Let's start with the trivial. The application is available and actually tested on three platforms - Linux, Windows, MacOS. You can download the installer for the OS of interest from our site . For Linux users it is possible to install a snap package . We really hope that hands will soon reach Microsoft Store and the App Store (Is it necessary? What do you think?).
Experimental scenario
As a test subject, we chose the following standard scenario:
- log in: user - admin, password - password
- add new record
- check correct entry
We will test on https://testmace-quick-start.herokuapp.com/ . This is a regular json-server , great for testing such applications. We just added a token authorization to all json-server routes and made a login method to get this token. We will move progressively, gradually improving our project.
Creating a project and trying to create an entity without authorization
First, create a new project ( File -> New project ). If you are launching the application for the first time, the new project will open automatically. To begin, let's try to make a request to create a new record (all of a sudden the creation of records is available without authorization). Select Add node -> RequestStep from the node's context menu. We specify create-post as the host name. As a result, a new node will be created in the tree and the tab of this node will open. We set the following query parameters:
- Request Type: POST
- url: https://testmace-quick-start.herokuapp.com/posts
- Request body: json with value
{"title": "New testmace quick start post"}
If you did everything correctly, the interface will look like this:

However, if we try to execute the request, the server will return 401 code and without authorization, nothing shines on this server. Well, in general, it is expected).
Add authorization request
As already mentioned, we have POST endpoint /login , which accepts json as the request body: {"username": "<username>", "password": "<password>"} , where username and password (again similarly, from the input above) have the values admin and password respectively. In response, this endpoint returns json of the form {"token": "<token>"} . We use it for authorization. Create a RequestStep node with the name login , the Project node will be the ancestor. Using drag-and-drop, move this node in the tree higher than the create-post node. Let's set the newly created request with the following parameters:
- Request Type: POST
- url: https://testmace-quick-start.herokuapp.com/login
- Request body: json with the value
{"username": "admin", "password": "password"}
Execute the query and get the 200th code with the token in the response. Something like this:

Refactoring: removing domain duplication
While requests are not connected in a single script. But this is not the only drawback. If you look closely, you will notice that at least the domain is duplicated in both requests. Not good. It's time to refactor this part of the future scenario and the variables will help us in this.
In the first approximation, variables perform the same role as in other similar tools and programming languages — eliminating duplication, increasing readability, etc. Read more about variables in our documentation . In this case, we need user variables.
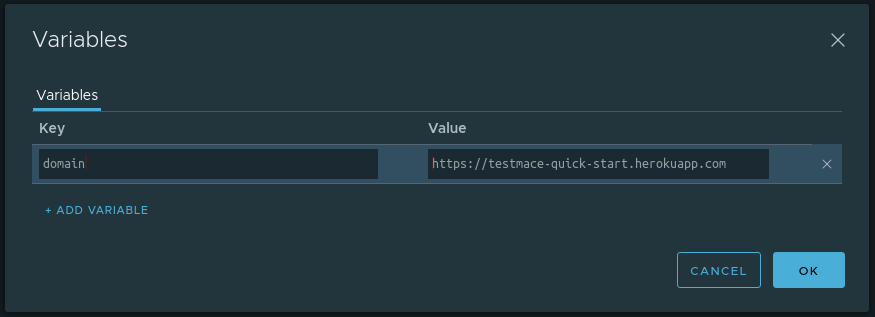
At the Project node level, we define a domain variable with the value https://testmace-quick-start.herokuapp.com . For this you need
- Open the tab with this node and click on the calculator icon in the upper right.
- Click on + ADD VARIABLE
- Enter variable name and value
In our case, the dialog with the added variable will look like this:
OK. Now, due to inheritance, we can use this variable in descendants of any nesting level. In our case, these are the login and create-post nodes. In order to use a variable in the text field, you need to write ${<variable_name>} . For example, the url for the login is converted to ${domain}/login , respectively, for the create-post node the url will look like ${domain}/posts .
Thus, guided by the principle of DRY, we have slightly improved the script.
Save the token to the variable
Since the conversation about variables has come, let's develop this topic a little. At the moment, in case of a successful login, we receive from the server an authorization token, which we will need in subsequent requests. Let's save this token to a variable. Because the value of the variable will be determined during the execution of the script, we use for this a special mechanism - dynamic variables .
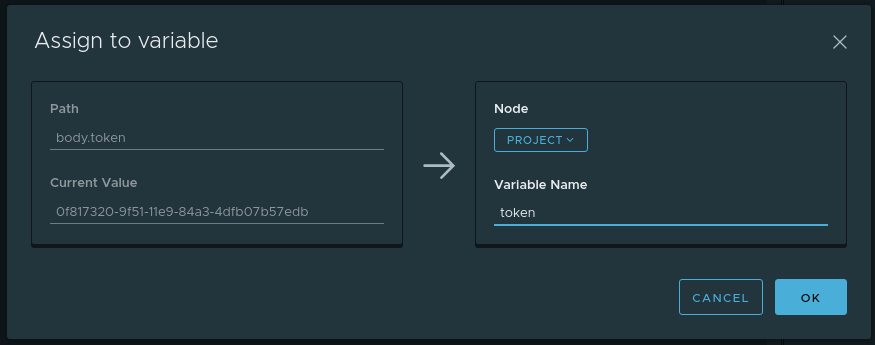
To begin with we will execute request for login. In the Parsed tab of the answer, move the cursor to the token and in the context menu (which is called either by right-clicking or pressing the button ...) select Assign to variable . A dialog will appear with the following fields:
- Path - which piece of the answer is taken (in our case, this is
body.token) - Current value - what value lies along the Path (in our case this is the value of the token)
- Variable name - the name of the variable where the Current value will be stored. In our case it will be
token - Node - in which of the ancestors the variable Variable name will be created. Choose Project
The completed dialog looks like this:
Now each time the login node runs, the dynamic variable token will be updated with the new value from the response. And this variable will be stored in the Project node and due to inheritance will be available to descendants.
In order to access dynamic variables, you must use the built-in variable $dynamicVar . For example, to reach a saved token, you need to call ${$dynamicVar.token} .
Throw authorization token in requests
In the previous steps, we received an authorization token and all we need to do is add the Authorization header with the Bearer <tokenValue> value to all requests that require authorization, including the create-post . There are several ways to do this:
- Manually copy the token and add the authorization header to the requests of interest. The way is working, but its use is limited only by requests of the form "made and thrown out". For multiple scripts will not work
- Use the authorization feature.
- Use default headers
Using the second method seems obvious, but in the context of this article this approach ... is not interesting. Well, in fact: the authorization mechanism, plus or minus, is familiar to you from other tools (even if we have things like inheritance of authorizations ) and is unlikely to cause questions.
Another thing is the default headers! If in a nutshell, the default headers are the HTTP headers that are inherited from the ancestors, which are added by default to the request unless explicitly disabled. Using this functionality, you can, for example, implement custom authorization or just get rid of duplication in scripts. Apply this feature to prokidydka token in the headers.
Previously, we prudently saved the token to the dynamic variable $dynamicVar.token at the level of the Project node. It remains to do the following:
- Define a default
Authorizationheader with aBearer ${$dynamicVar.token}at the Project node level. To do this, in the interface of the Project node you need to open a dialog with default headers (the Headers button in the upper right corner) and add the appropriate header. The dialog with the filled values will look as follows: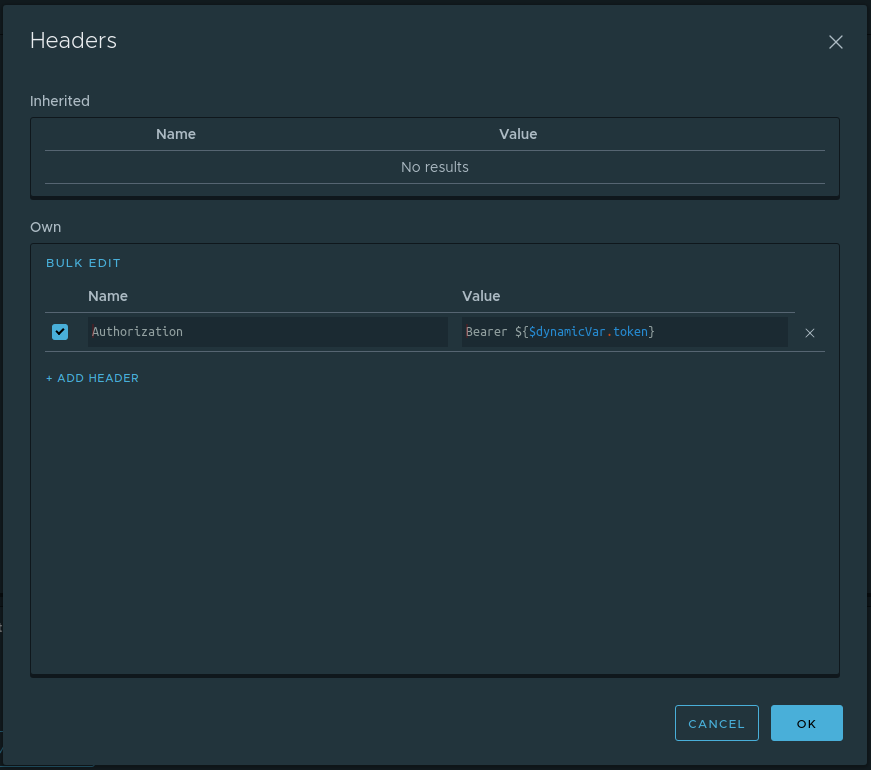
- Disable this header from the login request. This is understandable: at the time of login, we still do not have a token and we will install it with this request. Therefore, in the login request interface in the Headers tab in the Inherited area, remove the tick from the Authorization header.
That's all. Now the authorization header will be added to all requests that are descendants of the Project node, except for the login node. It turns out that at this stage we have a script ready and we can only run it. You can run the script by selecting the Run item in the context menu of the Project node.
Check the correctness of the post creation
At this stage, our script can log in and, using an authorization token, create a post. However, we need to make sure that the newly created post has the correct name. That is, in essence, it remains to do the following:
- Send a request for a post by id,
- Check that the name that came from the server matches the name given when creating the post.
Consider the first step. Once the id value is determined during the execution of the script, it is necessary to create a dynamic variable (let's call it postId ) from the create-post node at the Project level. How to do this, we already know, it’s enough to refer to the Save Token To Variable section. It remains only to create a request for a post on this id. To do this, create a RequestStep get-post with the following parameters:
- Request Type: GET
- URL: $ {domain} / posts / $ {$ dynamicVar.postId}
To implement the second step, we need to get acquainted with the Assertion node. The assertion node is a node that allows you to write checks for specific queries. Each Assertion node can contain several statements (checks). You can read more about all types of assertion from our documentation . We will use Compare assertion with the equal operator. There are several ways to create assertions:
- Long. Manually from the context menu of the RequestStep node create an Assertion node. In the node created by Assertion add the required assertion and fill in the fields.
- Fast. Create an Assertion node together with an assertion from the Request Request response of the node using the context menu
We use the second method. Here is how it will look for our case.
For those who do not understand, the following happens here:
- Make a request in the get-post site
- In the Parsed tab of the response, call the context menu and select Create assertion -> Compare -> Equal
Congratulations, we created the first test! Simple, isn't it? Now you can run the script completely and enjoy the result. It remains just a bit to refactor and make the title in a separate variable. But we will leave it to you as a homework)
Conclusion
In this guide, we created a complete script and at the same time reviewed some of the features of our product. Of course, we have used far from all the functionality and in the following articles we will conduct a detailed review of TestMace features. Stay tuned!
PS For those who are too lazy to reproduce all the steps, we kindly filed a repository with a project from the article. You can open it using File -> Open project and select the Project folder.
')
Source: https://habr.com/ru/post/458964/
All Articles