How to develop another platformer using Unity. Another tutorial
Hi, Habr!
Under the cut you will find another article that tells you how I set myself the goal to program the game, based on the translation of the article into Habr called Level Design Patterns for 2D games .
The article has a lot of text (both normal and original) and a lot of pictures.
Before I start my first article, let's get acquainted. My name is Denis. I work as a system administrator with a total experience of 9 years. It’s not for me to tell you that a system administrator is a type of IT staff who once diligently deploy, and then contemplate the merchanting of various characters on the monitor. Over time, I came to the conclusion that it was time to expand the boundaries of knowledge and switch to programming. Not going into details, I tried to do any projects in C ++ and Python. But over the course of a year of study, I came to the conclusion that programming application and system software is not mine. For different reasons.
Thinking deeper, I asked myself the question: what do I really like to do with computer equipment of different formats? My question to myself threw me far back into childhood itself, namely, in the happy hours spent for PS1, PS2, Railroad Tycoon 3 for PC ..., Well, you understood. Video games!
By the number of various educational materials, the choice fell on Unity (not to reinvent the wheel?). After a month of reading and viewing various materials, I decided to release the first very simple children's game in the play market. To overcome fear so to speak. After all, to release applications in the play market - it's not scary, right?
After a couple of months I released the platformer already more complicated. Then there was a break (after all, the work must work, after all).
About two weeks ago, I saw a translation of an article in habr called Level Design Patterns for 2D games ( https://habr.com/ru/post/456152/ ) and thought to myself, why not? The article has a simple and intuitive table with a list of what should be in the game so that it is interesting. I kindly copied the table to myself in OneNote and marked each pattern with a Deal tag (which can be marked as completed).
What do I want to get on the total? Your criticism. As I like to tell myself - you want to learn to swim, dive with your head. If you think that I did something well - write me about it in the comments. If you think that I did something bad - write about it twice.
I will start my longrid on programming another platformer.
Avatar
An entity controlled by players within the game. For example, Mario and Luigi in Super Mario Bros (Nintendo, 1985).
There are several subtasks that need to be implemented to give the hero life. Namely:
• ( ) • • • • To implement the animation, we need to convert a single sprite into a multi sprite. This is done incredibly simple. We fold the sprite into the project folder and find it in the Unity editor explorer. Then, by clicking on the sprite, in the inspector window changes the value of the SptiteMode property from Single to Multiple .
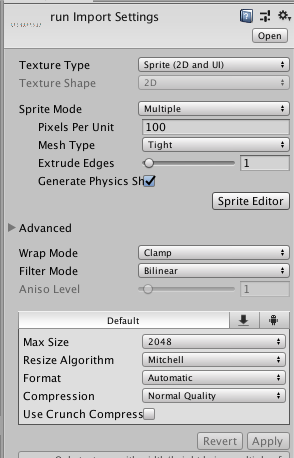
Click Apply , then SpriteEditor .
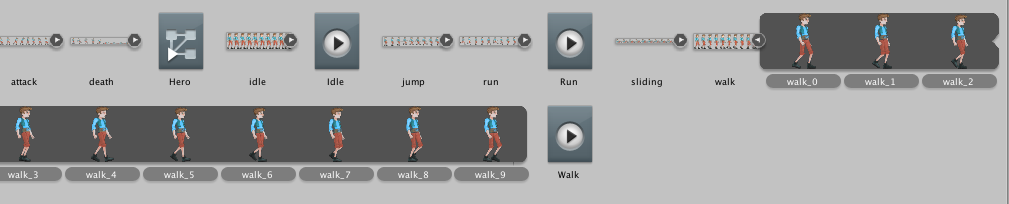
Inside the Sprite Editor window, you need to select each frame of the future animation with the mouse as shown in the figure below.
Also, Unity provides the ability to automatically select the boundaries of objects inside the sprite. For this, the Slice button must be pressed in the Sprite Editor window. In the drop-down menu, you should have Type => Automatic, Pivot => Center . All you have to do is click on the Slice button. After that, all objects inside the sprite will be selected automatically.

Let's do this operation for all other animations. Next, you will need to configure the state of the animation and their switching. This is done in two steps. The first action, the program code.
Create an empty game object. To do this, right-click in the Hierarchy tab and select Create Empty in the drop-down menu.

An empty game object that is created on the scene, by default, has only one component - Transform . This component determines the position of the object on the stage, the angle of inclination and its scale.
You can find the word transform in two different meanings:
- Transform is a class. Since this is a class, Transform describes the software implementation of what coordinates this object will be located in and how large it will be.
- transform is an instance of a class. That is, you can refer to a specific object and change its position or scale on the stage. For example, the next line in the code will be:
transform.position = new Vector2 (transform.position.x + dirX, transform.position.y + dirY);.
This line will be responsible for moving Lucas on stage.
To create your own component, you need to click the Add Component button in the object inspector tab. Next, a search window appears harming standard components. Simply start typing the name of the future script (or an already implemented component), if there are no suitable names, Unity will ask you to create a new component. I called this component HeroScript.cs .

First, we describe the fields that will store information about the visual and physical component of Lucas:
private Animator animator; // . private Rigidbody2D rb2d; //rb Further, the fields that will respond to the movement of the character:
/* , */ Vector3 localScale; bool facingRight = true; [SerializeField] private float dirX, dirY; // [Range(1f, 20f)] [SerializeField] private float moveSpeed; // private SpriteRenderer sprite; // SpriteRenderer /* , */ A start, great. Next, the enumeration will be described and the property will be written, which will be responsible for switching the state of the animation. This enumeration must be written outside the class:
/* * . * * . */ public enum CharState { idle, // 0 Run, // 1 Walk, // 2 Die // 3 } Implement the property that will receive and set the new animation state:
public CharState State { get {// CharState animator int return (CharState)animator.GetInteger("State"); } set { // animator int State , int. animator.SetInteger("State", (int)value); } } With the software part is complete. Now we have an enumeration and a property that will be associated with animation switching. Next, the second step. It is necessary in the Unity editor to link the state of the animation and specify which values of int need to be changed.
To do this, you need to associate the previously created multi sprites with an empty game object. All you need is to select the frames in the Unity Explorer and drag them to an empty game object, to which we previously assigned the script.
Do this with each of the following animations. Also, in the explorer with animations, you will find the appearance of an object with a block diagram and a Play button. Clicking on it twice will open the Animator tab. Inside you will see several blocks with animations and initially, only Entry states and the first animation set that were connected are connected. AnyState and other animations will be displayed in the form of ordinary gray squares. In order to link everything, you need to click on the state of AnyState and select the single Make Transaction drop-down menu and link it to the gray box. This operation must be done for each state. In the end, it should get about what you see in the screenshot below.
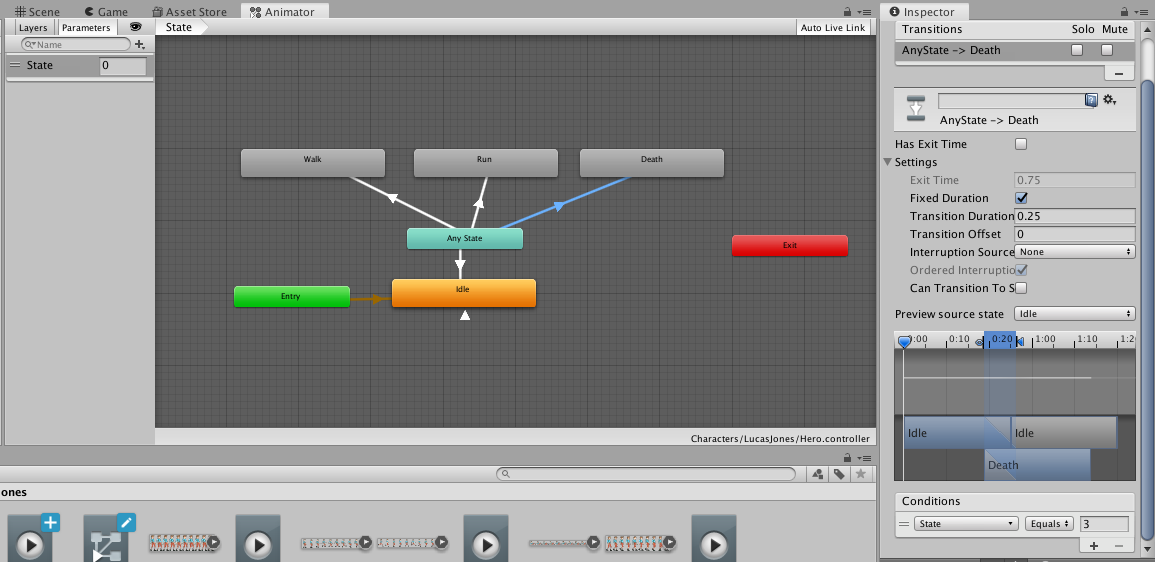
Next, you must clearly indicate what exactly State should be equal to in order to start the necessary animation. Pay attention to the screenshot, namely the left part of it. Parameters tab. It created a variable of type int State . Next, pay attention to the right side. First of all, from the transition of animation it is necessary to uncheck Can Transaction To Self . This operation will save you from strange and sometimes completely incomprehensible transitions of animation into itself and the Conditions section, where we indicated that this transition of animation was assigned the value 3 to the State variable. After which Unity will know which animation to run.
For an animated movement of the character, everything is done. Go ahead.
The next step is to teach Lucas to move around the scene. This is entirely programming. To move a character around the scene, you will need buttons, clicking on which Lucas will go back and forth. For this, in the Assets Store tab we need to import Standart Assets, but not all of it, only some additional components, namely:
• CrossPlatformInput
• Editor
• Environment
After importing Asseset, the main Unity window should be modified and one additional tab Mobile Input will appear. Activate it.
Let's create new UI elements on the stage - control buttons. Create 4 buttons in each direction. Up, down, forward and back. In the Image component we will assign an image to the buttons, which will correspond to the image, which means that it can be moved. It should look like in the screenshot below:

To each button we add the AxisTouchButton component. This script has only 4 fields. The axisName field indicates what name to respond to when calling. The axisValue field is responsible for the direction in which Lucas will move. The responseSpeed field is responsible for how fast Lucas will develop his speed. The returnToCentreSpeed field is responsible for how fast the button will return to the center. For the Next button, let's leave everything as it is. For the back button, change the value of the axisValue to -1, so that Lucas moves back. For the Up and Down buttons, change the axisName to Vertical . For the Up button, the axisValue is set to 1, for Down -1.
Next, we modify HeroScript.cs . Add to the directive using the namespace
using UnityStandardAssets.CrossPlatformInput; // . : /* , */ Vector3 localScale; // bool facingRight = true; [SerializeField] private float dirX, dirY; // [Range(1f, 20f)] [SerializeField] private float moveSpeed; // private SpriteRenderer sprite; // SpriteRenderer /* , */ Add the following code to the standard Start method:
void Start() { localScale = transform.localScale; animator = GetComponent<Animator>(); // . sprite = GetComponent<SpriteRenderer>(); // SpriteRenderer rb = GetComponent<Rigidbody2D>(); State = CharState.idle; } Create a method that will be responsible for moving the hero:
public void MoveHero() { dirX = CrossPlatformInputManager.GetAxis ("Horizontal") * moveSpeed * Time.deltaTime; dirY = CrossPlatformInputManager.GetAxis ("Vertical") * moveSpeed * Time.deltaTime; transform.position = new Vector2 (transform.position.x + dirX, transform.position.y + dirY); } As you can see, everything is simple. The dirX and DirY fields record information about what the Axis direction ( Horizontlal and Vertical ) was multiplied by the speed (which will need to be specified in the editor) and multiplied by the time from the last frame.
transform.position writes a new position to the Transform component of our game object.
On the practical side of the question, you can start the scene and see how Lucas falls into the abyss, since there are no objects under it that can prevent this, as the hero will move around the scene. But, Lucas is always in the Idle animation and does not turn around when we send him back. For this, the script must be modified yet. Create a method that determines in which direction Lucas is looking:
void CheckWhereToFace () { if (dirX > 0) { facingRight = true; State = CharState.Walk; } if (dirX < 0) { facingRight = false; State = CharState.Walk; } if (dirX == 0) { State = CharState.idle; } if (dirY < 0) { State = CharState.Walk; } if (dirY > 0) { State = CharState.Walk; } if (((facingRight) && (localScale.x < 0)) || ((!facingRight) && (localScale.x > 0))) localScale.x *= -1; transform.localScale = localScale; This part of the code is also not difficult. The method describes that if dirX > 0 (if we go to the right), then turn the sprite in this direction and start the walk animation. If less than 0, then unwrap Lucas 180 degrees and run the animation. If dirX is zero, then Lucas is worth it and you need to start the wait animation.
Why, in this case, use the operation with Scale is preferable to using flipX = true ? In the future, I will describe the ability to take any objects in hand and naturally, Lucas can turn around holding something in his hands. If I used the usual reflection, the object that I would hold in my hands would remain on the right side (for example) when Lucas is looking to the left and vice versa. Changing the scale will move the object that keeps Lucas in the same direction that Lucas turned around.
We place the CheckWhereToFace () function into the Update () function, for its frame-by-frame monitoring.
Fine. The first 2 points out of 5 are fulfilled. We turn to the needs of Lucas. Suppose Lucas has 3 types of needs that need to be met in order to stay alive. This is the standard of living, the level of hunger and the level of thirst. It is necessary to create for this a simple and clear panel with an indicator of each item. To create such a panel, right-click and select UI => Panel .
Mark it out like this:
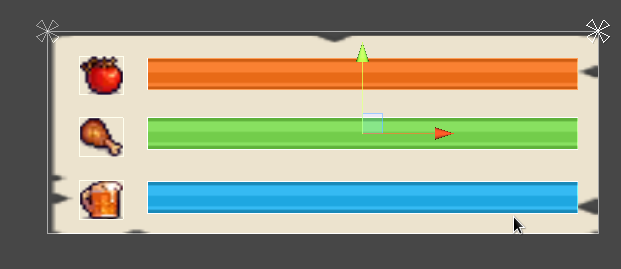
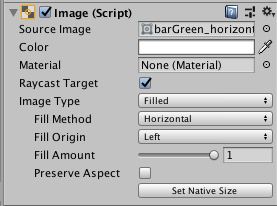
The panel consists of three images (Image) of each need (left). On the right is the panel itself. On the first layer (we will say so), there is a color indicator (Image) that does not have transparency, and an Image object that is different in transparency is copied under it. This Image is half transparent to the original. Also Image, which has no transparency, has the property Image Type = Filled . This feature will allow us to simulate a reduction in the fullness of the scale of needs.

We define new static variables:
/* , */ [SerializeField] public static float Health = 100, Eat = 100, Water = 100, _Eat = 0.05f, _Water = 0.1f; // . _ . /* , */ /* , */ [SerializeField] Image iHealt, iEat, iWater; // /* , */ In this case, I use static fields. This is done to ensure that these fields are the only ones for the whole class. Also, this will allow us to directly access these fields by class name. We write some simple functions:
private float fEat(float x) { Eat = Eat - x * Time.deltaTime; iEat.fillAmount = Eat / 100f; // , return Eat; } private float fWater(float x) { Water = Water - x * Time.deltaTime; iWater.fillAmount = Water / 100; return Water; } Then, we write a method that collects information about the desire to eat and drink:
private void Needs() { if (fEat(_Eat) < 0) { Debug.Log(Eat); } else if (fEat(0) == 0) { StartCoroutine(ifDie()); } if (fWater(_Water) < 0) { Debug.Log(Water); } else if (fWater(0) == 0) { StartCoroutine(ifDie()); } The Needs () function is placed in the Update () function and every frame is called. Accordingly, in the lines
if (fEat(_Eat) < 0) a function is called that passes as a parameter how much to subtract from the variable Eat and Water . If the result of the function does not return 0, then Lukas has not yet died of thirst or hunger. If Lucas still dies from starvation or mortally wounded, then we perform Corutin
StartCoroutine(ifDie()); which starts the death animation and restarts the level:
IEnumerator ifDie() { State = CharState.Die; yield return new WaitForSeconds(2); SceneManager.LoadScene("WoodDay", LoadSceneMode.Single); } Hard tile
A game object that does not allow a player to pass through it. Example: Gender in Super Mario Bros (Nintendo, 1985).
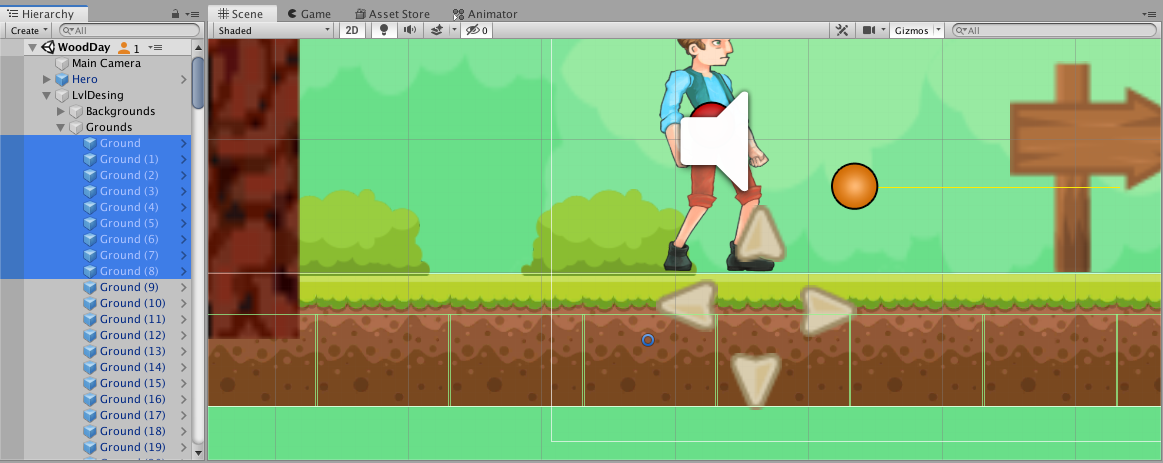
In order to realize the earth and prevent Lukas from falling through it, it is necessary to connect the BoxCollider2D and Rigidbody2D components to Lucas. Also, you will need a sprite of the earth, on which the BoxCollider2D component will be located . The BoxCollider2D component implements collision colliders and their collision behavior. At this stage, we do not need anything but to prevent the failures of Lucas underground. All that we can edit at will is the borders of the collider. In my case, the sprite of the ground has a grass surface and in order not to seem that the grass is able to withstand the weight of Lucas, I will edit the boundaries of the component.

Now, an exciting leveling process. For convenience, you can export this cube of land to the prefab. A prefab is a container of a game object, when modified, you can automatically apply changes to all game objects created from this prefab. Next, we clone this prefab with CTRL + D (after selecting it in the hierarchy tab) and stir it on the stage.
Screen
Part of the level / world of the game, currently visible to the player.
Set up a camera that will monitor the player to display part of the scene. Further, the script will be very simple to implement:
public GameObject objectToFollow; public float speed = 2.0f; void Update () { CamFoll(); } private void CamFoll() { float interpolation = speed * Time.deltaTime; Vector3 position = this.transform.position; position.y = Mathf.Lerp(this.transform.position.y, objectToFollow.transform.position.y, interpolation); position.x = Mathf.Lerp(this.transform.position.x, objectToFollow.transform.position.x, interpolation); this.transform.position = position; } In the objectToFollow field of the GameObject type, an object will be assigned to which you want to monitor, and in the speed field, the speed with which you need to smoothly move beyond the assigned GameObject.
The interpolation field records information about the movement speed since the last frame. Further, the Lerp method will be used, which will ensure the camera moves smoothly behind Lucas as it moves along Axis X and Y. Unfortunately, I cannot explain the line
position.y = Mathf.Lerp(this.transform.position.y, objectToFollow.transform.position.y, interpolation); in terms of mathematics. Therefore, I will say easier - this method will allow you to stretch the execution time of an action. In our case, this is moving the camera behind the object.
Danger
Entities that prevent the player from performing his task. Example: 1001 Spikes spikes (Nicalis and 8bits Fanatics, 2014).
Let's start adding something that will not just prevent Lukas from going through the scene to the end, but will affect the number of his lives and the possibility of perishing (in one, realizing the fifth subtask for realizing the tradition of life to Lukas - the Hero may be killed or may perish).
In this case, we will throw spikes on the stage, which will be hidden behind the vegetation and only the attentiveness of the player will help to pass by.
Create an empty GameObject and connect the SpriteRenderer and PolygonCollider2D components to it. In the SpriteRenderer component, we connect the sprite of the barbed button or any other object at will. Also, assign spike tag = Thorn .
Next, on Lucas's GameObject, we create a script that will be responsible for what happens to it if Lucas collides with other colliders. In my case, I called it ColliderReaction.cs
private Rigidbody2D rb2d; void Start() { rb2d = GetComponent<Rigidbody2D>(); } public void OnTriggerEnter2D(Collider2D collision) { switch (collision.gameObject.tag) { case "Thorn": { rb2d.AddForce(transform.up * 4, ForceMode2D.Impulse); HeroScript.Health = HeroScript.Health - 5; } break; } } The essence of the script is simple as 2x2. When a collision occurs with a game object on the Thorn tag, the Switch operator compares with the candidates we specified. In our case for now, this is Thorn . First, Lucas throws up, and then we turn to a static variable and subtract 5 units of life from Lucas. Looking ahead, I can say that it makes sense to describe the same thing for a collision with enemies:
case "Enemy": { rb2d.AddForce(transform.up * 2, ForceMode2D.Impulse); HeroScript.Health = HeroScript.Health - 10; } break; Further, I propose to kill two birds with one stone
Assembled item and Rule.
A game object that players can pick up.
We propose a rule that if Lucas wants to go between the islands and go up, then you need to collect wood in order to build bridges and stairs.
Already passed ways to create a tree and stairs.
We will connect a script to the tree, which will be responsible for how much logs can be knocked out of it, if you start cutting it. Since only attack animation was proposed in the set of sprites, we will use it when we cut down a tree (production costs).
The script that is on the tree:
[SerializeField] private Transform inst; // [SerializeField] private GameObject FireWoodPref; // [SerializeField] private int fireWood; // When starting the level, write a random value to fireWood :
void Awake() { fireWood = Random.Range(4,10); } Describes a method with a parameter that will be responsible for how many logs will fall out in one hit:
public int fireWoodCounter(int x) { for (int i = 0; i < fireWood; i++) { fireWood = fireWood - x; InstantiateFireWood(); } return fireWood; } A method that will create clones of logs on stage.
private void InstantiateFireWood ():
{ Instantiate(FireWoodPref, inst.position, inst.rotation); } 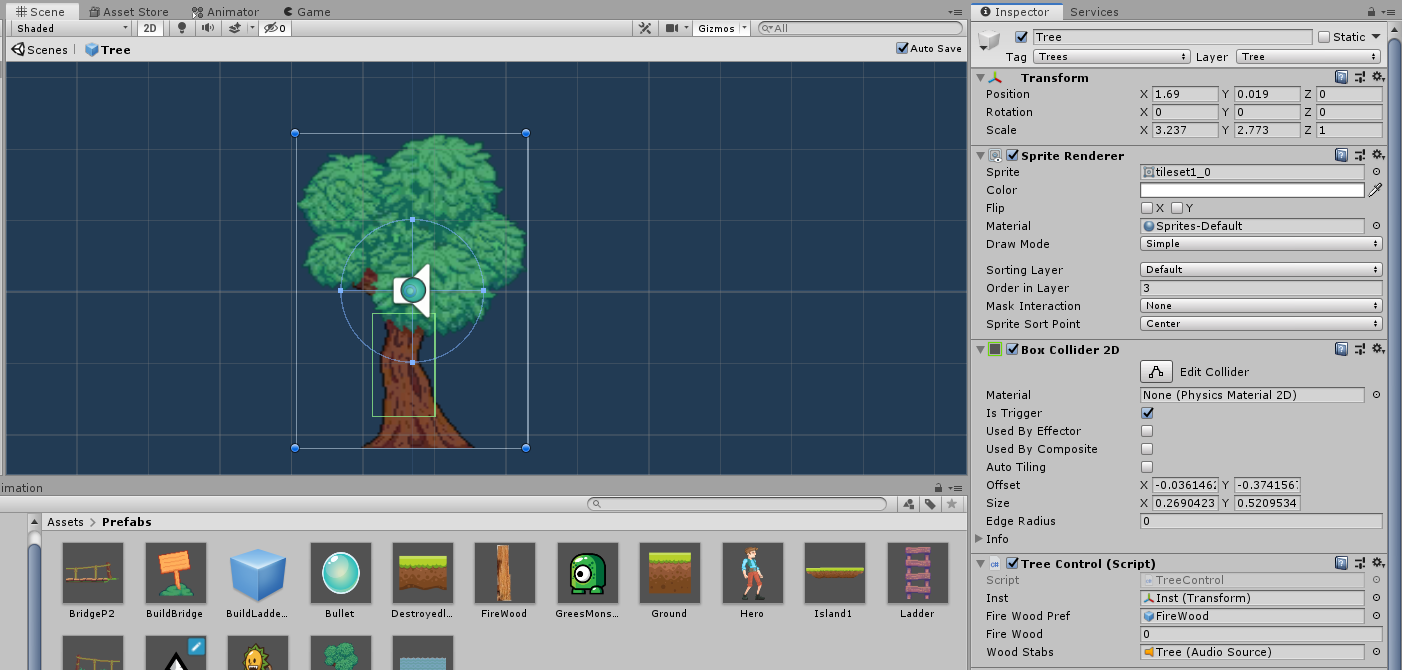
Create a log and connect to it a script with the following code:
public void OnTriggerEnter2D(Collider2D collision) { switch (collision.gameObject.tag) { case "Player": { if (InventoryOnHero.woodCount > 10) { Debug.Log(" !"); } else { InventoryOnHero.woodCount = InventoryOnHero.woodCount + 1; Destroy(this.gameObject); } } break; } } Next, we will also create a class that will be responsible for inventory.
First check whether there is a place in the bag. If not, then the error and the log remains to lie, if there is space, then replenish the inventory by one unit and destroy the log.
Next, you need to do something with these resources. As mentioned above, we will offer the player the opportunity to build bridges and stairs.
To create a bridge, we need 2 prefabs with the left and right half of the bridge. On each half, the BoxCollider2D component will be connected. , , - , .
:
[SerializeField] private Transform inst1, inst2; // [SerializeField] private GameObject bridgePref1, bridgePref2; // [SerializeField] private int BridgeCount; // , . :
public void BuildBridge() { if (InventoryOnHero.woodCount == 0) { Debug.LogWarning (" !"); } if (InventoryOnHero.woodCount > 0) { BridgeCount = BridgeCount - 1; InventoryOnHero.woodCount = InventoryOnHero.woodCount - 1; } switch (BridgeCount) { case 5: Inst1(); break; case 0: Inst2(); break; default: Debug.LogWarning("- "); break; } } , , . , 10 , 12 8.
, , , , . , 1 , 1 . , 5, , . 0, . , .
.
, ColliderReaction.cs :
void OnTriggerStay2D(Collider2D collision) { switch (collision.gameObject.tag) { case "Ladder": { rb2d.gravityScale = 0; } break; } } void OnTriggerExit2D(Collider2D collision) { switch (collision.gameObject.tag) { case "Ladder": { rb2d.gravityScale = 1; } break; } } OnTriggerStay2D , . , 0. , . OnTriggerExit2D , .
, .
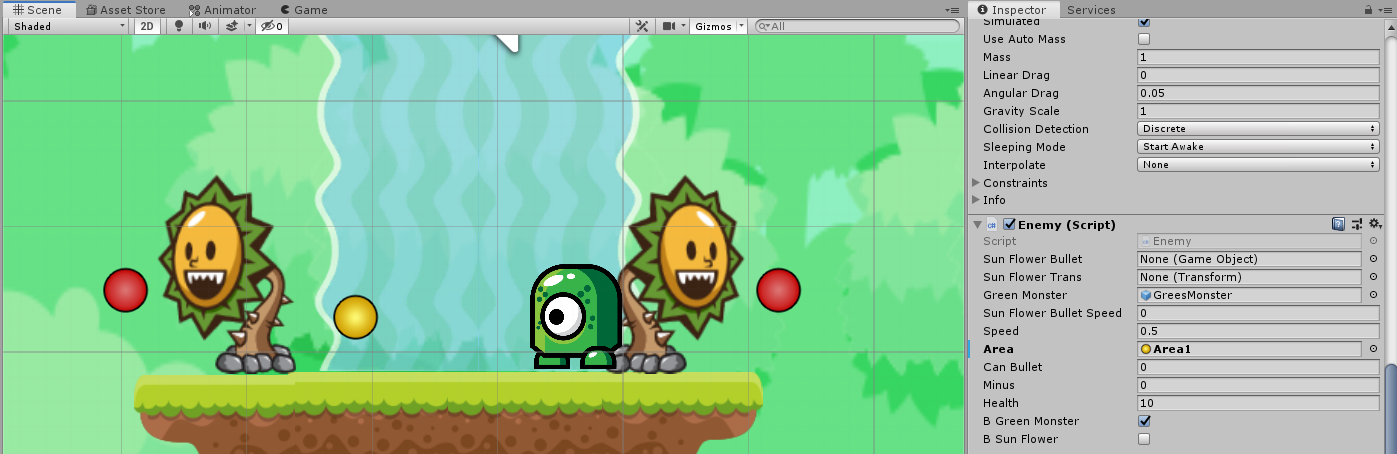
19 , . , , , , , .
GO, SpriteRenderer , BoxCollider2D , Rigidbody2D . , — , . , ru.stackoverflow.com.

Trees .
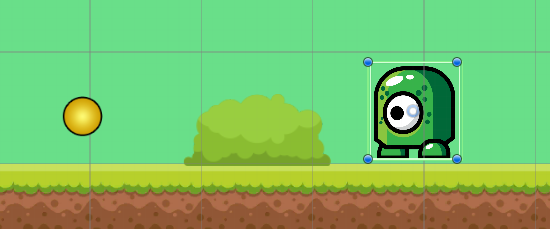
, . , -, , Raycast 2 (4 ). , , , ( ). ( ), . , . , , . , . , , ( , ).
, . , - .
:
[SerializeField] private GameObject area; private bool m1 = true, m2; // m move private void fGreenMonster() { float dist = Vector3.Distance(greenMonster.transform.position, area.transform.position); Debug.Log(dist); if (m1) { if (dist < 3f) { transform.position += new Vector3(speed,0,0) * Time.deltaTime; SR.flipX = true; } else { m1 = false; m2 = true; } } if (m2) { if(dist >= 1f) { transform.position += new Vector3(-speed,0,0) * Time.deltaTime; SR.flipX = false; } else { m2 = false; m1 = true; } } } Update() , . , 3 , . 3, , .
, .
private void fSunFlower() { canBullet = canBullet - minus * Time.deltaTime; if (canBullet <= 0 && SR.flipX == false) { GameObject newArrow = Instantiate(sunFlowerBullet) as GameObject; newArrow.transform.position = transform.position; Rigidbody2D rb = newArrow.GetComponent<Rigidbody2D>(); rb.velocity = sunFlowerTrans.transform.forward * -sunFlowerBulletSpeed; canBullet = 2; } if (canBullet <= 0 && SR.flipX == true) { GameObject newArrow = Instantiate(sunFlowerBullet) as GameObject; newArrow.transform.position = transform.position; Rigidbody2D rb = newArrow.GetComponent<Rigidbody2D>(); rb.velocity = sunFlowerTrans.transform.forward * sunFlowerBulletSpeed; canBullet = 2; } canBullet = canBullet - minus * Time.deltaTime; , .
if (canBullet <= 0 && SR.flipX == false) { GameObject newArrow = Instantiate(sunFlowerBullet) } , , , , :
public int Damage(int x) { Health = Health - x; return Health; } , , :
public void ifDie() { if (Damage(0) <= 0) { Destroy(this.gameObject); } } 0, .
, :
if (bGreenMonster) { fGreenMonster(); } if (bSunFlower) { fSunFlower(); } , .
.
, ?
, .
:

:
[SerializeField] private Transform Hero; // [SerializeField] private float distWhatHeroSee; // [SerializeField] private LayerMask Tree, BridgeBuild, LadderBuild ,drinkingWater, lEnemy; // , :
private void AttackBtn() { if (CrossPlatformInputManager.GetButtonDown("Attack")) { GameObject.Find("Hero").GetComponent<HeroScript>().State = CharState.AttackA; Collider2D[] Trees = Physics2D.OverlapCircleAll(Hero.position, distWhatHeroSee, Tree); for (int i = 0; i < Trees.Length; i++) { Trees[i].GetComponent<TreeControl>().fireWoodCounter(1); Debug.Log("Trees Collider"); HeroScript.Water = HeroScript.Water - 0.7f; } // BB BridgeBuild Collider2D[] BB = Physics2D.OverlapCircleAll(Hero.position, distWhatHeroSee, BridgeBuild); for (int i = 0; i < BB.Length; i++) { BB[i].GetComponent<BridgeBuilding>().BuildBridge(); HeroScript.Water = HeroScript.Water - 0.17f; } GameObject.Find("Hero").GetComponent<HeroScript>().State = CharState.AttackA; , .
, :
Collider2D[] Trees = Physics2D.OverlapCircleAll(Hero.position, distWhatHeroSee, Tree); for (int i = 0; i < Trees.Length; i++) { Trees[i].GetComponent<TreeControl>().fireWoodCounter(1); Debug.Log("Trees Collider"); HeroScript.Water = HeroScript.Water - 0.7f; } Trees , . , , , . .
, . Simple as that!
, - :
, — .
, . , , , .
2 , .
Good luck!
- Trees
- Monsters
- Unity ru.stackoverflow.com
- Link to my application store on Google Play
- Google Play
- sourceforge.net.
Feel free and write comments on Habré or me on the post worldofonehero@gmail.com.
')
Source: https://habr.com/ru/post/458846/
All Articles