Introduction to the development of CatBoost. Yandex report
My name is Stas Kirillov, I am a leading developer in the group of ML-platforms in Yandex. We develop machine learning tools, support and develop infrastructure for them. Below is my recent report on how the CatBoost library is organized. In the report, I talked about entry points and features of the code for those who want to understand it or become our contributor.
- CatBoost we live on GitHub under the Apache 2.0 license, that is, open and free for all. The project is actively developing, now our repository has more than four thousand stars. CatBoost, written in C ++, is a library for gradient boosting on decision trees. It supports several types of trees, including the so-called "symmetric" trees, which are used in the library by default.
What is the profit of our oblivious trees? They learn quickly, apply quickly and help learning to be more resilient to parameter changes in terms of changes in the final quality of the model, which greatly reduces the need for parameter selection. Our library is about making it convenient to use in production, learn quickly and get good quality right away.
')

Gradient boosting is an algorithm in which we build simple predictors that improve our objective function. That is, instead of immediately building a complex model, we build many small models in turn.

How does the learning process in CatBoost? I'll tell you how it works in terms of code. First, we parse the training parameters that the user passes, validate them, and continue to see if we need to load data. Because the data can already be loaded - for example, in Python or R. Next, we load the data and build a grid of borders to quantize the numerical features. It is necessary to make learning fast.
Categorical features we process a little differently. Categorical features we have at the very beginning we hash, and then we renumber the hashes from zero to the number of unique values of the categorical feature in order to quickly count combinations of categorical features.
Then we run the training loop directly - the main loop of our machine learning, where we iteratively build trees. After this cycle, the model is exported.
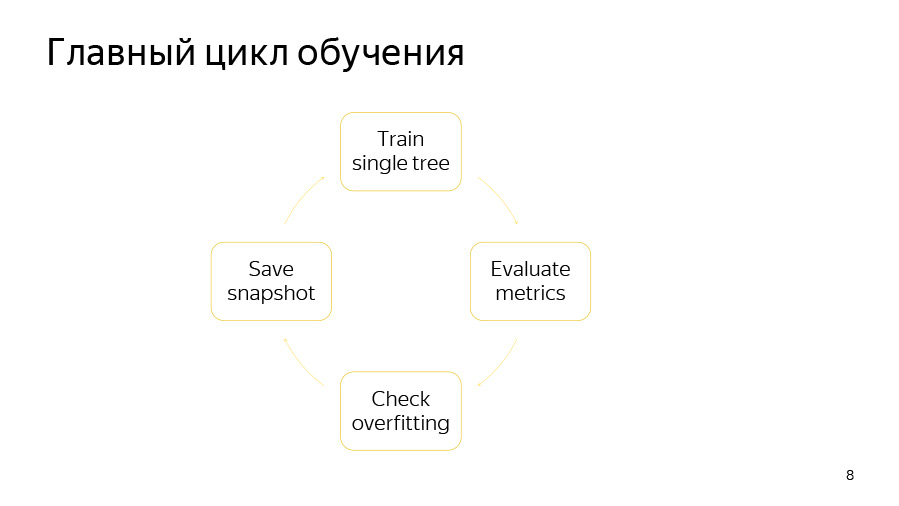
The training cycle itself consists of four points. First, we are trying to build one tree. Then we look at the increase or decrease in quality it gives. Then we check if our retraining detector has worked. Then we, if it's time, save the snapshot.

Learning a single tree is a cycle through the levels of the tree. At the very beginning, we randomly select a data permutation if we use ordered boosting or we have categorical features. Then we count the counters on this permutation. Then we try to greedily pick good splits in this tree. By splits, we simply understand certain binary conditions: such and such a numeric feature is greater than such a value, or such a counter for a categorical feature is greater than such a certain value.
How does the cycle of greedy selection of tree levels? At the very beginning, the bootstrap is done - we re-weigh or sample objects, after which only the selected objects will be used to build the tree. Bootstrap can also be recalculated before selecting each split, if the sampling option is enabled at each level.
Then we aggregate the derivatives in histograms, so we do for each split candidate. With the help of histograms we try to estimate the change in the objective function that will occur if we choose this split candidate.
We select the candidate with the best soon and add it to the tree. Then we calculate the statistics using this selected tree on the remaining permutations, update the value in the leaves on these permutations, count the values in the leaves for the model and proceed to the next iteration of the cycle.

It is very difficult to select any one place where the training takes place, so on this slide - it can be used as a certain entry point - the main files that we use for training are listed. This is greedy_tensor_search, in which we live the very procedure of greedy selection of splits. This is train.cpp, where we have the main CPU-training factory. This is aprox_calcer, where the functions of updating the values in the leaves are. And also score_calcer is a candidate's evaluation function.
No less important parts are catboost.pyx and core.py. This is the Python wrapper code, most likely, many of you will inject some things into the Python wrapper. Our Python wrapper is written in Cython, Cython is translated to C ++, so this code should be fast.
Our R-wrapper is in the R-package folder. It may be necessary for someone to add or correct some options, for options we have a separate library - catboost / libs / options.
We came from Arcadia to GitHub, so we have a lot of interesting artifacts you will encounter.
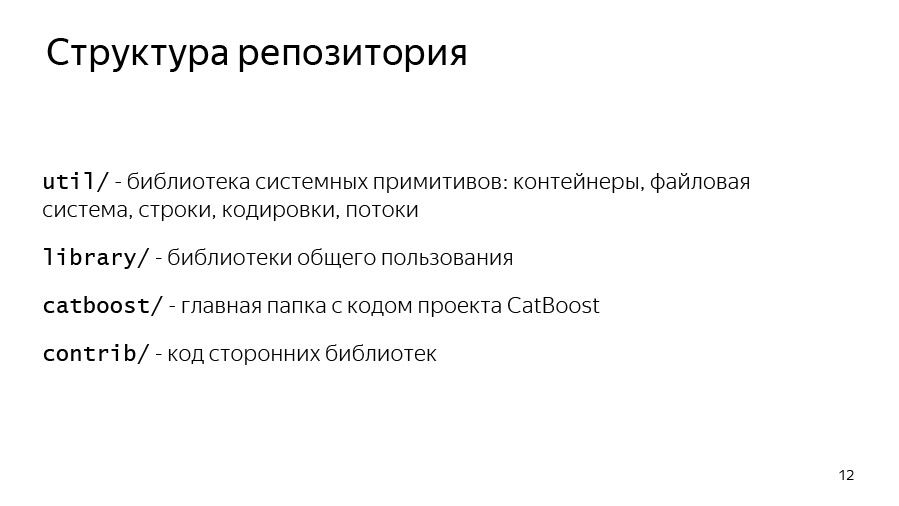
Let's start with the repository structure. We have the util folder, where the basic primitives lie: vectors, maps, file systems, work with strings, streams.
We have a library, where the public libraries used by Yandex are located - many, not just CatBoost.
The CatBoost and contrib folder is the code for third-party libraries that we link to.
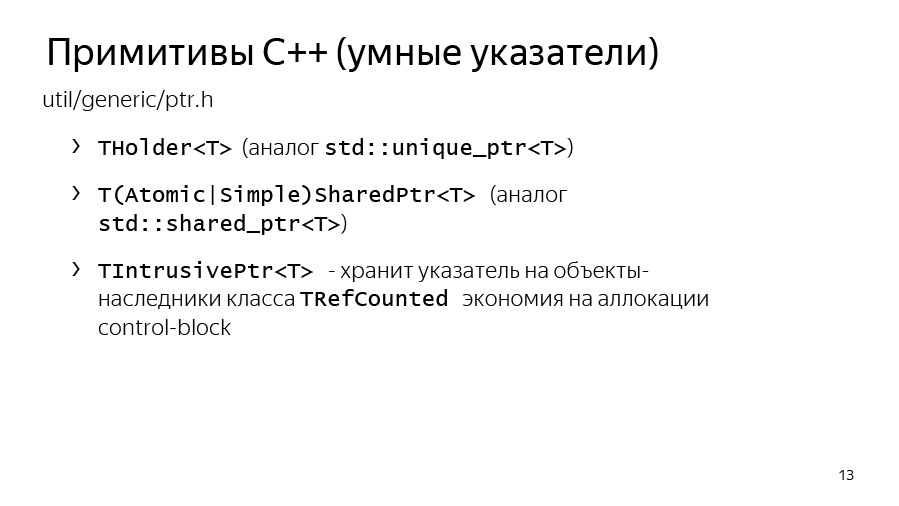
Let's now talk about the primitives of C ++ that you will encounter. The first is smart pointers. In Yandex, since the time of std :: unique_ptr, we use THolder, and instead of std :: make_unique, we use MakeHolder.

We have our own SharedPtr. And it exists in two ways, SimpleSharedPtr and AtomicSharedPtr, which differ in the type of counter. In one case, it is atomic, which means that the object can be owned as if by several threads. So it will be safe from the point of view of transmission between threads.
A separate class IntrusivePtr allows you to own objects inherited from the class TRefCounted, that is, classes that have an embedded reference counter inside. This is in order to allocate such objects at a time, without allocating an additional control unit with a counter.
We also have our own system for input and output. IInputStream and IOutputStream are interfaces for input and output. They have useful methods such as ReadTo, ReadLine, ReadAll, in general, everything that can be expected from InputStreams. And we have implementations of these streams for working with the console: Cin, Cout, Cerr and separate Endl, which is similar to std :: endl, that is, it flashes.
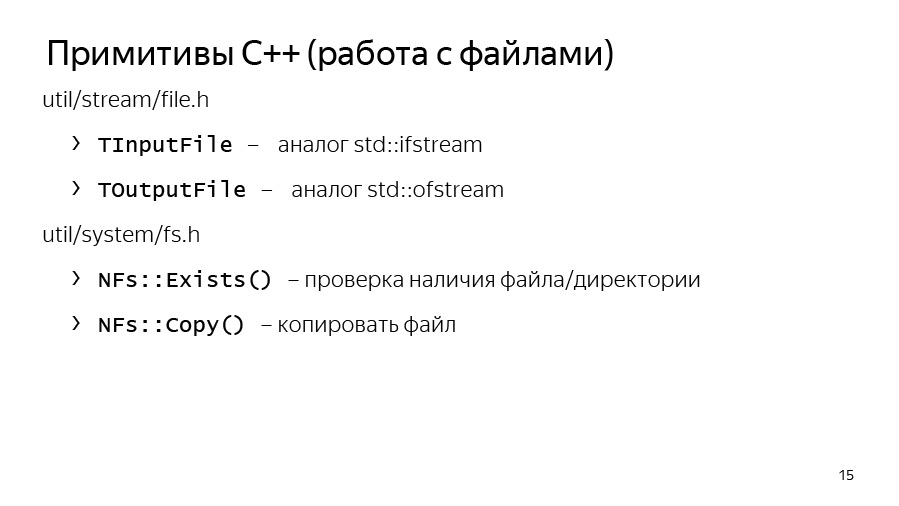
We also have our own implementation of interfaces for files: TInputFile, TOutputFile. This is a buffered read. They implement buffered read and buffered write to a file, so you can use them.
The util / system / fs.h has methods NFs :: Exists and NFs :: Copy, if suddenly you need to copy something or check that a file really exists.

We have our own containers. They moved to std :: vector for quite a long time, that is, they are simply inherited from std :: vector, std :: set and std :: map, but we also have our own THashMap and THashSet, which in some cases are compatible with unordered_map and unordered_set. But for some tasks, they were faster, so they are still used here.
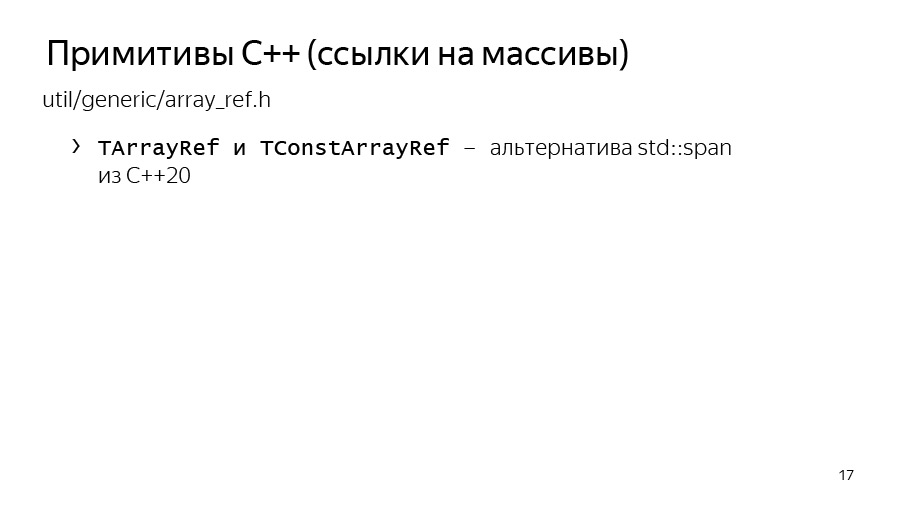
Array references are an analogue of std :: span from C ++. True, he appeared here not in the twentieth year, but much earlier. We actively use it to pass references to arrays, as if allocated on large buffers, so as not to allocate temporary buffers each time. Suppose that for calculating derivatives or some approximations, we can allocate memory on some preallocated large buffer and transfer the counting function only to TArrayRef. It is very convenient, and we use it a lot.
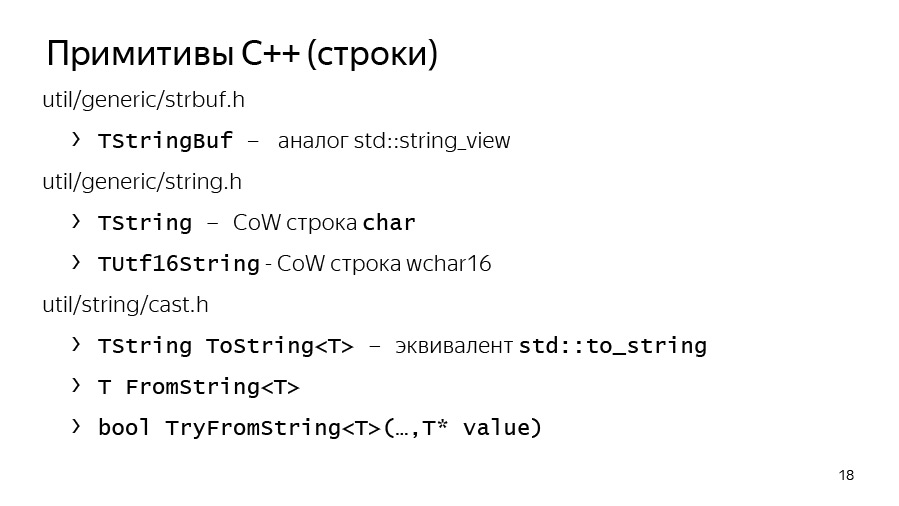
Arcadia uses its own set of classes for working with strings. First of all, TStingBuf is an analogue of str :: string_view from C ++ 17.
TString is not a std :: sting at all, it is a CopyOnWrite string, so you need to work with it quite carefully. In addition, TUtf16String is the same TString, only its base type is not char, but 16-bit wchar.
And we have tools to convert from strings to strings. This is ToString, which is analogous to std :: to_string and FromString paired with TryFromString, which allow you to turn a string into the type you need.

We have our own exception structure, the base exception in arcade libraries is yexception, which is inherited from std :: exception. We have a ythrow macro that adds information about the place from which the exception threw itself at yexception, this is just a convenient wrapper.
There is an analogue of std :: current_exception - CurrentExceptionMessage, this function displays the current exception as a string.
There are macros for asserts and verifies - these are Y_ASSERT and Y_VERIFY.
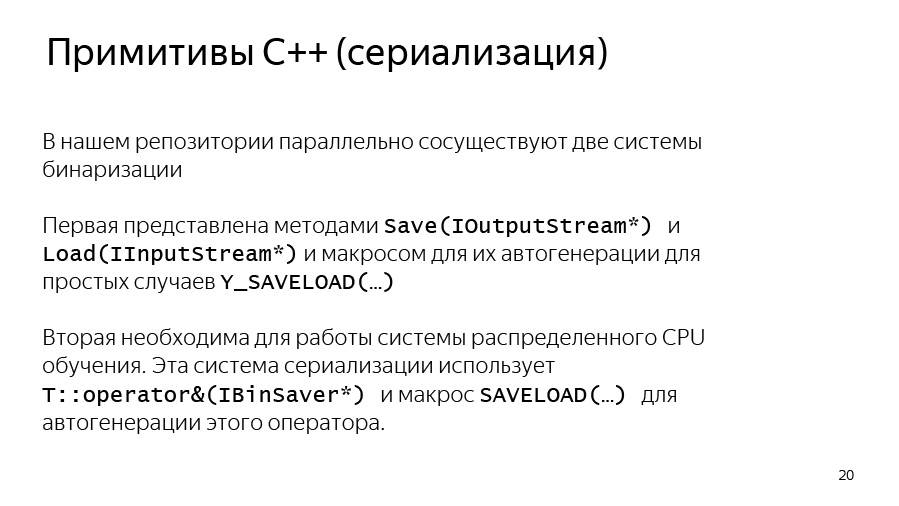
And we have our own embedded serialization, it is binary and is not intended to transfer data between different revisions. Rather, this serialization is needed in order to transfer data between two binaries of the same revision, for example, with distributed training.
It so happened that we use two versions of serialization in CatBoost. The first option works through the interface methods Save and Load, which serialize to the stream. Another option is used in our distributed learning, it uses a rather old internal library BinSaver, convenient for serializing polymorphic objects that need to be registered in a special factory. This is necessary for distributed learning, about which we are unlikely to have time to talk about here due to lack of time.
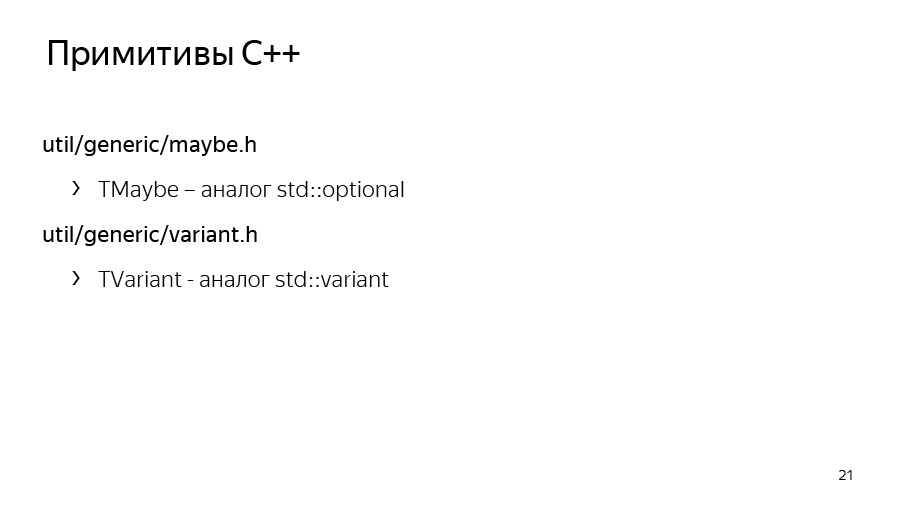
We also have our own analogue boost_optional or std :: optional - TMaybe. Analog std :: variant - TVariant. Need to use them.

There is also a certain agreement that inside the CatBoost code, instead of yexception, we throw a TCatBoostException. This is the same yexception, only in it the stack trace is always added when throwing.
And we also use the CB_ENSURE macro to conveniently check things and throw exceptions if they are not executed. For example, we often use this for parsing options or parsing parameters passed by the user.

Be sure to before starting work we recommend to familiarize yourself with the code style, it consists of two parts. The first one is a common Arc Style code style, which lies right in the root of the repository in the CPP_STYLE_GUIDE.md file. Also in the root of the repository is a separate guide for our team: catboost_command_style_guide_extension.md.
We try to draw the Python code using PEP8. It does not always work, because for Cython code the linter doesn't work for us, and sometimes there is something going around with PEP8.

What are the features of our assembly? The Arcade assembly was initially aimed at collecting the most tightly sealed applications, that is, to have a minimum of external dependencies due to static linking. This allows you to use the same binary on different versions of Linux without recompilation, which is quite convenient. Assembly targets are described in ya.make files. An example of ya.make can be seen on the next slide.
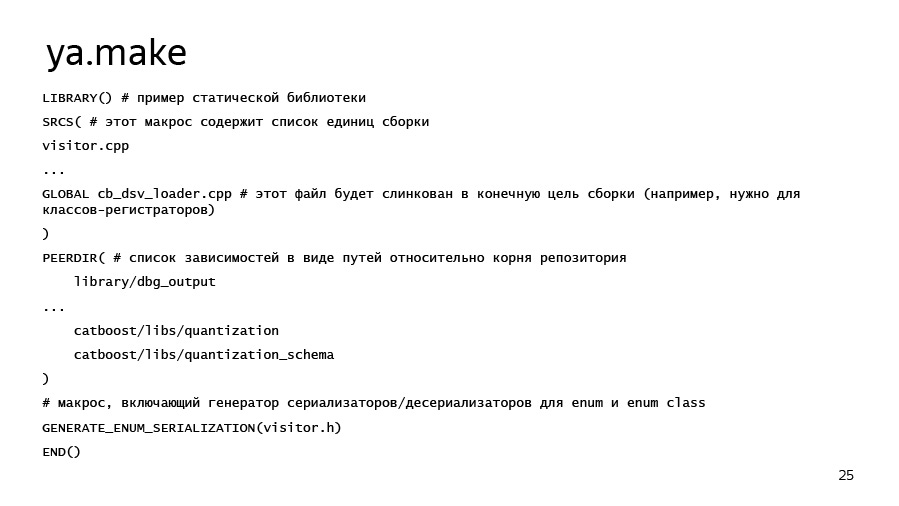
If suddenly you want to add some kind of library, program or something else, you can, firstly, just look in the neighboring ya.make-files, and secondly, use this example. Here we have the most important elements of ya.make. At the very beginning of the file we say that we want to declare the library, then we list the compilation units that we want to place in this library. There can be both cpp-files, and, for example, pyx-files, for which Cython will automatically start, and then the compiler. Library dependencies are listed through the PEERDIR macro. Here you just write the path to the folder with the library or with another artifact inside, relative to the root of the repository.
There is a useful thing, GENERATE_ENUM_SERIALIZATION, necessary to generate ToString, FromString methods for enum classes and enums, described in some header file that you pass to this macro.

Now about the most important - how to compile and run any test. At the root of the repository lies the ya script, which loads the necessary toolkits and tools, and it has the ya make command - the make subcommand - which allows you to build the -r release with the -r release key, and the -d key with the -d key. Artifacts in it are transmitted further and separated by a space.
To build Python, I immediately pointed out flags here that may be useful. This is a build with system Python, in this case with Python 3. If all of a sudden CUDA Toolkit is installed on your laptop or development machine, we recommend that you specify the –d have_cuda no flag for a faster build. CUDA has been around for quite some time, especially on 4-core systems.

It should already work ya ide. This is a tool that will generate clion or qt solution for you. And for those who came with Windows, we have a Microsoft Visual Studio solution, which lies in the msvs folder.
Listener:
- Do you have all the tests through the Python wrapper?
Stas:
- No, we separately have tests that are in the pytest folder. These are tests of our CLI interface, that is, our application. True, they work through pytest, that is, these are Python functions, in which we make a subprocess check call and check that the program does not crash and works correctly with some parameters.
Listener:
- What about unit tests in C ++?
Stas:
- We also have unit tests in C ++. They usually lie in the lib folder in ut subfolders. And they are written so - unit test or unit test for. There are examples. There are special macros to declare a class with unit tests, and separate registers for the function of unit tests.
Listener:
- To verify that nothing is broken, it is better to run those and those?
Stas:
- Yes. The only thing, our tests in open source are green only on Linux. Therefore, if you compile, for example, on a Mac, if there are five tests going to fall there is no harm. Due to the different implementation of the exhibitors on different platforms, or even some minor differences, the results can diverge greatly.

For example, take the puzzle. I want to show some example. We have a file with puzzles - open_problems.md. Solve the problem number 4 of open_problems.md. It is formulated as follows: if the user sets the learning rate to zero, then we should fall from a TCatBoostException. You need to add validation options.
To begin, we have to create a branch, clone our fork, clone origin, trigger origin, push origin into our fork and then create a branch and start working in it.
How do options parsing occur at all? As I said, we have an important catboost / libs / options folder where parsing of all options is stored.
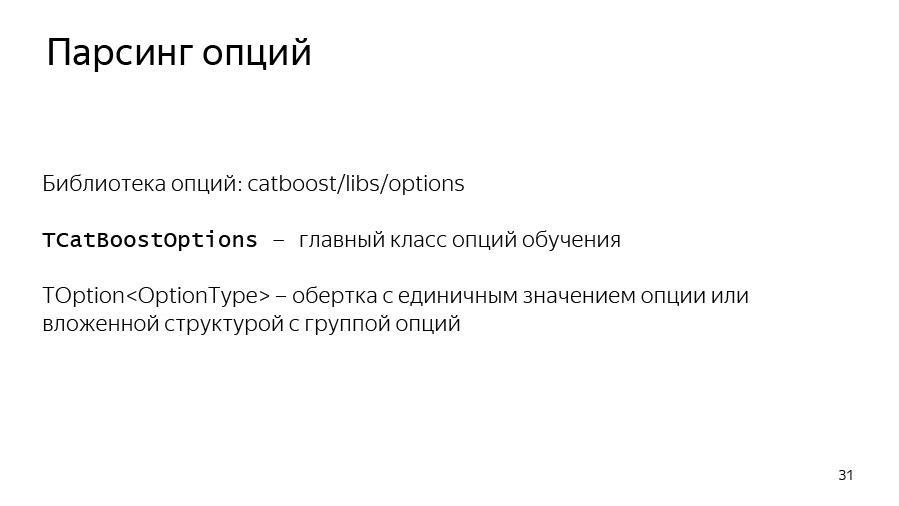
We have all the options stored in the TOption wrapper, which allows us to understand whether the option was redefined by the user. If it wasn’t, it stores some default value. In general, CatBoost parsit all options in the form of a large JSON dictionary, which during parsing turns into nested dictionaries and nested structures.

We somehow learned — for example, by searching for a grep or by reading a code — that we have a learning rate in TBoostingOptions. Let's try to write a code that simply adds CB_ENSURE, that our learning rate is more than std :: numeric_limits :: epsilon, that the user has entered something more or less reasonable.

We just used the CB_ENSURE macro here, wrote some code and now we want to add tests.
In this case, we add a test on the Command Line Interface. In the pytest folder, we have a test.py script, where there are already quite a few test samples and you can just pick up something similar to your task, copy it and change the parameters so that it starts to fall or not to fall - depending on the parameters you passed. In this case, we just take and create a simple pool of two lines. (We call datasets in Yandex as pools. We have such a feature.) And then we check that our binary really drops, if we pass learning rate 0.0.

We also add to the python-package test, which is located in atBoost / python-package / ut / medium. We still have large, large tests that are associated with tests for the assembly of python wheel-packages.

Next we have the keys for ya make - -t and -A. -t runs tests, -A forces all tests to run, regardless of whether they have large or medium tags.
Here I also used a filter by the name of the test for beauty. It is specified using the -F option and the test name specified below, which can be wild char-asterisks. In this case, I used test.py::test_zero_learning_rate*, because, looking at our python tests, you will see: almost all functions accept the task type fixture inside. This is so that by code our python-package tests look the same for both CPU- and GPU-learning and can be used for tests of GPU and CPU trainer.

Further we will commit our changes and push them into our forked repository. We publish pool rekvest. He has already joined, all is well.
- CatBoost we live on GitHub under the Apache 2.0 license, that is, open and free for all. The project is actively developing, now our repository has more than four thousand stars. CatBoost, written in C ++, is a library for gradient boosting on decision trees. It supports several types of trees, including the so-called "symmetric" trees, which are used in the library by default.
What is the profit of our oblivious trees? They learn quickly, apply quickly and help learning to be more resilient to parameter changes in terms of changes in the final quality of the model, which greatly reduces the need for parameter selection. Our library is about making it convenient to use in production, learn quickly and get good quality right away.
')
Gradient boosting is an algorithm in which we build simple predictors that improve our objective function. That is, instead of immediately building a complex model, we build many small models in turn.
How does the learning process in CatBoost? I'll tell you how it works in terms of code. First, we parse the training parameters that the user passes, validate them, and continue to see if we need to load data. Because the data can already be loaded - for example, in Python or R. Next, we load the data and build a grid of borders to quantize the numerical features. It is necessary to make learning fast.
Categorical features we process a little differently. Categorical features we have at the very beginning we hash, and then we renumber the hashes from zero to the number of unique values of the categorical feature in order to quickly count combinations of categorical features.
Then we run the training loop directly - the main loop of our machine learning, where we iteratively build trees. After this cycle, the model is exported.
The training cycle itself consists of four points. First, we are trying to build one tree. Then we look at the increase or decrease in quality it gives. Then we check if our retraining detector has worked. Then we, if it's time, save the snapshot.
Learning a single tree is a cycle through the levels of the tree. At the very beginning, we randomly select a data permutation if we use ordered boosting or we have categorical features. Then we count the counters on this permutation. Then we try to greedily pick good splits in this tree. By splits, we simply understand certain binary conditions: such and such a numeric feature is greater than such a value, or such a counter for a categorical feature is greater than such a certain value.
How does the cycle of greedy selection of tree levels? At the very beginning, the bootstrap is done - we re-weigh or sample objects, after which only the selected objects will be used to build the tree. Bootstrap can also be recalculated before selecting each split, if the sampling option is enabled at each level.
Then we aggregate the derivatives in histograms, so we do for each split candidate. With the help of histograms we try to estimate the change in the objective function that will occur if we choose this split candidate.
We select the candidate with the best soon and add it to the tree. Then we calculate the statistics using this selected tree on the remaining permutations, update the value in the leaves on these permutations, count the values in the leaves for the model and proceed to the next iteration of the cycle.
It is very difficult to select any one place where the training takes place, so on this slide - it can be used as a certain entry point - the main files that we use for training are listed. This is greedy_tensor_search, in which we live the very procedure of greedy selection of splits. This is train.cpp, where we have the main CPU-training factory. This is aprox_calcer, where the functions of updating the values in the leaves are. And also score_calcer is a candidate's evaluation function.
No less important parts are catboost.pyx and core.py. This is the Python wrapper code, most likely, many of you will inject some things into the Python wrapper. Our Python wrapper is written in Cython, Cython is translated to C ++, so this code should be fast.
Our R-wrapper is in the R-package folder. It may be necessary for someone to add or correct some options, for options we have a separate library - catboost / libs / options.
We came from Arcadia to GitHub, so we have a lot of interesting artifacts you will encounter.
Let's start with the repository structure. We have the util folder, where the basic primitives lie: vectors, maps, file systems, work with strings, streams.
We have a library, where the public libraries used by Yandex are located - many, not just CatBoost.
The CatBoost and contrib folder is the code for third-party libraries that we link to.
Let's now talk about the primitives of C ++ that you will encounter. The first is smart pointers. In Yandex, since the time of std :: unique_ptr, we use THolder, and instead of std :: make_unique, we use MakeHolder.
We have our own SharedPtr. And it exists in two ways, SimpleSharedPtr and AtomicSharedPtr, which differ in the type of counter. In one case, it is atomic, which means that the object can be owned as if by several threads. So it will be safe from the point of view of transmission between threads.
A separate class IntrusivePtr allows you to own objects inherited from the class TRefCounted, that is, classes that have an embedded reference counter inside. This is in order to allocate such objects at a time, without allocating an additional control unit with a counter.
We also have our own system for input and output. IInputStream and IOutputStream are interfaces for input and output. They have useful methods such as ReadTo, ReadLine, ReadAll, in general, everything that can be expected from InputStreams. And we have implementations of these streams for working with the console: Cin, Cout, Cerr and separate Endl, which is similar to std :: endl, that is, it flashes.
We also have our own implementation of interfaces for files: TInputFile, TOutputFile. This is a buffered read. They implement buffered read and buffered write to a file, so you can use them.
The util / system / fs.h has methods NFs :: Exists and NFs :: Copy, if suddenly you need to copy something or check that a file really exists.
We have our own containers. They moved to std :: vector for quite a long time, that is, they are simply inherited from std :: vector, std :: set and std :: map, but we also have our own THashMap and THashSet, which in some cases are compatible with unordered_map and unordered_set. But for some tasks, they were faster, so they are still used here.
Array references are an analogue of std :: span from C ++. True, he appeared here not in the twentieth year, but much earlier. We actively use it to pass references to arrays, as if allocated on large buffers, so as not to allocate temporary buffers each time. Suppose that for calculating derivatives or some approximations, we can allocate memory on some preallocated large buffer and transfer the counting function only to TArrayRef. It is very convenient, and we use it a lot.
Arcadia uses its own set of classes for working with strings. First of all, TStingBuf is an analogue of str :: string_view from C ++ 17.
TString is not a std :: sting at all, it is a CopyOnWrite string, so you need to work with it quite carefully. In addition, TUtf16String is the same TString, only its base type is not char, but 16-bit wchar.
And we have tools to convert from strings to strings. This is ToString, which is analogous to std :: to_string and FromString paired with TryFromString, which allow you to turn a string into the type you need.
We have our own exception structure, the base exception in arcade libraries is yexception, which is inherited from std :: exception. We have a ythrow macro that adds information about the place from which the exception threw itself at yexception, this is just a convenient wrapper.
There is an analogue of std :: current_exception - CurrentExceptionMessage, this function displays the current exception as a string.
There are macros for asserts and verifies - these are Y_ASSERT and Y_VERIFY.
And we have our own embedded serialization, it is binary and is not intended to transfer data between different revisions. Rather, this serialization is needed in order to transfer data between two binaries of the same revision, for example, with distributed training.
It so happened that we use two versions of serialization in CatBoost. The first option works through the interface methods Save and Load, which serialize to the stream. Another option is used in our distributed learning, it uses a rather old internal library BinSaver, convenient for serializing polymorphic objects that need to be registered in a special factory. This is necessary for distributed learning, about which we are unlikely to have time to talk about here due to lack of time.
We also have our own analogue boost_optional or std :: optional - TMaybe. Analog std :: variant - TVariant. Need to use them.
There is also a certain agreement that inside the CatBoost code, instead of yexception, we throw a TCatBoostException. This is the same yexception, only in it the stack trace is always added when throwing.
And we also use the CB_ENSURE macro to conveniently check things and throw exceptions if they are not executed. For example, we often use this for parsing options or parsing parameters passed by the user.
Links from the slide: first , second
Be sure to before starting work we recommend to familiarize yourself with the code style, it consists of two parts. The first one is a common Arc Style code style, which lies right in the root of the repository in the CPP_STYLE_GUIDE.md file. Also in the root of the repository is a separate guide for our team: catboost_command_style_guide_extension.md.
We try to draw the Python code using PEP8. It does not always work, because for Cython code the linter doesn't work for us, and sometimes there is something going around with PEP8.
What are the features of our assembly? The Arcade assembly was initially aimed at collecting the most tightly sealed applications, that is, to have a minimum of external dependencies due to static linking. This allows you to use the same binary on different versions of Linux without recompilation, which is quite convenient. Assembly targets are described in ya.make files. An example of ya.make can be seen on the next slide.
If suddenly you want to add some kind of library, program or something else, you can, firstly, just look in the neighboring ya.make-files, and secondly, use this example. Here we have the most important elements of ya.make. At the very beginning of the file we say that we want to declare the library, then we list the compilation units that we want to place in this library. There can be both cpp-files, and, for example, pyx-files, for which Cython will automatically start, and then the compiler. Library dependencies are listed through the PEERDIR macro. Here you just write the path to the folder with the library or with another artifact inside, relative to the root of the repository.
There is a useful thing, GENERATE_ENUM_SERIALIZATION, necessary to generate ToString, FromString methods for enum classes and enums, described in some header file that you pass to this macro.
Now about the most important - how to compile and run any test. At the root of the repository lies the ya script, which loads the necessary toolkits and tools, and it has the ya make command - the make subcommand - which allows you to build the -r release with the -r release key, and the -d key with the -d key. Artifacts in it are transmitted further and separated by a space.
To build Python, I immediately pointed out flags here that may be useful. This is a build with system Python, in this case with Python 3. If all of a sudden CUDA Toolkit is installed on your laptop or development machine, we recommend that you specify the –d have_cuda no flag for a faster build. CUDA has been around for quite some time, especially on 4-core systems.
It should already work ya ide. This is a tool that will generate clion or qt solution for you. And for those who came with Windows, we have a Microsoft Visual Studio solution, which lies in the msvs folder.
Listener:
- Do you have all the tests through the Python wrapper?
Stas:
- No, we separately have tests that are in the pytest folder. These are tests of our CLI interface, that is, our application. True, they work through pytest, that is, these are Python functions, in which we make a subprocess check call and check that the program does not crash and works correctly with some parameters.
Listener:
- What about unit tests in C ++?
Stas:
- We also have unit tests in C ++. They usually lie in the lib folder in ut subfolders. And they are written so - unit test or unit test for. There are examples. There are special macros to declare a class with unit tests, and separate registers for the function of unit tests.
Listener:
- To verify that nothing is broken, it is better to run those and those?
Stas:
- Yes. The only thing, our tests in open source are green only on Linux. Therefore, if you compile, for example, on a Mac, if there are five tests going to fall there is no harm. Due to the different implementation of the exhibitors on different platforms, or even some minor differences, the results can diverge greatly.
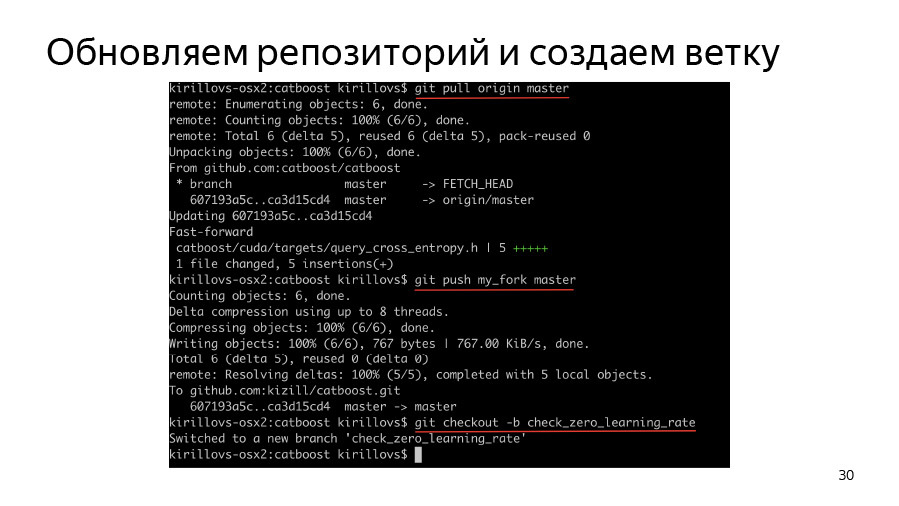
For example, take the puzzle. I want to show some example. We have a file with puzzles - open_problems.md. Solve the problem number 4 of open_problems.md. It is formulated as follows: if the user sets the learning rate to zero, then we should fall from a TCatBoostException. You need to add validation options.
To begin, we have to create a branch, clone our fork, clone origin, trigger origin, push origin into our fork and then create a branch and start working in it.
How do options parsing occur at all? As I said, we have an important catboost / libs / options folder where parsing of all options is stored.
We have all the options stored in the TOption wrapper, which allows us to understand whether the option was redefined by the user. If it wasn’t, it stores some default value. In general, CatBoost parsit all options in the form of a large JSON dictionary, which during parsing turns into nested dictionaries and nested structures.
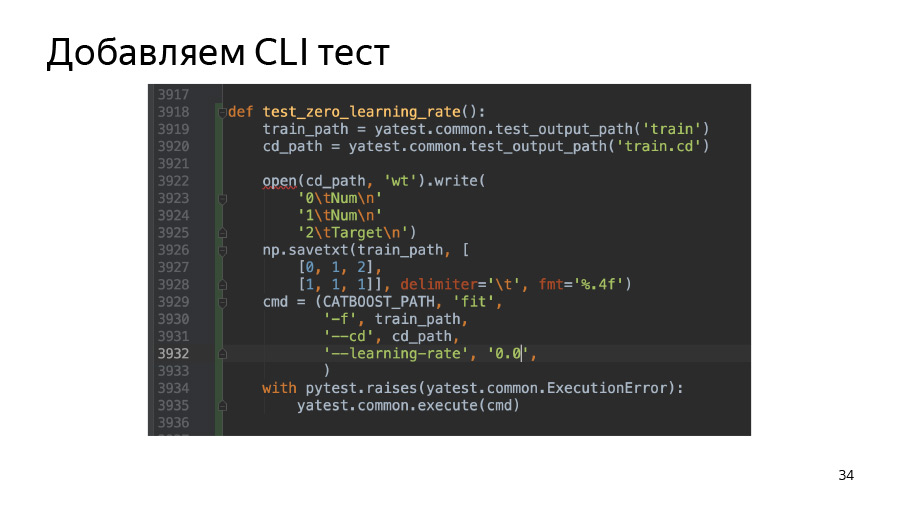
We somehow learned — for example, by searching for a grep or by reading a code — that we have a learning rate in TBoostingOptions. Let's try to write a code that simply adds CB_ENSURE, that our learning rate is more than std :: numeric_limits :: epsilon, that the user has entered something more or less reasonable.
We just used the CB_ENSURE macro here, wrote some code and now we want to add tests.
In this case, we add a test on the Command Line Interface. In the pytest folder, we have a test.py script, where there are already quite a few test samples and you can just pick up something similar to your task, copy it and change the parameters so that it starts to fall or not to fall - depending on the parameters you passed. In this case, we just take and create a simple pool of two lines. (We call datasets in Yandex as pools. We have such a feature.) And then we check that our binary really drops, if we pass learning rate 0.0.
We also add to the python-package test, which is located in atBoost / python-package / ut / medium. We still have large, large tests that are associated with tests for the assembly of python wheel-packages.
Next we have the keys for ya make - -t and -A. -t runs tests, -A forces all tests to run, regardless of whether they have large or medium tags.
Here I also used a filter by the name of the test for beauty. It is specified using the -F option and the test name specified below, which can be wild char-asterisks. In this case, I used test.py::test_zero_learning_rate*, because, looking at our python tests, you will see: almost all functions accept the task type fixture inside. This is so that by code our python-package tests look the same for both CPU- and GPU-learning and can be used for tests of GPU and CPU trainer.
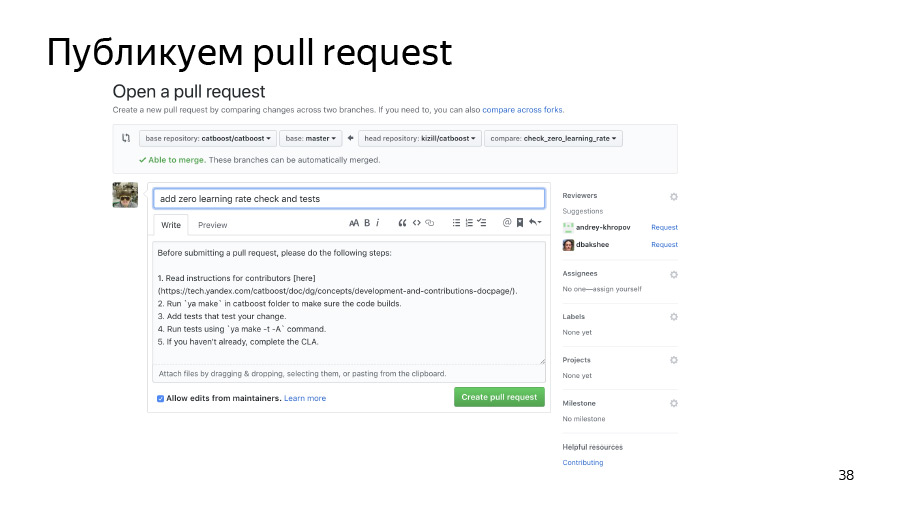
Further we will commit our changes and push them into our forked repository. We publish pool rekvest. He has already joined, all is well.
Source: https://habr.com/ru/post/458790/
All Articles