Texturing, or what you need to know to become an artist on surfaces. Part 3. PBR and materials
In the last part of the tutorial, we disassembled the principle of operation of the masks, what “texture” is and what channels are used absolutely for everything - the pixel parameters. Now we’ll consider everyone’s favorite PBR and collect textures to create wet, dirty asphalt.
In this lesson I will refer a lot to other tutors and sources of information in order to minimize the volume of the tutor itself. Most of the links will be provided at the beginning of the tutorial, so if you do not understand any of this tutor, click on the links and read the information there. When you are ready - go back to the tutor and continue to learn the basics of the artist on the surface. If any links are not available, please, let me know in a personal or in the comments. I will definitely correct this misunderstanding.
Also, if something is completely unclear - I beg you to inform about it, so that I can reveal this topic in more detail.
')
Part 1. Pixel here
Part 2. Masks and textures are here.
Part 3. PBR and Materials - you read it.
Part 4. Models, normals and sweep here .
This abbreviation stands for: Physically Based Rendering . What the translation means "Physics-based render."
As we all know, we could not see any object if the objects did not reflect the light that falls on them. It all works very simply - a beam of light falls on the table, is reflected and hits you on the retina of the eye.
Depending on the surface, on its condition (whether it reflects like a mirror, or has a roughness, if there are drops of dirt / water / coffee on the surface), an already modified beam comes to your eye (let's say). Moreover, the beam is not entirely correct, since it is already known that light is also a wave. But this is too deep for us, and here I could be wrong.
But the essence remains the same - the way we see objects, is built from the way the light reflects from the surface. And the PBR standard describes what parameters should be taken into account in order for the light to look as cinematic as possible.
I will not describe how the light is constructed according to the rules, how it is reflected and whether it is reflected at all. About how light works in physics there are a bunch of articles:
We will consider PBR from the point of view of the general concept and at the level of work with each parameter separately through channels of pixels.
From the last part of the tutorial, remember that PBR is actually created through the summation of parameters (you should not go into the formulas). That is, PBR consists of a set of parameters:
All parameters except Color and Normal map use 1 channel, and Color and Normal map use 3 channels each:
Now it is worth noting that rendering (mapping) based on physics has several different implementations. All of them are similar to each other and use all the same channels of pixels to adjust the final result. Usually there are 2 types of implementation:
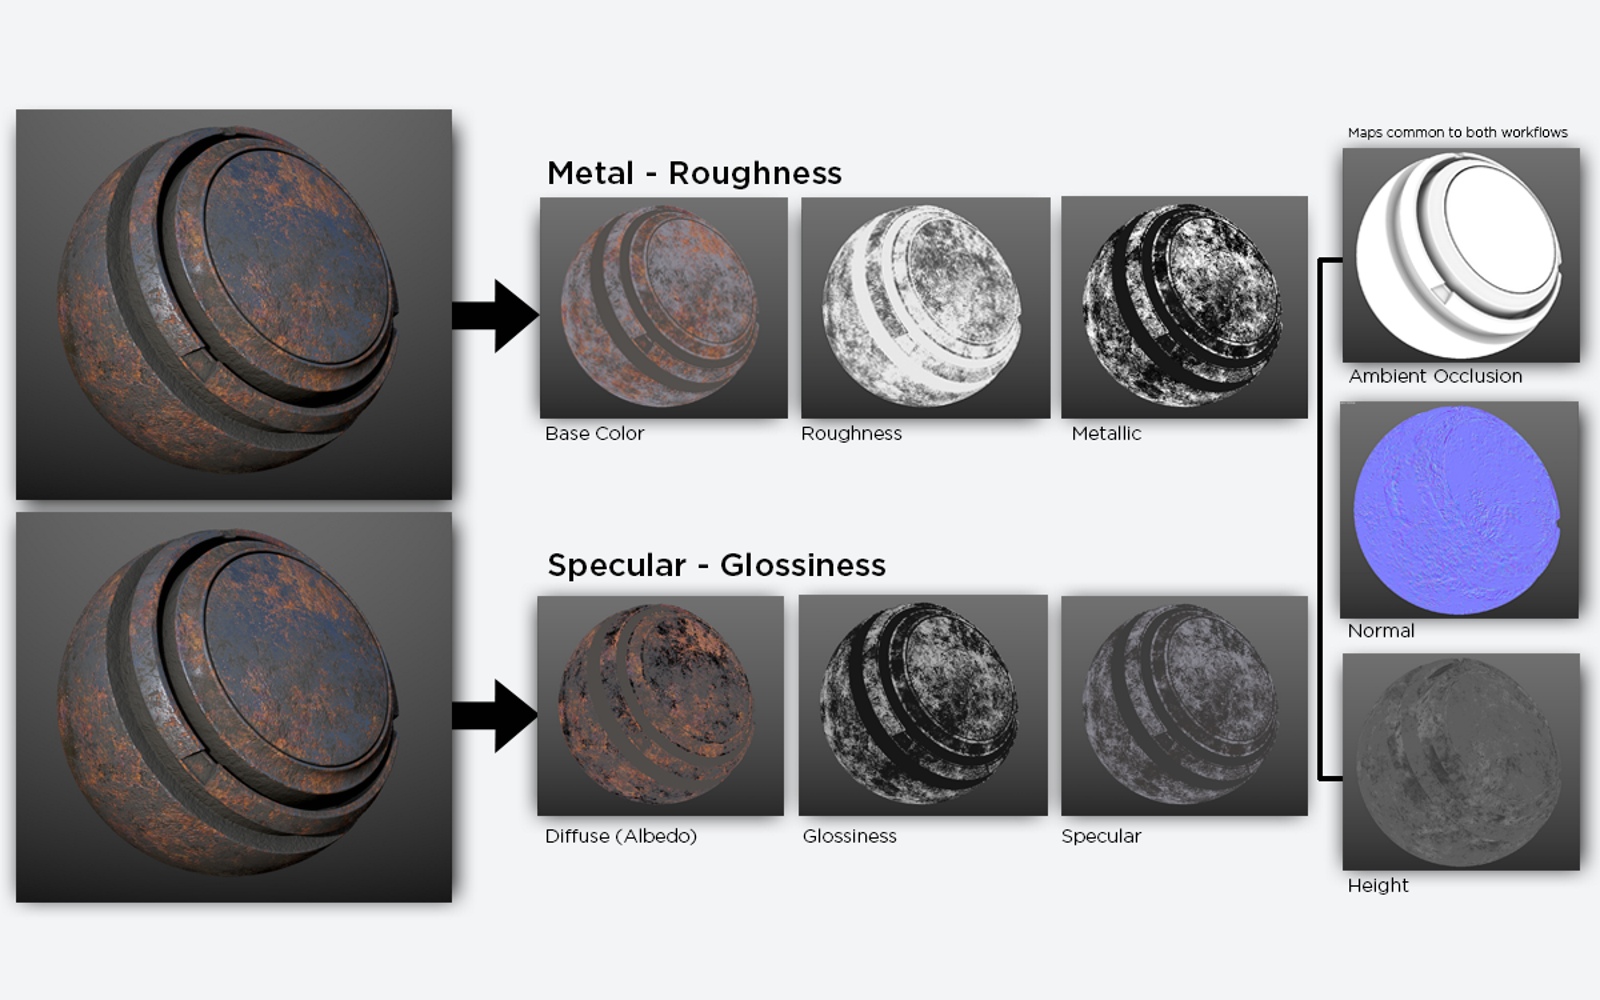
In the first type, the parameters of Color-Metal-Roughness are taken into account, in the second - Diffuse-Specular-Glossiness .
Both types of implementation use the same 3 parameters - AO, Normal map, Height .
Moreover, in modern PBR, the Height parameter is mixed and hidden in the Normal Map. In fact, it is easier to express the unevenness through one Normal Map, rather than calculate the depth / height of a pixel, or something else in additional channels. Everything is simpler than it seems, and it’s better not to be wise with dozens of parameters.
Although the parameter Height is rendered separately when creating textures in Substance Painter, when baking textures it is embedded into the normal map (you can still select it into a separate channel if you want).
Total, the final result of the image consists of the imposition of parameters in one pixel:

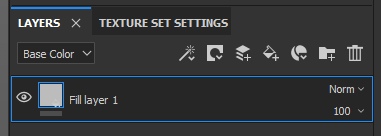
Let's now look at how this works in the Substance Painter. To do this, we are again creating a new project with the usual playlist and standard settings (I told about them in the second part of the tutors). And create a new fill layer:
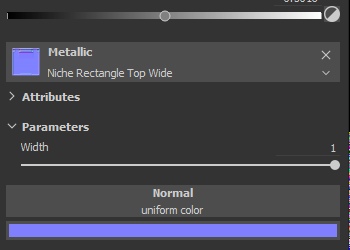
Now consider the standard normal texture from the Substance Painter set “Niche Rectangle Top Wide” , which is located under the Hard Surface tag:

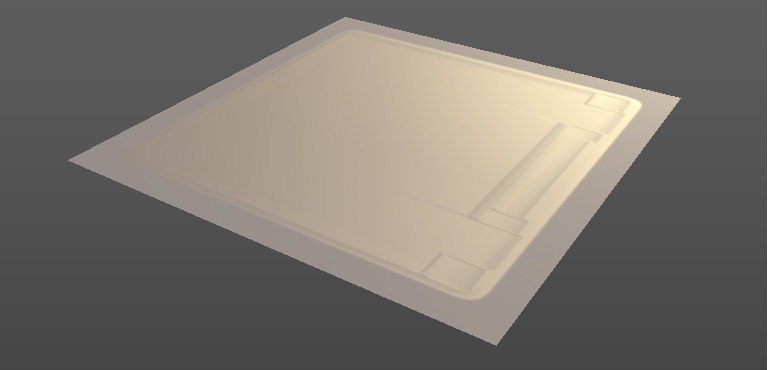
Next, we will transfer this normal map to the Base Color layer parameter (from the previous lesson we have to remember how to do this). This is what the normal map looks like if you take it as an image (the image above). But now remove it from the BaseColor parameter (we did this for general reference) by clicking on the cross in the parameter:

And transfer it to the Normal parameter:

Your final result immediately updated. Now, if you hold down Alt and LKM - you can turn the camera and look at the Plaine from different angles. The light reflected from the pixels will begin to shimmer, creating the illusion of depth. It’s as if there are really dimples and bulges on the playline. All this is noticeable at an angle from 90 to 140-150 degrees. And the greater the angle of inclination, the more it becomes clear that this is a calculation of a video card that determines how each pixel should reflect light in order to create this illusion. As input values, we transfer 3 parameters in the form of pixel channels to the video card (in other words, the Normal map texture):

Now let's pervert. Remove this map from the Normal parameter and specify it in the Metallic channel. The channel is one for Metallic, and the normal map has 3 channels, respectively, by inserting a normal map in this parameter, Substance Painter will cut off 2 extra channels (I assume that GB) and leave only one for calculations:
And the result:
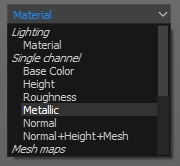
The final result shows now that there are no longer any bulges and depressions, but the surface itself began to resemble some kind of metallic plate. You can also see how Metallic one will look like without other parameters (BaseColor and others) by switching the display mode to 1 Metallic channel (if you didn’t change anything, you can switch the display in the viewport at the top right):
Choose a metallic and get the following result:
As you can see, this is one channel in grayscale, which determines which pixels should look like metal, which ones - as something in between, and which ones - not metal. 0 is not metallic. 1 - metal.
Similarly with the Roughness channel - any texture is suitable for working with it. B depends on what kind of end result you need. You can try to stick into the Roughness channel any texture available to you and look at the result.
The word “material” usually means a collection of ready-made parameters, the totality of which gives a cinematic result - material (in other words, texture, surface).
Take, for example, this is a leather chair:
Visually, the chair consists of 3 materials:
Each material has its own parameters:
And this is how the skin parameters look visually:
Let's sum up the intermediate result:
Now we know:
Based on all this, we can now imagine how you can create wet dirty asphalt with tire tracks. Can we?
And what do we need in order to collect wet dirty asphalt with tire tracks?
First we need to decide on the number of materials that will be used in our tutor:
Then add them to the Substance Painter project.
Here ( Link ) you can download textures for materials that we will use in our practice.
Our goal now is not to create very high-quality textures, but to get acquainted with how you can create something interesting using the PBR parameters and masks. Therefore, at this stage we will not use mask generators or dirt, and we will do everything manually to understand the essence. When you understand the essence , the basis of all this, you will be able to use the generators much better than just starting to unscrew them, hoping to get the perfect mask / material.
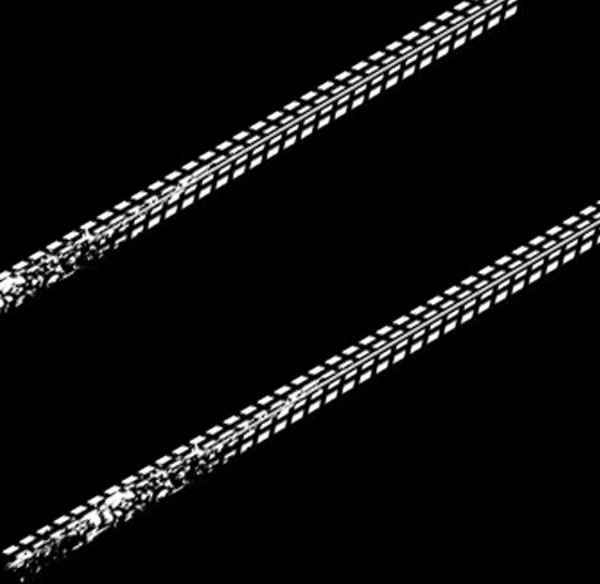
If you have already looked at the files, then you probably noticed a mask for tires. It was prepared separately, since I could not generate it on the go in Substance Painter, so I used the tire pattern found on the Internet and prepared it through Photoshop to work in Substance Painter:
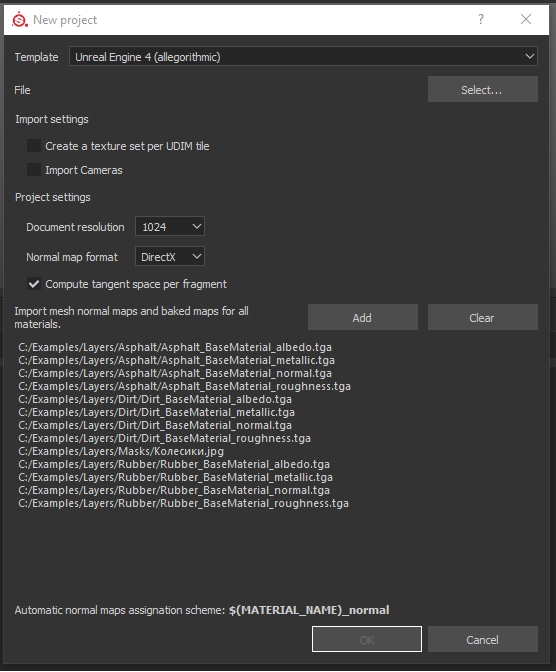
Now create a new project and add all our files to it. To do this, we choose the default settings, but now we need to specify our texture maps while creating the project:
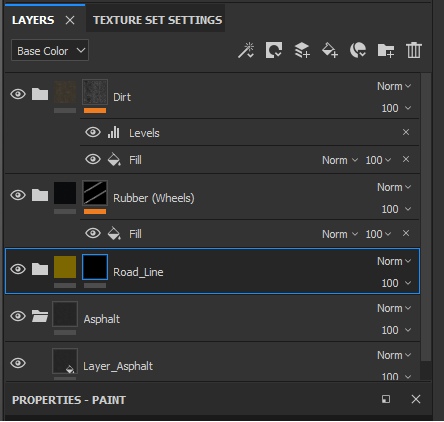
In the project we will create 3 folders for each material and name them so as not to be confused:
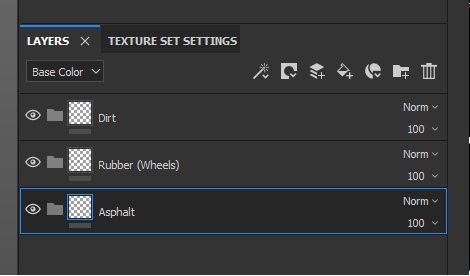
In our case, the hierarchy of folders is very important (and not only in ours, but always important). The hierarchy determines the level of material, in other words - what lies on it. Asphalt in our example is the bottom. There are traces of tires on it. But the dirt can be on the tracks of the tires, and on the pavement. Therefore, the dirt will be above all.
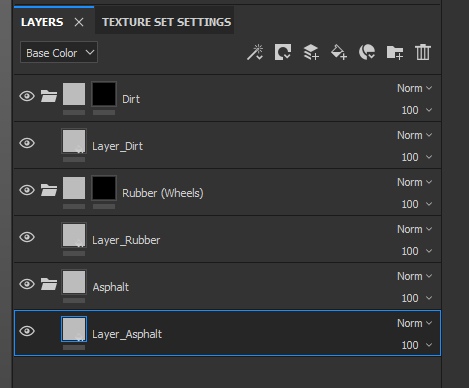
Now let's immediately hide everything that should be hidden, and leave only the asphalt. That is, create black masks on the Rubber and Dirt folders:

Now we will create the 1st layer in each folder. Or rather, create layers and distribute them into folders. Do not forget about naming, so that you don’t get confused (despite the fact that it’s not visually clear that the layers are in folders - believe me, they are in folders):
All new layers have basic average parameters. Therefore, Base Color is gray, the normal does not display bumps, and Metallic and Roughness do not create the impression of any material.
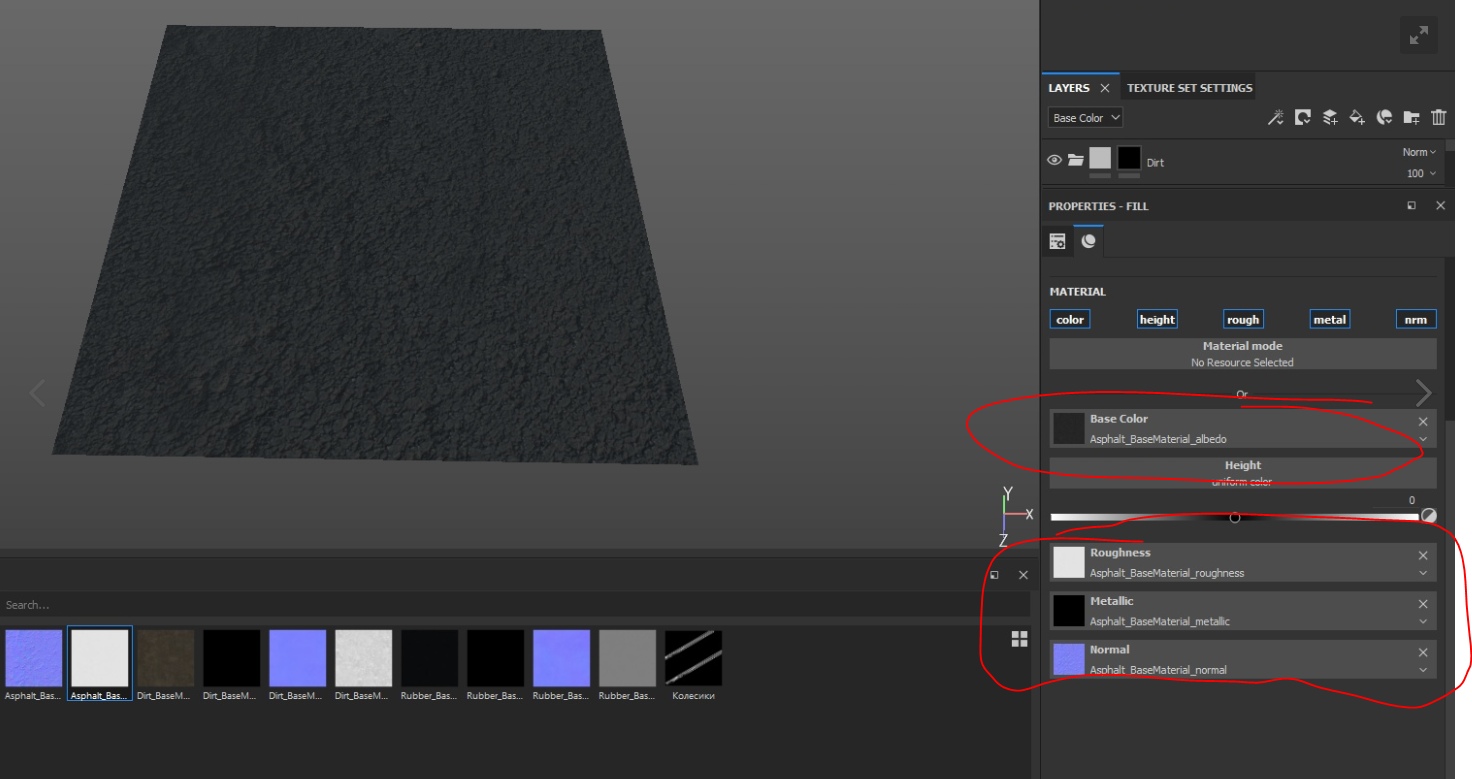
And now we need to fix this by specifying the corresponding texture in each parameter (for example, asphalt):
Your task now is to distribute all the textures of materials in the desired parameters of the layers. After you do all this, assign a mask to the rubber and create the effect of the traces. Since we already have a black mask for the folder, we just need to connect the file with the traces of the wheels to this mask. To do this, click RMB on the mask and select Add Fill:

And in the GrayScale parameters we specify the mask:

As a result, traces of rubber will appear on the asphalt, but they will be quite difficult to discern, since this is still PBR and cinematic (!!!). To see them, you need to turn Plane at a certain angle:
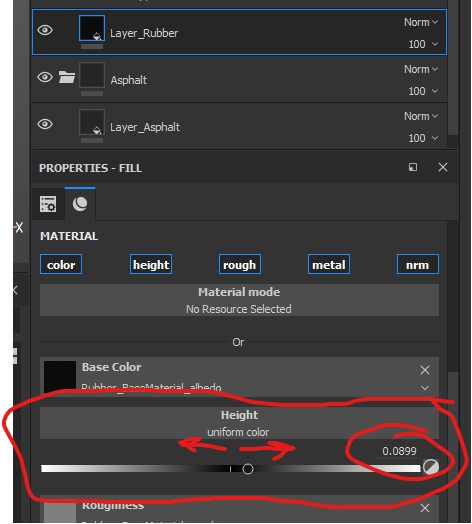
Now these two layers (asphalt and rubber) are on the same level. But we know that rubber is ON asphalt, which means that the layer with rubber should be physically higher. And now we will use the parameter Height.
Find it in the parameters of the Rubber layer and unscrew it to the maximum to get a feel for how it works. Twist the camera to see how the light began to process the pixels that you set up with your own hands. Feel your power! =)
Well, now align the parameter to 0.1, so that it is not so obvious and more likely:
We could unscrew at -0.1 so that we would have holes, like after cars on dirt, but this is asphalt, and it does not fall so easily.
Now we set up the dirt. On the basis of reality, we can assume that the dirt should get into the asphalt cracks in the first place. But we do not have a mask so that we can show a layer of dirt in the cracks. However, there is a solution - we can take BaseColor asphalt and, on its basis, make a mask for dirt.
How it works? If you look at the BaseColor asphalt, then you can note that the darker the pixel, the more it looks like a crack. That is, in this image everything is dark — these are cracks, and all light is the surface. And if we want to use the image as a mask, then it would be enough for us to invert the colors (dark to make light and vice versa) pixels, and we get a mask for dirt.
To do this, turn off the display of the layer with asphalt (by clicking on the eye of the folder with asphalt) to make it easier to perceive what we are doing.
Next, we point out that there should be a file in the dirt mask and attach the Asphalt_BaseColor file to it:

As I wrote above, the asphalt was light, and the cracks were dark. Accordingly, dirt began to appear on large surfaces, and the base gray color dominated in the cracks (basic parameters / background).
Now our task is to make this texture be perceived differently - to invert the colors and enhance them so that the mask shows dirt in the cracks. The easiest way to do this is with the optional Levels effect. Add an additional “Levels” filter to the mask in the same way as we added Fill (PCM - Add Levels). And twist the parameters around, as in the picture below:

And press the button below “Invert” to invert the intensity levels of the channel:
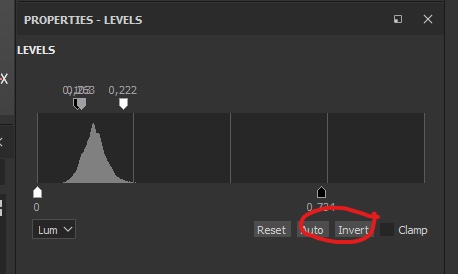
Now the dirt is located exactly where we need - in the cracks of asphalt:

We turn on the asphalt and look at our works:

But it is too easy. Therefore, let's now add orange markings to our asphalt. For this we will need:

You can also adjust the Metallic and Roughness settings to your taste to create realistic paint. I did not do this to shorten the splinter time.
Now, remembering the rules of the hierarchy of layers, let's place a folder with a road line between asphalt and rubber:
It is time to hand draw. Highlight the RoadLine folder mask and draw a markup strip on the playline. I got something like this:

Now it is necessary to add another mask on the paint layer itself to create a feeling of fallen paint. To do this, we will not create a folder, but create a mask directly on the layer and add any standard Substance Painter mask. To do this, add a mask, and then add a fill (right-click on the mask and Add Fill). In the fill, select the Dirt 4 texture, which is under the Procedural tag:

And see the result:

Do not forget that the layer of paint you need to specify the height. I propose to specify 0.05 - the average between rubber and asphalt.
Be careful, because for this you need to select exactly the layer, not the mask. You can manually specify the value by clicking on the number to the right above the slider.
Well, what asphalt without water?
To do this, create your own folder with the layer. Do NOT add any masks yet.
Set the folder in the hierarchy to the top. After all, water is on top, right? At the layer, unscrew at a maximum of Metallic and at a minimum of Roughness. Next, specify the height of the water, equal to 0.15.
And now turn off the Color channel by clicking on the button highlighted by the blue frame:
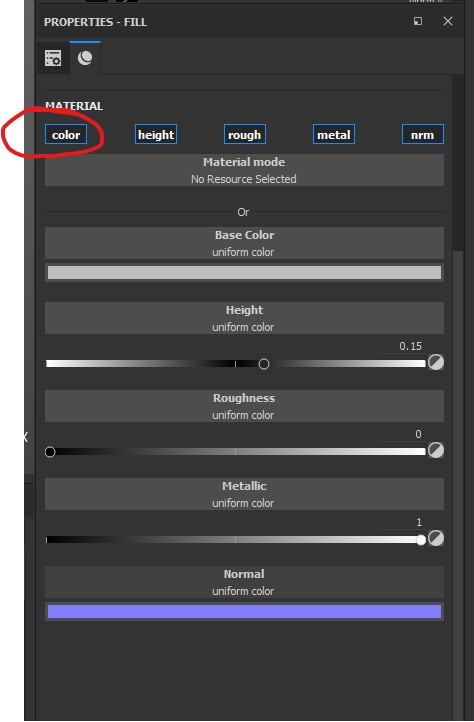
What happened? There was a mixture of all the lower layers according to the masks and the layer with water. But water now has no color channel, which means that it cannot paint the pixels it needs. For that, all the other channels affect the texture pixels, and the asphalt became as wet and unpleasant as possible, as if not asphalt at all =)
Now homework: put masks so that the asphalt was not completely wet, but with small puddles. Remember that puddles do not have irregularities on the surface - think about how to mix the layers so that the puddles are smooth. And what else do you need to do? I am sure you can handle =)
Total
In this tutorial, we sorted out how to create textures. In general, correctly applying the parameters, you can already begin to texture and even feel free to call yourself a junior texture artist.
We learned how PBR works.
Parameters in PBR do not have to be unique. These are still the usual parameters that we can specify via pixel channels.
We can use the same textures in different ways. This gives us an advantage - we do not need to load memory with unnecessary files with a large number of pixels, but it is enough to load one file and tell the program how to calculate it.
We got acquainted with the materials and how they are going. Now you know that it is not necessary to be a super-cool photoshop-master, but rather to find ready-made parameters so that the program can present the material correctly from them.
In the following parts, we will touch on topics such as sweep, texel density (and what texel is), and finally, let's get to the most interesting part - creating your own shaders in UE4.
Quixel and Substance Painter programs
I always recommend beginners who are engaged in the creation of textures from materials (not the materials themselves) to start working with Quixel. Since this program can already have hundreds of ready-made presets, which are very easily controlled and configured, and through masks you can achieve the same result as in practice through Substance Painter.
As for the Substance Painter, its power begins to manifest itself when the third Substance Designer is included in the work. Designer allows you to create your materials by generating the surfaces we need. The designer is cool in that you can create “smart materials” that will have settings for the internal masks that will control the quantity and quality of the internal materials. That is, “smart materials” in this case is a container that contains several materials and pre-installed masks, which are governed by the formulas and algorithms that the artist prescribes in the Designer.
Then this container is exported to Painter, where its fine tuning takes place. For example, we created our wet asphalt in Painter. But we could collect in the Designer and connect a bunch of additional settings that would allow us to change the result on the fly in one place, and not switch among the heaps of masks, as in Painter.
About PBR and the translation of this abbreviation
Very often, PBR is translated as a physically correct render.I think that accurate translation is important here, because translations like “Physically correct” are fundamentally wrong, since the render in this case is based on physics, but does not have to be correct in relation to physics. You can make metal = 1, and a roughness equal to 1, and include an additional bunch of other parameters, and this will no longer be a correct material from the point of view of physics, but once based on it and converted into your own set of parameters. That is, creating materials based on PBR, you can completely ignore the laws of physics and create material that is unique in its own way.
For example, stones drawn in their style. How physically correct should we display invented material that does not exist in nature?
In this lesson I will refer a lot to other tutors and sources of information in order to minimize the volume of the tutor itself. Most of the links will be provided at the beginning of the tutorial, so if you do not understand any of this tutor, click on the links and read the information there. When you are ready - go back to the tutor and continue to learn the basics of the artist on the surface. If any links are not available, please, let me know in a personal or in the comments. I will definitely correct this misunderstanding.
Also, if something is completely unclear - I beg you to inform about it, so that I can reveal this topic in more detail.
')
Part 1. Pixel here
Part 2. Masks and textures are here.
Part 3. PBR and Materials - you read it.
Part 4. Models, normals and sweep here .
PBR
This abbreviation stands for: Physically Based Rendering . What the translation means "Physics-based render."
As we all know, we could not see any object if the objects did not reflect the light that falls on them. It all works very simply - a beam of light falls on the table, is reflected and hits you on the retina of the eye.
Depending on the surface, on its condition (whether it reflects like a mirror, or has a roughness, if there are drops of dirt / water / coffee on the surface), an already modified beam comes to your eye (let's say). Moreover, the beam is not entirely correct, since it is already known that light is also a wave. But this is too deep for us, and here I could be wrong.
But the essence remains the same - the way we see objects, is built from the way the light reflects from the surface. And the PBR standard describes what parameters should be taken into account in order for the light to look as cinematic as possible.
I will not describe how the light is constructed according to the rules, how it is reflected and whether it is reflected at all. About how light works in physics there are a bunch of articles:
- An article on the basics from the creators of Substance Painter / Designer is here . And its translation from 2015 is here . Link to the second part of the translation is on the same page.
- Article from Google on their development of PBR (the same yiki, only in profile with other formulas) here .
- An article from MrShoor that reviewed PBR on low-level shader programming here .
Options. Or how PBR is configured.
We will consider PBR from the point of view of the general concept and at the level of work with each parameter separately through channels of pixels.
From the last part of the tutorial, remember that PBR is actually created through the summation of parameters (you should not go into the formulas). That is, PBR consists of a set of parameters:
- Color (Base Color / Albedo).
- Metallic.
- Specular.
- Roughness
- Glossiness.
- Ambient Occlusion (hereinafter AO).
- Height
- Normal map.
All parameters except Color and Normal map use 1 channel, and Color and Normal map use 3 channels each:
- Color uses 3 channels - RGB to form a pixel color.
- The normal map uses 3 channels to simulate the slope of the surface. Each channel is responsible for the vertical slope, horizontal and depth, respectively.
Offtop. Normal Map.
As for the Normal Map, its technical implementation (which channels for which slope are responsible) differs from the render settings. So, for example, in Unreal Engine 4, the Green Channel is responsible for the negative value of the vertical slope, and in Unity for the positive one.
More information can be found here .
There is also a huge comprehensive article on how to bake a Normal Map and how to work with it in general, on the website render.ru here .
The link to the normal and height map discussion forum (parameter Height) is here .
And the wikipedia description of embossed texturing is here .
Now it is worth noting that rendering (mapping) based on physics has several different implementations. All of them are similar to each other and use all the same channels of pixels to adjust the final result. Usually there are 2 types of implementation:
In the first type, the parameters of Color-Metal-Roughness are taken into account, in the second - Diffuse-Specular-Glossiness .
Both types of implementation use the same 3 parameters - AO, Normal map, Height .
Offtopic about what standard we will use
We will use the first option, because in the future we will transfer our training to the Unreal Engine 4, and this engine uses the first option of combinations + has an additional Specular parameter, which once again shows that PBR is a convention.
Moreover, in modern PBR, the Height parameter is mixed and hidden in the Normal Map. In fact, it is easier to express the unevenness through one Normal Map, rather than calculate the depth / height of a pixel, or something else in additional channels. Everything is simpler than it seems, and it’s better not to be wise with dozens of parameters.
Although the parameter Height is rendered separately when creating textures in Substance Painter, when baking textures it is embedded into the normal map (you can still select it into a separate channel if you want).
Total, the final result of the image consists of the imposition of parameters in one pixel:
Let's now look at how this works in the Substance Painter. To do this, we are again creating a new project with the usual playlist and standard settings (I told about them in the second part of the tutors). And create a new fill layer:
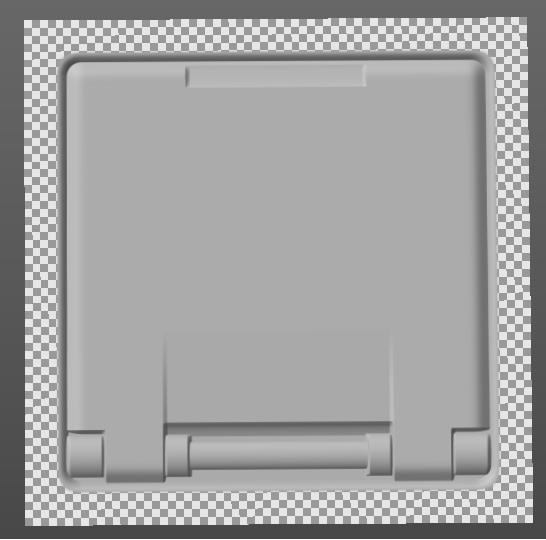
Now consider the standard normal texture from the Substance Painter set “Niche Rectangle Top Wide” , which is located under the Hard Surface tag:
Next, we will transfer this normal map to the Base Color layer parameter (from the previous lesson we have to remember how to do this). This is what the normal map looks like if you take it as an image (the image above). But now remove it from the BaseColor parameter (we did this for general reference) by clicking on the cross in the parameter:
And transfer it to the Normal parameter:
Your final result immediately updated. Now, if you hold down Alt and LKM - you can turn the camera and look at the Plaine from different angles. The light reflected from the pixels will begin to shimmer, creating the illusion of depth. It’s as if there are really dimples and bulges on the playline. All this is noticeable at an angle from 90 to 140-150 degrees. And the greater the angle of inclination, the more it becomes clear that this is a calculation of a video card that determines how each pixel should reflect light in order to create this illusion. As input values, we transfer 3 parameters in the form of pixel channels to the video card (in other words, the Normal map texture):
Now let's pervert. Remove this map from the Normal parameter and specify it in the Metallic channel. The channel is one for Metallic, and the normal map has 3 channels, respectively, by inserting a normal map in this parameter, Substance Painter will cut off 2 extra channels (I assume that GB) and leave only one for calculations:
And the result:
The final result shows now that there are no longer any bulges and depressions, but the surface itself began to resemble some kind of metallic plate. You can also see how Metallic one will look like without other parameters (BaseColor and others) by switching the display mode to 1 Metallic channel (if you didn’t change anything, you can switch the display in the viewport at the top right):
Choose a metallic and get the following result:
As you can see, this is one channel in grayscale, which determines which pixels should look like metal, which ones - as something in between, and which ones - not metal. 0 is not metallic. 1 - metal.
Similarly with the Roughness channel - any texture is suitable for working with it. B depends on what kind of end result you need. You can try to stick into the Roughness channel any texture available to you and look at the result.
Complex materials
The word “material” usually means a collection of ready-made parameters, the totality of which gives a cinematic result - material (in other words, texture, surface).
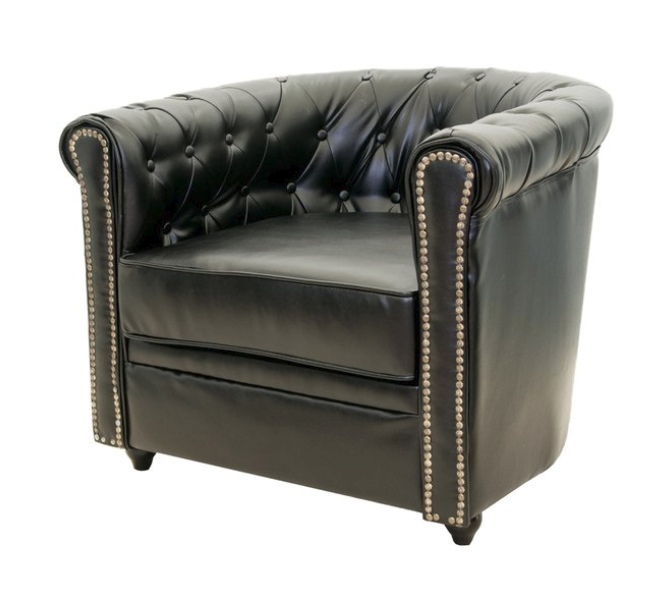
Take, for example, this is a leather chair:
Visually, the chair consists of 3 materials:
- Leather.
- Metal riveting.
- Plastic (possibly wooden) legs.
Each material has its own parameters:
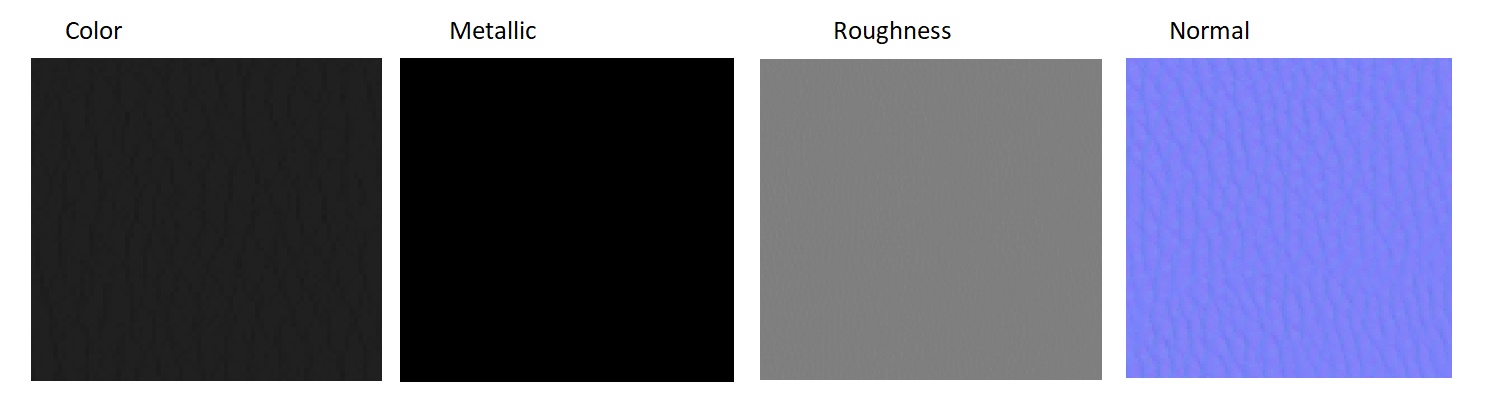
- Color. (for example, leather is a color close to black with speckles of cracks, and riveting is a golden color with some kind of dirt stains).
- Metallic (in the skin it is practically equal to 0, and in riveting it is close to 1).
- Roughness (in skin it is closer to 1, and in rivets it is closer to 0).
- Normal Map (In the skin, the normal map displays the cracks and their depth, and in the rivets - the technical grooves / appearances).
- AO (in the skin will display the correctness of shading cracks, and in riveting - recesses).
And this is how the skin parameters look visually:
Let's sum up the intermediate result:
Now we know:
- The principle of the PBR. And how to manage it through the channels.
- How all the parameters work, and how we can influence them through textures.
- The principle of construction of complex materials.
- How to mix materials with masks.
Based on all this, we can now imagine how you can create wet dirty asphalt with tire tracks. Can we?
Practice
And what do we need in order to collect wet dirty asphalt with tire tracks?
First we need to decide on the number of materials that will be used in our tutor:
- Asphalt.
- Mud.
- Traces of tires (in other words, rubber).
Then add them to the Substance Painter project.
Where to get materials?
There was a question - where to get these materials? You can suffer a little and create a collection of parameters for each material manually. For example, find an image of asphalt. Trim it to a square and make it as a BaseColor. Then, through special programs (for example, xNormal) in this image create a normal map. Adjust the Metallic and Roughness through the normal map (you can also use BaseColor). In the end, spend a few hours creating the perfect asphalt material, adjusting the correct parameters for metal and roughness.
And you can make everything easier.
As I said above, most of the materials have been prepared long ago for you. Your only task is to find ready-made solutions that meet your requirements, download and install them. If you are using Substance Painter, then allegorithmic (now Adobe) has a specialized repository of ready-made materials that can be downloaded. Access to them is both paid and free.
If you use Quixel, then this program already contains hundreds of different materials, and you just need to specify them and start working with masks. Which, by the way, is very convenient for beginners, so if you are just starting to master texturing and are not yet ready to work with the generation of materials, I recommend starting with Quixel. The principle is the same, another wrapper. Tutorials on the program is on the Internet.
Here ( Link ) you can download textures for materials that we will use in our practice.
Our goal now is not to create very high-quality textures, but to get acquainted with how you can create something interesting using the PBR parameters and masks. Therefore, at this stage we will not use mask generators or dirt, and we will do everything manually to understand the essence. When you understand the essence , the basis of all this, you will be able to use the generators much better than just starting to unscrew them, hoping to get the perfect mask / material.
If you have already looked at the files, then you probably noticed a mask for tires. It was prepared separately, since I could not generate it on the go in Substance Painter, so I used the tire pattern found on the Internet and prepared it through Photoshop to work in Substance Painter:
Now create a new project and add all our files to it. To do this, we choose the default settings, but now we need to specify our texture maps while creating the project:
In the project we will create 3 folders for each material and name them so as not to be confused:
In our case, the hierarchy of folders is very important (and not only in ours, but always important). The hierarchy determines the level of material, in other words - what lies on it. Asphalt in our example is the bottom. There are traces of tires on it. But the dirt can be on the tracks of the tires, and on the pavement. Therefore, the dirt will be above all.
Now let's immediately hide everything that should be hidden, and leave only the asphalt. That is, create black masks on the Rubber and Dirt folders:
Now we will create the 1st layer in each folder. Or rather, create layers and distribute them into folders. Do not forget about naming, so that you don’t get confused (despite the fact that it’s not visually clear that the layers are in folders - believe me, they are in folders):
All new layers have basic average parameters. Therefore, Base Color is gray, the normal does not display bumps, and Metallic and Roughness do not create the impression of any material.
And now we need to fix this by specifying the corresponding texture in each parameter (for example, asphalt):
Your task now is to distribute all the textures of materials in the desired parameters of the layers. After you do all this, assign a mask to the rubber and create the effect of the traces. Since we already have a black mask for the folder, we just need to connect the file with the traces of the wheels to this mask. To do this, click RMB on the mask and select Add Fill:
And in the GrayScale parameters we specify the mask:
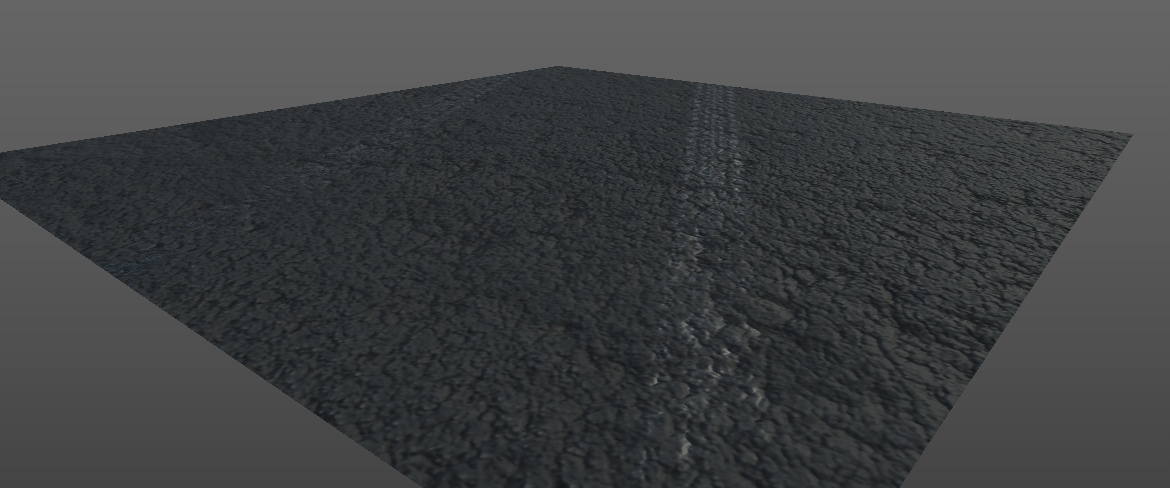
As a result, traces of rubber will appear on the asphalt, but they will be quite difficult to discern, since this is still PBR and cinematic (!!!). To see them, you need to turn Plane at a certain angle:
Now these two layers (asphalt and rubber) are on the same level. But we know that rubber is ON asphalt, which means that the layer with rubber should be physically higher. And now we will use the parameter Height.
Find it in the parameters of the Rubber layer and unscrew it to the maximum to get a feel for how it works. Twist the camera to see how the light began to process the pixels that you set up with your own hands. Feel your power! =)
Well, now align the parameter to 0.1, so that it is not so obvious and more likely:
We could unscrew at -0.1 so that we would have holes, like after cars on dirt, but this is asphalt, and it does not fall so easily.
Now we set up the dirt. On the basis of reality, we can assume that the dirt should get into the asphalt cracks in the first place. But we do not have a mask so that we can show a layer of dirt in the cracks. However, there is a solution - we can take BaseColor asphalt and, on its basis, make a mask for dirt.
How it works? If you look at the BaseColor asphalt, then you can note that the darker the pixel, the more it looks like a crack. That is, in this image everything is dark — these are cracks, and all light is the surface. And if we want to use the image as a mask, then it would be enough for us to invert the colors (dark to make light and vice versa) pixels, and we get a mask for dirt.
To do this, turn off the display of the layer with asphalt (by clicking on the eye of the folder with asphalt) to make it easier to perceive what we are doing.
Next, we point out that there should be a file in the dirt mask and attach the Asphalt_BaseColor file to it:
As I wrote above, the asphalt was light, and the cracks were dark. Accordingly, dirt began to appear on large surfaces, and the base gray color dominated in the cracks (basic parameters / background).
Now our task is to make this texture be perceived differently - to invert the colors and enhance them so that the mask shows dirt in the cracks. The easiest way to do this is with the optional Levels effect. Add an additional “Levels” filter to the mask in the same way as we added Fill (PCM - Add Levels). And twist the parameters around, as in the picture below:
And press the button below “Invert” to invert the intensity levels of the channel:
Now the dirt is located exactly where we need - in the cracks of asphalt:
We turn on the asphalt and look at our works:
But it is too easy. Therefore, let's now add orange markings to our asphalt. For this we will need:
- Create a new folder and name it Road_Line.
- Add black mask folder.
- Add a new layer to the folder and name it Layer_RoadLine.
- For the layer, in the BaseColor parameters, specify orange color directly:
You can also adjust the Metallic and Roughness settings to your taste to create realistic paint. I did not do this to shorten the splinter time.
Now, remembering the rules of the hierarchy of layers, let's place a folder with a road line between asphalt and rubber:
It is time to hand draw. Highlight the RoadLine folder mask and draw a markup strip on the playline. I got something like this:
Now it is necessary to add another mask on the paint layer itself to create a feeling of fallen paint. To do this, we will not create a folder, but create a mask directly on the layer and add any standard Substance Painter mask. To do this, add a mask, and then add a fill (right-click on the mask and Add Fill). In the fill, select the Dirt 4 texture, which is under the Procedural tag:
And see the result:
Do not forget that the layer of paint you need to specify the height. I propose to specify 0.05 - the average between rubber and asphalt.
Be careful, because for this you need to select exactly the layer, not the mask. You can manually specify the value by clicking on the number to the right above the slider.
Well, what asphalt without water?
To do this, create your own folder with the layer. Do NOT add any masks yet.
Set the folder in the hierarchy to the top. After all, water is on top, right? At the layer, unscrew at a maximum of Metallic and at a minimum of Roughness. Next, specify the height of the water, equal to 0.15.
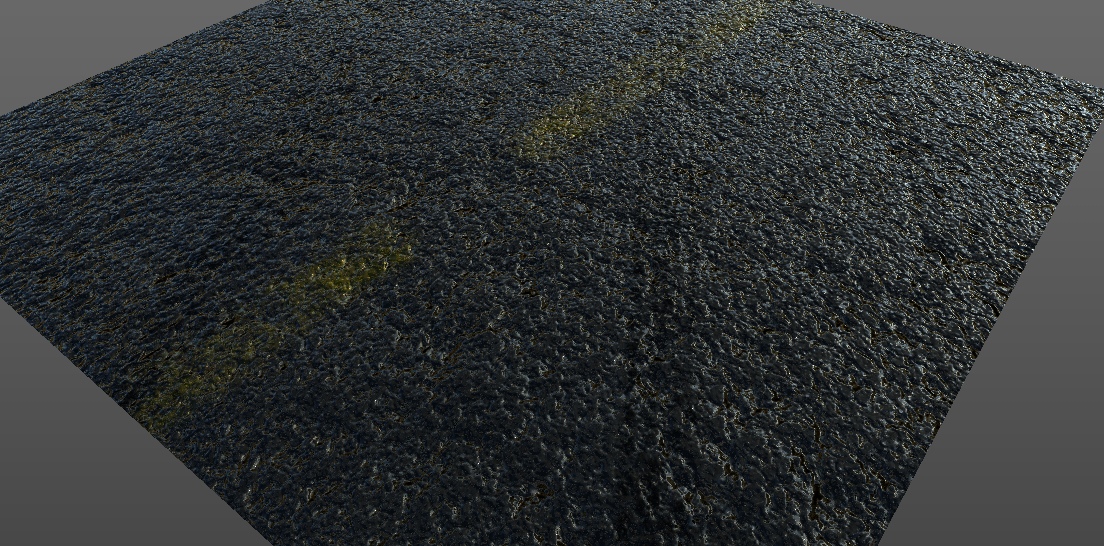
And now turn off the Color channel by clicking on the button highlighted by the blue frame:
What happened? There was a mixture of all the lower layers according to the masks and the layer with water. But water now has no color channel, which means that it cannot paint the pixels it needs. For that, all the other channels affect the texture pixels, and the asphalt became as wet and unpleasant as possible, as if not asphalt at all =)
Now homework: put masks so that the asphalt was not completely wet, but with small puddles. Remember that puddles do not have irregularities on the surface - think about how to mix the layers so that the puddles are smooth. And what else do you need to do? I am sure you can handle =)
Total
In this tutorial, we sorted out how to create textures. In general, correctly applying the parameters, you can already begin to texture and even feel free to call yourself a junior texture artist.
We learned how PBR works.
Parameters in PBR do not have to be unique. These are still the usual parameters that we can specify via pixel channels.
We can use the same textures in different ways. This gives us an advantage - we do not need to load memory with unnecessary files with a large number of pixels, but it is enough to load one file and tell the program how to calculate it.
We got acquainted with the materials and how they are going. Now you know that it is not necessary to be a super-cool photoshop-master, but rather to find ready-made parameters so that the program can present the material correctly from them.
In the following parts, we will touch on topics such as sweep, texel density (and what texel is), and finally, let's get to the most interesting part - creating your own shaders in UE4.
Quixel and Substance Painter programs
I always recommend beginners who are engaged in the creation of textures from materials (not the materials themselves) to start working with Quixel. Since this program can already have hundreds of ready-made presets, which are very easily controlled and configured, and through masks you can achieve the same result as in practice through Substance Painter.
As for the Substance Painter, its power begins to manifest itself when the third Substance Designer is included in the work. Designer allows you to create your materials by generating the surfaces we need. The designer is cool in that you can create “smart materials” that will have settings for the internal masks that will control the quantity and quality of the internal materials. That is, “smart materials” in this case is a container that contains several materials and pre-installed masks, which are governed by the formulas and algorithms that the artist prescribes in the Designer.
Then this container is exported to Painter, where its fine tuning takes place. For example, we created our wet asphalt in Painter. But we could collect in the Designer and connect a bunch of additional settings that would allow us to change the result on the fly in one place, and not switch among the heaps of masks, as in Painter.
About PBR and the translation of this abbreviation
Very often, PBR is translated as a physically correct render.I think that accurate translation is important here, because translations like “Physically correct” are fundamentally wrong, since the render in this case is based on physics, but does not have to be correct in relation to physics. You can make metal = 1, and a roughness equal to 1, and include an additional bunch of other parameters, and this will no longer be a correct material from the point of view of physics, but once based on it and converted into your own set of parameters. That is, creating materials based on PBR, you can completely ignore the laws of physics and create material that is unique in its own way.
For example, stones drawn in their style. How physically correct should we display invented material that does not exist in nature?
Source: https://habr.com/ru/post/458696/
All Articles