CI / CD using AWS and Bamboo
Our team consists of one developer and one DevOps engineer. I am responsible for deploying the application to an Amazon ECS cluster. I use Bamboo as the CI / CD server. In this article I will explain in detail how I implement the deployment of the application in the dev-environment.


Here I am performing the following steps:
')
First, I update the server where Bamboo is installed, install the necessary packages, and set up the Docker repository. Here it should be noted that I installed Bamboo on the CentOS 7 operating system. Information on installing docker on other operating systems can be found at www.docker.com .
Then I install the Docker application and start the service:
Then I add the bamboo user to the Docker group:
If, after running these commands, docker responds with the message “Hello from Docker!”, This means that my installation is working correctly.
Application development is conducted on Grails . When the application is compiled, a file with the war extension is created. This file, in Bamboo terminology, is an artifact. Configure Bamboo to use this file in subsequent tasks. To do this, I turn to the Tasks tab:

And set up the Grails task as shown below:

We see that Grails first clears the build folder, then runs the tests, and finally creates the war file for the dev environment.
After that, I click the Artifacts tab and the Create artifact button:

I set the artifact as shown below:
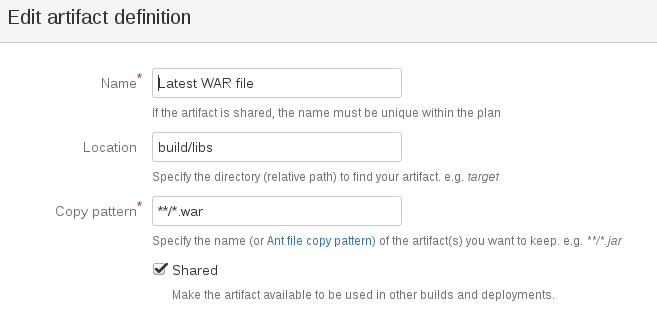
Grails places the war file in the build / libs directory. I tick the Shared parameter, as I will need this artifact later.
Now I create a deployment project and specify an artifact to use in my build plan:

I also configure the Artifact download task in the deployment project:

Thus, Bamboo is now configured to use a war file.
Amazon ECR is a Docker image storage and management service. To configure, open the AWS console and select the ECR:

Creating a repository, I get the following address:
After finishing the settings, here you can find instructions on how to login, how to download an image from the repository and upload the image to the repository.
Now I need to configure the trigger to run the Docker image assembly. To do this, I go to the Triggers tab and click on the Add trigger button:
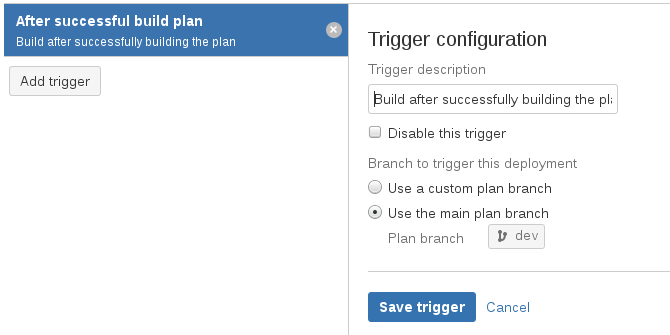
Here I choose the Build after successfully building the plan option so that the Docker image is assembled after the project is compiled.
Now you need to add the Docker image build task. To do this, go to the Tasks tab, click Add task , select the Docker type. Enter a description and select Build a Docker image from the drop-down list. Enter in the Repository field
As for the Dockerfile, it can be as shown below:
When you start the application, you must specify the database. The environment variables DATASOURCE_URL, DATASOURCE_USERNAME, DATASOURCE_PASSWORD are used to pass this information to the application, but their values are set during the launch of the container.
This completes the process of building the Docker image with the application. The next step is to configure the download of this image to the Amazon ECR repository.

For storing images collected using Bamboo, you can use the Elastic Container Registry. To achieve this goal, I perform the following steps:
You must have credentials to upload Docker images to Amazon ECR. Such credentials can be obtained by running the command
However, these credentials are valid only for 12 hours. Therefore, it is possible either to execute the above command each time before downloading the image to ECR, or to install the ECR Docker Credential Helper, which keeps the temporary credentials up to date and logs into the ECR. To install ECR Docker Credential Helper, follow these steps.
First you need to install git and then clone the github repository:
Then you need to put the following lines in the file /home/bamboo/.docker/config.json :
And copy the compiled application to the / usr / bin directory :
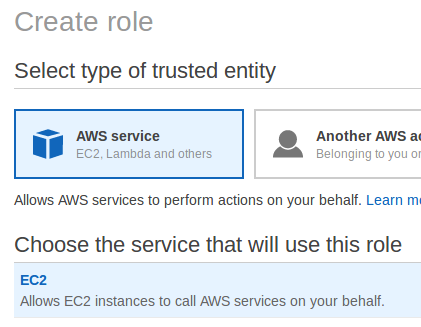
In order for the Bamboo server to use ECR, you must create a role, add an AmazonEC2ContainerRegistryPowerUser policy to this role, and then attach this role to the EC2 instance of Bamboo. Open the AWS console and select IAM. Next, click the Create role button, select AWS service and EC2 , as shown below:
Then click the Next: Permissions button and on the next screen we find and select the AmazonEC2ContainerRegistryPowerUser policy. After that, we finish creating the role and attach it to our Bamboo server.
We compiled the application and collected the Docker image with the war file. Now you need to upload this image to the repository. To do this, I add another Docker task, this time to load the image into the ECR repository. I go to the Tasks tab, click Add task , select the Docker type. I enter the description and select Push a Docker image to a Docker registry from the drop-down list. I select the Custom registry and enter the repository address in the Repository field. As the Authentication type, I choose Use the agent's native credentials .
This completes the process of loading the Docker image to the Amazon ECR repository. The following steps describe how to configure the cluster and the service to run the container application. But before that, you need to configure the launch parameters of the container. This is what we will do now.

Task Definition - here the parameters of container execution are recorded. Our application uses a database, the parameters of which are specified when the container is launched, so in this section we will create a database. I use Amazon RDS as a database, and I store the password in encrypted form to access the database in the AWS Systems Manager Parameter Store . The following steps I perform in order to create Task Definition:
Our application uses a PostgreSQL database. To create a database, I open the AWS console, select Amazon RDS, click the Create database button, and then select PostgreSQL as the database engine. On the next page, I select Dev / Test as the workbench and click the Next button. Then I denote the DB instance identifier as onboard-dev-db , and the master username as devdbadmin . Then I go to the next page to configure the VPC, the subnet group, and the security group. This database will be used in a private network, therefore for the Public accessibility parameter I choose No. I enter devdb in the Database name field and click the Create database button.
I store the database password in encrypted form. To do this, open the AWS console and go to AWS Systems Manager → Shared Resources → Parameter Store → Create Parameter. I enter devdbpassword as the parameter name and select SecureString for the parameter type, then enter the database password in the Value field.
Amazon ECS is a cluster that runs container applications. It uses Task Definition to specify the execution parameters of the container application. To set such parameters, I click the Create new Task Definition button. Then I select Fargate as the startup type and proceed to the next step. Here I set the name as onboard-dev-taskdef . For the Task execution IAM role field, I select Create new role . As for the resources allocated for this application, I designate 2 GB of memory and 1 vCPU. Now you need to add the parameters to run the container. The container I will call onboard-dev-container . The name of the image is indicated by:
aws_account_id.dkr.ecr.us-east-2.amazonaws.com/onboard:latest . Amazon ECR Docker Credential Helper will take care of ECR authentication, so I’ll leave the option Private repository authentication unchecked. In the dev environment, the application is available on port 8080, so for the port mappings parameter I write 8080 and select the tcp protocol. Database URL parameters, username, and password are passed to the container using environment variables. I set these parameters in the Environment variables section. In order to get the value of the devdbpassword parameter from the Parameter Store, I specify the type ValueFrom . The last thing I configure is Log configuration , here I select Auto-configure CloudWatch Logs . Now the creation of Task Definition is complete.
However, for the ecsTaskExecutionRole role, a policy is needed to get the devdbpassword from the Parameter Store. To do this, go to IAM Roles and select ecsTaskExecutionRole, click Add inline policy . In this case, I add using the visual editor. Therefore, I enter Systems Manager in the Service field, and GetParameters in the Actions field. Then I click Add ARN for the Resources field and fill in my values:

At the end, I look at the values of the specified parameters by clicking the Review policy, giving it a name and completing work with the ecsTaskExecutionRole configuration.
This completes the configuration of the launch parameters for the container application. Now you need to create an ECS cluster and service.

Our container application runs as a service in an ECS cluster. To configure, you must perform the following steps:
To create an ECS cluster, go to the AWS console and select the ECS service. Then click Create Cluster and select the Networking only cluster pattern. On the next page, I call the cluster as onboard-dev-cluster and finish creating the cluster. Now I have an ECS cluster based on Fargate .
To create a service, I click on the onboard-dev-cluster link, then go to the Services tab and click the Create button. For the launch type I choose Fargate, for Task Definition I choose onboard-dev-taskdef. In addition, I choose onboard-dev-cluster in the Cluster field. In the Service name field I prescribe onboard-dev. I set the Number of tasks parameter to zero, since I don’t want to run the application right now. I leave the Minimum healthy percent parameter values equal to 100, and Maximum percent - 200. For the Deployment type parameter, I select the Rolling update and proceed to the next step.
On the Configure Network page for the Cluster VPC parameter, I select a previously created VPC called Development VPC . An application under development is only available on a private network, so I choose two private subnets. To set up security groups, I click the Edit button, then select the Select existing security group , then the default security group and click the Save button. For the Auto-assign public IP option, I select Disabled . Next, for the Load balancer type parameter, I select None and leave the Enable service discovery integration option unchecked . Then I click Next, Next and Create service .
Now I have a service in which the number of running tasks is zero. The launch of the application will be configured in the next step.

As soon as the developer updates the application code, our deployment goes through creating a Docker image, loading it into the Elastic Container Registry, and finally launching the container application as a service in the ECS Fargate cluster. At the moment, the number of jobs running in the cluster is zero. In order for the application to start, you need to update the service, indicating the number is equal to one. I perform the following steps to achieve this goal:
Tasks for AWS Bamboo is a plugin that simplifies the preparation and operation of AWS resources from Bamboo build and deployment projects. To install this plugin, go to the deployment project, click Add task , go to the Atlassian Marketplace and install Tasks for AWS (Bamboo) .
Now in the deployment project, I add the Amazon ECS Service job. Then I write down the Update Service for onBoard-dev job description field. In the Action field, select Update Service and Force new deployment . Then I choose US East (Ohio) as the launch region for the application. Then I write in the appropriate fields ARN (Amazon Resource Name) for Task Definiton, cluster and service. In this task, I update the desired number of running tasks to one. Next, I populate the deployment configuration text box with the following values:
I set up a non-public IP network as follows:
In the Source section for AWS Security Credentials, I select the IAM Role for EC2 .
I need to be able to update the ECS service, so I attach the AmazonECS_FullAccess policy to my Bamboo EC2 instance. To do this, open the AWS console, select IAM. Then I choose the role I use for my Bamboo server. I click the Attach policies button, find the AmazonECS_FullAccess policy, check the box on the left, and finish attaching the policy.
This ends the CI / CD setup using AWS and Bamboo. Thus, when updating the application code by the developer, loading this code into the repository, testing and application assembly is started. It then builds the Docker image with the application's war file, and copies that image to the Amazon ECR repository. Next, in a cluster, Amazon ECS runs as a service a container application that updates the current application if it has not been stopped. If the application was stopped to save resources, the application simply starts. After the application has been tested in the dev-environment, the application can be stopped by specifying the number of jobs running in the cluster to be zero.
If you liked the article and have ideas for improvement, write in the comments.
Build Docker Image
Here I am performing the following steps:
')
- Step 1: Install and configure Docker;
- Step 2: Set up the artifacts in Bamboo;
- Step 3: Set up an Amazon ECR repository;
- Step 4: Build the Docker image in Bamboo.
Step 1: Install and configure Docker
First, I update the server where Bamboo is installed, install the necessary packages, and set up the Docker repository. Here it should be noted that I installed Bamboo on the CentOS 7 operating system. Information on installing docker on other operating systems can be found at www.docker.com .
$ sudo yum update $ sudo yum install -y yum-utils device-mapper-persistent-data lvm2 $ sudo yum-config-manager --add-repo https://download.docker.com/linux/centos/docker-ce.repo Then I install the Docker application and start the service:
$ sudo yum install docker-ce docker-ce-cli containerd.io $ sudo systemctl enable docker $ sudo systemctl start docker Then I add the bamboo user to the Docker group:
$ sudo usermod -aG docker bamboo $ sudo su - bamboo $ docker run hello-world If, after running these commands, docker responds with the message “Hello from Docker!”, This means that my installation is working correctly.
Step 2: Configure Bamboo Artifacts
Application development is conducted on Grails . When the application is compiled, a file with the war extension is created. This file, in Bamboo terminology, is an artifact. Configure Bamboo to use this file in subsequent tasks. To do this, I turn to the Tasks tab:
And set up the Grails task as shown below:
We see that Grails first clears the build folder, then runs the tests, and finally creates the war file for the dev environment.
After that, I click the Artifacts tab and the Create artifact button:
I set the artifact as shown below:
Grails places the war file in the build / libs directory. I tick the Shared parameter, as I will need this artifact later.
Now I create a deployment project and specify an artifact to use in my build plan:
I also configure the Artifact download task in the deployment project:
Thus, Bamboo is now configured to use a war file.
Step 3. Configure Amazon ECR Repository
Amazon ECR is a Docker image storage and management service. To configure, open the AWS console and select the ECR:
Creating a repository, I get the following address:
aws_account_id.dkr.ecr.us-east-2.amazonaws.com/onboard After finishing the settings, here you can find instructions on how to login, how to download an image from the repository and upload the image to the repository.
Step 4: Build the Docker image in Bamboo
Now I need to configure the trigger to run the Docker image assembly. To do this, I go to the Triggers tab and click on the Add trigger button:
Here I choose the Build after successfully building the plan option so that the Docker image is assembled after the project is compiled.
Now you need to add the Docker image build task. To do this, go to the Tasks tab, click Add task , select the Docker type. Enter a description and select Build a Docker image from the drop-down list. Enter in the Repository field
aws_account_id.dkr.ecr.us-east-2.amazonaws.com/onboard:latest. As for the Dockerfile, it can be as shown below:
FROM openjdk:8-jre COPY *.war /usr/src/onboard.war WORKDIR /usr/src CMD ["/bin/bash", "-c", "java -DdataSource.url=$DATASOURCE_URL -DdataSource.username=$DATASOURCE_USERNAME -DdataSource.password=$DATASOURCE_PASSWORD -jar onboard.war"] When you start the application, you must specify the database. The environment variables DATASOURCE_URL, DATASOURCE_USERNAME, DATASOURCE_PASSWORD are used to pass this information to the application, but their values are set during the launch of the container.
This completes the process of building the Docker image with the application. The next step is to configure the download of this image to the Amazon ECR repository.
Uploading an image to the Elastic Container Registry
For storing images collected using Bamboo, you can use the Elastic Container Registry. To achieve this goal, I perform the following steps:
- Step 1. Install Amazon ECR Docker Credential Helper
- Step 2. Connecting the IAM Role to the Bamboo Server
- Step 3: Configure the Docker boot image job
Step 1. Install Amazon ECR Docker Credential Helper
You must have credentials to upload Docker images to Amazon ECR. Such credentials can be obtained by running the command
aws ecr get-login However, these credentials are valid only for 12 hours. Therefore, it is possible either to execute the above command each time before downloading the image to ECR, or to install the ECR Docker Credential Helper, which keeps the temporary credentials up to date and logs into the ECR. To install ECR Docker Credential Helper, follow these steps.
First you need to install git and then clone the github repository:
$ sudo yum install git $ sudo su - bamboo $ git clone https://github.com/awslabs/amazon-ecr-credential-helper.git $ make docker Then you need to put the following lines in the file /home/bamboo/.docker/config.json :
{ "credsStore": "ecr-login" } And copy the compiled application to the / usr / bin directory :
$ exit $ sudo cp /home/bamboo/docker-credential-ecr-login /usr/bin/ Step 2. Connecting the IAM Role to the Bamboo Server
In order for the Bamboo server to use ECR, you must create a role, add an AmazonEC2ContainerRegistryPowerUser policy to this role, and then attach this role to the EC2 instance of Bamboo. Open the AWS console and select IAM. Next, click the Create role button, select AWS service and EC2 , as shown below:
Then click the Next: Permissions button and on the next screen we find and select the AmazonEC2ContainerRegistryPowerUser policy. After that, we finish creating the role and attach it to our Bamboo server.
Step 3: Configure the Docker boot image job
We compiled the application and collected the Docker image with the war file. Now you need to upload this image to the repository. To do this, I add another Docker task, this time to load the image into the ECR repository. I go to the Tasks tab, click Add task , select the Docker type. I enter the description and select Push a Docker image to a Docker registry from the drop-down list. I select the Custom registry and enter the repository address in the Repository field. As the Authentication type, I choose Use the agent's native credentials .
This completes the process of loading the Docker image to the Amazon ECR repository. The following steps describe how to configure the cluster and the service to run the container application. But before that, you need to configure the launch parameters of the container. This is what we will do now.
Create Amazon ECS Task Definition
Task Definition - here the parameters of container execution are recorded. Our application uses a database, the parameters of which are specified when the container is launched, so in this section we will create a database. I use Amazon RDS as a database, and I store the password in encrypted form to access the database in the AWS Systems Manager Parameter Store . The following steps I perform in order to create Task Definition:
- Step 1. Create a database in an Amazon RDS instance;
- Step 2. Configure AWS Systems Manager Parameter Store;
- Step 3. Create Task Definition.
Step 1: Create a database in a Amazon RDS instance
Our application uses a PostgreSQL database. To create a database, I open the AWS console, select Amazon RDS, click the Create database button, and then select PostgreSQL as the database engine. On the next page, I select Dev / Test as the workbench and click the Next button. Then I denote the DB instance identifier as onboard-dev-db , and the master username as devdbadmin . Then I go to the next page to configure the VPC, the subnet group, and the security group. This database will be used in a private network, therefore for the Public accessibility parameter I choose No. I enter devdb in the Database name field and click the Create database button.
Step 2: Configure AWS Systems Manager Parameter Store
I store the database password in encrypted form. To do this, open the AWS console and go to AWS Systems Manager → Shared Resources → Parameter Store → Create Parameter. I enter devdbpassword as the parameter name and select SecureString for the parameter type, then enter the database password in the Value field.
Step 3. Creating Task Definition
Amazon ECS is a cluster that runs container applications. It uses Task Definition to specify the execution parameters of the container application. To set such parameters, I click the Create new Task Definition button. Then I select Fargate as the startup type and proceed to the next step. Here I set the name as onboard-dev-taskdef . For the Task execution IAM role field, I select Create new role . As for the resources allocated for this application, I designate 2 GB of memory and 1 vCPU. Now you need to add the parameters to run the container. The container I will call onboard-dev-container . The name of the image is indicated by:
aws_account_id.dkr.ecr.us-east-2.amazonaws.com/onboard:latest . Amazon ECR Docker Credential Helper will take care of ECR authentication, so I’ll leave the option Private repository authentication unchecked. In the dev environment, the application is available on port 8080, so for the port mappings parameter I write 8080 and select the tcp protocol. Database URL parameters, username, and password are passed to the container using environment variables. I set these parameters in the Environment variables section. In order to get the value of the devdbpassword parameter from the Parameter Store, I specify the type ValueFrom . The last thing I configure is Log configuration , here I select Auto-configure CloudWatch Logs . Now the creation of Task Definition is complete.
However, for the ecsTaskExecutionRole role, a policy is needed to get the devdbpassword from the Parameter Store. To do this, go to IAM Roles and select ecsTaskExecutionRole, click Add inline policy . In this case, I add using the visual editor. Therefore, I enter Systems Manager in the Service field, and GetParameters in the Actions field. Then I click Add ARN for the Resources field and fill in my values:
At the end, I look at the values of the specified parameters by clicking the Review policy, giving it a name and completing work with the ecsTaskExecutionRole configuration.
This completes the configuration of the launch parameters for the container application. Now you need to create an ECS cluster and service.
Create Amazon ECS
Our container application runs as a service in an ECS cluster. To configure, you must perform the following steps:
- Step 1. Create Amazon ECS Cluster;
- Step 2: Creating a service
Step 1. Create an Amazon ECS Cluster
To create an ECS cluster, go to the AWS console and select the ECS service. Then click Create Cluster and select the Networking only cluster pattern. On the next page, I call the cluster as onboard-dev-cluster and finish creating the cluster. Now I have an ECS cluster based on Fargate .
Step 2: Creating a service
To create a service, I click on the onboard-dev-cluster link, then go to the Services tab and click the Create button. For the launch type I choose Fargate, for Task Definition I choose onboard-dev-taskdef. In addition, I choose onboard-dev-cluster in the Cluster field. In the Service name field I prescribe onboard-dev. I set the Number of tasks parameter to zero, since I don’t want to run the application right now. I leave the Minimum healthy percent parameter values equal to 100, and Maximum percent - 200. For the Deployment type parameter, I select the Rolling update and proceed to the next step.
On the Configure Network page for the Cluster VPC parameter, I select a previously created VPC called Development VPC . An application under development is only available on a private network, so I choose two private subnets. To set up security groups, I click the Edit button, then select the Select existing security group , then the default security group and click the Save button. For the Auto-assign public IP option, I select Disabled . Next, for the Load balancer type parameter, I select None and leave the Enable service discovery integration option unchecked . Then I click Next, Next and Create service .
Now I have a service in which the number of running tasks is zero. The launch of the application will be configured in the next step.
Service update
As soon as the developer updates the application code, our deployment goes through creating a Docker image, loading it into the Elastic Container Registry, and finally launching the container application as a service in the ECS Fargate cluster. At the moment, the number of jobs running in the cluster is zero. In order for the application to start, you need to update the service, indicating the number is equal to one. I perform the following steps to achieve this goal:
- Step 1. Install the Tasks for AWS Bamboo plugin;
- Step 2. Update ECS Service
Step 1. Install the Tasks for AWS Bamboo Plugin
Tasks for AWS Bamboo is a plugin that simplifies the preparation and operation of AWS resources from Bamboo build and deployment projects. To install this plugin, go to the deployment project, click Add task , go to the Atlassian Marketplace and install Tasks for AWS (Bamboo) .
Step 2. Update the ECS service
Now in the deployment project, I add the Amazon ECS Service job. Then I write down the Update Service for onBoard-dev job description field. In the Action field, select Update Service and Force new deployment . Then I choose US East (Ohio) as the launch region for the application. Then I write in the appropriate fields ARN (Amazon Resource Name) for Task Definiton, cluster and service. In this task, I update the desired number of running tasks to one. Next, I populate the deployment configuration text box with the following values:
{ "maximumPercent": 200, "minimumHealthyPercent": 100 } I set up a non-public IP network as follows:
{ "awsvpcConfiguration": { "assignPublicIp": "DISABLED", "subnets": ["subnet-ID1", "subnet-ID2"], "securityGroups": ["sg-ID"] } } In the Source section for AWS Security Credentials, I select the IAM Role for EC2 .
I need to be able to update the ECS service, so I attach the AmazonECS_FullAccess policy to my Bamboo EC2 instance. To do this, open the AWS console, select IAM. Then I choose the role I use for my Bamboo server. I click the Attach policies button, find the AmazonECS_FullAccess policy, check the box on the left, and finish attaching the policy.
This ends the CI / CD setup using AWS and Bamboo. Thus, when updating the application code by the developer, loading this code into the repository, testing and application assembly is started. It then builds the Docker image with the application's war file, and copies that image to the Amazon ECR repository. Next, in a cluster, Amazon ECS runs as a service a container application that updates the current application if it has not been stopped. If the application was stopped to save resources, the application simply starts. After the application has been tested in the dev-environment, the application can be stopped by specifying the number of jobs running in the cluster to be zero.
If you liked the article and have ideas for improvement, write in the comments.
Source: https://habr.com/ru/post/458648/
All Articles