13 tricks to work with npm, which help save time
Every day, millions of developers, creating their own JavaScript-applications, turn to npm (or Yarn). Execution of commands like
But the npm utility is not only capable of initializing projects or installing packages. The author of the material, the translation of which we are publishing today, wants to tell you about the 13 npm tricks that will allow you to squeeze everything you can out of this system. Techniques of various scales will be discussed here - from using command abbreviations to customizing the behavior of

')
Many programmers use npm daily. This means that in the long run, even a small saving of time can change something for the better. This material is designed primarily for novice developers and developers of the average level. However, even if you are a professional, the author of the material hopes that you can find here a couple of interesting things that you have never encountered before.
If you are completely unfamiliar with npm, you should know that the program you are interested in is installed along with Node.js. If you are working in Windows, it is recommended to install Git Bash in order to play some of what is going to be discussed here.
Let's start with the basics. By spending a bit of time studying the shortened versions of the most common npm commands, you will save yourself a lot of time in the future.
Now to save the packages you do not need to use the
Here are some more useful abbreviations, which, however, are not used as widely as the ones we just looked at.
Using the
Typically, the dot character (
This abbreviation can be used, for example, with commands like
By constantly running the
In order to verify the correctness of adding such information to the system, enter the
In order to return to the default settings - you can use the following script. Its first line removes configuration data from the file, and the second fills it with default values.
The above script resets the default values for the user. The following script resets global defaults to their original state:
Any code executed on the command line may encounter compatibility issues. This is especially true of incompatibility between systems based on Windows and Unix (this includes Mac and Linux). This is not a problem if you and only you are working on a certain project. But in many cases, cross-platform script compatibility is very important. For example, working independently of the operating system is a huge plus for any open source, training or demonstration project.
Fortunately, solving the problem of script compatibility is not particularly difficult. We have several options. However, here I would like to tell about one of them, about that, using which I obtained the best results. This is a cross-env package. It should be installed as a development dependency using the
I found that the
In order to organize the sequential execution of commands in the Linux command shell, the
To begin, the selected package must be set as a development dependency:
Sometimes you have to deal with applications where there are several
For a start, you can use the
But this problem can be solved in a more interesting way. It consists in using the
Below is an example of applying this solution from a real application. Here we need to run
When developing a full-stack application, there is often a need to run both client and server applications. The wait-on package allows you to synchronize the execution of certain processes. In our case, it is necessary that before launching the client part of the application, a certain port would be available.
For example, there is a dev script that is used in an Electron application, whose interface is written using React. The script, using
In addition, the standard behavior of React projects is the automatic opening of a browser window. In the case of using React with Electron, this is not necessary. This can be
In order to display the list of scripts available in
But there is an even more convenient way to display a list of scripts. When using it, the necessary script can be immediately selected from the list and launched. In order to use this method of working with scripts, we will need to globally install the
Then in the project folder you need to run the
Using the ntl command
This feature can be very useful if you do not know exactly what scripts are in the project. It is also good in those cases when the programmer wants to replace the input of a long command to start the script with the input of a short command and a quick press of a few more keys on the keyboard.
Perhaps you are familiar with the
This not only allows you to make the code cleaner, but also helps to run pre-and post-scripts in isolation.
Instead of manually changing the version of the application, the programmer can use special commands
Depending on how often you update your application, you can save time by setting the version number to automatically increase each time you deploy a new version of the application. For example - like this:
The package.json file is a regular json file, so it can be edited directly from the command line using the json utility. This opens up new opportunities in those situations when you need to change
You can then use the
In the next section, you will see a more practical example of using the
If your
If your project is already connected to a remote repository and you have the
But that's not all. If, according to the previous
Now let's talk about solving a larger problem. Namely, we are going to develop our own script that manages the work of the
You can configure the behavior of the
Before integrating with
Each question is based on the following pattern:
In order to specify a certain value and not ask a question to the user, it is sufficient to simply remove the
If you want to return to the standard
In order to execute
In addition, we will create an auxiliary function that outputs the results of our function to the console:
And finally, let's create an appropriate prompt-block to handle the URL of the GitHub repository. If the URL is available to the script, we will create the
So, one of the elements of the
Here's how the full code of the
Here is the
Customizing the process of initializing new projects, you can go further. For example, to make it so that when creating a project, a new repository for it would be created.
I hope this material has helped you see what can be achieved with npm. I want to believe that you have found something here that will allow you to work more productively - whether it is about using abbreviated versions of commands, scripts from
Dear readers! Do you automate work with npm?

npm init or npx create-react-app has become a familiar way of starting work on almost any JavaScript project. It can be a server, client, or even a desktop application.But the npm utility is not only capable of initializing projects or installing packages. The author of the material, the translation of which we are publishing today, wants to tell you about the 13 npm tricks that will allow you to squeeze everything you can out of this system. Techniques of various scales will be discussed here - from using command abbreviations to customizing the behavior of
npm init .')
Many programmers use npm daily. This means that in the long run, even a small saving of time can change something for the better. This material is designed primarily for novice developers and developers of the average level. However, even if you are a professional, the author of the material hopes that you can find here a couple of interesting things that you have never encountered before.
If you are completely unfamiliar with npm, you should know that the program you are interested in is installed along with Node.js. If you are working in Windows, it is recommended to install Git Bash in order to play some of what is going to be discussed here.
1. Brief options for recording basic commands
Let's start with the basics. By spending a bit of time studying the shortened versions of the most common npm commands, you will save yourself a lot of time in the future.
- Installing packages. The usual option:
npm install. Short version:npm i. - Run tests. The usual option:
npm test. Short version:npm t. - Help call. The usual option:
npm --help. Short version:npm -h. - Global installation flag. The usual option is -
--global. Shortcut:-g. - Package installation flag as a design dependency. The usual option: -
--save-dev. Shortcut:-D. - Acceptance of
npm initinstallations by default. The usual option isnpm init --yesornpm init --force. The abbreviated version isnpm init -yornpm init -f.
Now to save the packages you do not need to use the
--save or -S flag. Packages are saved by default. And in order to install the package without saving it, you can use the --no-save flag.▍Short recording options for less common commands
Here are some more useful abbreviations, which, however, are not used as widely as the ones we just looked at.
- Saving the package as an optional dependency. The usual option:
--save-optional. Shortcut:-O. - Save information about the exact version of the package. The usual option: -
--save-exact. Shortcut:-E.
Using the
npm install command with the --save-bundle , or -B switch --save-bundle package.json entry for installed packages to appear in the bundledDependencies section. These packages will be packaged with the project when it is published. To create a tarball file containing project files and packages listed in bundledDependencies , you can use the npm pack command.▍Reduce for root directory
Typically, the dot character (
. ) Is used to represent the root directory of the application, or (depending on the context) to represent the entry point to the application. In npm, this is what is set as the value of the main property in the package.json file: { "main": "index.js" } This abbreviation can be used, for example, with commands like
npx create-react-app . So, instead of running this command as npx create-react-app my-app (which will create a new my-app folder), you can run this command like this: npx create-react-app . (pay attention to the point that comes after the command). This will allow you to create a template React-application project in the folder in which you are at the time you start the command.2. Setting default values for npm init
By constantly running the
npm init command to create a new project, you will most likely find that you enter the same data over and over in response to questions from the system. For example - it is quite likely that you are the author of most of the projects you create. In order to save time on entering the same data, you can set your own default values for the corresponding fields: npm config set init.author.name "Joe Bloggs" npm config set init.author.email "joebloggs@gmail.com" npm config set init.author.url "joebloggs.com" npm config set init.license "MIT" In order to verify the correctness of adding such information to the system, enter the
npm config edit command. This will open the configuration file in the system editor. If you want to edit the global npm parameters, use the npm config edit -g command.In order to return to the default settings - you can use the following script. Its first line removes configuration data from the file, and the second fills it with default values.
echo "" > $(npm config get userconfig) npm config edit The above script resets the default values for the user. The following script resets global defaults to their original state:
echo "" > $(npm config get globalconfig) npm config --global edit 3. Cross-platform scripts
Any code executed on the command line may encounter compatibility issues. This is especially true of incompatibility between systems based on Windows and Unix (this includes Mac and Linux). This is not a problem if you and only you are working on a certain project. But in many cases, cross-platform script compatibility is very important. For example, working independently of the operating system is a huge plus for any open source, training or demonstration project.
Fortunately, solving the problem of script compatibility is not particularly difficult. We have several options. However, here I would like to tell about one of them, about that, using which I obtained the best results. This is a cross-env package. It should be installed as a development dependency using the
npm i -D cross-env command. Then you need to put a cross-env in front of each environment variable. For example - it might look like this: { "scripts": { "build": "cross-env NODE_ENV=production webpack --config build/webpack.config.js" } I found that the
cross-env package is the most convenient tool for achieving cross-platform script compatibility. But it will be useful for you to take a look at the following two popular tools that can help in this task:- Package rimraf . It can be installed globally to run cross-platform scripts.
- Package ShellJS . This is a portable Node.js implementation of the Unix shell.
4. Parallel Script Launch
In order to organize the sequential execution of commands in the Linux command shell, the
&& construct is used. What about parallel scripts running? To achieve this goal, you can select the appropriate npm-package. The most popular packages of this kind are concurrently and npm-run-all . Here we will demonstrate the use of the package concurrently.To begin, the selected package must be set as a development dependency:
npm i -D concurrently . Then in package.json you can use the following construction: { "start": "concurrently \"command1 arg\" \"command2 arg\"" } 5. Running scripts in different directories
Sometimes you have to deal with applications where there are several
package.json files located in different directories. It would be convenient, for example, to run the scripts declared in them, being in the root directory of the project. This is much better than having to travel to different folders whenever you need to run a certain script. In order to do this, you can use the following two approaches.For a start, you can use the
cd to organize an automatic transition to the desired directory. It might look something like this: cd folder && npm start && cd .. But this problem can be solved in a more interesting way. It consists in using the
--prefix flag, with which you can specify the path: npm start --prefix path/to/your/folder Below is an example of applying this solution from a real application. Here we need to run
npm start for the client and server parts of the project. Their code, respectively, is located in the client and server folders. "start": "concurrently \"(npm start --prefix client)\" \"(npm start --prefix server)\"", 6. Postponing the launch of the script until a resource is available.
When developing a full-stack application, there is often a need to run both client and server applications. The wait-on package allows you to synchronize the execution of certain processes. In our case, it is necessary that before launching the client part of the application, a certain port would be available.
For example, there is a dev script that is used in an Electron application, whose interface is written using React. The script, using
concurrently , simultaneously launches the presentation layer of the application and the Electron window. But using wait-on you can make the Electron window open only when the React presentation layer is ready for work and becomes available at http://localhost:3000 . This is what the wait-on usage looks like: "dev": "concurrently \"cross-env BROWSER=none npm run start\" \"wait-on http://localhost:3000 && electron .\"", In addition, the standard behavior of React projects is the automatic opening of a browser window. In the case of using React with Electron, this is not necessary. This can be
BROWSER=none using the BROWSER=none environment variable, in front of which, for the sake of cross-platform compatibility of the solution, is the cross-env command.7. Listing available scripts and working with them.
In order to display the list of scripts available in
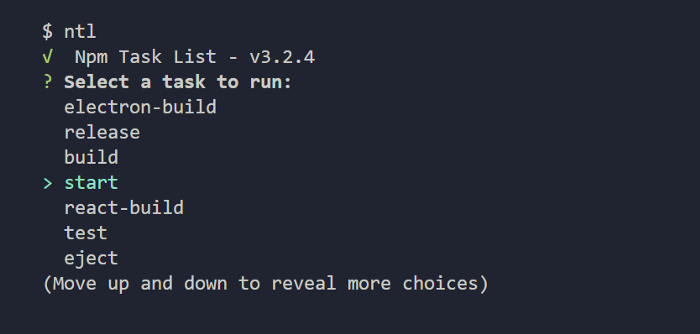
package.json , it is enough to go to the root directory of the project and execute the npm run command in the terminal.But there is an even more convenient way to display a list of scripts. When using it, the necessary script can be immediately selected from the list and launched. In order to use this method of working with scripts, we will need to globally install the
ntl module (Npm Task List): npm i -g ntl Then in the project folder you need to run the
ntl command. It will display a list of available scripts and allow you to select the script that you want to run. Here's what it looks like.Using the ntl command
This feature can be very useful if you do not know exactly what scripts are in the project. It is also good in those cases when the programmer wants to replace the input of a long command to start the script with the input of a short command and a quick press of a few more keys on the keyboard.
8. Run pre-scripts and post-scripts
Perhaps you are familiar with the
prebuild and postbuild scripts that allow you to run some code before and after running the build script. Such pre-and post-scripts can be defined for any other script. This includes those descriptions that the programmer himself adds to p ackage.json .This not only allows you to make the code cleaner, but also helps to run pre-and post-scripts in isolation.
9. Application Version Management
Instead of manually changing the version of the application, the programmer can use special commands
npm . In order to increase the corresponding part of the application version number, you can use the npm version command, followed by major , minor or patch : // 1.0.0 npm version patch // 1.0.1 npm version minor // 1.1.0 npm version major // 2.0.0 Depending on how often you update your application, you can save time by setting the version number to automatically increase each time you deploy a new version of the application. For example - like this:
{ "predeploy": "npm version patch" } 10. Editing package.json from the command line
The package.json file is a regular json file, so it can be edited directly from the command line using the json utility. This opens up new opportunities in those situations when you need to change
package.json , allowing you to create your own abbreviated versions of commands. Install the json package globally: npm install -g json You can then use the
json utility to quickly edit a file with the -I . For example, to add a new foo script with a value of bar to a file, you can use the following command: json -I -f package.json -e 'this.scripts.foo="bar"' In the next section, you will see a more practical example of using the
json utility.11. Automating the configuration and opening of the repository
If your
package.json file has a "repository" entry, this means that you can open the repository page in the default browser used in the system. To do this, use the npm repo command.If your project is already connected to a remote repository and you have the
git command line utility installed, this means that you can find out the address of your repository using this command: git config --get remote.origin.url But that's not all. If, according to the previous
json , you have installed the json utility, then you can use the following script to automatically add the correct information about the repository to package.json : json -I -f package.json -e "this.repository=\"$(git config --get remote.origin.url)\"" 12. Creating your own script to manage the npm init command.
Now let's talk about solving a larger problem. Namely, we are going to develop our own script that manages the work of the
npm init command, which accepts the URL of the GitHub repository and automatically sends the first commit to it. Here we will talk about how to create such scripts. And in the next section, which will be our last tip, we'll talk about working with git .You can configure the behavior of the
npm init command using the .npm-init.js . Create such a file in the current user's home directory (on Windows, this is usually C:/Users/<username> , and on Mac it is /Users/<username> ). After that, run the following command, which tells npm where this file is located: npm config set init-module ~\.npm-init.js Before integrating with
git , let's look at a simple example of the .npm-init.js , which reproduces the questions that the system asks the user when using the npm init command without additional settings: module.exports = { name: prompt('package name', basename || package.name), version: prompt('version', '0.0.0'), decription: prompt('description', ''), main: prompt('entry point', 'index.js'), repository: prompt('git repository', ''), keywords: prompt(function (s) { return s.split(/\s+/) }), author: prompt('author', 'Joe Bloggs <joe.bloggs@gmail.com> (joebloggs.com)'), license: prompt('license', 'ISC') } Each question is based on the following pattern:
nameInPackage: prompt('nameInPrompt', 'defaultValue') In order to specify a certain value and not ask a question to the user, it is sufficient to simply remove the
prompt method.If you want to return to the standard
npm init settings, simply delete the .npm-init.js .13. Sending the first commit to the GitHub repository using npm init
In order to execute
git commands in the .npm-init.js we need to find a way to work with the command line. To do this, you can use the child_process module. We connect it at the top of the file, and since we only need the execSync function, we only import it using restructuring: const { execSync } = require('child_process'); In addition, we will create an auxiliary function that outputs the results of our function to the console:
function run(func) { console.log(execSync(func).toString()) } And finally, let's create an appropriate prompt-block to handle the URL of the GitHub repository. If the URL is available to the script, we will create the
README.md file and send the first commit to the repository.So, one of the elements of the
module.exports object of the .npm-init.js should be the following code: repository: prompt('github repository url', '', function (url) { if (url) { run('touch README.md'); run('git init'); run('git add README.md'); run('git commit -m "first commit"'); run(`git remote add origin ${url}`); run('git push -u origin master'); return url; }) Here's how the full code of the
.npm-init.js file should look after this addition: const { execSync } = require('child_process'); function run(func) { console.log(execSync(func).toString()) } module.exports = { name: prompt('package name', basename || package.name), version: prompt('version', '0.0.0'), decription: prompt('description', ''), main: prompt('entry point', 'index.js'), keywords: prompt(function (s) { return s.split(/\s+/) }), author: prompt('author', 'Joe Bloggs <joe.bloggs@gmail.com> (joebloggs.com)'), license: prompt('license', 'ISC'), repository: prompt('github repository url', '', function (url) { if (url) { run('touch README.md'); run('git init'); run('git add README.md'); run('git commit -m "first commit"'); run(`git remote add origin ${url}`); run('git push -u origin master'); return url; }), } Here is the
package.json file that the system creates using this .npm-init.js : { "name": "Custom npm init", "version": "0.0.0", "decription": "A test project, to demonstrate a custom npm init script.", "main": "index.js", "keywords": [], "author": "Joe Bloggs <joe.bloggs@gmail.com> (joebloggs.com)", "license": "ISC", "repository": { "type": "git", "url": "git+https://github.com/JoeBloggs/custom.git" }, "bugs": { "url": "https://github.com/JoeBloggs/custom/issues" }, "homepage": "https://github.com/JoeBloggs/custom#readme" } Customizing the process of initializing new projects, you can go further. For example, to make it so that when creating a project, a new repository for it would be created.
Results
I hope this material has helped you see what can be achieved with npm. I want to believe that you have found something here that will allow you to work more productively - whether it is about using abbreviated versions of commands, scripts from
package.json , or setting up npm init according to your needs.Dear readers! Do you automate work with npm?
Source: https://habr.com/ru/post/458504/
All Articles