Texturing, or what you need to know to become an artist on surfaces. Part 2. Masks and Textures
Masks and textures
We continue a series of lessons on how to become an artist on surfaces. The first part is here .
Masks
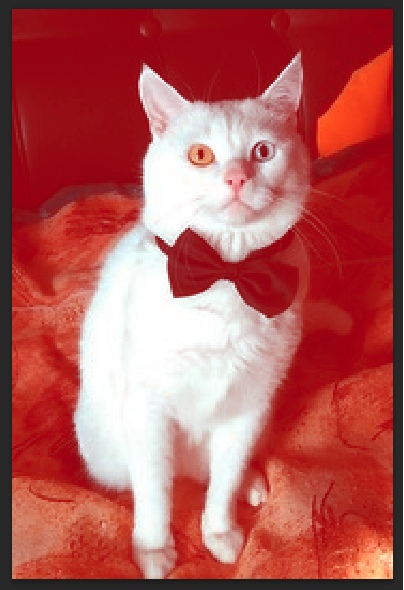
In the last part, we looked at the principles of the channels and our first mask that I created - the transparency mask.
The transparency mask in the cat example was created using a separate channel called Alpha Channel. This channel also had a dimension of 8 bits per pixel.
')
Each mask pixel can have a value from 0 to 255 (or up to 1), where 0 is a fully transparent pixel, and 255 (or 1) is a completely NOT transparent pixel.
Now, if you look at the Alpha channel as a normal channel, it will become clear that it is no different from any other RGB channel. In fact, these are all the same pixels that have the same intensity from 0 to 255 (up to 1). This is all the same gradient gray. And if we took any other channel, copied it and inserted it into the Alpha channel, we would get an interesting effect:

The mask is superimposed on the entire image, but where the pixel intensity is the brightest (close to 1 or 255), the mask color is the smallest, and where the intensity is the lowest (closer to 0), then the mask is displayed on the contrary:
And now, if such an image is exported and opened in any program for viewing images, you get the following image:
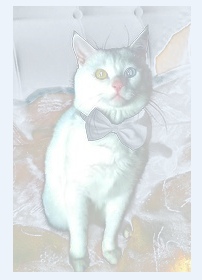
Most of the pixels have a semi-transparency according to the intensity specified in the alpha channel. But if the transparency mask is the same as other channels, then the question should be whether it is necessary to use it in the Alpha channel?
Actually, not necessarily. An alpha channel is needed so that the image can store color data while still having transparency data. That is, it turns out that in the image 1 pixel has 3 mandatory channels, and the 4th channel is optional and not mandatory.
Total, in our image not 32 bits of color, but only 24 bits of color (8 bits * 3 channels) + 8 bits of transparency. Moreover, we can not include the transparency channel in the image, and then the file size will be 1/4 smaller.
What is a mask?
The mask in texturing (yes, probably, and not only) This image, which consists of the 1st channel and is necessary for regulating other channels and visualizing the parameters of textures (This is already PBR, and we will definitely encounter it later).
That is, the mask is used to solve 2 tasks:
- Determining the degree of transparency.
- Determining the intensity of something in a pixel (more on that later, but necessary).
In fact, it is not necessary to divide the work of masks into two tasks - both there and there the intensity is used, just in the first case for transparency, and in the second case for the purpose of regulating the appearance of the texture.
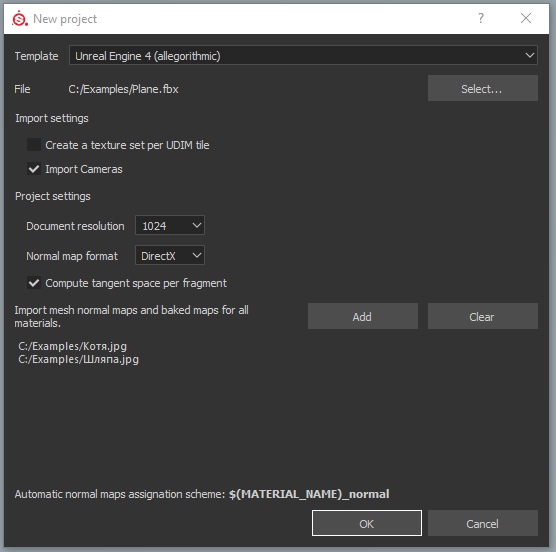
Now we will consider visually the principle of the masks in the Substance Painter and try to pull the cap on my cat.
To do this, we will create a new project, indicate and add our photos of the cap and the cat to the program. (Note: Substance Painter will not allow you to create a project without a 3D model, so I created a square plane in Autodesk Maya. Model creation is beyond our scope, so you need to find this information yourself. Also, we will not consider the Substance Painter interface in detail. in order not to delay the tutorials to the maximum, however, you are working with Substance Painter for the first time, then if you don’t press anything extra, all windows should be displayed correctly, and finding the necessary parameters will not be difficult).
Next we need to create 2 fill layers:
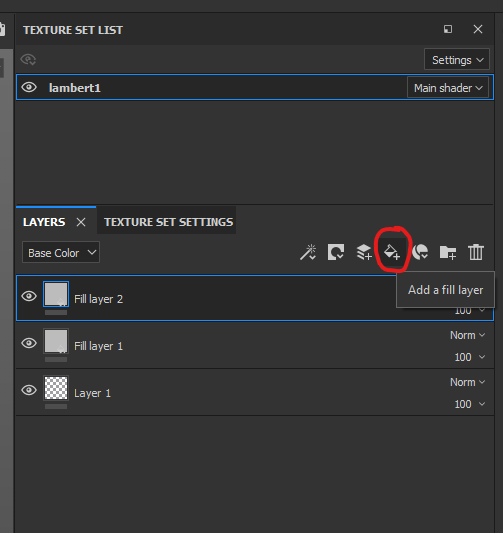
The fill layer in Substance Painter is a huge set of parameters for how the texture should look. Here you can customize the visual representation of metal, plastic and any other textures. However, we will talk about this later, but now we should have a clear idea that the fill layer is an image (Color) consisting of 3 channels and a bunch of additional channels of 8 bits, which are responsible for how this fill layer should look like.
That is, the fill layer has a more complex combination than a regular image. In this case, the fill layer consists of:
- 3 main channels that stand out to build color. These three channels are combined into one “BaseColor” parameter.
- 3 additional channels, each of which is responsible for some visual effects (for example, the Metal channel is responsible for how much a pixel will be considered a metal from the point of view of PBR texturing).
- 3 channels for working with the normal map (Normal map).
We are not interested in additional channels right now, since we have not yet become acquainted with PBR texturing, and we will definitely return to them later, and now our task is to learn using masks to control which layers in the pixels we need will dominate (in the case of transparent mask) which layers will be completely hidden, and which layers will be displayed in their own way.
We will now analyze this on a cat and a hat, and then proceed to simpler monotonous colors and more deeply analyze the difficult-combined use of masks to control layers.
Our task now is to disable all those channels in this layer that we are not interested in at the moment. Turn off the channels Height, Rough, Metal, Nrm (Normal) and leave only the color (color):
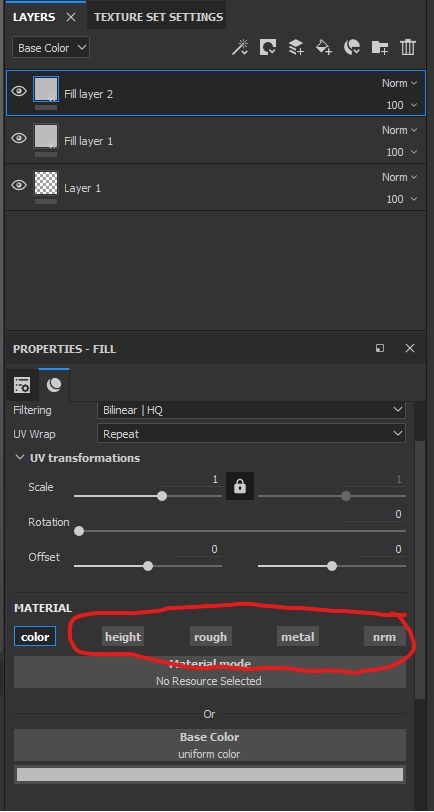
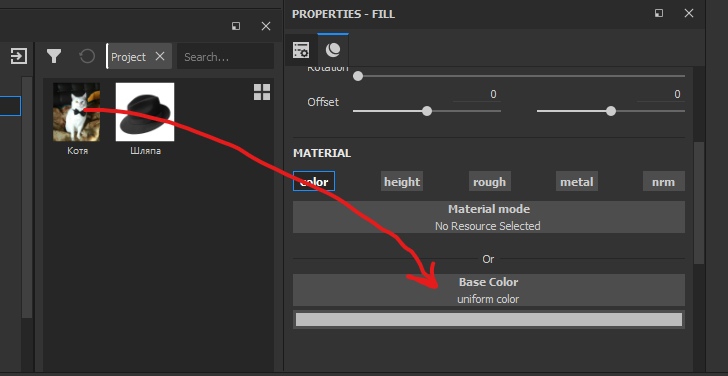
Now we need to distribute our pictures into layers and set up their correct display. To do this, select the layer, find the image, import it into the Project folder (in the Shelf panel) and drag the image into the Base Color parameter.
Repeat this action with a second layer and a hat.
Important. The layer with the hat should be higher in the hierarchy than the cat, since we want the hat to be ON the cat, and not UNDER it. Remember that you can control the visibility of layers using the eye button to the left of the layer.
Since the project is designed for textures, and textures are supposed to be made square (preferably, the size is always a multiple of 2. m. That is, the size of 64 * 64 pixels is 2 * 2 * 2 * 2 * 2), the image of the cat will be slightly stretched in breadth since the photo of it is rectangular vertically, and the Substance Painter has stretched it to square shape.
In this regard, we need to zoom the image and stretch the photo on a layer vertically. To do this, we remove the lock for the preservation of ratios and stretch the image by setting the vertical scale to 0.7.

Now you need to adjust the size of the hat in the same way, but now you do not need to turn off saving relationships. Since my hat turned out to be very large, when zooming in, an effect like tiling starts to work - the texture begins to repeat horizontally and vertically, so the system does not allow to leave empty places if the image is smaller than the size of the final image (in our case, less than 1024x1024 pixels).
A small digression: Why do I need tiling?
Tiling is needed when we need to fill in some duplicate elements of textures. For example, a mesh or some kind of fabric pattern. The image below has a specially structured picture structure in such a way that if we attach a copy of this picture from above, below or from either side, it will still look as solid and wider (specifically in the lower example, the picture already consists of 16 repeating pictures ):

These repetitions are called patterns (or more simply, seamless textures) and they are designed to allow these patterns to be repeated over and over again at least a million times. We will use this repetition in the future to improve the quality of the image, but we will mainly use this when creating shaders, so we will not return to tiling and patterns soon.
And so, we continue
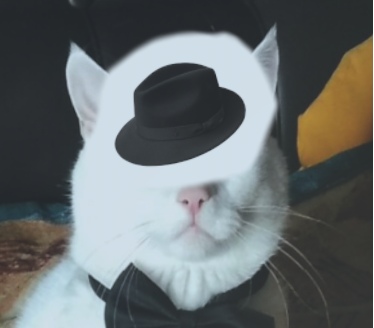
We made scale hats to fit our size. Now we need to place the hat plus or minus over the cat's head - for this we begin to turn the parameters Offset (offset), shifting the hat we need to the cat.
We got about the following picture:

Well, now it is time to use masks in order to edit the visibility of the layer with hats. Masks in Substance Painter can be created in 2 ways:
- Create a mask on the layer itself, limiting its visibility.
- Create a folder in which to place the layer. And put a mask on the folder.
The second option allows you to create more combinations of masks, but now we are interested in the principle of the mask itself, and not the complexity of the combinations, so we will create a mask on the layer and immediately make it black. To do this, we click on the PKM layer and select “Add Black Mask”.
And what happens to a pixel when the channel of the pixel transparency mask on it is 0 (completely black)? That's right, the pixel becomes completely transparent and is not displayed at all:

As you noticed, now the layer consists of two images: one image is hats, and the second image is a completely black mask. The mask in Substance Painter (as elsewhere, in principle) is created from a single channel with a size of 8 bits. And now, controlling the intensity, we can paint on the mask in shades of gray, “revealing” the top layer. The higher the intensity of the pixel filling, the brighter will be the layer of pixels with hats up to the full display of pixels.
Now our task is to make the hat we need visible, and for this we need to indicate on the mask which zone of the hat fill layer will be displayed. To do this, select the layer with the mask, and select the mask itself (this is important, since you cannot edit the fill layer, you can only edit the mask). When selecting a mask, we open the settings of the brush, which we will draw on the mask, and at the very bottom of the settings there is an intensity setting (Grayscale) from 0 to 1 (from 0 to 255, respectively).
Now, drawing on the mask over the head of the cat, we will show a hat:
Well, and remove too much with a brush with 0 intensity:
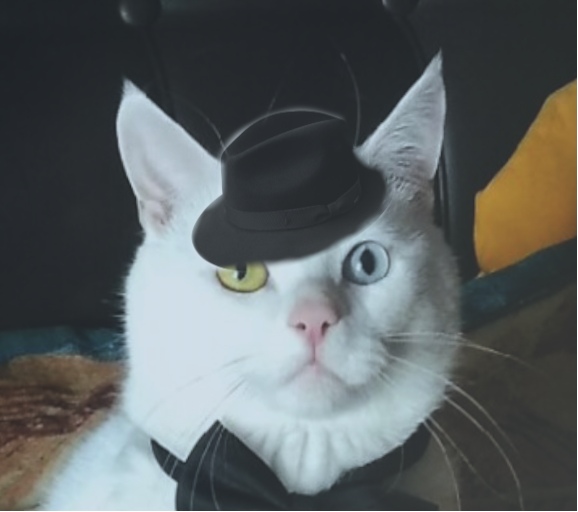
The mask itself looks like this:
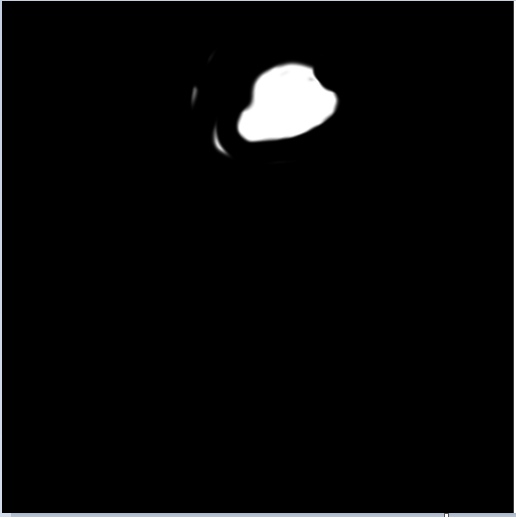
Thus, the mask allowed us to determine which area in the layer with hats to display.
Well, this applies to editing cats. How does this apply to textures in games?
Difficult combinations of masks.
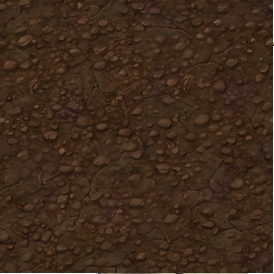
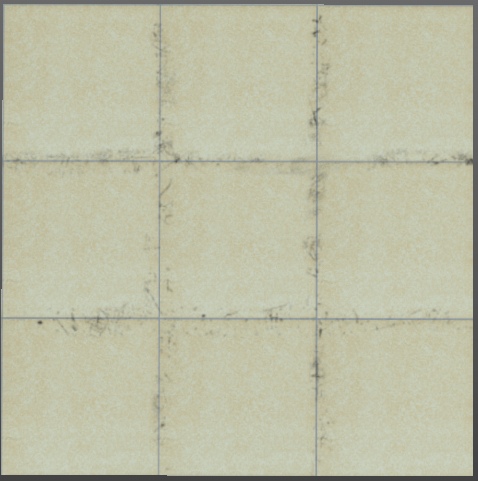
Now let's look at a clean floor tile. More precisely, its texture:

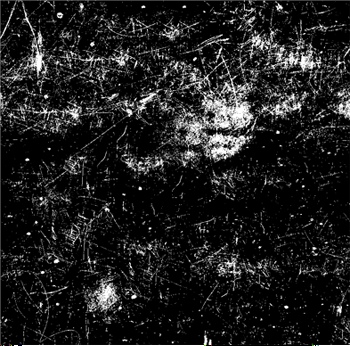
Now imagine that we need to create a tile texture that would be broken with cracks and dirt. And not just with dirt, but just like the one below on the texture:
Accordingly, we already know how to create fill layers with textures and now our task is:
- Create a new project with the same settings that were in the previous (we will consider them standard).
- Create 2 layers - one for tile, the other for dirt. Since the dirt should be on top of the tile, we have a layer of dirt above.
But now we do not put a mask on the layer with dirt, but create an empty folder for the layers and place the layer with dirt in this folder (remember that the folder should still be higher in the hierarchy than the tile).
And we create a mask already on the folder.

Now let's define the areas in which you can draw dirt (you do yours, and I mine). And do not forget that to edit the mask, we need to select the mask on the folder, not the layers.
So, I got about the following picture:
Not a masterpiece, but the zones in which the dirt should be displayed, we have defined.
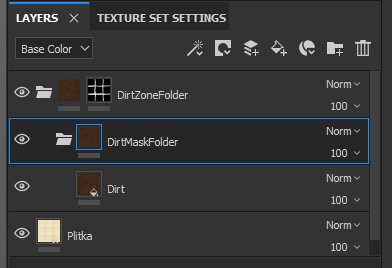
Now create another folder in the folder with a layer of dirt and move the layer with dirt into this folder. So, it turned out that the layer with dirt is in a folder that is in another folder:
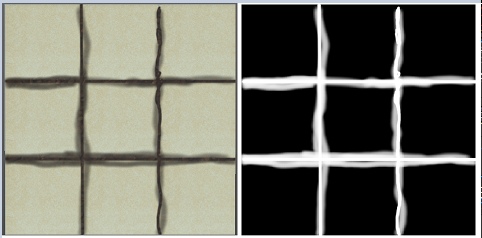
We will also create a mask on the new folder, but this time it is not a solid fill, but choose something from the existing various masks. For example, I found this on the Internet:
Offtop.
To upload an image and then use it as a mask, you need to transfer it to the shelf (in the folder) from the browser and select the following parameters:

Perhaps you can specify a different format, rather than “texture,” and the image will still connect as a mask, but I do not know (tell me in the comments).
We continue.
Setting this texture as a mask is easy. We click on the folder in the same way with PKM and select Add Bitmap Mask. In the window that appears, we find the texture we need and select it as a mask. The hierarchy with folders began to look like this:

Note that in the small thumbnail window at the top folder, instead of full-fledged dirt, a bunch of little squares with little visible glimpses of dirt began to appear. This is the result of how the current layer of dirt will be processed, taking into account all the masks that we added.
But in general, we got about the following picture:
In this example, we have a mixture of masks. The first level of the mask defined areas where 100% should NOT appear dirt, and where it can appear. The second level of the mask determined where 100% dirt will appear and where not. Those pixels in which both masks had values greater than 0 began to display dirt depending on the lower intensity limit (if the first mask has a pixel intensity of 0.5 and the second has 0.2, then the pixel will be transparent at 0.2). Simply put, each pixel takes into account all the masks that affect its display. And if at least one mask is 0, then the pixel will not be displayed.
Total:
Layers are the fill for the entire project area, which has a bunch of channels to control the image state.
A mask is 1 channel of an image pixel (texture) that is needed to process the visibility of something.
The number of channels for the 1st pixel can be very large. With the default settings, Substance Painter takes into account 9 channels already in the 1st layer - 3 per color, and 3 for different effects, 3 on normal maps. The image itself in the picture in your browser contains only 3 channels + 1 additional if there is transparency.
Moreover, the layers can be superimposed on each other, and the program is already doing calculations for 1 pixel much larger than for 9 channels. That is, in the case of mixing 2 layers in the 1st pixel, the software needs to calculate 9 channels of one layer, then take into account the transparency that was specified in the mask channel and calculate the total pixel intensity taking into account the mask. Then it is necessary to calculate the second layer, and its 9 channels. Then apply a translucent layer on top. Total 18 channels of layers and 1 channel of mixing. Of course, when you upload it to images (textures), there will be no 19 channels - Substance Painter will create 3 images (textures):
- Image (texture) with color (3 channels per pixel).
- Image (texture) with channels for PBR parameters.
- Image (texture) to determine the normals.
That is, the Substance Painter already does all the calculations so that you can simply get the final result in the image. Well, as you understand, controlling the dirt transparency mask in these images is no longer possible - the images (textures) in this case turned out to be the final result, which we can place on the model and get a painted model.
Texture
I deliberately wrote in the results about the masks “Image (texture)”, so that you would begin to postpone the understanding that texture in fact is not an image in our usual understanding.
A texture is a set of parameters in order for game engines or programs for working with textures to understand how to process a pixel.
A texture can contain 1 channel. For example, for transparency. Or it can contain 3 channels at once for various purposes (for example, for metallic operation parameters, rustiness and shading).
There are a lot of variations in the use of textures, but they all boil down to one thing - to work with 1 or several channels.
For example, the texture Cavity (cracks) usually describes the edges (edges) of an object on the scan, highlighting the maximum white pixels along the entire length of the edges. But in fact - it's just a texture, the channel of which is directed to display the intensity of the pixels at the right points. Such a texture can be used, for example, for mud masks - that is, by it we can display dirt on the object.
Applying masks outside texturing software.
Masks are needed not only for programs like Substance Painter. In game engines, texturing is very similar to the work of Substance Painter - you can simply stick in ready-made textures from Painter, or you can start customizing shaders (materials) at your own discretion, combining textures through masks in various ways. And if the Painter gives the finished result, the mask based shader makes calculations on the fly (roughly speaking online).
Some PBR texturing
Based on how the texture works and why it is needed, you can very quickly explain what PBR is.
PBR is a physics-based render texture. That is, this is a set of parameters, by controlling which we can make the texture look cinematic.
To do this, use the parameters that are responsible for how the light should be displayed on the pixel.
Here is a list of these parameters:
- Metallic. Responsible for representing a pixel as metal. How easily light is reflected from a pixel.
- Roughness Responsible for the degree of pixel roughness. How much light is scattered when touching a pixel.
- Ambient Occlusion (outdated). Responsible for shading pixels. That parameter, which becomes obsolete and, soon, it will not be used at all.
- Normal Map. Responsible for how light can be distorted on a pixel, creating imaginary false depth or bending.
- Albedo (Color) - the color with which the pixel should be displayed.
There are a ton of different parameters that you can or should not take into account to get the desired result. It all depends on what effect you are seeking.
For example, if a program sticks a pixel into a metal channel with a single channel whose intensity is 1 (255), then this pixel will reflect everything around it as pure metal as possible.

By adjusting the Roughness channel to the maximum (specifying all the pixels as 1 or 255), we see that now the pixel stopped reflecting everything around and began to scatter the light so strongly that it turned gray:
It is very important to understand that there are no separate textures that specialize in one thing. All textures are channels whose pixels have intensity or values, indicating that you tell a parameter to react one way or another.
We will analyze PBR in as much detail as possible in the next part of the lesson. And also consider additional techniques for mixing masks to improve the picture.
If I have written something incorrectly or not clearly, I beg you to inform me about it so that I can correct this lesson.
Thank you all for your attention =)
Source: https://habr.com/ru/post/458470/
All Articles