Everything you need to get started with Vue.js
Most likely, you, while reading these lines, have already heard about a JavaScript framework called Vue . If you were going to try it out, but didn’t very well imagine what you should start with, then this material was written especially for you. His author says he wants to talk about why he really likes Vue. In addition, he is going to present to everyone 4 ways to write the first application on Vue.

Usually I try not to talk about too many ways to solve the same tasks to those who are just starting to master a framework. But in this case, I believe that to show several ways to develop the first application on Vue is very important. Perhaps you like working with the command line, and perhaps with tools equipped with a graphical interface. Both are suitable for Vue-development. In addition, Vue-applications can be written without resorting to the command line. To do this, simply add a tag to the HTML page to load the corresponding script. And finally, you may not want to take care of setting up the development environment. Instead, you strive to try Vue as quickly as possible, without unnecessary movements. In fact, no matter what strategy you follow, here you will find something that will help you get started with Vue.
In the process of reading this material you will find links to useful resources. And when you read this whole article, I'll tell you about what you should pay attention to for further study of Vue. It should be noted that here we will not dive into the subtleties of Vue, we will not consider all the possible mechanisms of this framework. We are going to deal with the basics and go to the first working application.
')
First, let's talk about some interesting features of Vue.
The strength of Vue, in my opinion, is how friendly this framework is to newbies. The Vue development team has done a wonderful job, striving to ensure that developers of various qualifications can quickly begin to work productively with the framework. If you know HTML, CSS and JavaScript - this means that you are literally a step away from developing quite powerful applications on Vue.
I also believe that Vue, among the three leading front-end development tools (this is Angular, React and Vue), has the lowest entry barriers. This is so for several reasons, but for me it comes down to three main features of Vue:
If you talk to developers who like Vue, then I think that many of them will first of all speak about the quality of the documentation of this framework. If you visit the site Vue.js, you can find that the documentation is divided into several sections:
I, working as a programmer, feel involved in several great communities. One of these is the Vue community. Its members are friendly, friendly, they are more than willing to help those in need. I recommend to subscribe to the Twitter accounts of the following members of the Vue community. So it will be easiest for you to understand what they do and learn about what they live. Here are the links:
If you visit the home page of Vue.js, you can see that there it is called: “Progressive JavaScript framework”. At first glance, this may seem like an ordinary marketing ploy, but with a little insight into the essence of Vue, you can see that this is not the case. First, let's define the meaning of the word “progressive”. It is something that happens or develops gradually or in stages; it is something that is performed step by step.
Very soon, you will see that when developing Vue applications, you can work by gradually incorporating the capabilities of this framework into them. For example, if you already have a certain project, you can easily equip it with Vue support. You can start by downloading the Vue script and writing a few lines of code.
If you want to use the Vue CLI, the Vue command-line tool, to deploy a new project with the capabilities you need, then this is also not a problem. As your application grows, and you need quite advanced features like routing or state management, it is easy to equip an application with these capabilities.
As already mentioned, Vue is an accessible framework. If you already know HTML, CSS and JavaScript, it means that you are ready to start working with Vue. As a matter of fact, if you really want to start writing Vue-applications, then I suggest that you do it.
The first way to use Vue, which we explore, is to connect a Vue script to a page using the
It is usually quite difficult to introduce new tools, libraries or frameworks in real projects, say, in the organization where the programmer works. For example, you really like working with Vue. You go to the authorities and ask - can you rewrite the entire project on Vue. In response to such a question, you almost without any options will immediately be refused. If you propose to use Vue on a certain page, the development of which you are currently engaged in, then such a proposal may well be accepted.
In the following example, we will develop a very primitive application, which is good because it will be very convenient to consider some of the concepts of Vue.
In this application, we are going to display the text “Hello, Vue!”, And below the text - the current time and date. Then we will write a code that keeps the date and time up to date. As a result, the user of the application will be able to use it as a normal watch, watching the passage of time. Create a new folder, create an
Now we have the page frame, the foundation of the future application. Therefore, our next step is to connect to this page of the script Vue.js. Add to the page code, just above the closing
Pay attention to the comment. He points to one important thing. Namely, now we have connected to the page the version of Vue, intended for development. If a certain page is intended for real use, then you need to connect the production version of the script to it. Details about this can be found here .
Now, after connecting the script, we, first of all, need to add the root element to the page, to which the Vue instance will be connected:
After that, create a new instance of Vue and let it know which root element it needs to connect to:
Now create a couple of variables. They will store the values that we use to display information on the page. This is done by declaring the properties of the
Now that the data is ready, we are ready to resort to the possibilities of Vue to bring them to the page. This is done using simple, easy-to-understand structures:
Now you can congratulate yourself on the fact that you have just created your first Vue.js application. If you open
What we have done here does not look like a particularly advanced project. But in the depths of Vue, a lot of things happen that allow this project to work as we need. The framework established a link between the DOM and the data, after which the application was reactive. How do we check this out? It's very simple - just open the JS console (right on the application page) and write something in
Application research
Vue also gives the developer the ability to create handlers for component lifecycle events. This means that we can listen for events like
Thanks to the following code, the value of the
If you open this page in the browser, then its appearance will not change, but the time displayed on it will be updated every second. However, we do not need to manually update the DOM. Vue has associated data with the DOM. When you change the data changes and what is shown on the page.
Although we created the application by simply connecting the Vue script to the page, this approach is not very scalable. If you need to develop a full-fledged one-page application (Single Page Application, SPA) and at the same time want to use the Vue helper tools, then the best would be to resort to the Vue CLI.
If you are one of those who do not like working on the command line, then you can easily use a tool with similar capabilities that has a graphical interface (Vue UI).
First we need to install the Vue CLI. Before you do this, you need to get Node.js and npm. If you haven’t previously worked with Node.js and npm, take some time to get to know them and sort out some of them. Here is the command with which you can install the Vue CLI:
To create a new application, you can use the

List of commands supported by the vue utility
The
During the execution of this command, a new
Now it’s enough for us to accept the default options. This will lead to the creation of a new application.
Creating a new application with the Vue CLI
Now go to the
Note that the value of the text that appears in
Now, on the command line or in the built-in terminal in your editor, run the following command:
It will start the server, after which it will provide information on how to open the home page of the application. Namely, it is http: // localhost: 8080 / .
Vue application in the browser
Here we have considered the use of the Vue CLI only very superficially. However, I hope that this example has shown you how easy it is to create new applications with the help of Vue CLI, which are provided with a reliable infrastructure and can scale in line with the growing needs of a developing project.
Together with the Vue CLI, with the command line tool, the Vue UI tool is also installed. To start it - use the following command:
During its execution, a new application page will be opened, located at http: // localhost: 8000 / dashboard .
Vue UI page
With Vue UI, you can create a new project that will have the same capabilities as a project created by command line tools.

Creating a new project in Vue UI
After the project setup is completed, you can start it directly from the Vue UI by going to the
Launching an app in Vue UI
Although the above options for creating the first Vue application allowed us to achieve our goal, they require some customization of the development environment. Perhaps this does not suit you and you have not yet created your first Vue application. If so, then now we will look at another way to work with Vue. It consists of using online development environments, one of which is CodeSandbox .
Before creating projects on CodeSandbox, you will need to register on the site or log in using a GitHub account. After that, you need to create a new “sandbox” (in the framework of the project this is called “sandbox”) and find Vue among the available templates (on the

Creating a new Vue-based project in CodeSandbox
After that, at your disposal will be a new Vue-application. In the following figure, you can see that you can work with project files in the left pane, in the center is the editor window, and on the right is the preview area in which the running application is displayed.

Work on the application in CodeSandbox
Open the
After that, you will see the same application that we have already engaged. In the course of working on a project, it may be necessary to show it to someone. For example - in order to consult about something. CodeSandbox allows you to do this with a special link .
Work on the application in CodeSandbox
Here are links to some of my favorite Vue resources. They will help you advance in the development of this framework. For example - here is the Awesome Vue page, by visiting which you can get an idea of the scale of the Vue ecosystem. Here you can find Vue repositories. Here is the official blog of the project. Here is the Vue developer community site. Here and here - podcasts on Vue. Here are pages of several Vue-based projects: VuePress , Nuxt , Gridsome .
No matter what framework you use to develop the frontend, you need to keep your JavaScript knowledge in good condition. The more time you can devote to improving your knowledge of JS, the better. If you know JavaScript well, it means that you can cope with any framework or library you may need to work with.
I have already spoken about the Vue manual from the official documentation. But it is worth mentioning again. I would, if I were a novice developer, would try to deal with this manual as thoroughly as possible, read it and reread it. But at the same time, I would not forget to test in practice those code examples that are found there. No wonder they say that repetition is the mother of learning. Repetition plays an important role in the process of learning new technologies, and without it you can not do.
In the process of working with documentation, you should pay particular attention to the following basic concepts of Vue:
Do not yet strive to create large applications. Focus on mastering basic things, and everything else will come with time.
If you follow my Twitter posts, then you know that I am a big fan of Vue. I like to create component-based applications. I believe that using Vue not only simplifies the work, but also makes the code writing process enjoyable and fun.
Dear readers! If you have recently studied your first client framework, please tell us how it was.

Material overview
Usually I try not to talk about too many ways to solve the same tasks to those who are just starting to master a framework. But in this case, I believe that to show several ways to develop the first application on Vue is very important. Perhaps you like working with the command line, and perhaps with tools equipped with a graphical interface. Both are suitable for Vue-development. In addition, Vue-applications can be written without resorting to the command line. To do this, simply add a tag to the HTML page to load the corresponding script. And finally, you may not want to take care of setting up the development environment. Instead, you strive to try Vue as quickly as possible, without unnecessary movements. In fact, no matter what strategy you follow, here you will find something that will help you get started with Vue.
In the process of reading this material you will find links to useful resources. And when you read this whole article, I'll tell you about what you should pay attention to for further study of Vue. It should be noted that here we will not dive into the subtleties of Vue, we will not consider all the possible mechanisms of this framework. We are going to deal with the basics and go to the first working application.
')
First, let's talk about some interesting features of Vue.
Vue strengths
The strength of Vue, in my opinion, is how friendly this framework is to newbies. The Vue development team has done a wonderful job, striving to ensure that developers of various qualifications can quickly begin to work productively with the framework. If you know HTML, CSS and JavaScript - this means that you are literally a step away from developing quite powerful applications on Vue.
I also believe that Vue, among the three leading front-end development tools (this is Angular, React and Vue), has the lowest entry barriers. This is so for several reasons, but for me it comes down to three main features of Vue:
- Excellent documentation.
- Wonderful community.
- This is a progressive framework.
Documentation
If you talk to developers who like Vue, then I think that many of them will first of all speak about the quality of the documentation of this framework. If you visit the site Vue.js, you can find that the documentation is divided into several sections:
- Guide . Here you can find everything you need to get started with Vue.js. This section is broken down into easy-to-read subsections that introduce the reader to the concepts needed to begin developing applications based on components.
- API . This section provides a detailed description of the Vue API. For example, if you ever get any method, the purpose of which you are not quite sure, visit this section will help clarify the situation.
- Recommendations . Here you can find wonderful recommendations, following which you can avoid the appearance of errors. These recommendations may warn the developer against the use of anti-patterns. It is important that here are not the hard rules, but something like a guide. After you get a little familiar with Vue, write a few applications, I would recommend you read the material in this section. I believe this is a very valuable source of knowledge on Vue.
- Examples Here you can find examples of applications developed by Vue. If I were you, I would not have looked here until I had mastered a bit with the development of components. But a little later, when you are ready to learn how the full-fledged Vue-applications are arranged, you should study this section.
- Recipe book . In this section, you can find answers to frequently asked questions about Vue. For example - on such: “How to perform form validation?”, “How to conduct unit testing of a component?”. This, again, is a valuable resource, but the development of its materials should be postponed until the moment when you have questions similar to those given above.
- Tools and main libraries. Vue has great tools and main libraries. We will not go into special details about this here, since we need to start writing the code as soon as possible. I will give here some links to materials, the existence of which is useful to know. So among the Vue tools, I would point out the following: developer tools , Vue CLI , Vue Loader . Here are links to materials on official libraries: Vue Router , Vuex , Vue Server Renderer .
▍Community
I, working as a programmer, feel involved in several great communities. One of these is the Vue community. Its members are friendly, friendly, they are more than willing to help those in need. I recommend to subscribe to the Twitter accounts of the following members of the Vue community. So it will be easiest for you to understand what they do and learn about what they live. Here are the links:
- Evan you
- Chris Fritz
- Sarah drasner
- Damian sulisz
- Divya sasidharan
- Guillaume chau
- Ben hong
- Sebastien chopin
- Natalia Tepluhina
- Edd yerburgh
▍Vue is a progressive framework
If you visit the home page of Vue.js, you can see that there it is called: “Progressive JavaScript framework”. At first glance, this may seem like an ordinary marketing ploy, but with a little insight into the essence of Vue, you can see that this is not the case. First, let's define the meaning of the word “progressive”. It is something that happens or develops gradually or in stages; it is something that is performed step by step.
Very soon, you will see that when developing Vue applications, you can work by gradually incorporating the capabilities of this framework into them. For example, if you already have a certain project, you can easily equip it with Vue support. You can start by downloading the Vue script and writing a few lines of code.
If you want to use the Vue CLI, the Vue command-line tool, to deploy a new project with the capabilities you need, then this is also not a problem. As your application grows, and you need quite advanced features like routing or state management, it is easy to equip an application with these capabilities.
As already mentioned, Vue is an accessible framework. If you already know HTML, CSS and JavaScript, it means that you are ready to start working with Vue. As a matter of fact, if you really want to start writing Vue-applications, then I suggest that you do it.
Option number 1: Vue script, connected to the page
The first way to use Vue, which we explore, is to connect a Vue script to a page using the
<script> . If you have already worked with JavaScript, then there will be nothing new for you here. Namely, we are talking about the fact that there is an HTML page that needs to be equipped with some functionality implemented in some JS library. To do this, the library is connected to the page using the <script> . It should be noted that the method of using Vue considered here is not only suitable for the development of a training application. It is used in real projects.It is usually quite difficult to introduce new tools, libraries or frameworks in real projects, say, in the organization where the programmer works. For example, you really like working with Vue. You go to the authorities and ask - can you rewrite the entire project on Vue. In response to such a question, you almost without any options will immediately be refused. If you propose to use Vue on a certain page, the development of which you are currently engaged in, then such a proposal may well be accepted.
In the following example, we will develop a very primitive application, which is good because it will be very convenient to consider some of the concepts of Vue.
▍ "Hello, Vue!"
In this application, we are going to display the text “Hello, Vue!”, And below the text - the current time and date. Then we will write a code that keeps the date and time up to date. As a result, the user of the application will be able to use it as a normal watch, watching the passage of time. Create a new folder, create an
index.html file in it, and add the following code to this file: <!DOCTYPE html> <html lang="en"> <head> <meta charset="UTF-8"> <meta name="viewport" content="width=device-width, initial-scale=1.0"> <meta http-equiv="X-UA-Compatible" content="ie=edge"> <title>Hello, Vue.js</title> </head> <body> </body> </html> Now we have the page frame, the foundation of the future application. Therefore, our next step is to connect to this page of the script Vue.js. Add to the page code, just above the closing
</body> , the following: <!-- --> <script src="https://cdn.jsdelivr.net/npm/vue/dist/vue.js"></script> <script> </script> Pay attention to the comment. He points to one important thing. Namely, now we have connected to the page the version of Vue, intended for development. If a certain page is intended for real use, then you need to connect the production version of the script to it. Details about this can be found here .
Now, after connecting the script, we, first of all, need to add the root element to the page, to which the Vue instance will be connected:
<div id="app"> </div> After that, create a new instance of Vue and let it know which root element it needs to connect to:
<script> const app = new Vue({ el: '#app' }) </script> Now create a couple of variables. They will store the values that we use to display information on the page. This is done by declaring the properties of the
data object: <script> const app = new Vue({ el: '#app', data: { message: 'Hello, Vue!', now: new Date() }) </script> Now that the data is ready, we are ready to resort to the possibilities of Vue to bring them to the page. This is done using simple, easy-to-understand structures:
<div id="app"> <h1>{{ message }}</h1> <p>{{ now }}</p> </div> Now you can congratulate yourself on the fact that you have just created your first Vue.js application. If you open
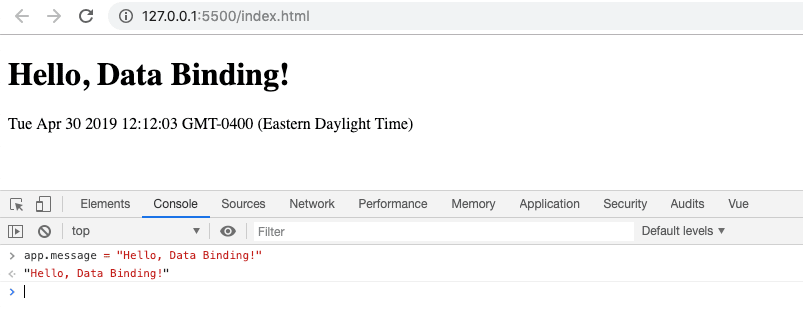
index.html in the browser, then it should display a page in which “Hello, Vue!” Is written in large letters. Below this inscription should be a line that displays the current date and time. In the course of developing and researching my version of the example, I used the Visual Studio Code and the Live Server extension.What we have done here does not look like a particularly advanced project. But in the depths of Vue, a lot of things happen that allow this project to work as we need. The framework established a link between the DOM and the data, after which the application was reactive. How do we check this out? It's very simple - just open the JS console (right on the application page) and write something in
app.message . This should lead to a change in the inscription displayed on the page. Below is what it looks like.Application research
Vue also gives the developer the ability to create handlers for component lifecycle events. This means that we can listen for events like
created , mounted and destroyed . When an event occurs, you can organize the execution of some code. I will not go into details, since the main purpose of this material is to demonstrate the various methods of creating Vue-applications, and not to disassemble all the details of the framework. However, now we still take a look at how the processing of component lifecycle events looks like and complete the work on our first application.Thanks to the following code, the value of the
now variable will be updated every second. During the Vue mount, we set up a second call to a function that updates the date and time using setInterval . You can create lifecycle event handlers by adding appropriate methods to the methods object. This is very similar to how we worked with the data object. Here is the code: <script> const app = new Vue({ el: '#app', data: { message: 'Hello Vue!', now: new Date() }, methods: { updateDate() { this.now = new Date(); }, mounted() { setInterval(() => { this.updateDate(); }, 1000); }) </script> If you open this page in the browser, then its appearance will not change, but the time displayed on it will be updated every second. However, we do not need to manually update the DOM. Vue has associated data with the DOM. When you change the data changes and what is shown on the page.
Option number 2: Vue CLI
Although we created the application by simply connecting the Vue script to the page, this approach is not very scalable. If you need to develop a full-fledged one-page application (Single Page Application, SPA) and at the same time want to use the Vue helper tools, then the best would be to resort to the Vue CLI.
If you are one of those who do not like working on the command line, then you can easily use a tool with similar capabilities that has a graphical interface (Vue UI).
▍Install Vue CLI
First we need to install the Vue CLI. Before you do this, you need to get Node.js and npm. If you haven’t previously worked with Node.js and npm, take some time to get to know them and sort out some of them. Here is the command with which you can install the Vue CLI:
npm install -g @vue/cli To create a new application, you can use the
vue create command. You can find out the list of commands that vue supports by using the vue -h command.List of commands supported by the vue utility
The
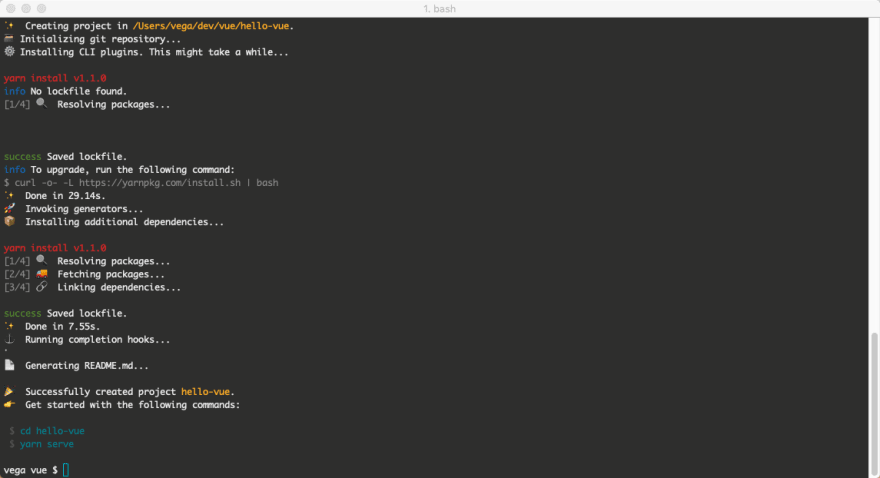
create command takes the name of the application. Create a new Vue application by executing the following command: vue create hello-vue During the execution of this command, a new
hello-vue folder will be created in the current directory. A detailed description of the process of creating an application using vue create worthy of a separate article.Now it’s enough for us to accept the default options. This will lead to the creation of a new application.
Creating a new application with the Vue CLI
Now go to the
hello-vue folder, open the file that is located at src/components/HelloWorld.vue , and replace all of its contents with the following code: <template> <div class="hello"> <h1>{{ msg }}</h1> <p>{{ now }}</p> </div> </template> <script> export default { name: "HelloWorld", props: { msg: String }, data() { return { now: new Date() }; }, methods: { updateDate() { this.now = new Date(); }, mounted() { setInterval(() => { this.updateDate(); }, 1000); }; </script> Note that the value of the text that appears in
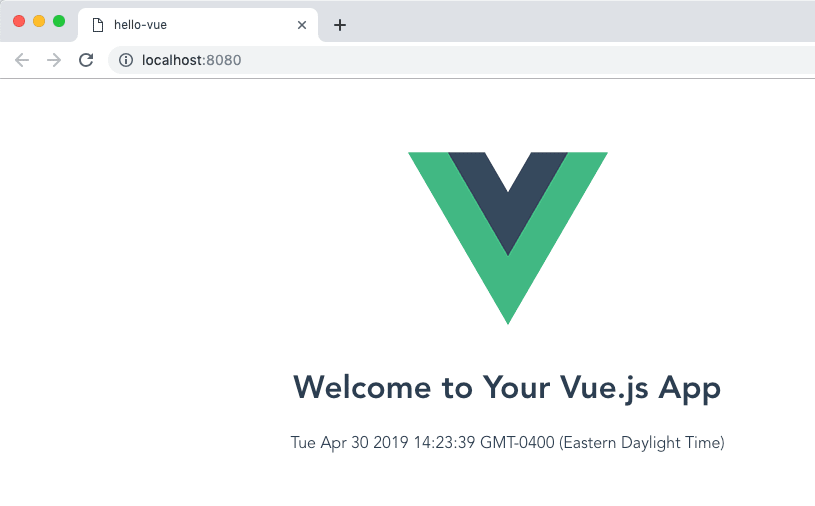
msg is specified in the src/App.vue .Now, on the command line or in the built-in terminal in your editor, run the following command:
npm run serve It will start the server, after which it will provide information on how to open the home page of the application. Namely, it is http: // localhost: 8080 / .
Vue application in the browser
Here we have considered the use of the Vue CLI only very superficially. However, I hope that this example has shown you how easy it is to create new applications with the help of Vue CLI, which are provided with a reliable infrastructure and can scale in line with the growing needs of a developing project.
Option number 3: Vue UI
Together with the Vue CLI, with the command line tool, the Vue UI tool is also installed. To start it - use the following command:
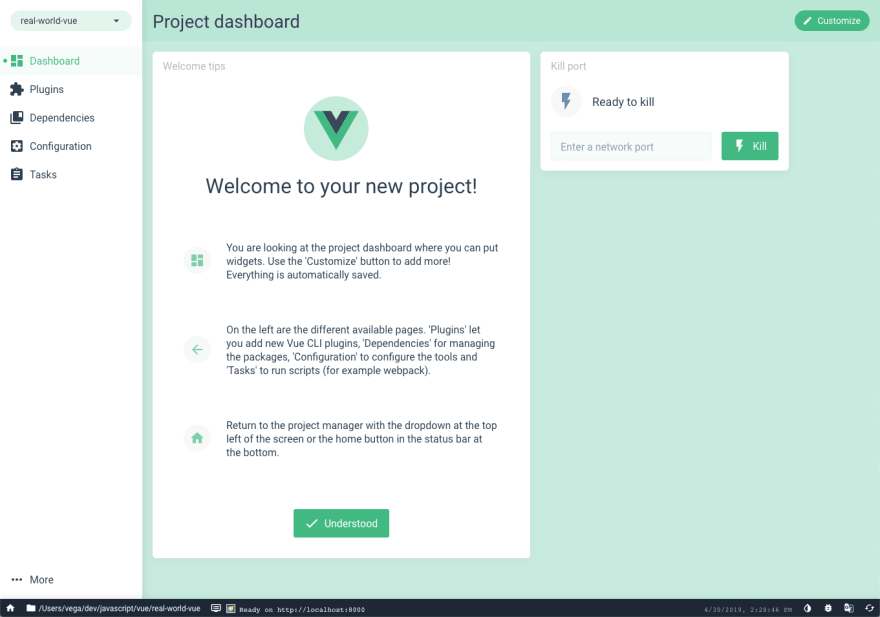
vue ui During its execution, a new application page will be opened, located at http: // localhost: 8000 / dashboard .
Vue UI page
With Vue UI, you can create a new project that will have the same capabilities as a project created by command line tools.
Creating a new project in Vue UI
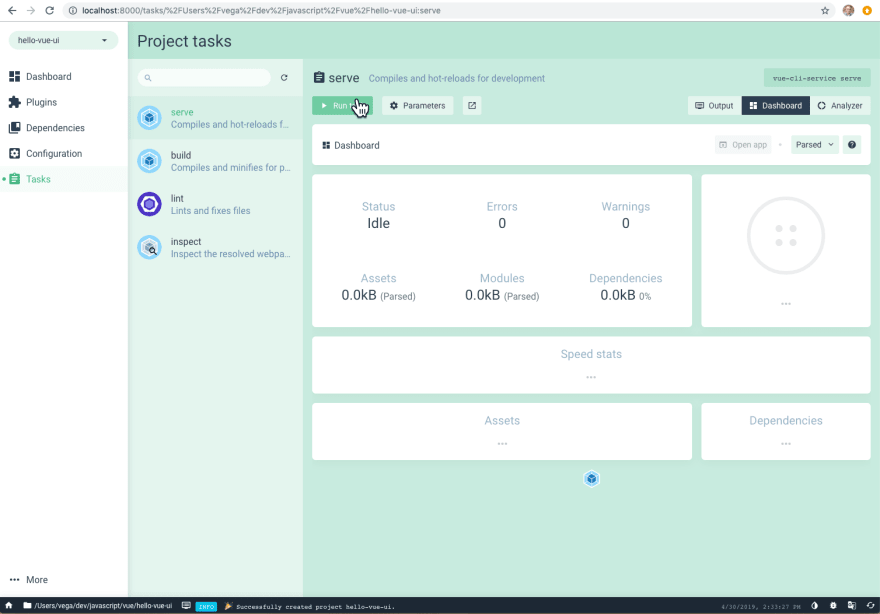
After the project setup is completed, you can start it directly from the Vue UI by going to the
Project tasks section and clicking the appropriate button.Launching an app in Vue UI
Option number 4: CodeSandbox
Although the above options for creating the first Vue application allowed us to achieve our goal, they require some customization of the development environment. Perhaps this does not suit you and you have not yet created your first Vue application. If so, then now we will look at another way to work with Vue. It consists of using online development environments, one of which is CodeSandbox .
Before creating projects on CodeSandbox, you will need to register on the site or log in using a GitHub account. After that, you need to create a new “sandbox” (in the framework of the project this is called “sandbox”) and find Vue among the available templates (on the
Popular templates or Client templates tab).Creating a new Vue-based project in CodeSandbox
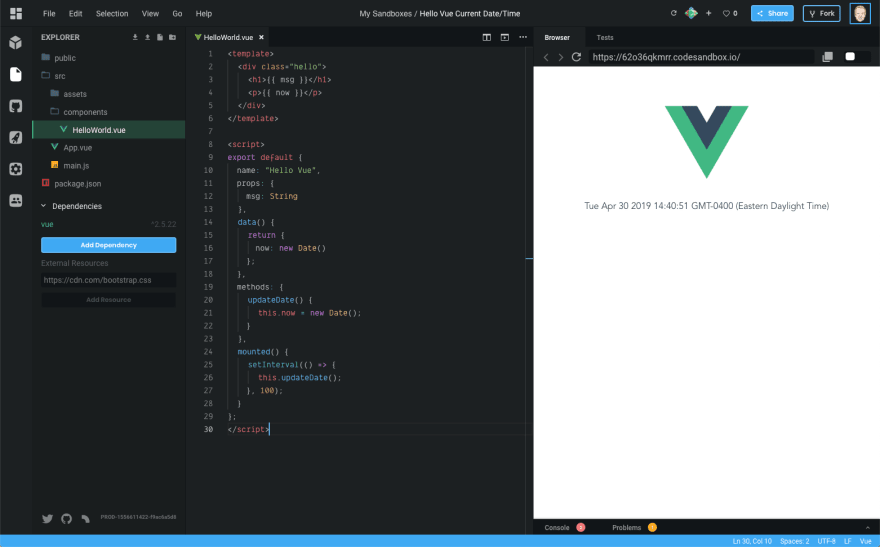
After that, at your disposal will be a new Vue-application. In the following figure, you can see that you can work with project files in the left pane, in the center is the editor window, and on the right is the preview area in which the running application is displayed.
Work on the application in CodeSandbox
Open the
src/components/HelloWorld.vue file in the editor and replace its contents with the following code: <template> <div class="hello"> <h1>{{ msg }}</h1> <p>{{ now }}</p> </div> </template> <script> export default { name: "HelloWorld", props: { msg: String }, data() { return { now: new Date() }; }, methods: { updateDate() { this.now = new Date(); }, mounted() { setInterval(() => { this.updateDate(); }, 1000); }; </script> After that, you will see the same application that we have already engaged. In the course of working on a project, it may be necessary to show it to someone. For example - in order to consult about something. CodeSandbox allows you to do this with a special link .
Work on the application in CodeSandbox
Useful resources
Here are links to some of my favorite Vue resources. They will help you advance in the development of this framework. For example - here is the Awesome Vue page, by visiting which you can get an idea of the scale of the Vue ecosystem. Here you can find Vue repositories. Here is the official blog of the project. Here is the Vue developer community site. Here and here - podcasts on Vue. Here are pages of several Vue-based projects: VuePress , Nuxt , Gridsome .
What's next?
No matter what framework you use to develop the frontend, you need to keep your JavaScript knowledge in good condition. The more time you can devote to improving your knowledge of JS, the better. If you know JavaScript well, it means that you can cope with any framework or library you may need to work with.
I have already spoken about the Vue manual from the official documentation. But it is worth mentioning again. I would, if I were a novice developer, would try to deal with this manual as thoroughly as possible, read it and reread it. But at the same time, I would not forget to test in practice those code examples that are found there. No wonder they say that repetition is the mother of learning. Repetition plays an important role in the process of learning new technologies, and without it you can not do.
In the process of working with documentation, you should pay particular attention to the following basic concepts of Vue:
- Components.
- Data binding
- Event handling
- Directives.
- Methods
- Calculated properties.
- The life cycle of components.
- Properties passed to components.
Do not yet strive to create large applications. Focus on mastering basic things, and everything else will come with time.
Results
If you follow my Twitter posts, then you know that I am a big fan of Vue. I like to create component-based applications. I believe that using Vue not only simplifies the work, but also makes the code writing process enjoyable and fun.
Dear readers! If you have recently studied your first client framework, please tell us how it was.
Source: https://habr.com/ru/post/458324/
All Articles