PVS-Studio goes to the clouds - launch analysis on Travis CI
At the moment, cloud CI-systems are a very demanded service. In this article we will describe how, using existing tools available in PVS-Studio, you can integrate source code analysis with the cloud-based CI platform, using the example of the Travis CI service.

Why do we consider third-party clouds and do not make our own? There are a number of reasons, and the main one is that the SaaS organization is a rather expensive and complicated procedure. In fact, directly integrating the analysis of PVS-Studio with a third-party cloud platform (be it open platforms like CircleCI, Travis CI, GitLab, or some specialized enterprise solution used only in one particular company) is a rather simple and trivial task. That is, we can say that PVS-Studio is already available “in the clouds” . Quite another matter in the organization and provision of infrastructure for such work 24/7. This is a completely different task, and PVS-Studio has not yet planned to provide its own cloud platform directly for launching analysis on it.
Travis CI is a service for building and testing software that uses GitHub as storage. Travis CI does not require changing the program code to use the service, all settings occur in the .travis.yml file located in the repository root.
')
We will take LXC (Linux Containers) as a test project for testing with PVS-Studio. It is an operating system-level virtualization system for running multiple instances of the Linux operating system on a single host.
The project is small, but more than enough for demonstration. The output of the cloc command:
Note: The LXC developers are already using Travis CI, so we will take their configuration file as a base and edit it for our purposes.
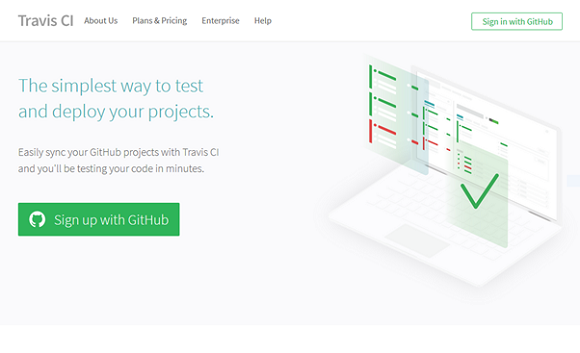
To get started with Travis CI , click on the link and authenticate using a GitHub account.
In the opened window you need to authorize Travis CI.

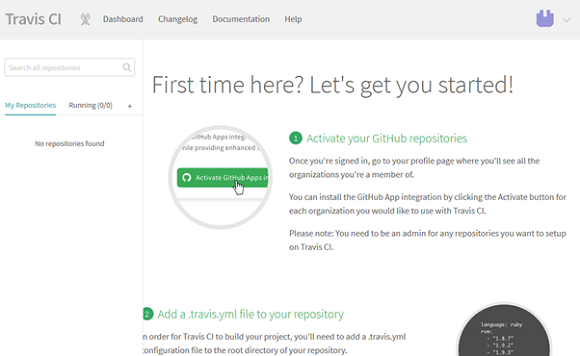
After authorization is redirected to the welcome page “First time here? Lets get you started! ” , Which briefly describes what you need to do next to get started:
Begin to perform these items.
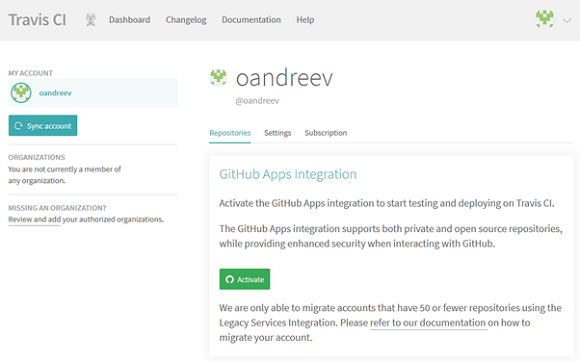
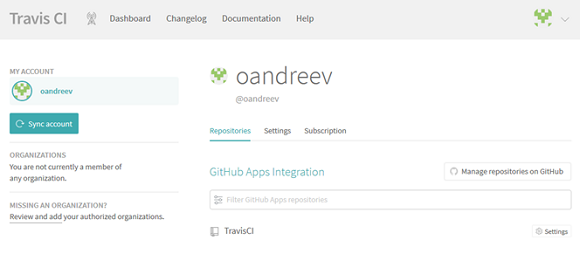
To add our repository to Travis CI, go to the profile settings by the link and click the “Activate” button.
After clicking, a window will open with a selection of repositories to which the Travis CI application will be granted access.
Note: to provide access to the repository, the account must have administrative rights to it.
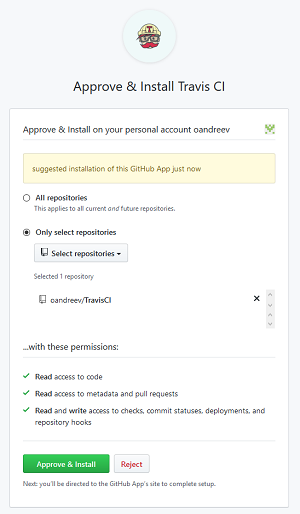
Select the desired repository, confirm the selection with the “Approve & Install” button, and redirect us back to the profile settings page.
We will immediately create the variables that we will use to create the analyzer license file and send its reports. To do this, go to the settings page - the “Settings” button to the right of the desired repository.
The settings window will open.

A brief description of the settings:
In the “Environment Variables” section, we will create the PVS_USERNAME and PVS_KEY variables , containing, respectively, the user name and the license key for the static analyzer. If you do not have a permanent license of PVS-Studio, then you can request a trial license .
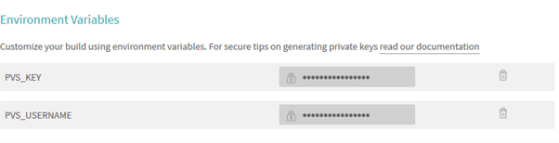
Here we will create the variables MAIL_USER and MAIL_PASSWORD containing the username and password from the mailbox, which we will use to send reports.

When you run the task, Travis CI takes the instructions from the .travis.yml file in the root of the repository.
Using Travis CI, we can run static analysis directly in the virtual machine, or use a pre-configured container for this. The results of these approaches do not differ from each other, but using a pre-configured container can be useful, for example, if we already have a container with some specific environment in which a software product is assembled and tested, and there is no desire to restore this environment in Travis CI .
Create a configuration for running the analyzer in a virtual machine.
For assembly and testing, we will use a virtual machine based on Ubuntu Trusty, its description can be viewed at the link .
First of all, we indicate that the project is written in C and list the compilers that we will use to build:
Note : when specifying more than one compiler, tasks will be run in parallel for each of them. Read more in the documentation .
Before we start building, we need to add the analyzer repository, install dependencies and additional packages:
Before building the project, you need to prepare the environment:
Next we need to create a file with the license and run the analysis of the project.
The first command is to create a file with a license for the analyzer. The data for the $ PVS_USERNAME and $ PVS_KEY variables are taken from the project settings.
The next command runs the project build trace:
After we start static analysis.
Note: when using a trial license, you need to specify the --disableLicenseExpirationCheck parameter.
With the last command, the file with the results of the analyzer is converted into an html report.
Since TravisCI does not allow changing the format of email notifications, we will use the sendemail package to send reports in the last step:
The full text of the configuration file for running the analyzer in a virtual machine:
To run a static analyzer in a container, first create it using the following Dockerfile:
In this case, the configuration file may look like this:
As you can see, in this case we are not doing anything inside the virtual machine, and absolutely all actions for building and testing a project occur inside the container.
Note : when starting the container, it is necessary to specify the --cap-add SYS_PTRACE parameter or --security-opt seccomp: unconfined , since the ptrace system call is used to compile the trace.
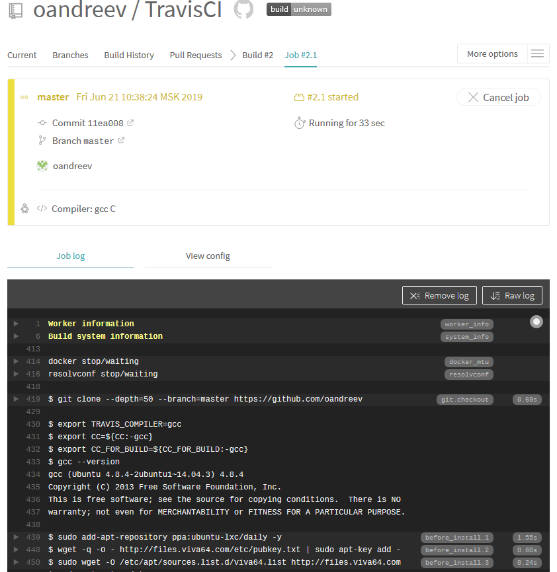
We load the configuration file into the repository root and see that Travis CI received a notification about the presence of changes in the project and automatically started the build.
Detailed information on the assembly and verification by the analyzer can be seen in the console.
After the end of the tests, we will receive 2 letters to the post office: one with the results of the static analysis for building the project using gcc, and the second, respectively, with clang.
In general, the project is quite clean, the analyzer issued only 24 critical and 46 average warnings. To demonstrate the work, consider a couple of interesting notifications:
V590 Consider inspecting the 'ret! = (- 1) && ret == 1' expression. The expression is misprint. attach.c 107
If ret == 1 , then it is definitely not equal to -1 (EOF). Excess check, you can remove ret! = EOF .
Two more such warnings were issued:
V784 The size of the bit mask is less than the size of the first operand. This will cause the loss of higher bits. conf.c 1879
Under Linux, long is a 64-bit integer variable, mo-> flag is a 32-bit integer variable. Using mo-> flag as a bitmask will result in a loss of 32 high-order bits. Implicit bit-mask conversion to a 64-bit integer variable after bitwise inversion is performed. The upper bits of this mask will be zero.
Let us demonstrate by example:
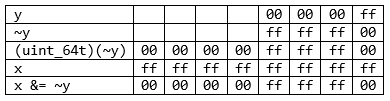
The correct code is:
The analyzer issued another similar warning:
V612 An unconditional 'return' within a loop. conf.c 3477
Launch the loop and interrupt it at the first iteration. Perhaps it was conceived, but then the cycle can be omitted.
V557 Array underrun is possible. The value of 'bytes - 1' index could reach -1. network.c 2570
From pipe'a read bytes to the buffer. In case of an error, the lxc_read_nointr function will return a negative value. If everything went well, then the last element is the zero-terminal. However, if 0 bytes are read, the buffer will overflow, leading to undefined behavior.
The analyzer issued another similar warning:
V576 Incorrect format. Consider checking the sscanf function. It is dangerous to use string specifier without width specification. Buffer overflow is possible. lxc_unshare.c 205
Using sscanf in this case can be dangerous, because if the length of the oparq buffer is greater than the length of the name buffer, it will overflow when the name buffer is formed.
As we have seen, setting up a static code analyzer check of our project in the cloud is a fairly simple task. To do this, you just need to add one file to the repository and spend the minimum time setting up the CI system. As a result, we will get a tool that allows you to identify problem code at the writing stage, and does not allow errors to get into the next stages of testing, where fixing them will take more time and resources.
Of course, the use of PVS-Studio in conjunction with cloud platforms is not limited to Travis CI only. By analogy with the method described in the article, with minimal differences, the analysis of PVS-Studio can be integrated with other popular cloud CI solutions, such as CircleCI, GitLab, etc.
If you want to share this article with an English-speaking audience, then please use the link to the translation: Oleg Andreev. PVS-Studio in the Clouds -Running the Analysis on Travis CI
Why do we consider third-party clouds and do not make our own? There are a number of reasons, and the main one is that the SaaS organization is a rather expensive and complicated procedure. In fact, directly integrating the analysis of PVS-Studio with a third-party cloud platform (be it open platforms like CircleCI, Travis CI, GitLab, or some specialized enterprise solution used only in one particular company) is a rather simple and trivial task. That is, we can say that PVS-Studio is already available “in the clouds” . Quite another matter in the organization and provision of infrastructure for such work 24/7. This is a completely different task, and PVS-Studio has not yet planned to provide its own cloud platform directly for launching analysis on it.
Information about the software used
Travis CI is a service for building and testing software that uses GitHub as storage. Travis CI does not require changing the program code to use the service, all settings occur in the .travis.yml file located in the repository root.
')
We will take LXC (Linux Containers) as a test project for testing with PVS-Studio. It is an operating system-level virtualization system for running multiple instances of the Linux operating system on a single host.
The project is small, but more than enough for demonstration. The output of the cloc command:
| Language | files | blank | comment | code |
| C | 124 | 11937 | 6758 | 50836 |
| C / C ++ Header | 65 | 1117 | 3676 | 3774 |
Customization
To get started with Travis CI , click on the link and authenticate using a GitHub account.
In the opened window you need to authorize Travis CI.
After authorization is redirected to the welcome page “First time here? Lets get you started! ” , Which briefly describes what you need to do next to get started:
- activate repositories;
- add the .travis.yml file to the repository;
- run the first build.
Begin to perform these items.
To add our repository to Travis CI, go to the profile settings by the link and click the “Activate” button.
After clicking, a window will open with a selection of repositories to which the Travis CI application will be granted access.
Note: to provide access to the repository, the account must have administrative rights to it.
Select the desired repository, confirm the selection with the “Approve & Install” button, and redirect us back to the profile settings page.
We will immediately create the variables that we will use to create the analyzer license file and send its reports. To do this, go to the settings page - the “Settings” button to the right of the desired repository.
The settings window will open.
A brief description of the settings:
- The “General” section - setting up the task autorun trigger;
- Section "Auto Cancelation" - allows you to customize the assembly;
- The “Environment Variables” section allows you to define environment variables containing both public and confidential information, such as credentials, ssh-keys;
- “Cron Jobs” section - setting up the task launch schedule.
In the “Environment Variables” section, we will create the PVS_USERNAME and PVS_KEY variables , containing, respectively, the user name and the license key for the static analyzer. If you do not have a permanent license of PVS-Studio, then you can request a trial license .
Here we will create the variables MAIL_USER and MAIL_PASSWORD containing the username and password from the mailbox, which we will use to send reports.
When you run the task, Travis CI takes the instructions from the .travis.yml file in the root of the repository.
Using Travis CI, we can run static analysis directly in the virtual machine, or use a pre-configured container for this. The results of these approaches do not differ from each other, but using a pre-configured container can be useful, for example, if we already have a container with some specific environment in which a software product is assembled and tested, and there is no desire to restore this environment in Travis CI .
Create a configuration for running the analyzer in a virtual machine.
For assembly and testing, we will use a virtual machine based on Ubuntu Trusty, its description can be viewed at the link .
First of all, we indicate that the project is written in C and list the compilers that we will use to build:
language: c compiler: - gcc - clang Note : when specifying more than one compiler, tasks will be run in parallel for each of them. Read more in the documentation .
Before we start building, we need to add the analyzer repository, install dependencies and additional packages:
before_install: - sudo add-apt-repository ppa:ubuntu-lxc/daily -y - wget -q -O - https://files.viva64.com/etc/pubkey.txt | sudo apt-key add - - sudo wget -O /etc/apt/sources.list.d/viva64.list https://files.viva64.com/etc/viva64.list - sudo apt-get update -qq - sudo apt-get install -qq coccinelle parallel libapparmor-dev libcap-dev libseccomp-dev python3-dev python3-setuptools docbook2x libgnutls-dev libselinux1-dev linux-libc-dev pvs-studio libio-socket-ssl-perl libnet-ssleay-perl sendemail ca-certificates Before building the project, you need to prepare the environment:
script: - ./coccinelle/run-coccinelle.sh -i - git diff --exit-code - export CFLAGS="-Wall -Werror" - export LDFLAGS="-pthread -lpthread" - ./autogen.sh - rm -Rf build - mkdir build - cd build - ../configure --enable-tests --with-distro=unknown Next we need to create a file with the license and run the analysis of the project.
The first command is to create a file with a license for the analyzer. The data for the $ PVS_USERNAME and $ PVS_KEY variables are taken from the project settings.
- pvs-studio-analyzer credentials $PVS_USERNAME $PVS_KEY -o PVS-Studio.lic The next command runs the project build trace:
- pvs-studio-analyzer trace -- make -j4 After we start static analysis.
Note: when using a trial license, you need to specify the --disableLicenseExpirationCheck parameter.
- pvs-studio-analyzer analyze -j2 -l PVS-Studio.lic -o PVS-Studio-${CC}.log –-disableLicenseExpirationCheck With the last command, the file with the results of the analyzer is converted into an html report.
- plog-converter -t html PVS-Studio-${CC}.log -o PVS-Studio-${CC}.html Since TravisCI does not allow changing the format of email notifications, we will use the sendemail package to send reports in the last step:
- sendemail -t mail@domain.com -u "PVS-Studio $CC report, commit:$TRAVIS_COMMIT" -m "PVS-Studio $CC report, commit:$TRAVIS_COMMIT" -s smtp.gmail.com:587 -xu $MAIL_USER -xp $MAIL_PASSWORD -o tls=yes -f $MAIL_USER -a PVS-Studio-${CC}.log PVS-Studio-${CC}.html The full text of the configuration file for running the analyzer in a virtual machine:
language: c compiler: - gcc - clang before_install: - sudo add-apt-repository ppa:ubuntu-lxc/daily -y - wget -q -O - https://files.viva64.com/etc/pubkey.txt | sudo apt-key add - - sudo wget -O /etc/apt/sources.list.d/viva64.list https://files.viva64.com/etc/viva64.list - sudo apt-get update -qq - sudo apt-get install -qq coccinelle parallel libapparmor-dev libcap-dev libseccomp-dev python3-dev python3-setuptools docbook2x libgnutls-dev libselinux1-dev linux-libc-dev pvs-studio libio-socket-ssl-perl libnet-ssleay-perl sendemail ca-certificates script: - ./coccinelle/run-coccinelle.sh -i - git diff --exit-code - export CFLAGS="-Wall -Werror" - export LDFLAGS="-pthread -lpthread" - ./autogen.sh - rm -Rf build - mkdir build - cd build - ../configure --enable-tests --with-distro=unknown - pvs-studio-analyzer credentials $PVS_USERNAME $PVS_KEY -o PVS-Studio.lic - pvs-studio-analyzer trace -- make -j4 - pvs-studio-analyzer analyze -j2 -l PVS-Studio.lic -o PVS-Studio-${CC}.log --disableLicenseExpirationCheck - plog-converter -t html PVS-Studio-${CC}.log -o PVS-Studio-${CC}.html - sendemail -t mail@domain.com -u "PVS-Studio $CC report, commit:$TRAVIS_COMMIT" -m "PVS-Studio $CC report, commit:$TRAVIS_COMMIT" -s smtp.gmail.com:587 -xu $MAIL_USER -xp $MAIL_PASSWORD -o tls=yes -f $MAIL_USER -a PVS-Studio-${CC}.log PVS-Studio-${CC}.html To run a static analyzer in a container, first create it using the following Dockerfile:
FROM docker.io/ubuntu:trusty ENV CFLAGS="-Wall -Werror" ENV LDFLAGS="-pthread -lpthread" RUN apt-get update && apt-get install -y software-properties-common wget \ && wget -q -O - https://files.viva64.com/etc/pubkey.txt | sudo apt-key add - \ && wget -O /etc/apt/sources.list.d/viva64.list https://files.viva64.com/etc/viva64.list \ && apt-get update \ && apt-get install -yqq coccinelle parallel libapparmor-dev libcap-dev libseccomp-dev python3-dev python3-setuptools docbook2x libgnutls-dev libselinux1-dev linux-libc-dev pvs-studio git libtool autotools-dev automake pkg-config clang make libio-socket-ssl-perl libnet-ssleay-perl sendemail ca-certificates \ && rm -rf /var/lib/apt/lists/* In this case, the configuration file may look like this:
before_install: - docker pull docker.io/oandreev/lxc env: - CC=gcc - CC=clang script: - docker run --rm --cap-add SYS_PTRACE -v $(pwd):/pvs -w /pvs docker.io/oandreev/lxc /bin/bash -c " ./coccinelle/run-coccinelle.sh -i && git diff --exit-code && ./autogen.sh && mkdir build && cd build && ../configure CC=$CC && pvs-studio-analyzer credentials $PVS_USERNAME $PVS_KEY -o PVS-Studio.lic && pvs-studio-analyzer trace -- make -j4 && pvs-studio-analyzer analyze -j2 -l PVS-Studio.lic -o PVS-Studio-$CC.log --disableLicenseExpirationCheck && plog-converter -t html -o PVS-Studio-$CC.html PVS-Studio-$CC.log && sendemail -t mail@domain.com -u 'PVS-Studio $CC report, commit:$TRAVIS_COMMIT' -m 'PVS-Studio $CC report, commit:$TRAVIS_COMMIT' -s smtp.gmail.com:587 -xu $MAIL_USER -xp $MAIL_PASSWORD -o tls=yes -f $MAIL_USER -a PVS-Studio-${CC}.log PVS-Studio-${CC}.html" As you can see, in this case we are not doing anything inside the virtual machine, and absolutely all actions for building and testing a project occur inside the container.
Note : when starting the container, it is necessary to specify the --cap-add SYS_PTRACE parameter or --security-opt seccomp: unconfined , since the ptrace system call is used to compile the trace.
We load the configuration file into the repository root and see that Travis CI received a notification about the presence of changes in the project and automatically started the build.
Detailed information on the assembly and verification by the analyzer can be seen in the console.
After the end of the tests, we will receive 2 letters to the post office: one with the results of the static analysis for building the project using gcc, and the second, respectively, with clang.
Briefly about the test results
In general, the project is quite clean, the analyzer issued only 24 critical and 46 average warnings. To demonstrate the work, consider a couple of interesting notifications:
Excess Conditions in if
V590 Consider inspecting the 'ret! = (- 1) && ret == 1' expression. The expression is misprint. attach.c 107
#define EOF -1 static struct lxc_proc_context_info *lxc_proc_get_context_info(pid_t pid) { .... while (getline(&line, &line_bufsz, proc_file) != -1) { ret = sscanf(line, "CapBnd: %llx", &info->capability_mask); if (ret != EOF && ret == 1) // <= { found = true; break; } } .... } If ret == 1 , then it is definitely not equal to -1 (EOF). Excess check, you can remove ret! = EOF .
Two more such warnings were issued:
- V590 Consider inspecting the 'ret! = (- 1) && ret == 1' expression. The expression is misprint. attach.c 579
- V590 Consider inspecting the 'ret! = (- 1) && ret == 1' expression. The expression is misprint. attach.c 583
Loss of high bits
V784 The size of the bit mask is less than the size of the first operand. This will cause the loss of higher bits. conf.c 1879
struct mount_opt { char *name; int clear; int flag; }; static void parse_mntopt(char *opt, unsigned long *flags, char **data, size_t size) { struct mount_opt *mo; /* If opt is found in mount_opt, set or clear flags. * Otherwise append it to data. */ for (mo = &mount_opt[0]; mo->name != NULL; mo++) { if (strncmp(opt, mo->name, strlen(mo->name)) == 0) { if (mo->clear) { *flags &= ~mo->flag; // <= } else { *flags |= mo->flag; } return; } } .... } Under Linux, long is a 64-bit integer variable, mo-> flag is a 32-bit integer variable. Using mo-> flag as a bitmask will result in a loss of 32 high-order bits. Implicit bit-mask conversion to a 64-bit integer variable after bitwise inversion is performed. The upper bits of this mask will be zero.
Let us demonstrate by example:
unsigned long long x; unsigned y; .... x &= ~y; The correct code is:
*flags &= ~(unsigned long)(mo->flag); The analyzer issued another similar warning:
- V784 The size of the bit mask is less than the size of the first operand. This will cause the loss of higher bits. conf.c 1933
Suspicious cycle
V612 An unconditional 'return' within a loop. conf.c 3477
#define lxc_list_for_each(__iterator, __list) \ for (__iterator = (__list)->next; __iterator != __list; \ __iterator = __iterator->next) static bool verify_start_hooks(struct lxc_conf *conf) { char path[PATH_MAX]; struct lxc_list *it; lxc_list_for_each (it, &conf->hooks[LXCHOOK_START]) { int ret; char *hookname = it->elem; ret = snprintf(path, PATH_MAX, "%s%s", conf->rootfs.path ? conf->rootfs.mount : "", hookname); if (ret < 0 || ret >= PATH_MAX) return false; ret = access(path, X_OK); if (ret < 0) { SYSERROR("Start hook \"%s\" not found in container", hookname); return false; } return true; // <= } return true; } Launch the loop and interrupt it at the first iteration. Perhaps it was conceived, but then the cycle can be omitted.
Array bounds
V557 Array underrun is possible. The value of 'bytes - 1' index could reach -1. network.c 2570
static int lxc_create_network_unpriv_exec(const char *lxcpath, const char *lxcname, struct lxc_netdev *netdev, pid_t pid, unsigned int hooks_version) { int bytes; char buffer[PATH_MAX] = {0}; .... bytes = lxc_read_nointr(pipefd[0], &buffer, PATH_MAX); if (bytes < 0) { SYSERROR("Failed to read from pipe file descriptor"); close(pipefd[0]); } else { buffer[bytes - 1] = '\0'; } .... } From pipe'a read bytes to the buffer. In case of an error, the lxc_read_nointr function will return a negative value. If everything went well, then the last element is the zero-terminal. However, if 0 bytes are read, the buffer will overflow, leading to undefined behavior.
The analyzer issued another similar warning:
- V557 Array underrun is possible. The value of 'bytes - 1' index could reach -1. network.c 2725
Buffer overflow
V576 Incorrect format. Consider checking the sscanf function. It is dangerous to use string specifier without width specification. Buffer overflow is possible. lxc_unshare.c 205
static bool lookup_user(const char *oparg, uid_t *uid) { char name[PATH_MAX]; .... if (sscanf(oparg, "%u", uid) < 1) { /* not a uid -- perhaps a username */ if (sscanf(oparg, "%s", name) < 1) // <= { free(buf); return false; } .... } .... } Using sscanf in this case can be dangerous, because if the length of the oparq buffer is greater than the length of the name buffer, it will overflow when the name buffer is formed.
Conclusion
As we have seen, setting up a static code analyzer check of our project in the cloud is a fairly simple task. To do this, you just need to add one file to the repository and spend the minimum time setting up the CI system. As a result, we will get a tool that allows you to identify problem code at the writing stage, and does not allow errors to get into the next stages of testing, where fixing them will take more time and resources.
Of course, the use of PVS-Studio in conjunction with cloud platforms is not limited to Travis CI only. By analogy with the method described in the article, with minimal differences, the analysis of PVS-Studio can be integrated with other popular cloud CI solutions, such as CircleCI, GitLab, etc.
useful links
- Additional information about launching PVS-Studio on Linux and MacOS can be found here .
- You can read about the creation, configuration and use of containers with the installed PVS-Studio static analyzer here .
- TravisCI documentation .

If you want to share this article with an English-speaking audience, then please use the link to the translation: Oleg Andreev. PVS-Studio in the Clouds -Running the Analysis on Travis CI
Source: https://habr.com/ru/post/458072/
All Articles