Work with Proxmox Cluster: Installation, Network Configuration, ZFS, Common Problem Solving
Over the past few years, I have been working very closely with Proxmox clusters: many clients need their own infrastructure where they can develop their project. That is why I can tell you about the most common mistakes and problems that you may also face. In addition, we of course configure a cluster of three nodes from scratch.

Proxmox cluster can consist of two or more servers. The maximum number of nodes in a cluster is 32 pieces. Our own cluster will consist of three nodes on a multicast (in the article I will also describe how to raise a cluster on a unique one — this is important if you base your cluster infrastructure on Hetzner or OVH, for example). In short, the multicast allows data transfer to several nodes simultaneously. When multicasting, we can not think about the number of nodes in the cluster (focusing on the restrictions above).
The cluster itself is built on an internal network (it is important that IP addresses are on the same subnet), the same Hetzner and OVH have the ability to cluster nodes in different data centers using Virtual Switch (Hetzner) and vRack (OVH) technology - about Virtual Switch we'll also talk in the article. If your hosting provider does not have similar technologies in operation, then you can use OVS (Open Virtual Switch), which is natively supported by Proxmox, or use VPN. However, I recommend in this case to use a unicast with a small number of nodes - situations often arise where the cluster simply “collapses” on the basis of such a network infrastructure and has to be restored. Therefore, I try to use OVH and Hetzner in my work - I observed fewer such incidents, but first of all, study the hosting provider that you will be hosting: does it have alternative technology, what solutions does it offer, does multicast support, and so on .
Proxmox can be installed in two ways: ISO-installer and installation through the shell. We choose the second method, so install Debian on the server.
')
Let's proceed directly to installing Proxmox on each server. Installation is extremely simple and is described in the official documentation here.
Add the Proxmox repository and the key of this repository:
We update the repositories and the system itself:
After a successful upgrade, install the necessary Proxmox packages:
Note : during the installation, Postfix and grub will be configured - one of them may fail with an error. Perhaps this will be due to the fact that the hostname does not resolve the name. Edit the hosts entry and run apt-get update
From now on, we can log in to the Proxmox web interface at https: // <external ip-address>: 8006 (you will encounter an untrusted certificate during connection).

Image 1. Proxmox node web interface
I do not really like the situation with the certificate and IP address, so I suggest to install Nginx and configure Let's Encrypt certificate. I will not describe Nginx installation, I will leave only important files for Let's encrypt the certificate:
The command to issue an SSL certificate:
Do not forget after installing the SSL certificate to put it on auto-update via cron:
Fine! Now we can access our domain via HTTPS.
Note : to disable the subscription info window, run this command:
Network settings
Before connecting to the cluster, we configure the network interfaces on the hypervisor. It should be noted that the configuration of the rest of the nodes is no different, except for the IP addresses and server names, so I will not duplicate their settings.
We will create a network bridge for the internal network so that our virtual machines (in my version there will be an LXC container for convenience) firstly, be connected to the internal network of the hypervisor and can interact with each other. Secondly, we will add a bridge for the external network a bit later so that the virtual machines have their external IP address. Accordingly, the containers will be currently behind NAT'om with us.
There are two ways to work with the Proxmox network configuration: through the web interface or through the / etc / network / interfaces configuration file. In the first option, you will need to restart the server (or you can just rename the interfaces.new file to interfaces and restart the networking service via systemd). If you are just starting the configuration and there are no virtual machines or LXC containers yet, then it is advisable to restart the hypervisor after the changes.
Now create a network bridge called vmbr1 in the network tab in the Proxmox web panel.

Figure 2. Network interfaces proxmox1 nodes

Image 3. Creating a network bridge

Image 4. Configure the vmbr1 network configuration
Setup is extremely simple - we need vmbr1 in order for instances to access the Internet.
Now we restart our hypervisor and check if the interface has been created:

Figure 5. Network interface vmbr1 in the output of the ip a command
Note: I already have an interface ens19 - this is an interface with an internal network, on the basis of which a cluster will be created.
Repeat these steps on the remaining two hypervisors, and then proceed to the next step — preparing the cluster.
Also, an important step now is to enable packet forwarding - without it, instances will not get access to the external network. Open the sysctl.conf file and change the value of the net.ipv4.ip_forward parameter to 1, and then enter the following command:
In the output you should see the directive net.ipv4.ip_forward (if you haven’t changed it before)
Configure Proxmox Cluster
We now turn directly to the cluster. Each node must rezolvit themselves and other nodes on the internal network, for this you need to change the values in the hosts records as follows (each node must contain a record of the others):
You also need to add the public keys of each node to the rest - this is required to create a cluster.
Create a cluster through the web panel:

Image 6. Creating a cluster via the web interface
After creating the cluster, we need to get information about it. Go to the same tab of the cluster and click the button “Join Information”:

Figure 7. Information about the created cluster
This information is useful to us at the time of joining the second and third nodes in the cluster. Connect to the second node and in the Cluster tab, click the “Join Cluster” button:

Figure 8. Connecting the node to the cluster
Let us consider the details of the connection:
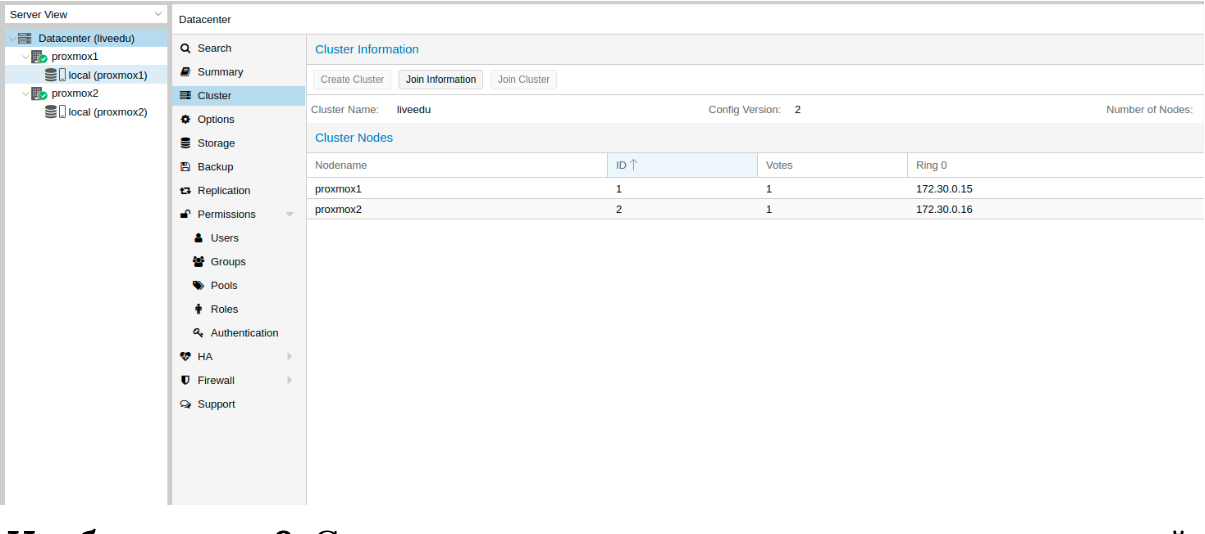
Figure 9. Cluster state after connecting the second node
The second node is successfully connected! However, this is not always the case. If you perform the steps incorrectly or network problems arise, the connection to the cluster will fail, and the cluster itself will be “broken up”. The best solution is to disconnect the node from the cluster, delete all the information about the cluster itself, then restart the server and check the previous steps. How is it safe to disconnect the node from the cluster? First, remove it from the cluster on the first server:
After that, the node will be disconnected from the cluster. Now go to the broken node and disable the following services on it:
Proxmox cluster stores information about itself in the sqlite database, it also needs to be cleared:
The data on the boletus has been successfully deleted. Delete the remaining files, for this you need to run the cluster file system in standalone mode:
We restart the server (this is optional, but we will re-insure: all services should be started and work correctly. To not miss anything, we are restarting). After switching on, we will get a blank node without any information about the previous cluster and we can start connecting again.
ZFS is a file system that can be used with Proxmox. Using it, you can afford to replicate data to another hypervisor, migrate a virtual machine / LXC container, access the LXC container from a host system, and so on. Installing it is quite simple, let's proceed to the analysis. Three SSD drives are available on my servers, which we will combine into a RAID array.
Add repositories:
Update the list of packages:
Install the required dependencies:
Install ZFS itself:
If you get a fusermount: fuse device not found error in the future, try 'modprobe fuse' first, then run the following command:
Now proceed directly to the setting. First we need to format the SSD and configure them via parted:
Similar actions need to be made for other disks. After all the disks are prepared, proceed to the next step:
zpool create -f -o ashift = 12 rpool / dev / sda4 / dev / sdb4 / dev / sdc4
We choose ashift = 12 for performance reasons - this is the recommendation of zfsonlinux itself, read more about this in their wiki: github.com/zfsonlinux/zfs/wiki/faq#performance-considerations
Let's apply some settings for ZFS:
Now we need to calculate some variables to calculate zfs_arc_max, I do this as follows:
At the moment, the pool has been successfully created, we also created a subpul data. You can check the status of your pool with the zpool status command. This action must be performed on all hypervisors, and then proceed to the next step.
Now add ZFS to Proxmox. Go to the settings of the datacenter (namely him, and not a separate node) in the “Storage” section, click on the “Add” button and select the “ZFS” option, after which we will see the following parameters:
ID: The name of the stack. I gave him the name local-zfs
ZFS Pool: We created rpool / data, and add it here.
Nodes: specify all available nodes
This command creates a new pool with selected disks. At each hypervisor, a new storage should appear under the name local-zfs, after which you can migrate your virtual machines from local storage to ZFS.
In a Proxmox cluster, there is the ability to replicate data from one hypervisor to another: this option allows you to switch an instance from one server to another. The data will be relevant at the time of the last synchronization - its time can be set when creating replication (15 minutes is standardly set). There are two ways to migrate an instance to another Proxmox node: manual and automatic. Let's first consider the manual version, and at the end I will provide you with a Python script that will allow you to create a virtual machine on an available hypervisor when one of the hypervisors is unavailable.
To create replication, go to the Proxmox web panel and create a virtual machine or LXC container. In the previous paragraphs, we set up a vmbr1 bridge with NAT, which will allow us to go to the external network. I will create an LXC container with MySQL, Nginx and PHP-FPM with a test site to test replication work. Below is a step by step instruction.
We load the appropriate template (go to storage -> Content -> Templates), an example in the screenshot:

Image 10. Local storage with templates and VM images
Click the “Templates” button and load the container LXC template we need:

Figure 11. Selecting and loading a template
Now we can use it when creating new LXC containers. Select the first hypervisor and click the “Create CT” button in the upper right corner: we will see the panel for creating a new instance. The installation steps are quite simple and I will only provide the configuration file for this LXC container:
Container successfully created. You can connect to LXC containers via the pct enter command, I also added an SSH hypervisor key before installing to connect directly via SSH (there are some minor problems with the terminal display in PCT). I prepared the server and installed all the necessary server applications there, now you can proceed to creating replication.
We click on the LXC container and go to the “Replication” tab, where we create the replication parameter using the “Add” button:

Figure 12. Creating replication in Proxmox interface

Figure 13. Replication job creation window
I created the task to replicate the container to the second node, as seen in the following screenshot, the replication was successful - pay attention to the “Status” field, it notifies you of the replication status, you should also pay attention to the “Duration” field to know how long the data is replicated.

Picture 14. List of VM syncs
Now we will try to migrate the car to the second node using the “Migrate” button
The migration of the container begins, the log can be viewed in the task list - there will be our migration. After that, the container will be moved to the second node.
“Host Key Verification Failed” Error
Sometimes when setting up a cluster, a similar problem may arise - it prevents the machines from migrating and creating replication, which negates the advantages of cluster solutions. To correct this error, delete the known_hosts file and connect via SSH to the conflicting node:
Accept the Hostkey and try entering this command, it should connect you to the server:
Go to the Robot panel and click on the “Virtual Switches” button. On the next page, you will see the Virtual Switch interface creation and management panel: you first need to create it, and then “connect” the dedicated servers to it. In the search, we add the necessary servers to connect - they do not need to be rebooted, just have to wait up to 10-15 minutes when the connection to the Virtual Switch is active.
After adding the servers to the Virtual Switch, we connect to the servers via the web panel and open the network interface configuration files, where we create a new network interface:
Let's take a closer look at what it is. At its core, this is a VLAN that connects to a single physical interface called enp4s0 (it may differ from you), with the VLAN number indicated — this is the Virtual Switch number you created in the Hetzner Robot web panel. You can specify any address, as long as it is local.
I note that you should configure enp4s0 as usual, in fact, it should contain the external IP address that was issued to your physical server. Repeat these steps on other hypervisors, and then reboot the networking service onto them, ping to the next node at the IP address of the Virtual Switch. If the ping was successful, then you have successfully established a connection between the servers via the Virtual Switch.
I will also attach the sysctl.conf configuration file, it will be needed if you have problems with forwarding packet and other network parameters:
Adding an IPv4 Subnet to Hetzner
Before starting work, you need to order a subnet in Hetzner, you can do this through the Robot panel.
Create a network bridge with an address that will be from this subnet. Configuration example:
Now go to the virtual machine settings in Proxmox and create a new network interface that will be attached to the bridge vmbr2. I use the LXC container, its configuration can be changed immediately in Proxmox. Final configuration for Debian:
Please note: I have specified 26 masks, not 29 - this is required for the network to work on the virtual machine.
Adding an IPv4 Address to Hetzner
The situation with a single IP address is different - usually Hetzner gives us an additional address from the server's subnet. This means that instead of vmbr2 we need to use vmbr0, but at the moment we don’t have one. The bottom line is that vmbr0 must contain the IP address of the iron server (that is, use the address used by the physical network interface enp2s0). The address must be moved to vmbr0, for this the following configuration will do (I advise you to order KVM in order to resume network operation in case of anything):
Restart the server if possible (if not, restart the networking service), then check the network interfaces via ip a:
As you can see here, enp2s0 is connected to vmbr0 and does not have an IP address, since it was reassigned to vmbr0.
Now in the settings of the virtual machine, add the network interface that will be connected to vmbr0. As gateway, specify the address attached to vmbr0.
I hope that this article will be useful to you when you configure the Proxmox cluster in Hetzner. If time permits, then I will expand the article and add instructions for OVH - there is also not everything obvious, as it seems at first glance. The material turned out to be quite voluminous, if you find errors, then please write in the comments, I will correct them. Thank you all for your attention.
Author: Ilya Andreev, edited by Alexey Zhadan and the Live Linux team
Proxmox cluster can consist of two or more servers. The maximum number of nodes in a cluster is 32 pieces. Our own cluster will consist of three nodes on a multicast (in the article I will also describe how to raise a cluster on a unique one — this is important if you base your cluster infrastructure on Hetzner or OVH, for example). In short, the multicast allows data transfer to several nodes simultaneously. When multicasting, we can not think about the number of nodes in the cluster (focusing on the restrictions above).
The cluster itself is built on an internal network (it is important that IP addresses are on the same subnet), the same Hetzner and OVH have the ability to cluster nodes in different data centers using Virtual Switch (Hetzner) and vRack (OVH) technology - about Virtual Switch we'll also talk in the article. If your hosting provider does not have similar technologies in operation, then you can use OVS (Open Virtual Switch), which is natively supported by Proxmox, or use VPN. However, I recommend in this case to use a unicast with a small number of nodes - situations often arise where the cluster simply “collapses” on the basis of such a network infrastructure and has to be restored. Therefore, I try to use OVH and Hetzner in my work - I observed fewer such incidents, but first of all, study the hosting provider that you will be hosting: does it have alternative technology, what solutions does it offer, does multicast support, and so on .
Install Proxmox
Proxmox can be installed in two ways: ISO-installer and installation through the shell. We choose the second method, so install Debian on the server.
')
Let's proceed directly to installing Proxmox on each server. Installation is extremely simple and is described in the official documentation here.
Add the Proxmox repository and the key of this repository:
echo "deb http://download.proxmox.com/debian/pve stretch pve-no-subscription" > /etc/apt/sources.list.d/pve-install-repo.list wget http://download.proxmox.com/debian/proxmox-ve-release-5.x.gpg -O /etc/apt/trusted.gpg.d/proxmox-ve-release-5.x.gpg chmod +r /etc/apt/trusted.gpg.d/proxmox-ve-release-5.x.gpg # optional, if you have a changed default umask We update the repositories and the system itself:
apt update && apt dist-upgrade After a successful upgrade, install the necessary Proxmox packages:
apt install proxmox-ve postfix open-iscsi Note : during the installation, Postfix and grub will be configured - one of them may fail with an error. Perhaps this will be due to the fact that the hostname does not resolve the name. Edit the hosts entry and run apt-get update
From now on, we can log in to the Proxmox web interface at https: // <external ip-address>: 8006 (you will encounter an untrusted certificate during connection).
Image 1. Proxmox node web interface
Installing Nginx and Let's Encrypt Certificate
I do not really like the situation with the certificate and IP address, so I suggest to install Nginx and configure Let's Encrypt certificate. I will not describe Nginx installation, I will leave only important files for Let's encrypt the certificate:
/etc/nginx/snippets/letsencrypt.conf
location ^~ /.well-known/acme-challenge/ { allow all; root /var/lib/letsencrypt/; default_type "text/plain"; try_files $uri =404; } The command to issue an SSL certificate:
certbot certonly --agree-tos --email sos@livelinux.info --webroot -w /var/lib/letsencrypt/ -d proxmox1.domain.name Site configuration in NGINX
upstream proxmox1.domain.name { server 127.0.0.1:8006; } server { listen 80; server_name proxmox1.domain.name; include snippets/letsencrypt.conf; return 301 https://$host$request_uri; } server { listen 443 ssl; server_name proxmox1.domain.name; access_log /var/log/nginx/proxmox1.domain.name.access.log; error_log /var/log/nginx/proxmox1.domain.name.error.log; include snippets/letsencrypt.conf; ssl_certificate /etc/letsencrypt/live/proxmox1.domain.name/fullchain.pem; ssl_certificate_key /etc/letsencrypt/live/proxmox1.domain.name/privkey.pem; location / { proxy_pass https://proxmox1.domain.name; proxy_next_upstream error timeout invalid_header http_500 http_502 http_503 http_504; proxy_redirect off; proxy_buffering off; proxy_set_header Host $host; proxy_set_header X-Real-IP $remote_addr; proxy_set_header X-Forwarded-For $proxy_add_x_forwarded_for; } Do not forget after installing the SSL certificate to put it on auto-update via cron:
0 */12 * * * /usr/bin/certbot -a \! -d /run/systemd/system && perl -e 'sleep int(rand(3600))' && certbot -q renew --renew-hook "systemctl reload nginx" Fine! Now we can access our domain via HTTPS.
Note : to disable the subscription info window, run this command:
sed -i.bak "s/data.status !== 'Active'/false/g" /usr/share/javascript/proxmox-widget-toolkit/proxmoxlib.js && systemctl restart pveproxy.service Network settings
Before connecting to the cluster, we configure the network interfaces on the hypervisor. It should be noted that the configuration of the rest of the nodes is no different, except for the IP addresses and server names, so I will not duplicate their settings.
We will create a network bridge for the internal network so that our virtual machines (in my version there will be an LXC container for convenience) firstly, be connected to the internal network of the hypervisor and can interact with each other. Secondly, we will add a bridge for the external network a bit later so that the virtual machines have their external IP address. Accordingly, the containers will be currently behind NAT'om with us.
There are two ways to work with the Proxmox network configuration: through the web interface or through the / etc / network / interfaces configuration file. In the first option, you will need to restart the server (or you can just rename the interfaces.new file to interfaces and restart the networking service via systemd). If you are just starting the configuration and there are no virtual machines or LXC containers yet, then it is advisable to restart the hypervisor after the changes.
Now create a network bridge called vmbr1 in the network tab in the Proxmox web panel.
Figure 2. Network interfaces proxmox1 nodes
Image 3. Creating a network bridge
Image 4. Configure the vmbr1 network configuration
Setup is extremely simple - we need vmbr1 in order for instances to access the Internet.
Now we restart our hypervisor and check if the interface has been created:
Figure 5. Network interface vmbr1 in the output of the ip a command
Note: I already have an interface ens19 - this is an interface with an internal network, on the basis of which a cluster will be created.
Repeat these steps on the remaining two hypervisors, and then proceed to the next step — preparing the cluster.
Also, an important step now is to enable packet forwarding - without it, instances will not get access to the external network. Open the sysctl.conf file and change the value of the net.ipv4.ip_forward parameter to 1, and then enter the following command:
sysctl -p In the output you should see the directive net.ipv4.ip_forward (if you haven’t changed it before)
Configure Proxmox Cluster
We now turn directly to the cluster. Each node must rezolvit themselves and other nodes on the internal network, for this you need to change the values in the hosts records as follows (each node must contain a record of the others):
172.30.0.15 proxmox1.livelinux.info proxmox1 172.30.0.16 proxmox2.livelinux.info proxmox2 172.30.0.17 proxmox3.livelinux.info proxmox3 You also need to add the public keys of each node to the rest - this is required to create a cluster.
Create a cluster through the web panel:
Image 6. Creating a cluster via the web interface
After creating the cluster, we need to get information about it. Go to the same tab of the cluster and click the button “Join Information”:
Figure 7. Information about the created cluster
This information is useful to us at the time of joining the second and third nodes in the cluster. Connect to the second node and in the Cluster tab, click the “Join Cluster” button:
Figure 8. Connecting the node to the cluster
Let us consider the details of the connection:
- Peer Address: IP address of the first server (to the one to which we connect)
- Password: first server password
- Fingerprint: we get this value from the cluster information
Figure 9. Cluster state after connecting the second node
The second node is successfully connected! However, this is not always the case. If you perform the steps incorrectly or network problems arise, the connection to the cluster will fail, and the cluster itself will be “broken up”. The best solution is to disconnect the node from the cluster, delete all the information about the cluster itself, then restart the server and check the previous steps. How is it safe to disconnect the node from the cluster? First, remove it from the cluster on the first server:
pvecm del proxmox2 After that, the node will be disconnected from the cluster. Now go to the broken node and disable the following services on it:
systemctl stop pvestatd.service systemctl stop pvedaemon.service systemctl stop pve-cluster.service systemctl stop corosync systemctl stop pve-cluster Proxmox cluster stores information about itself in the sqlite database, it also needs to be cleared:
sqlite3 /var/lib/pve-cluster/config.db delete from tree where name = 'corosync.conf'; .quit The data on the boletus has been successfully deleted. Delete the remaining files, for this you need to run the cluster file system in standalone mode:
pmxcfs -l rm /etc/pve/corosync.conf rm /etc/corosync/* rm /var/lib/corosync/* rm -rf /etc/pve/nodes/* We restart the server (this is optional, but we will re-insure: all services should be started and work correctly. To not miss anything, we are restarting). After switching on, we will get a blank node without any information about the previous cluster and we can start connecting again.
Installing and configuring ZFS
ZFS is a file system that can be used with Proxmox. Using it, you can afford to replicate data to another hypervisor, migrate a virtual machine / LXC container, access the LXC container from a host system, and so on. Installing it is quite simple, let's proceed to the analysis. Three SSD drives are available on my servers, which we will combine into a RAID array.
Add repositories:
nano /etc/apt/sources.list.d/stretch-backports.list deb http://deb.debian.org/debian stretch-backports main contrib deb-src http://deb.debian.org/debian stretch-backports main contrib nano /etc/apt/preferences.d/90_zfs Package: libnvpair1linux libuutil1linux libzfs2linux libzpool2linux spl-dkms zfs-dkms zfs-test zfsutils-linux zfsutils-linux-dev zfs-zed Pin: release n=stretch-backports Pin-Priority: 990 Update the list of packages:
apt update Install the required dependencies:
apt install --yes dpkg-dev linux-headers-$(uname -r) linux-image-amd64 Install ZFS itself:
apt-get install zfs-dkms zfsutils-linux If you get a fusermount: fuse device not found error in the future, try 'modprobe fuse' first, then run the following command:
modprobe fuse Now proceed directly to the setting. First we need to format the SSD and configure them via parted:
Configure / dev / sda
parted /dev/sda (parted) print Model: ATA SAMSUNG MZ7LM480 (scsi) Disk /dev/sda: 480GB Sector size (logical/physical): 512B/512B Partition Table: msdos Disk Flags: Number Start End Size Type File system Flags 1 1049kB 4296MB 4295MB primary raid 2 4296MB 4833MB 537MB primary raid 3 4833MB 37,0GB 32,2GB primary raid (parted) mkpart Partition type? primary/extended? primary File system type? [ext2]? zfs Start? 33GB End? 480GB Warning: You requested a partition from 33,0GB to 480GB (sectors 64453125..937500000). The closest location we can manage is 37,0GB to 480GB (sectors 72353792..937703087). Is this still acceptable to you? Yes/No? yes Similar actions need to be made for other disks. After all the disks are prepared, proceed to the next step:
zpool create -f -o ashift = 12 rpool / dev / sda4 / dev / sdb4 / dev / sdc4
We choose ashift = 12 for performance reasons - this is the recommendation of zfsonlinux itself, read more about this in their wiki: github.com/zfsonlinux/zfs/wiki/faq#performance-considerations
Let's apply some settings for ZFS:
zfs set atime=off rpool zfs set compression=lz4 rpool zfs set dedup=off rpool zfs set snapdir=visible rpool zfs set primarycache=all rpool zfs set aclinherit=passthrough rpool zfs inherit acltype rpool zfs get -r acltype rpool zfs get all rpool | grep compressratio Now we need to calculate some variables to calculate zfs_arc_max, I do this as follows:
mem =`free --giga | grep Mem | awk '{print $2}'` partofmem=$(($mem/10)) echo $setzfscache > /sys/module/zfs/parameters/zfs_arc_max grep c_max /proc/spl/kstat/zfs/arcstats zfs create rpool/data cat > /etc/modprobe.d/zfs.conf << EOL options zfs zfs_arc_max=$setzfscache EOL echo $setzfscache > /sys/module/zfs/parameters/zfs_arc_max grep c_max /proc/spl/kstat/zfs/arcstats At the moment, the pool has been successfully created, we also created a subpul data. You can check the status of your pool with the zpool status command. This action must be performed on all hypervisors, and then proceed to the next step.
Now add ZFS to Proxmox. Go to the settings of the datacenter (namely him, and not a separate node) in the “Storage” section, click on the “Add” button and select the “ZFS” option, after which we will see the following parameters:
ID: The name of the stack. I gave him the name local-zfs
ZFS Pool: We created rpool / data, and add it here.
Nodes: specify all available nodes
This command creates a new pool with selected disks. At each hypervisor, a new storage should appear under the name local-zfs, after which you can migrate your virtual machines from local storage to ZFS.
Replicating instances to a neighboring hypervisor
In a Proxmox cluster, there is the ability to replicate data from one hypervisor to another: this option allows you to switch an instance from one server to another. The data will be relevant at the time of the last synchronization - its time can be set when creating replication (15 minutes is standardly set). There are two ways to migrate an instance to another Proxmox node: manual and automatic. Let's first consider the manual version, and at the end I will provide you with a Python script that will allow you to create a virtual machine on an available hypervisor when one of the hypervisors is unavailable.
To create replication, go to the Proxmox web panel and create a virtual machine or LXC container. In the previous paragraphs, we set up a vmbr1 bridge with NAT, which will allow us to go to the external network. I will create an LXC container with MySQL, Nginx and PHP-FPM with a test site to test replication work. Below is a step by step instruction.
We load the appropriate template (go to storage -> Content -> Templates), an example in the screenshot:
Image 10. Local storage with templates and VM images
Click the “Templates” button and load the container LXC template we need:
Figure 11. Selecting and loading a template
Now we can use it when creating new LXC containers. Select the first hypervisor and click the “Create CT” button in the upper right corner: we will see the panel for creating a new instance. The installation steps are quite simple and I will only provide the configuration file for this LXC container:
arch: amd64 cores: 3 memory: 2048 nameserver: 8.8.8.8 net0: name=eth0,bridge=vmbr1,firewall=1,gw=172.16.0.1,hwaddr=D6:60:C5:39:98:A0,ip=172.16.0.2/24,type=veth ostype: centos rootfs: local:100/vm-100-disk-1.raw,size=10G swap: 512 unprivileged: Container successfully created. You can connect to LXC containers via the pct enter command, I also added an SSH hypervisor key before installing to connect directly via SSH (there are some minor problems with the terminal display in PCT). I prepared the server and installed all the necessary server applications there, now you can proceed to creating replication.
We click on the LXC container and go to the “Replication” tab, where we create the replication parameter using the “Add” button:
Figure 12. Creating replication in Proxmox interface
Figure 13. Replication job creation window
I created the task to replicate the container to the second node, as seen in the following screenshot, the replication was successful - pay attention to the “Status” field, it notifies you of the replication status, you should also pay attention to the “Duration” field to know how long the data is replicated.
Picture 14. List of VM syncs
Now we will try to migrate the car to the second node using the “Migrate” button
The migration of the container begins, the log can be viewed in the task list - there will be our migration. After that, the container will be moved to the second node.
“Host Key Verification Failed” Error
Sometimes when setting up a cluster, a similar problem may arise - it prevents the machines from migrating and creating replication, which negates the advantages of cluster solutions. To correct this error, delete the known_hosts file and connect via SSH to the conflicting node:
/usr/bin/ssh -o 'HostKeyAlias=proxmox2' root@172.30.0.16 Accept the Hostkey and try entering this command, it should connect you to the server:
/usr/bin/ssh -o 'BatchMode=yes' -o 'HostKeyAlias=proxmox2' root@172.30.0.16 Features of network settings on Hetzner
Go to the Robot panel and click on the “Virtual Switches” button. On the next page, you will see the Virtual Switch interface creation and management panel: you first need to create it, and then “connect” the dedicated servers to it. In the search, we add the necessary servers to connect - they do not need to be rebooted, just have to wait up to 10-15 minutes when the connection to the Virtual Switch is active.
After adding the servers to the Virtual Switch, we connect to the servers via the web panel and open the network interface configuration files, where we create a new network interface:
auto enp4s0.4000 iface enp4s0.4000 inet static address 10.1.0.11/24 mtu 1400 vlan-raw-device enp4s0 Let's take a closer look at what it is. At its core, this is a VLAN that connects to a single physical interface called enp4s0 (it may differ from you), with the VLAN number indicated — this is the Virtual Switch number you created in the Hetzner Robot web panel. You can specify any address, as long as it is local.
I note that you should configure enp4s0 as usual, in fact, it should contain the external IP address that was issued to your physical server. Repeat these steps on other hypervisors, and then reboot the networking service onto them, ping to the next node at the IP address of the Virtual Switch. If the ping was successful, then you have successfully established a connection between the servers via the Virtual Switch.
I will also attach the sysctl.conf configuration file, it will be needed if you have problems with forwarding packet and other network parameters:
net.ipv6.conf.all.disable_ipv6=0 net.ipv6.conf.default.disable_ipv6 = 0 net.ipv6.conf.all.forwarding=1 net.ipv4.conf.all.rp_filter=1 net.ipv4.tcp_syncookies=1 net.ipv4.ip_forward=1 net.ipv4.conf.all.send_redirects=0 Adding an IPv4 Subnet to Hetzner
Before starting work, you need to order a subnet in Hetzner, you can do this through the Robot panel.
Create a network bridge with an address that will be from this subnet. Configuration example:
auto vmbr2 iface vmbr2 inet static address ip-address netmask 29 bridge-ports none bridge-stp off bridge-fd 0 Now go to the virtual machine settings in Proxmox and create a new network interface that will be attached to the bridge vmbr2. I use the LXC container, its configuration can be changed immediately in Proxmox. Final configuration for Debian:
auto eth0 iface eth0 inet static address ip-address netmask 26 gateway bridge-address Please note: I have specified 26 masks, not 29 - this is required for the network to work on the virtual machine.
Adding an IPv4 Address to Hetzner
The situation with a single IP address is different - usually Hetzner gives us an additional address from the server's subnet. This means that instead of vmbr2 we need to use vmbr0, but at the moment we don’t have one. The bottom line is that vmbr0 must contain the IP address of the iron server (that is, use the address used by the physical network interface enp2s0). The address must be moved to vmbr0, for this the following configuration will do (I advise you to order KVM in order to resume network operation in case of anything):
auto enp2s0 iface enp2s0 inet manual auto vmbr0 iface vmbr0 inet static address ip-address netmask 255.255.255.192 gateway ip-gateway bridge-ports enp2s0 bridge-stp off bridge-fd 0 Restart the server if possible (if not, restart the networking service), then check the network interfaces via ip a:
2: enp2s0: <BROADCAST,MULTICAST,UP,LOWER_UP> mtu 1500 qdisc pfifo_fast master vmbr0 state UP group default qlen 1000 link/ether 44:8a:5b:2c:30:c2 brd ff:ff:ff:ff:ff:ff As you can see here, enp2s0 is connected to vmbr0 and does not have an IP address, since it was reassigned to vmbr0.
Now in the settings of the virtual machine, add the network interface that will be connected to vmbr0. As gateway, specify the address attached to vmbr0.
At the end
I hope that this article will be useful to you when you configure the Proxmox cluster in Hetzner. If time permits, then I will expand the article and add instructions for OVH - there is also not everything obvious, as it seems at first glance. The material turned out to be quite voluminous, if you find errors, then please write in the comments, I will correct them. Thank you all for your attention.
Author: Ilya Andreev, edited by Alexey Zhadan and the Live Linux team
Source: https://habr.com/ru/post/457894/
All Articles