Developing an application for streaming with Node.js and React
The author of the material, the translation of which we are publishing today, says that he is working on an application that allows organizing streaming (streaming) of what is happening on the user's desktop.

The application receives a stream in RTMP format from the tape drive and converts it into an HLS stream that can be played in viewers' browsers. This article will explain how to create your own streaming application using Node.js and React. If you are used to seeing the idea that interests you, immediately dive into the code, you can look into this repository right now.
Let's create a simple web server based on Node.js, in which, using the passport.js library, a local user authentication strategy is implemented. In the role of a permanent repository of information, we will use MongoDB. We will work with the database using the Mongoose ODM library.
')
Initializing a new project:
Install the dependencies:
In the project directory, create two folders -
Here is the code for the file located in the project at
We downloaded everything necessary for the middleware application, connected to MongoDB, set up an express session to use file storage. Session storage will allow restoring them after server restart.
Now we will describe the passport.js strategies designed to organize the registration and authentication of users. Create an
In addition, we need to describe the schema for the user model (it will be called
Here is the code for the
Here is the code for the
Now that we have defined the passport strategies, described the
Here is the code that needs to be added to the
In addition,
Create files
Here is the code for the
Here is the code for the
We use the ejs templating engine. Add the template files
Here is the contents of the
Here is what should be in the
We can say we have finished work on the authentication system. Now let's start creating the next part of the project and configure the RTMP server.
RTMP (Real-Time Messaging Protocol) is a protocol that was developed for high-performance transmission of video, audio, and various data between a tape drive and a server. Twitch, Facebook, YouTube and many other sites offering streaming capabilities accept RTMP streams and transcode them into HTTP streams (HLS format) before transferring these streams to their CDNs to ensure their high availability.
We use the node-media-server module, the Node.js implementation of the RTMP media server. This media server accepts RTMP streams and converts them to HLS / DASH using the ffmpeg multimedia framework. For the project to work successfully, ffmpeg must be installed on your system. If you are working on Linux and you already have ffmpeg installed, you can figure out the path to it by running the following command from the terminal:
Ffmpeg version 4.x is recommended for working with the node-media-server package. You can check the installed version of ffmpeg like this:
If ffmpeg is not installed and you are working in Ubuntu, you can install this framework by running the following command:
If you are running Windows, you can download ffmpeg assemblies for Windows.
Add the
Replace the value of the
Now install node-media-server by running the following command:
Create a
Here is the code to put in
Using the
Add the following code to
Download and install OBS (Open Broadcaster Software). Open the program settings window and go to the
OBS setup
Go to the terminal and look at what the media server brings there. You will see there information about the incoming stream and the logs of several event listeners.

Data that a Node.js based media server brings to the terminal
The media server gives access to the API, which allows you to get a list of connected clients. In order to see this list - you can go to the browser at
Now the backend is almost ready. It is a working streaming server that supports HTTP, RTMP and HLS technologies. However, we have not yet created a system for checking incoming RTMP connections. It should allow us to ensure that the server accepts threads only from authenticated users. Add the following code to the
In the closure, we perform a database query to locate the user with the streaming key. If the key belongs to the user, we simply allow the user to connect to the server and publish his broadcast. Otherwise, we reject the incoming RTMP connection.
In the next section, we will create a simple client-side application based on React. It is needed to allow viewers to watch streaming, as well as to allow streamers to generate and view their streaming keys.
Now go to the
Add to the project, in its root directory, a configuration file for webpack (
Add the
Here is the contents of the
For routing, use react-router. In the frontend, we also use bootstrap, and video.js to show the broadcasts. Now add the
The
Create the
This is what the application page looks like.

Frontend Streaming Service
After the
In the
We pass streaming information returned by the NMS API to the backend by doing this to get information about the connected clients.
We query the database to get a list of users whose streaming keys match those we received from the NMS API. We return the resulting list in JSON format. Register a route in the
As a result, we display a list of active broadcasts. This list contains the username and thumbnail. We'll talk about how to create thumbnails for broadcasts at the end of the material. Thumbnails are tied to specific pages on which HLS streams are played using video.js.
Create the
When the component is mounted, we get the user’s streaming key to initialize the HLS stream in the video.js player.

Record player
Create a
passport.js, , , .
.
shortid.
,
. cron, , 5 , .
ffmpeg-, HLS-.
, cron (
5 . API NMS .
, . , . - — . - — .
.
Dear readers! , , ?

The application receives a stream in RTMP format from the tape drive and converts it into an HLS stream that can be played in viewers' browsers. This article will explain how to create your own streaming application using Node.js and React. If you are used to seeing the idea that interests you, immediately dive into the code, you can look into this repository right now.
Developing a web server with a basic authentication system
Let's create a simple web server based on Node.js, in which, using the passport.js library, a local user authentication strategy is implemented. In the role of a permanent repository of information, we will use MongoDB. We will work with the database using the Mongoose ODM library.
')
Initializing a new project:
$ npm init Install the dependencies:
$ npm install axios bcrypt-nodejs body-parser bootstrap config connect-ensure-login connect-flash cookie-parser ejs express express-session mongoose passport passport-local request session-file-store --save-dev In the project directory, create two folders -
client and server . The frontend code based on React will go to the client folder, and the backend code will be stored in the server folder. We are currently working in the server folder. Namely, to create an authentication system, we will use passport.js. We have already installed the passport and passport-local modules. Before we describe the local user authentication strategy, create an app.js file and add the code needed to start a simple server. If you will run this code on your own, make sure that you have MongoDB DBMS installed and that it is running as a service.Here is the code for the file located in the project at
server/app.js : const express = require('express'), Session = require('express-session'), bodyParse = require('body-parser'), mongoose = require('mongoose'), middleware = require('connect-ensure-login'), FileStore = require('session-file-store')(Session), config = require('./config/default'), flash = require('connect-flash'), port = 3333, app = express(); mongoose.connect('mongodb://127.0.0.1/nodeStream' , { useNewUrlParser: true }); app.set('view engine', 'ejs'); app.set('views', path.join(__dirname, './views')); app.use(express.static('public')); app.use(flash()); app.use(require('cookie-parser')()); app.use(bodyParse.urlencoded({extended: true})); app.use(bodyParse.json({extended: true})); app.use(Session({ store: new FileStore({ path : './server/sessions' }), secret: config.server.secret, maxAge : Date().now + (60 * 1000 * 30) })); app.get('*', middleware.ensureLoggedIn(), (req, res) => { res.render('index'); }); app.listen(port, () => console.log(`App listening on ${port}!`)); We downloaded everything necessary for the middleware application, connected to MongoDB, set up an express session to use file storage. Session storage will allow restoring them after server restart.
Now we will describe the passport.js strategies designed to organize the registration and authentication of users. Create an
auth folder in the server folder and place the passport.js file in it. Here is what should be in the server/auth/passport.js file: const passport = require('passport'), LocalStrategy = require('passport-local').Strategy, User = require('../database/Schema').User, shortid = require('shortid'); passport.serializeUser( (user, cb) => { cb(null, user); }); passport.deserializeUser( (obj, cb) => { cb(null, obj); }); // passport, passport.use('localRegister', new LocalStrategy({ usernameField: 'email', passwordField: 'password', passReqToCallback: true }, (req, email, password, done) => { User.findOne({$or: [{email: email}, {username: req.body.username}]}, (err, user) => { if (err) return done(err); if (user) { if (user.email === email) { req.flash('email', 'Email is already taken'); if (user.username === req.body.username) { req.flash('username', 'Username is already taken'); return done(null, false); } else { let user = new User(); user.email = email; user.password = user.generateHash(password); user.username = req.body.username; user.stream_key = shortid.generate(); user.save( (err) => { if (err) throw err; return done(null, user); }); }); })); // passport, passport.use('localLogin', new LocalStrategy({ usernameField: 'email', passwordField: 'password', passReqToCallback: true }, (req, email, password, done) => { User.findOne({'email': email}, (err, user) => { if (err) return done(err); if (!user) return done(null, false, req.flash('email', 'Email doesn\'t exist.')); if (!user.validPassword(password)) return done(null, false, req.flash('password', 'Oops! Wrong password.')); return done(null, user); }); })); module.exports = passport; In addition, we need to describe the schema for the user model (it will be called
UserSchema ). Create a database folder in the server folder, and the UserSchema.js file in it.Here is the code for the
server/database.UserSchema.js file: let mongoose = require('mongoose'), bcrypt = require('bcrypt-nodejs'), shortid = require('shortid'), Schema = mongoose.Schema; let UserSchema = new Schema({ username: String, email : String, password: String, stream_key : String, }); UserSchema.methods.generateHash = (password) => { return bcrypt.hashSync(password, bcrypt.genSaltSync(8), null); }; UserSchema.methods.validPassword = function(password){ return bcrypt.compareSync(password, this.password); }; UserSchema.methods.generateStreamKey = () => { return shortid.generate(); }; module.exports = UserSchema; UserSchema has three methods. The generateHash method is used to convert a password, presented in plain text, to a bcrypt hash. We use this method in the passport strategy to convert user-entered passwords into bcrypt hashes. The resulting password hashes are then stored in the database. The validPassword method accepts the password entered by the user and checks it by comparing its hash with the hash stored in the database. The generateStreamKey method generateStreamKey unique strings, which we will transfer to users as their streaming keys (stream keys) for RTMP clients.Here is the code for the
server/database/Schema.js : let mongoose = require('mongoose'); exports.User = mongoose.model('User', require('./UserSchema')); Now that we have defined the passport strategies, described the
UserSchema schema and created a model based on it, let's initialize passport to app.jsHere is the code that needs to be added to the
server/app.js : // , const passport = require('./auth/passport'); app.use(passport.initialize()); app.use(passport.session()); In addition,
app.js need to register new routes in app.js To do this, add the following code to server/app.js : // app.use('/login', require('./routes/login')); app.use('/register', require('./routes/register')); Create files
login.js and register.js in the routes folder, which is located in the server folder. In these files, we define a pair of the above routes and use the passport middleware to organize the registration and authentication of users.Here is the code for the
server/routes/login.js : const express = require('express'), router = express.Router(), passport = require('passport'); router.get('/', require('connect-ensure-login').ensureLoggedOut(), (req, res) => { res.render('login', { user : null, errors : { email : req.flash('email'), password : req.flash('password') }); }); router.post('/', passport.authenticate('localLogin', { successRedirect : '/', failureRedirect : '/login', failureFlash : true })); module.exports = router; Here is the code for the
server/routes/register.js file: const express = require('express'), router = express.Router(), passport = require('passport'); router.get('/', require('connect-ensure-login').ensureLoggedOut(), (req, res) => { res.render('register', { user : null, errors : { username : req.flash('username'), email : req.flash('email') }); }); router.post('/', require('connect-ensure-login').ensureLoggedOut(), passport.authenticate('localRegister', { successRedirect : '/', failureRedirect : '/register', failureFlash : true }) ); module.exports = router; We use the ejs templating engine. Add the template files
login.ejs and register.ejs to the views folder, which is located in the server folder.Here is the contents of the
server/views/login.ejs : <!doctype html> <html lang="en"> <% include header.ejs %> <body> <% include navbar.ejs %> <div class="container app mt-5"> <h4>Login</h4> <hr class="my-4"> <div class="row"> <form action="/login" method="post" class="col-xs-12 col-sm-12 col-md-8 col-lg-6"> <div class="form-group"> <label>Email address</label> <input type="email" name="email" class="form-control" placeholder="Enter email" required> <% if (errors.email.length) { %> <small class="form-text text-danger"><%= errors.email %></small> <% } %> </div> <div class="form-group"> <label>Password</label> <input type="password" name="password" class="form-control" placeholder="Password" required> <% if (errors.password.length) { %> <small class="form-text text-danger"><%= errors.password %></small> <% } %> </div> <div class="form-group"> <div class="leader"> Don't have an account? Register <a href="/register">here</a>. </div> </div> <button type="submit" class="btn btn-dark btn-block">Login</button> </form> </div> </div> <% include footer.ejs %> </body> </html> Here is what should be in the
server/views/register.ejs file: <!doctype html> <html lang="en"> <% include header.ejs %> <body> <% include navbar.ejs %> <div class="container app mt-5"> <h4>Register</h4> <hr class="my-4"> <div class="row"> <form action="/register" method="post" class="col-xs-12 col-sm-12 col-md-8 col-lg-6"> <div class="form-group"> <label>Username</label> <input type="text" name="username" class="form-control" placeholder="Enter username" required> <% if (errors.username.length) { %> <small class="form-text text-danger"><%= errors.username %></small> <% } %> </div> <div class="form-group"> <label>Email address</label> <input type="email" name="email" class="form-control" placeholder="Enter email" required> <% if (errors.email.length) { %> <small class="form-text text-danger"><%= errors.email %></small> <% } %> </div> <div class="form-group"> <label>Password</label> <input type="password" name="password" class="form-control" placeholder="Password" required> </div> <div class="form-group"> <div class="leader"> Have an account? Login <a href="/login">here</a>. </div> </div> <button type="submit" class="btn btn-dark btn-block">Register</button> </form> </div> </div> <% include footer.ejs %> </body> </html> We can say we have finished work on the authentication system. Now let's start creating the next part of the project and configure the RTMP server.
Configuring an RTMP server
RTMP (Real-Time Messaging Protocol) is a protocol that was developed for high-performance transmission of video, audio, and various data between a tape drive and a server. Twitch, Facebook, YouTube and many other sites offering streaming capabilities accept RTMP streams and transcode them into HTTP streams (HLS format) before transferring these streams to their CDNs to ensure their high availability.
We use the node-media-server module, the Node.js implementation of the RTMP media server. This media server accepts RTMP streams and converts them to HLS / DASH using the ffmpeg multimedia framework. For the project to work successfully, ffmpeg must be installed on your system. If you are working on Linux and you already have ffmpeg installed, you can figure out the path to it by running the following command from the terminal:
$ which ffmpeg # /usr/bin/ffmpeg Ffmpeg version 4.x is recommended for working with the node-media-server package. You can check the installed version of ffmpeg like this:
$ ffmpeg --version # ffmpeg version 4.1.3-0york1~18.04 Copyright (c) 2000-2019 the # FFmpeg developers built with gcc 7 (Ubuntu 7.3.0-27ubuntu1~18.04) If ffmpeg is not installed and you are working in Ubuntu, you can install this framework by running the following command:
# PPA-. PPA, # ffmpeg 3.x. $ sudo add-apt-repository ppa:jonathonf/ffmpeg-4 $ sudo apt install ffmpeg If you are running Windows, you can download ffmpeg assemblies for Windows.
Add the
server/config/default.js configuration file to the project: const config = { server: { secret: 'kjVkuti2xAyF3JGCzSZTk0YWM5JhI9mgQW4rytXc' }, rtmp_server: { rtmp: { port: 1935, chunk_size: 60000, gop_cache: true, ping: 60, ping_timeout: 30 }, http: { port: 8888, mediaroot: './server/media', allow_origin: '*' }, trans: { ffmpeg: '/usr/bin/ffmpeg', tasks: [ app: 'live', hls: true, hlsFlags: '[hls_time=2:hls_list_size=3:hls_flags=delete_segments]', dash: true, dashFlags: '[f=dash:window_size=3:extra_window_size=5]' }; module.exports = config; Replace the value of the
ffmpeg property with the path that ffmpeg is installed on your system. If you are running Windows and have downloaded the ffmpeg Windows build from the link above, do not forget to add the .exe extension to the file name. Then the corresponding fragment of the above code will look like this: const config = { .... trans: { ffmpeg: 'D:/ffmpeg/bin/ffmpeg.exe', ... }; Now install node-media-server by running the following command:
$ npm install node-media-server --save Create a
media_server.js file in the server folder.Here is the code to put in
server/media_server.js : const NodeMediaServer = require('node-media-server'), config = require('./config/default').rtmp_server; nms = new NodeMediaServer(config); nms.on('prePublish', async (id, StreamPath, args) => { let stream_key = getStreamKeyFromStreamPath(StreamPath); console.log('[NodeEvent on prePublish]', `id=${id} StreamPath=${StreamPath} args=${JSON.stringify(args)}`); }); const getStreamKeyFromStreamPath = (path) => { let parts = path.split('/'); return parts[parts.length - 1]; }; module.exports = nms; Using the
NodeMediaService object NodeMediaService quite simple. It provides the RTMP server and allows you to wait for connections. If the streaming key is invalid, you can reject the incoming connection. We will handle the event of this prePublish object. In the next section, we will add an additional code to the closure of the prePublish event prePublish . It will allow to reject incoming connections with invalid streaming keys. In the meantime, we will accept all incoming connections coming to the default RTMP port (1935). We just need to import the app.js object in the node_media_server and call its run method.Add the following code to
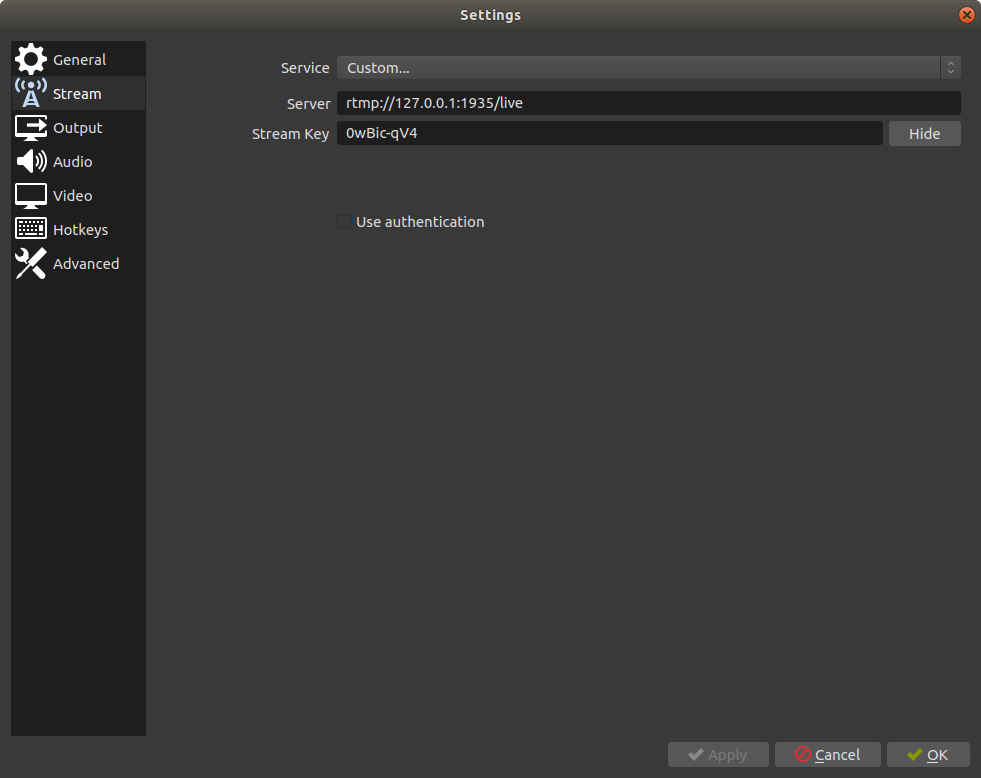
server/app.js : // app.js, // , const node_media_server = require('./media_server'); // run() , // , - node_media_server.run(); Download and install OBS (Open Broadcaster Software). Open the program settings window and go to the
Stream section. Select Custom in the Service field and enter rtmp://127.0.0.1:1935/live in the Server field. The Stream Key field can be left blank. If the program does not allow you to save the settings without filling this field, you can enter an arbitrary set of characters into it. Click on the Apply button and on the OK button. Click the Start Streaming button to start sending your RTMP stream to your own local server.OBS setup
Go to the terminal and look at what the media server brings there. You will see there information about the incoming stream and the logs of several event listeners.
Data that a Node.js based media server brings to the terminal
The media server gives access to the API, which allows you to get a list of connected clients. In order to see this list - you can go to the browser at
http://127.0.0.1:8888/api/streams . Later we will use this API in the React-application to display the list of users conducting broadcasts. Here is what you can see by accessing this API: { "live": { "0wBic-qV4": { "publisher": { "app": "live", "stream": "0wBic-qV4", "clientId": "WMZTQAEY", "connectCreated": "2019-05-12T16:13:05.759Z", "bytes": 33941836, "ip": "::ffff:127.0.0.1", "audio": { "codec": "AAC", "profile": "LC", "samplerate": 44100, "channels": 2 }, "video": { "codec": "H264", "width": 1920, "height": 1080, "profile": "High", "level": 4.2, "fps": 60 }, "subscribers": [ "app": "live", "stream": "0wBic-qV4", "clientId": "GNJ9JYJC", "connectCreated": "2019-05-12T16:13:05.985Z", "bytes": 33979083, "ip": "::ffff:127.0.0.1", "protocol": "rtmp" } Now the backend is almost ready. It is a working streaming server that supports HTTP, RTMP and HLS technologies. However, we have not yet created a system for checking incoming RTMP connections. It should allow us to ensure that the server accepts threads only from authenticated users. Add the following code to the
prePublish event prePublish in the server/media_server.js : // const User = require('./database/Schema').User; nms.on('prePublish', async (id, StreamPath, args) => { let stream_key = getStreamKeyFromStreamPath(StreamPath); console.log('[NodeEvent on prePublish]', `id=${id} StreamPath=${StreamPath} args=${JSON.stringify(args)}`); User.findOne({stream_key: stream_key}, (err, user) => { if (!err) { if (!user) { let session = nms.getSession(id); session.reject(); } else { // - }); }); const getStreamKeyFromStreamPath = (path) => { let parts = path.split('/'); return parts[parts.length - 1]; }; In the closure, we perform a database query to locate the user with the streaming key. If the key belongs to the user, we simply allow the user to connect to the server and publish his broadcast. Otherwise, we reject the incoming RTMP connection.
In the next section, we will create a simple client-side application based on React. It is needed to allow viewers to watch streaming, as well as to allow streamers to generate and view their streaming keys.
Streaming Shows
Now go to the
clients folder. Since we are going to create a React application, we need a webpack. We also need loaders that are used to translate JSX code into JavaScript code that is understandable to browsers. Install the following modules: $ npm install @babel/core @babel/preset-env @babel/preset-react babel-loader css-loader file-loader mini-css-extract-plugin node-sass sass-loader style-loader url-loader webpack webpack-cli react react-dom react-router-dom video.js jquery bootstrap history popper.js Add to the project, in its root directory, a configuration file for webpack (
webpack.config.js ): const path = require('path'); const MiniCssExtractPlugin = require("mini-css-extract-plugin"); const devMode = process.env.NODE_ENV !== 'production'; const webpack = require('webpack'); module.exports = { entry : './client/index.js', output : { filename : 'bundle.js', path : path.resolve(__dirname, 'public') }, module : { rules : [ test: /\.s?[ac]ss$/, use: [ MiniCssExtractPlugin.loader, { loader: 'css-loader', options: { url: false, sourceMap: true } }, { loader: 'sass-loader', options: { sourceMap: true } } ], }, test: /\.js$/, exclude: /node_modules/, use: "babel-loader" }, test: /\.woff($|\?)|\.woff2($|\?)|\.ttf($|\?)|\.eot($|\?)|\.svg($|\?)/, loader: 'url-loader' }, test: /\.(png|jpg|gif)$/, use: [{ loader: 'file-loader', options: { outputPath: '/', }, }], }, }, devtool: 'source-map', plugins: [ new MiniCssExtractPlugin({ filename: "style.css" }), new webpack.ProvidePlugin({ $: 'jquery', jQuery: 'jquery' }) ], mode : devMode ? 'development' : 'production', watch : devMode, performance: { hints: process.env.NODE_ENV === 'production' ? "warning" : false }, }; Add the
client/index.js file to the project: import React from "react"; import ReactDOM from 'react-dom'; import {BrowserRouter} from 'react-router-dom'; import 'bootstrap'; require('./index.scss'); import Root from './components/Root.js'; if(document.getElementById('root')){ ReactDOM.render( <BrowserRouter> <Root/> </BrowserRouter>, document.getElementById('root') ); } Here is the contents of the
client/index.scss : @import '~bootstrap/dist/css/bootstrap.css'; @import '~video.js/dist/video-js.css'; @import url('https://fonts.googleapis.com/css?family=Dosis'); html,body{ font-family: 'Dosis', sans-serif; } For routing, use react-router. In the frontend, we also use bootstrap, and video.js to show the broadcasts. Now add the
components folder to the client folder, and the Root.js file in it. Here is the contents of the client/components/Root.js : import React from "react"; import {Router, Route} from 'react-router-dom'; import Navbar from './Navbar'; import LiveStreams from './LiveStreams'; import Settings from './Settings'; import VideoPlayer from './VideoPlayer'; const customHistory = require("history").createBrowserHistory(); export default class Root extends React.Component { constructor(props){ super(props); render(){ return ( <Router history={customHistory} > <div> <Navbar/> <Route exact path="/" render={props => ( <LiveStreams {...props} /> )}/> <Route exact path="/stream/:username" render={(props) => ( <VideoPlayer {...props}/> )}/> <Route exact path="/settings" render={props => ( <Settings {...props} /> )}/> </div> </Router> } The
<Root/> component renders a <Router/> React containing three <Route/> subcomponents. The <LiveStreams/> component displays a list of broadcasts. The <VideoPlayer/> component is responsible for displaying the video.js player. The <Settings/> component is responsible for creating an interface for working with streaming keys.Create the
client/components/LiveStreams.js : import React from 'react'; import axios from 'axios'; import {Link} from 'react-router-dom'; import './LiveStreams.scss'; import config from '../../server/config/default'; export default class Navbar extends React.Component { constructor(props) { super(props); this.state = { live_streams: [] componentDidMount() { this.getLiveStreams(); getLiveStreams() { axios.get('http://127.0.0.1:' + config.rtmp_server.http.port + '/api/streams') .then(res => { let streams = res.data; if (typeof (streams['live'] !== 'undefined')) { this.getStreamsInfo(streams['live']); }); getStreamsInfo(live_streams) { axios.get('/streams/info', { params: { streams: live_streams }).then(res => { this.setState({ live_streams: res.data }, () => { console.log(this.state); }); }); render() { let streams = this.state.live_streams.map((stream, index) => { return ( <div className="stream col-xs-12 col-sm-12 col-md-3 col-lg-4" key={index}> <span className="live-label">LIVE</span> <Link to={'/stream/' + stream.username}> <div className="stream-thumbnail"> <img align="center" src={'/thumbnails/' + stream.stream_key + '.png'}/> </div> </Link> <span className="username"> <Link to={'/stream/' + stream.username}> {stream.username} </Link> </span> </div> ); }); return ( <div className="container mt-5"> <h4>Live Streams</h4> <hr className="my-4"/> <div className="streams row"> {streams} </div> </div> } This is what the application page looks like.
Frontend Streaming Service
After the
<LiveStreams/> component is mounted, the NMS API is called to get a list of clients connected to the system. The NMS API does not provide much user information. In particular, we can get information from it about streaming keys through which users are connected to an RTMP server. We will use these keys when creating queries to the database to obtain information about user accounts.In the
getStreamsInfo method getStreamsInfo we are executing an XHR request to /streams/info , but we have not yet created what is capable of responding to this request. Create a server/routes/streams.js with the following contents: const express = require('express'), router = express.Router(), User = require('../database/Schema').User; router.get('/info', require('connect-ensure-login').ensureLoggedIn(), (req, res) => { if(req.query.streams){ let streams = JSON.parse(req.query.streams); let query = {$or: []}; for (let stream in streams) { if (!streams.hasOwnProperty(stream)) continue; query.$or.push({stream_key : stream}); User.find(query,(err, users) => { if (err) return; if (users) { res.json(users); }); }); module.exports = router; We pass streaming information returned by the NMS API to the backend by doing this to get information about the connected clients.
We query the database to get a list of users whose streaming keys match those we received from the NMS API. We return the resulting list in JSON format. Register a route in the
server/app.js : app.use('/streams', require('./routes/streams')); As a result, we display a list of active broadcasts. This list contains the username and thumbnail. We'll talk about how to create thumbnails for broadcasts at the end of the material. Thumbnails are tied to specific pages on which HLS streams are played using video.js.
Create the
client/components/VideoPlayer.js : import React from 'react'; import videojs from 'video.js' import axios from 'axios'; import config from '../../server/config/default'; export default class VideoPlayer extends React.Component { constructor(props) { super(props); this.state = { stream: false, videoJsOptions: null componentDidMount() { axios.get('/user', { params: { username: this.props.match.params.username }).then(res => { this.setState({ stream: true, videoJsOptions: { autoplay: false, controls: true, sources: [{ src: 'http://127.0.0.1:' + config.rtmp_server.http.port + '/live/' + res.data.stream_key + '/index.m3u8', type: 'application/x-mpegURL' }], fluid: true, }, () => { this.player = videojs(this.videoNode, this.state.videoJsOptions, function onPlayerReady() { console.log('onPlayerReady', this) }); }); }) componentWillUnmount() { if (this.player) { this.player.dispose() render() { return ( <div className="row"> <div className="col-xs-12 col-sm-12 col-md-10 col-lg-8 mx-auto mt-5"> {this.state.stream ? ( <div data-vjs-player> <video ref={node => this.videoNode = node} className="video-js vjs-big-play-centered"/> </div> ) : ' Loading ... '} </div> </div> } When the component is mounted, we get the user’s streaming key to initialize the HLS stream in the video.js player.
Record player
Streaming keys issued to those who are going to stream
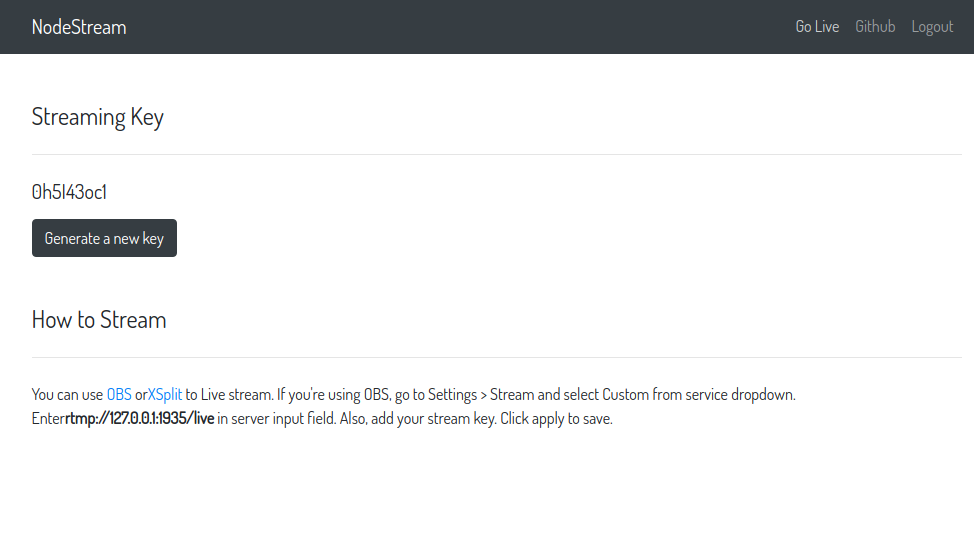
Create a
client/components/Settings.js component file: import React from 'react'; import axios from 'axios'; export default class Navbar extends React.Component { constructor(props){ super(props); this.state = { stream_key : '' }; this.generateStreamKey = this.generateStreamKey.bind(this); componentDidMount() { this.getStreamKey(); generateStreamKey(e){ axios.post('/settings/stream_key') .then(res => { this.setState({ stream_key : res.data.stream_key }); }) getStreamKey(){ axios.get('/settings/stream_key') .then(res => { this.setState({ stream_key : res.data.stream_key }); }) render() { return ( <React.Fragment> <div className="container mt-5"> <h4>Streaming Key</h4> <hr className="my-4"/> <div className="col-xs-12 col-sm-12 col-md-8 col-lg-6"> <div className="row"> <h5>{this.state.stream_key}</h5> </div> <div className="row"> <button className="btn btn-dark mt-2" onClick={this.generateStreamKey}> Generate a new key </button> </div> </div> </div> <div className="container mt-5"> <h4>How to Stream</h4> <hr className="my-4"/> <div className="col-12"> <div className="row"> <p> You can use <a target="_blank" href="https://obsproject.com/">OBS</a> or <a target="_blank" href="https://www.xsplit.com/">XSplit</a> to Live stream. If you're using OBS, go to Settings > Stream and select Custom from service dropdown. Enter <b>rtmp://127.0.0.1:1935/live</b> in server input field. Also, add your stream key. Click apply to save. </p> </div> </div> </div> </React.Fragment> } passport.js, , , .
/settings — . XHR- <Settings/> ..
Generate a new key . XHR- . , . . — GET POST /settings/stream_key . server/routes/settings.js : const express = require('express'), router = express.Router(), User = require('../database/Schema').User, shortid = require('shortid'); router.get('/stream_key', require('connect-ensure-login').ensureLoggedIn(), (req, res) => { User.findOne({email: req.user.email}, (err, user) => { if (!err) { res.json({ stream_key: user.stream_key }) }); }); router.post('/stream_key', require('connect-ensure-login').ensureLoggedIn(), (req, res) => { User.findOneAndUpdate({ email: req.user.email }, { stream_key: shortid.generate() }, { upsert: true, new: true, }, (err, user) => { if (!err) { res.json({ stream_key: user.stream_key }) }); }); module.exports = router; shortid.
server/app.js : app.use('/settings', require('./routes/settings')); ,
<LiveStreams/> ( client/components/LiveStreams.js ) : render() { let streams = this.state.live_streams.map((stream, index) => { return ( <div className="stream col-xs-12 col-sm-12 col-md-3 col-lg-4" key={index}> <span className="live-label">LIVE</span> <Link to={'/stream/' + stream.username}> <div className="stream-thumbnail"> <img align="center" src={'/thumbnails/' + stream.stream_key + '.png'}/> </div> </Link> <span className="username"> <Link to={'/stream/' + stream.username}> {stream.username} </Link> </span> </div> ); }); return ( <div className="container mt-5"> <h4>Live Streams</h4> <hr className="my-4"/> <div className="streams row"> {streams} </div> </div> } . cron, , 5 , .
server/helpers/helpers.js : const spawn = require('child_process').spawn, config = require('../config/default'), cmd = config.rtmp_server.trans.ffmpeg; const generateStreamThumbnail = (stream_key) => { const args = [ '-y', '-i', 'http://127.0.0.1:8888/live/'+stream_key+'/index.m3u8', '-ss', '00:00:01', '-vframes', '1', '-vf', 'scale=-2:300', 'server/thumbnails/'+stream_key+'.png', ]; spawn(cmd, args, { detached: true, stdio: 'ignore' }).unref(); }; module.exports = { generateStreamThumbnail : generateStreamThumbnail }; generateStreamThumbnail .ffmpeg-, HLS-.
prePublish ( server/media_server.js ): nms.on('prePublish', async (id, StreamPath, args) => { let stream_key = getStreamKeyFromStreamPath(StreamPath); console.log('[NodeEvent on prePublish]', `id=${id} StreamPath=${StreamPath} args=${JSON.stringify(args)}`); User.findOne({stream_key: stream_key}, (err, user) => { if (!err) { if (!user) { let session = nms.getSession(id); session.reject(); } else { helpers.generateStreamThumbnail(stream_key); }); }); , cron (
server/cron/thumbnails.js ): const CronJob = require('cron').CronJob, request = require('request'), helpers = require('../helpers/helpers'), config = require('../config/default'), port = config.rtmp_server.http.port; const job = new CronJob('*/5 * * * * *', function () { request .get('http://127.0.0.1:' + port + '/api/streams', function (error, response, body) { let streams = JSON.parse(body); if (typeof (streams['live'] !== undefined)) { let live_streams = streams['live']; for (let stream in live_streams) { if (!live_streams.hasOwnProperty(stream)) continue; helpers.generateStreamThumbnail(stream); }); }, null, true); module.exports = job; 5 . API NMS .
server/app.js : // app.js, const thumbnail_generator = require('./cron/thumbnails'); // start() thumbnail_generator.start(); Results
, . , . - — . - — .
.
Dear readers! , , ?
Source: https://habr.com/ru/post/457860/
All Articles